Intro
1.5 animate diff video to video with controlnet, ip adapter
https://civitai.com/models/271305/video-to-video-workflows
Hi let me introduce myself to those who done know me. My name is Ryan and this is an article to explain how to use my V5 video to video workflow.
My spell check stopped working on this about 1/2 way through forgive my spelling and typos.
This is a warning, this will be LONG… there is no shortcut to this. Doing AI videos is not a one click thing. (yet) This takes time and skill, and you will need to invest the time into developing those skills. Most people are looking for a one button video maker... this is NOT it. Try runway, or any other text to video service for that. Videos I render take anywhere from 1 to 6 days to edit and put together.
This article took a long time to put together. This website needs to upgrade this.. I had parts deleted multiple times trying to save. :( I still dont know how the table of contents works. So sorry about that.
This entire workflow will be obsolete the MOMENT a company comes up with the big "generate a good video" button. And it's coming.
Currently, i dont think anything offers this level of choices when it comes to video to video. While many things do exactly what this workflow does in an easier to use way, they all take away options I leave open for you to choose to learn or not. No easy to use apps will have you make masks, or give you options to choose how to make them, none of them allow you to save controls to be used for different videos, they all do one thing well, they make a SIMPLE video with simple to use controls.
This does not do that. It is fully open, for you to add, change, and delete anything you want. It lets you choose how you get your masks and controls and just gives many options of doing it. It lets you choose what controls to use, what references to use, what style you use. It's a playground, not an APP. Once you learn the options, you can edit the flow however you like to do whatever you want. I don't tell you what to do, and I certainly don't limit your options. This makes the flow amazing, but the barrier to entry is high. I hope this article can change that.
Most of what I am going to explain and go over is MY EXPERIENCE. I have no formal training in this. If I am wrong, I am sorry, but you are being warned now that everything I say is how I do things and why, not the best way to do things or even the right way to do things. I learned from no one but me because very few people share their knowledge of this topic freely. I have been doing video workflows for over a year, I have tested thousands of nodes, thousands of videos. Now i just share with you everything I have learned. Everything I do is with a small little 3060 12gb... I don't have the money of the YouTubers. I could not imagine what I could do with a 4090 and this flow...
The workflow you are here to learn about is my video to video advanced workflow. I know this is not a video for all that have been asking, but this explains EVERYTHING. I will go into as much detail as I can for each group to allow anyone to learn how to turn one video into another via comfy UI. If I made a video, it would not contain half of this info.
I plan to add the masking and other flows included in V5 in this manner but i wanted to get this and V5 out. I think it may be the best version yet.
V5 contains many flows. Masking, video gen, controlnets, upscale, face enhancer, liveportrait. Hopefully i can do this for all of them soon.
This workflow while being very large and over 1k nodes is not as complex as many think it is. Over 50% of its nodes are optional. Today I will go over each area/group to explain what each does and when/why I use each option
If you appreciate the workflows and or this article, you can thank my by liking my videos on here, YouTube or tiktok that you enjoy and share your knowledge with others.
https://www.youtube.com/@aivideos322
https://www.tiktok.com/@simpleaivideo
Loading Models
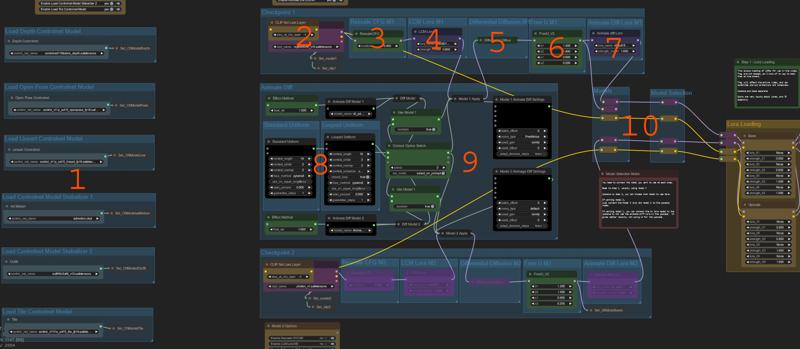
Loading models
This group is located at the top left of the flow, it contains the following
Checkpoint model loading for both base and upscale
LCM Lora loading for both base and upscale
Animate diff Model Loading for both base and upscale
Animate diff Lora Loading for both base and upscale
Control net model loading for both base and upscale
In the image listed here is what you are looking at by number
Loading control net models
These loaders load in the control nets used in the workflow. Not all need to be enabled here, unless you are using them
The following models are defaults. Download locations are here for all
Open pose
Depth
Line art
Tile
Admotion - 2 download options i am pretty sure both these are the same. you only need one.
Outfit to outfit
Model Loader and Clip Skip
this area has 2 model loaders to load 2 different checkpoints to use for the base, and the upscale, this is done mainly because some models animate better than others, and most of the time it's cartoon/anime that do the best base animations.
2 Checkpoints allows you to set a base model to animate the original animation, then change its style with the upscale model.
I use this to use anime/cartoon models for the base, then upscale with realistic models.
You do not need to Load 2 models, there is a selection area to the right #10 that allows you to use only one for both steps.
Load any models you wish here, and set the clip skip how you would like
Rescale CFG
this allows you to rescale your model CFG to better match LCM. LCM works best at 1.3-3 CFG while most models want a higher CFG. This helps your model listen to prompting better with LCM. Disable if not using LCM.
LCM Lora
this is used because doing 25 steps for a video with 100+ frames makes me quiver. I LOVE LCM Lora as it allows me to use ANY model I want and use only 8 steps for the base, and 4 for the upscale. If not using LCM, the render time is tripled, and I don't have time for that when I test 1000s of videos.
You can use whatever you wish here. If you want to not use LCM, the two samplers for base and upscale need their settings changed to not use LCM and the steps/cfgs set accordingly. I can't tell you even how well this works without LCM... I have never run one video without it.
Do not leave defaults for this, set this to your LCM Lora.
there are many versions, I have found most work the same.
https://huggingface.co/latent-consistency/lcm-lora-sdv1-5 - my version
Differential Diffusion
- This is used when I in paint to help it blend better, I disable this if I am not in painting.
Free U
TBH, I don't know what or how it does what it does. It just helps 90% of the time for videos. I don't run without it enabled anymore. It helps both consistency and adding details.
Animate Diff Lora
This is the animate diff adapter Lora loader.
This is used to help animate diff with motions. IMO, it helps quite a bit for any model, not just V3.
This adapter Lora is can be loaded for both the base and upscale models.
I use this at 1.0 strength most of the time for base, but bypass it for the upscale model. It helps A lot for base renders, but hurts upscales usually.
This is available from https://civitai.com/models/239419/animatediff-v3-models
It is the adapter (one of the first 2)
Animate diff context options
Length - this should be 16 for 99% of videos This is what it was trained on, so stick here IMO unless you have reasons to change it.
Stride - this is a setting many people ignore and should not. (please note I am going by experience not knowledge first hand, But even if I am wrong about details, this is how it affects the render)
I use this to stabilize backgrounds over longer frame sets
This sets a sort of skip every to the sampler (I know, that explains nothing)
Stride of 1 - Selects first 16 frames / renders / second 16 frames / renders / etc.
Stride of 2 - Selects every OTHER frame First 16 / 1,3,5,7,9,11,13,15,17,19,21,23,25,27,29,31 / render / Second 16 / 2,4,6,8,10,12,14,16,18,20,22,24,26,28,30,32 / render
Stride of 3 - selects every 3rd same pattern but skipping 3
Stride of 4 - selects every 4th same pattern but skipping 4
As you can see, this renders very differently depending on what you select.
This is why, with text to video, I recommend the stride match your total frames to a max of 4. Meaning 16=1 32=2 48=3 64=4 and 4 for all above that.
Video to video is less dependent on this setting because you are using controls to tell it what to render, so it drifts less. However, clothing shifts more at lower strides still in video to video, usually due to having less strict controls than backgrounds.
In general, the higher the stride, the more stable the video for things like clothing, backgrounds, or anything that can shift however, as you go up in stride, the video movement gets less stable and less detailed. Past 4 gets almost unworkable.
For this flow, I recommend a stride of 2.
Overlap
this lets animate diff look at the previous (overlap setting) frames of the context length to blend contexts together.
This is again good for text to video, but video to video this is much less needed because again, we have controls holding the context.
Higher the context length, the longer render time for the video.
For this flow, I recommend an Overlap of 2.
standart uniform and looped uniform
Standard Uniform is best for any video that is not a loop. One of V5 examples uses looped uniform with a closed loop, beacause the video can be fully looped.
If you use looped uniform for a non looped video, the backgrounds can be more stable. However the first and last few frames of the video will try to loop, and mess those frames up. If you can cut those first and last frames, the background stability with looped is MUCH higher.
Animate diff Motion Modules
-Animate diff Model Loading for both base and upscale
This is used to set the animate diff motion module separately for each the base and upscale.
I have set this up to use a switch, defaults are set to use model 1, if set to false you will use model 2.
Any model works here. I prefer by far v3, but v2 works. LCM, V3, V2. Set this to what you want to use.
V3 models - https://civitai.com/models/239419?modelVersionId=270076
https://github.com/guoyww/animatediff/
Model Selections
This is how you choose what model to use at what step. Upscale and base.
You can use the same model for both by connecting the model 1 and clip 1 to the upscale nodes, or you can use a different one, you connect the model you want to use for each.
Video Loading
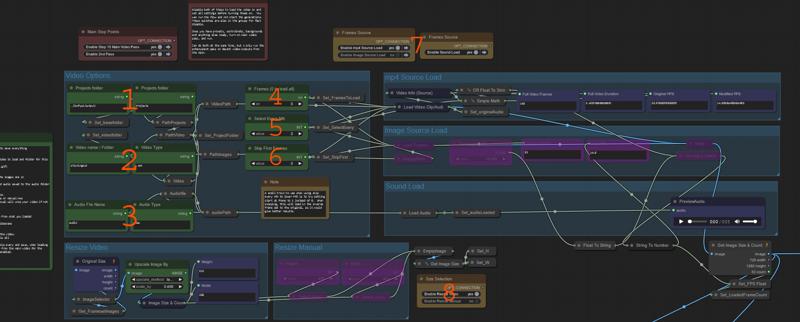
This next group is the video loader section. This loads in a video grabs any infomation it needs and sends it to the many areas it will be needed.
First i want to explain how i am loading in videos and the controls because its not intuative until you understand it
I have created a folder inside comfyUI output folder. Called "projects" This folder is where EVERYTHING goes. Missing something check here. Saves, loads, everything.
Inside this projects folder will be a bunch of video folders. The name of the folder should match the name of the video without the extention.
If you used the masking workflow it saves everything in the proper folder inside projects for you. I recommend that flow as loading is better than generating.
If you did not use the masking flow and only have your video, you will need to create a folder inside the projects folder named the same as the video name, and place your video inside that folder. Best to rename the video/folder to something easy.
Lets go over the image
Project Folder
this is used to direct everything to the proper folder inside output
You can change this, but i dont recommend it, all flows depend on this.
Video name / Folder
this is the video folder name / video name of the video being loaded. It should be located inside the projects folder mentioned earlier
This also has the video extention if loading from video. Mp4, gif eg.
Audio Loading
This is used to load in audio saved from the masking flow. Helpfull when you saved images and not the video. Masking flow saves .flac
Frames to load
This allows you to limit the frames you bring in, 0 brings in all frames.
Select Every Nth
This allows you to select every nth image in the frameset, allowing you to lower the FPS of the video. Most of my videos are rendered at 12-15 fps. Most are using skip every 2 to get this result, but 60fps needs skip every 4 to be 15fps.
You can run all frames, you dont need to skip any, I limit to 15 due to wanting longer videos and not wanting to render all frames.
Skip First Frames
This allows you to start your video at any frame. Tip - This does not take your skip every into account. meaning 600 frames skips 600 frames, NOT 1200 as it does not skip these.
Loading Options
These Switches allow you to choose to load either an image folder or an MP4 video
You can choose to load in any saved audio from the masking flow
Resize Video
This allows you to rescale the original video to your desired size OR set a HxW manually for your base render. This does NOT resize any images or controls, it only sets the latent size that the render will happen at.
When you run the flow with this set up it should populate all info boxes with things like FPS, frame counts, etc.
Now you have a video ready.
Controlnet Loading
Masks Loading
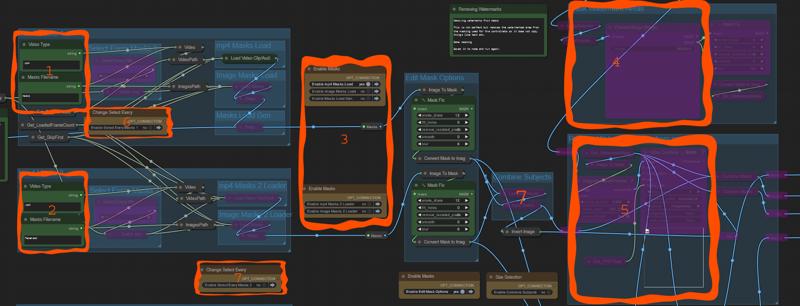
This flow can load multiple masks for use. Used mostly for 2 separate subjects, but can be used for facemasks, hands, etc.
You dont need to load 2 masks, 0 or 1 works.
Subject masks are loaded from the same project folder
Reasons to use masking
Separating subjects and background
Separating subjects from one another
The MAIN reason i use it is for the background. With masks of subjects you can separate the controlnets used for the subjects and the background. This allows you to use full controls on backgrounds so they are not shifting all over the place. While allowing you to use weaker controls on the subject to allow you to change the appearance.
Without masks this is not possible. You need to use full controls for the whole video, or weaker controls. Full allows no real change to the subjects, while weaker allows the backgrounds to shift and morph all over the place. It makes poor videos most of the time.
Lets look at the image
This is mask 1 name, video type is ussually MP4 unless you changed that
VideoFilename is either the Mp4 masks name or an image folder located in projects/videoname
This is the same as above for mask 2
This is your switches to change how you load in the masks
you can load an image folder, a video file, or load in the generated from this flow.
2 masks to enable here if you want to use 2.
Generate Watermarks mask
This allows you to generate a mask over the watermarks of the video
Remove Watermarks from mask
this uses the mask generated above to remove the area masked form your subject and background masks. This ensures it wont copy the watermark.
This uses a preview bridge again like our masking, and allows you to cover the area you want to exclude from the controlnets
once you run the workflow once the preview is populated you can right click on the preview and select "open in mask editer"
Cover the watermark, click save to node
You can choose to also remove the watermark area from the subject masks used in regional prompting but not recomended because you want the ip adaptor to be able to color that area with something new.
Skip every override
This allows you to change the masking skip every option separate. This is only needed when you generate any control in this flow with the skip every option of the main video higher than one and save, it will save the control at a lower fps than the video. This allows you to sync them when loading.
Combine subjects
This group combines mask 1 and mask 2 into one mask to use as the subject mask in any controlnets. This allow you to keep 2 masks for regional prompting but use 1 control for both subjects instead of 2.
Enable this when 2 masks, disable when 1 mask. I really should have probably automated this more.
Controlnets
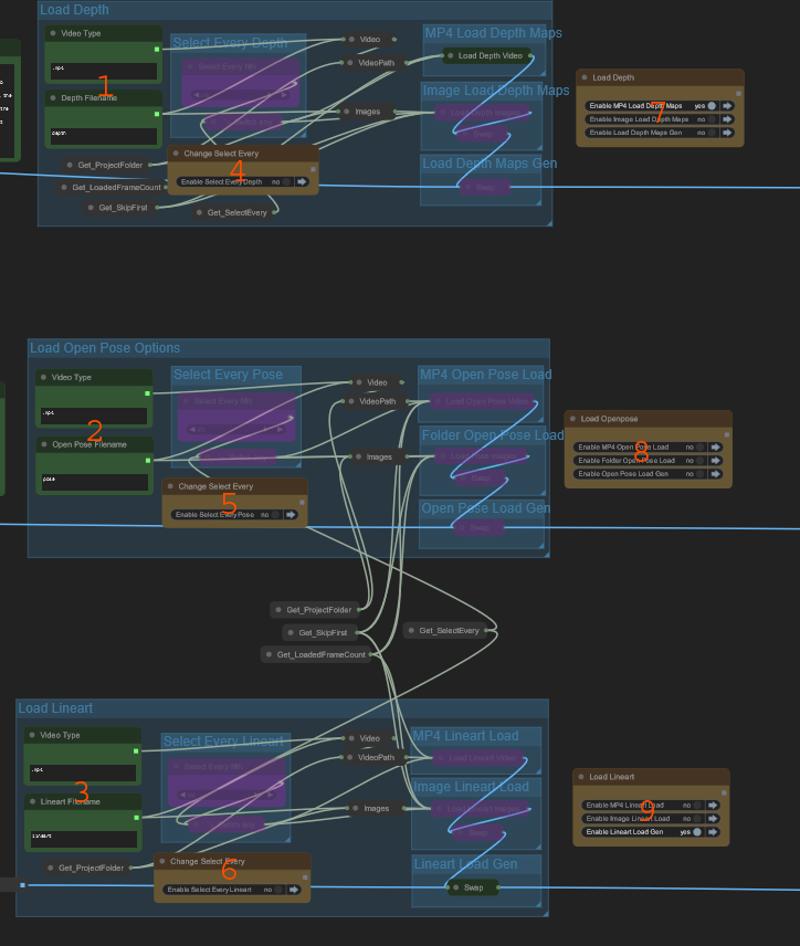
This area loads in control nets the same way as above with the masks.
Lets look at the image
2 and 3 - Control Name and video types
Filename is either the Mp4 masks name or an image folder located in projects/videoname
above
above
Select every nth Frame Override
This allows you to change the control skip every option separate. This is only needed when you generate any control in this flow with the skip every option of the main video higher than one and save, it will save the control at a lower fps than the video. This allows you to sync them when loading.
above
above
Controlnet Loader Selection
Switch to choose where to load the controls from, Image folder or a video control.
above
above
Video Options
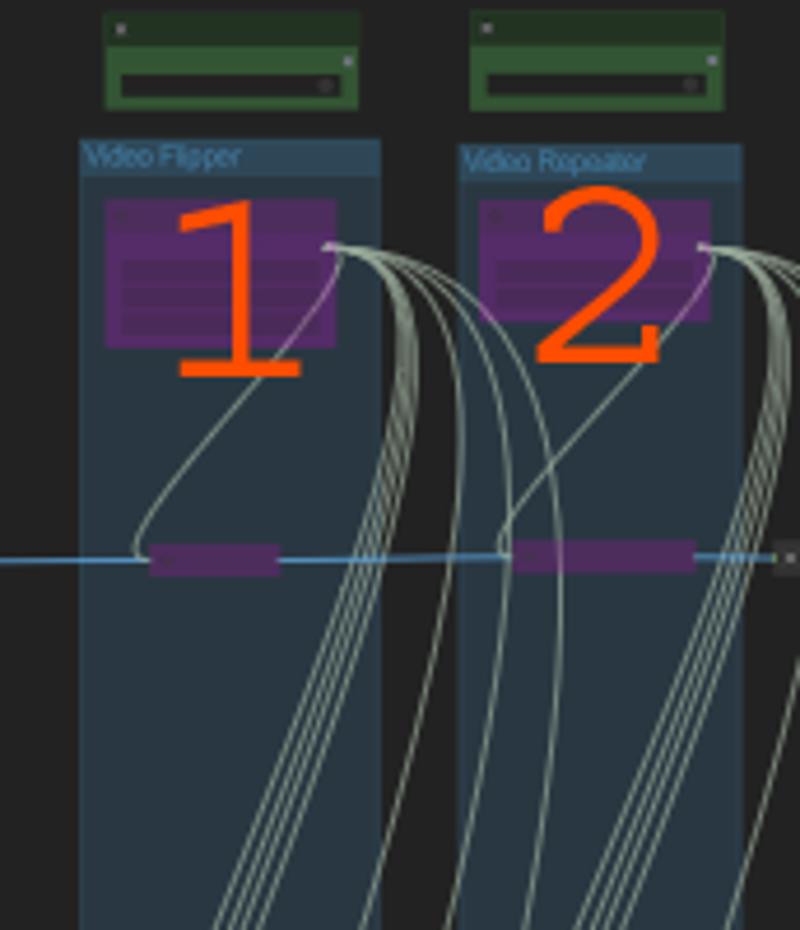
Video flipper
this allows you to flip the video horazontal, or vertical.
Useful to give your video a different look to the original
Useful when you are doing something where a person is upside down.
Video Repeater
this allows you to repeat the video
useful when you have a short looped video and want to extend it.
original video should be looped to do this properly.
Previews
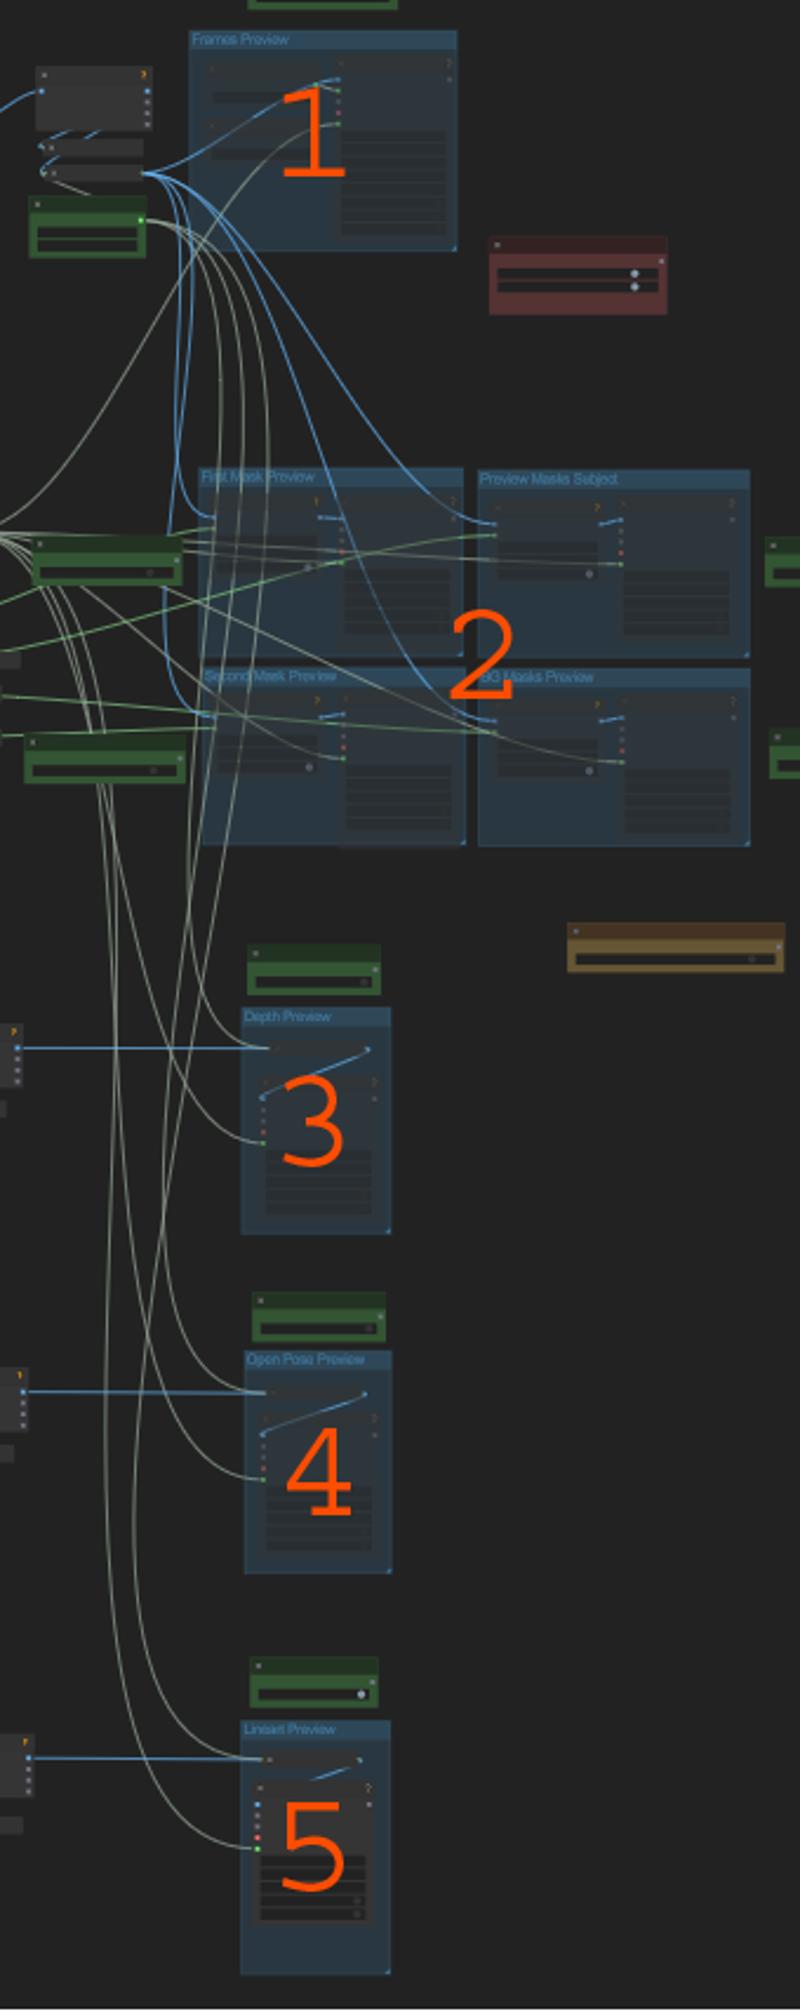
these all can be enabled to show previews of all controls and the masks.
Use this to ensure everything loaded properly.
Not really much else to explain here
Background Controls
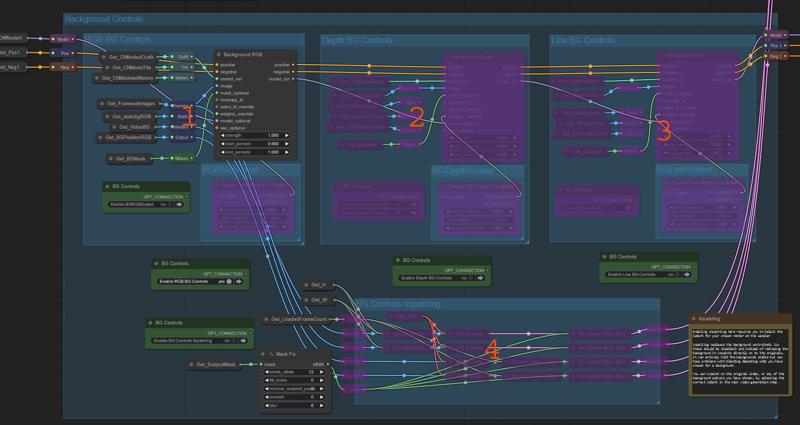
This is the area used to control the background. This is only used if you have masks generated as it requires the bg mask to be available.
General Description of what this group does
This uses background masks (inverted subject masks) on a controlnet or inpainting to control the background generation. The controls can be RGB, depth or lineart and they all render different
these controls do effect the subject generation despite being masked and all differently, you will need to experiment to understand what they do yourself. I explain how they effect things, but each video can work different so what i say can change with a different video. I only use RGB admotion or outfit to outfit for this background control for 95% of my renders because they are the most stable and animate best. Outfit even has some unique qualities when used this way explained below.
There may be many options here but IMO it could be limited strictly to 2 RGB controls for admotion and outfit, those are the two main choices for controls for most videos. Everything else is very situational.
4 Choices of background source.
Use original frames from the video
this just loads the original frames from the video to copy
this allows you to copy the original background used mostly when its a moving camera shot
if you dont want to change the background this is the option.
Generate Static image
this allows you to insert a static image as the background of the video.
You can generate an image the same size as your video generation. This is then uses with the background controls or inpainting.
Moving camera shots will not work well with this
Video load
this allows you to load a video as the background of the generated video.
this lets you load in any video for the background, this group auto loops the video inported to fill the full generation video.
Moving camera shots will not work well with this
Using looped videos here works best unless you have enough frames to cover the whole generation
Placed in Generated image
this allows you to generate an image in this flow, then crop that image to the size of your video in the location you choose.
This works similar to the static image, however it allows you to generate a larger image and crop/place the subject inside alowing you to place feet in locations that work.
This is never NEEDED but static images are hard to prompt into the proper image to place a person into. This makes it easier to put feet on a floor.
Use a loaded image with placement options
this works the same as placed image but allows you to load in the image to crop.
use nothing.
Lets look at the photo
RGB controls
This is my most used control for backgrounds
This uses the RGB video frames to copy backgrounds Via a choice of 3 models
This allows you to connect any of the background generation choices
This allows you to copy the original videos frames.
Three RGB controls to choose from
Outfit to Outfit - 0.4-1 strength 1.0 recomended for full copy
this is my main controlnet for RGB background "copies".
This can copy most backgrounds without morphing
despite its name, this is the best background full copy model by far. It animates poorly so things like water waves, or background movement is not great.
fully stable background copy of static locations
this is the only model i can use with background masks that will FORCE the subject to stay in its mask. Its very good at this.
This has a unique ability to force subjects inside the masks, at 1.0 strength it will NOT allow the subject to be drawn on the background mask area. This can be very useful. If you try to animate a video with the subject out of frame to start, you will find prompting hard to do as the subject will appear in frame before they should. Outfit changes this and the subject will not appear if the subject mask is not in the frame. No other control does this.
AdMotion - 0.4-1 strength (scaled weights works well at .8-.95)
this is my main background control for animated backgrounds.
this does well for things that need to move slightly, like waves in the water.
This cant hold a background 100% but does 90%. And allows better subject change than outfit because it does not force the subject inside the mask. it can go outside slightly.
this is probably the best control to use if you want to prompt changes to the original background
Tile - 0.4-1 strength (scaled weights at .8-.95)
This is no longer used by me because it is much worse than admotion and outfit for this task.
Depth - 0.6-1 strength
This allows you to use the depth maps from your chosen background to direct the background generation
Lineart - 0.4-1 strength
This allows you to use the linearts from your chosen background to direct the background generation
In painting Options - I use this as much as i use a background control.
This allows you to disable all background controls and in paint the subject masks
This offers the best background transfer/copy as it does not touch it.
This allows you to inpaint anything in the subject mask. People, clothing, faces, etc.
This can offer worse blending than a background control.
This uses the least amount of ram due to not using background controls or subject masks.
You can in paint on any of your background choices.
If you choose to inpaint, you must select the proper latent from the base sampler group. Description is above the sampler.
Generating/loading Backgrounds
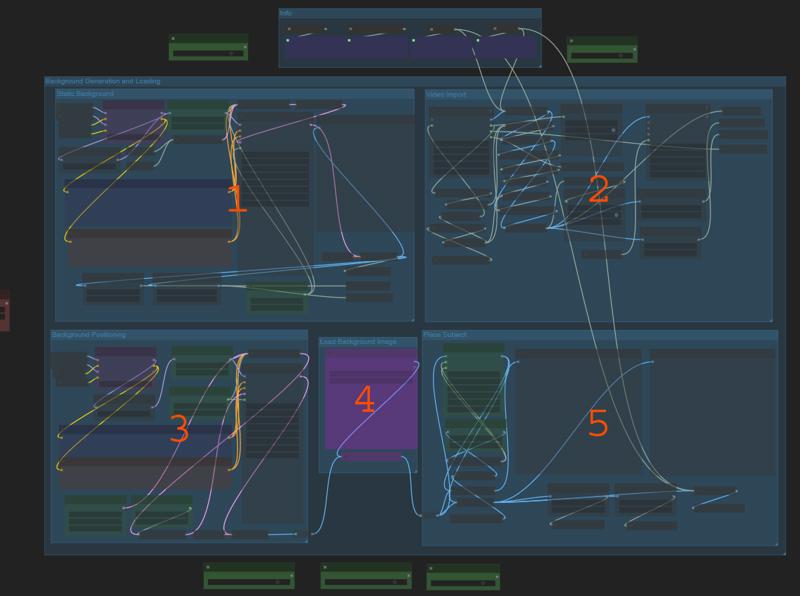
this area requires you to set your LCM lora (or bypass)
this area allows 5 ways to generate/load your background if you are not copying original or just not using any controls.
Static Image
this generates an image via text to image, just prompt the image you want in the background.
this can not replace moving camera videos
this does decent at blending in feet to where they are standing if the image is decent to mix.
Video loader
this loads a video of your choice, generated, youtube, any video.
It will loop the video in the background if it does not have enough frames to fill your video
This works well, but its hard to find good background videos.
Placed Generation
This allows you to generate a larger image than your video send to the cropper
Normal text to image again
Placed Image Load
This lets you load an image to place the subject on, instead of generating.
Place Your Subject - cutout
This area allows you to place your subject inside larger images.
This is best used to place subjects feet on solid surfaces to blend properly.
This is done via a rect mask generation. Whatever image you send it, it will show a preview of a cutout the size of your generation
Resize base allows you to size the cutout
x and y allows you to place the subject where you wish inside the image.
It will crop an image the size of your video render
Any of these choices can be used with any of the controls above.
Subject Controls
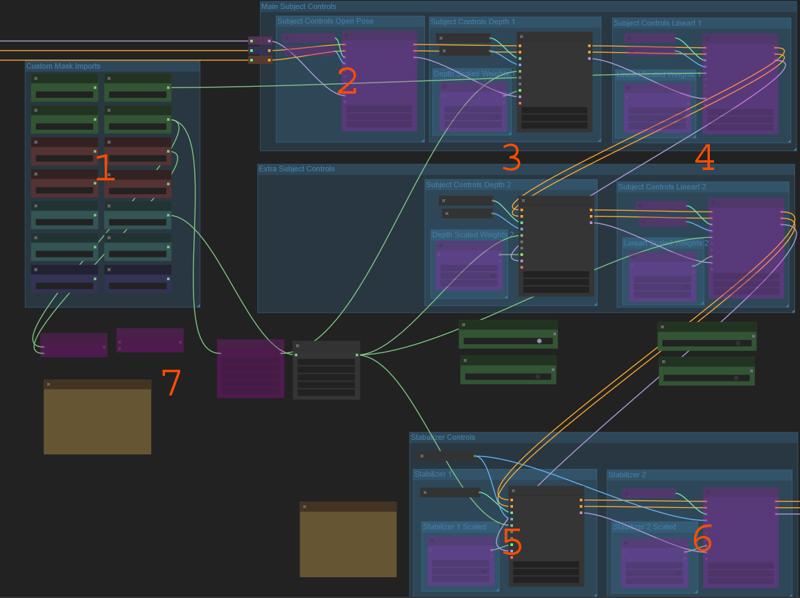
Mask Imports
this area loads in ALL masks that you have loaded or created in the flow.
Green are your main subject and BG, and mask 1 and 2 if loaded.
Red are the custom masks generated in this flow
Cyan are the SAM 1 masks generated in this flow
Blue are the loaded custom masks from this flow.
All masks can be added, or subtracted from one another via #7
All masks can be blured, eroded, etc before you use them in a control.
To use a mask it needs to be connected to a control, Open pose does not need masks
Do not leave masks connected if not using them
Main Controls
Open Pose strengths 0.6-1 start and end can be played with
Open pose can be great, can be the reason a video is messed up.
If you can get a GOOD openpose, its a great control, but getting a good openpose relies on the type of video. It failes on spins, it fails when near the edges of frames, it fails with complex hands. etc. etc. etc.
When it works it allows the best and most dynamic changes to the subject
When it fails, you will notices jerky movments, and somtimes just body parts in the wrong spots.
Depth strengths 0.4-1 start and end can be played with
This is my main control, it just works, and even better with depth anything v2.
Most of my videos are depth at 0.6-0.8 strength and that is all for subject.
Depth is a great base for nearly all animations, full strength can copy clothing but 0.6 offers a lot of subject versitility.
Depth copies physics well, and does really well masked to areas that require it.
Depth can copy spins, hand motions, head movements, hair physics, clothing physics, body physics, etc.
scaled weights allow more change but can lose animation content.
Lineart strengths 0.4-1 start and end can be played with
This is my main control i use with custom masking. Hands/face etc.
Lineart offers great copies. But is very hard to change expecially at higher strengths
Many different models to use, because i dont use this much i stick with realistic lineart most of the time. This is usually masked to hands or face when needed.
scaled weights allow more change but can lose animation content.
Extra Controls Lineart and depth
these are used with custom masks to split lineart and depth strengths in the image. This allows you to use 2 depth or lineart with different strengths masked to different areas.
Can use full strength lineart on face, or hands etc while lower strength on body.
Stabalizer Controls 5 & 6
these are used to assist in generations
Choices default of outfit to outfit and admotion
Admotion 0.6-1 - can use scaled weights
offers good stability to main controls, combine with openpose or depth for best results.
This can copy clothing at higher strengths.
This offers better animation than outfit to outfit in this slot
Works good masked to hands/face with lineart.
Outfit to outfit
this is used very little in the subject slot, mostly used for background copies.
Offers good static copy of the subject, but at high strengths offers little change and poor animation movment.
Custom Masking
This area allows you to generate or create custom masks for use in the controlnets.
This is not needed for any video, but it can help control the strengths of controls for different areas of the video.
2 ways to create custom masks
Sam 1 Masking
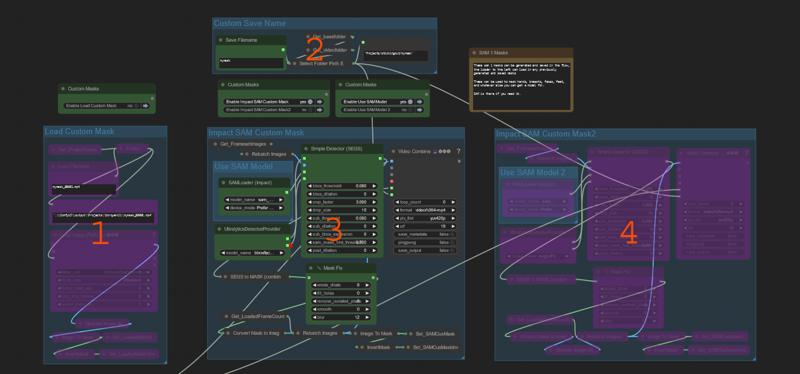
this allows you to use sam 1 masking (impact pack) to mask anything its models can mask. Faces, hair, hands, etc. to use in any of the control nets
This allows you to save your mask to the same folder as the rest of the video controls.
This allows a loader to load in previously generated masks
Lets look at the image
Mask loader
this allows the loading of any mp4 mask from your project/videoname folder
Load filename is the name of the mask save that you want to load
Custom masks save names
this is used if you want to save the masks generated. You can name them here, enable saving in the previews for the masks to save.
SAM 1 masking nodes
this area lets you use sam 1 to mask whatever your model allows.
SAM is optional, you dont need it if you have a segs model detection
SAM is slower
Can blur masks and erode/dilate.
Bbox threshold and sub threshold determine what is detected.
SAM 1 masking nodes same as above for second mask.
Custom Masking
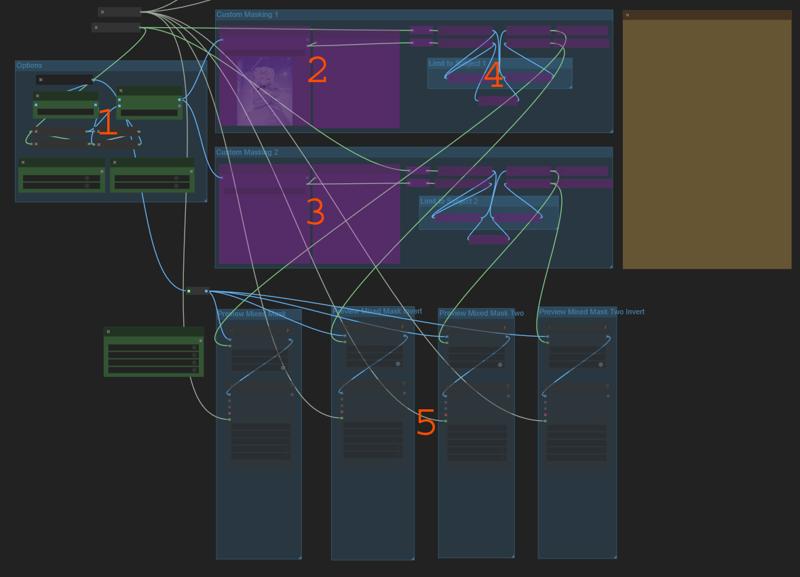
this area is 100% custom masking.
This area allows you to mask any part of the video you want
This can mix your created mask with the subject mask to further limit the mask.
Lets look at the image
Preview Selection
this area allows you to select what frame to bring in for the mask preview, as well as choose to view 1 frame, or a combined mask to draw the mask on.
Mask generation 1
This uses a preview bridge again like our masking, and allows you to cover the area you want to mask
once you run the workflow once the preview is populated you can right click on the preview and select "open in mask editer"
Cover the area you want to mask, click save to node
Mask generation 2 - same as above with a second mask
Mix mask with subjects
This allows you to mix your mask with the subject masks, allowing you to select only the parts of the subject inside the mask you create here.
This can allow you to mask certain things in a video that sam can not.
Both a mask and an inverted mask is generated to use in the controlnets
Enable previews to view what is happening
All these masks can be attached to any controlnet or the ip adapter
Ip Adapter
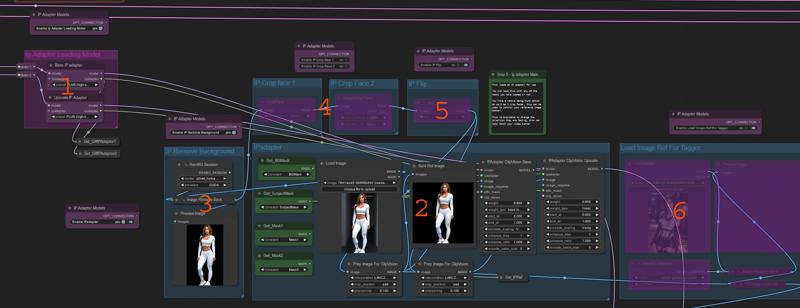
this area is for ip adapter
This is used like a lora, to get a subject copy and it tends to help hold the subject appearance throughout a video better when enabled.
This can disrupt animations a lot. Spins, or anything where a face is not facing the camera can be an issue.
Lets take a look at the image
Ip adapter model loading
Ensure this group is DISABLED if not using IP adapter, or regional prompting
this area loads in the ip adapter model via the unified loader.
both base and upscale can use different models.
High strength models can disrupt animations more than the light.
Ip adapter Main group
Enable this to enable ip adapter for the video generation
This area allows loading of a base image to use as a ref image for the video subject, or background.
Masks are available beside the image loader if you wish to mask the ip adapter.
Background mask can be used to guild background generations.
Subject mask can be used to guild subject generations.
Ip adapter weights can be 0.4-1, but stronger means more disrupted animation
Can change the start and end times of the ip adapter, this can allow better animation following to start at 0.25-0.4 etc.
Both base and upscale use separeate controls/ strengths
Many more options that others would probably be best described by https://www.youtube.com/@latentvision
Remove background
This allows you to remove the background of the ip ref image.
This can help not copy background elements
Crop face 1
this can crop the face of the subject, works good for realistic
Crop face 2
this can crop the face of the subject, works good for anime
Flip Ref Image
this can let you flip the ref image to best match your video direction.
Load tagger image
this allows you to load in an image to use tagger on, this enabled lazy prompting.
This is used if you are not loading an ip adapter image but still want to use tagger to tag someting.
Prompting
Basic Prompting
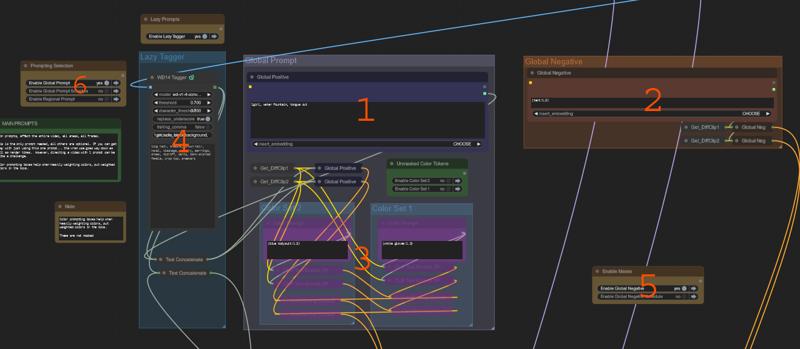
This area is the main prompt area
This area has optional tagger prompt help
Lets look at the image
The main positive prompt, affect the entire video, all areas, all frames when enabled
This is the only prompt needed, all others are optional. If you can get away with just using this one prompt... the vram use goes way down as well as render times. However, directing a video with 1 prompt can be quite a challenge.
Embeddings can be used here.
The main Negative prompt, affect the entire video, all areas, all frames when enabled
This is the only prompt needed, all others are optional. If you can get away with just using this one prompt do so.
Color Box Prompting
These 2 boxes allow you to prompt heavily weighted colors and have them bleed into other concepts in the main prompt
eg (blue shoes:1.3), (red hat:1.4) Put these in seperate boxes.
Tagger Lazy Prompting
this allows tagger to tag your IP image or a loaded image and add those tags to the prompting chosen, both schedule and normal are added.
This can help get the person you are looking for
This can disrupt animations a lot when it chooses bad keywords.
Can use the exclude tags field to stop some words from appearing you do not want.
things like portrait, or front view, or full body show up so be careful using this as those words dont mix well with video to video.
Negative Switch
Choose normal negative (99% of the time) or scheduled negatives.
You dont need scheduled negatives unless you know what you are doing.
Positive prompt Switch
This allows you to swap from normal, schedule or regional prompting
Scheduled Prompts
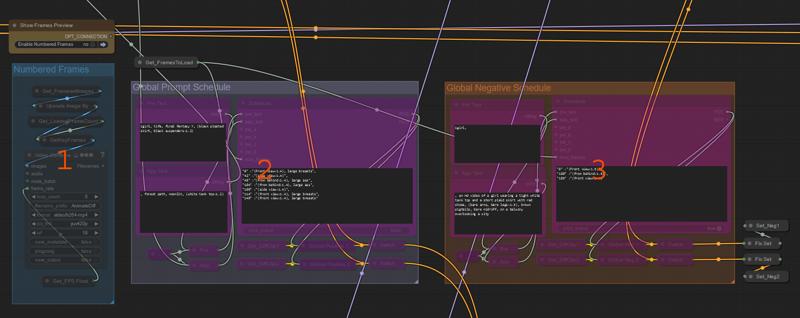
These are best avoided if you can help it
These can help spins, and front/back motions.
Lets look at the image
Numbered frames preview
This allows you to view a video with the frame number embedded into the video. This can help schedule prompts.
Positive Schedule
This is used to schedule prompts amoung the frames of your video.
This can help with spins or front/back
Gen time and memory needed go up by a metric ton using this.
I am finding it less needed with depth anything v2 able to hold spin animations quite well alone.
Negative Schedule
This is best avoided, I used it a few times to negative out something for a few frames, it works... but useful... not so much.
Regional Prompting
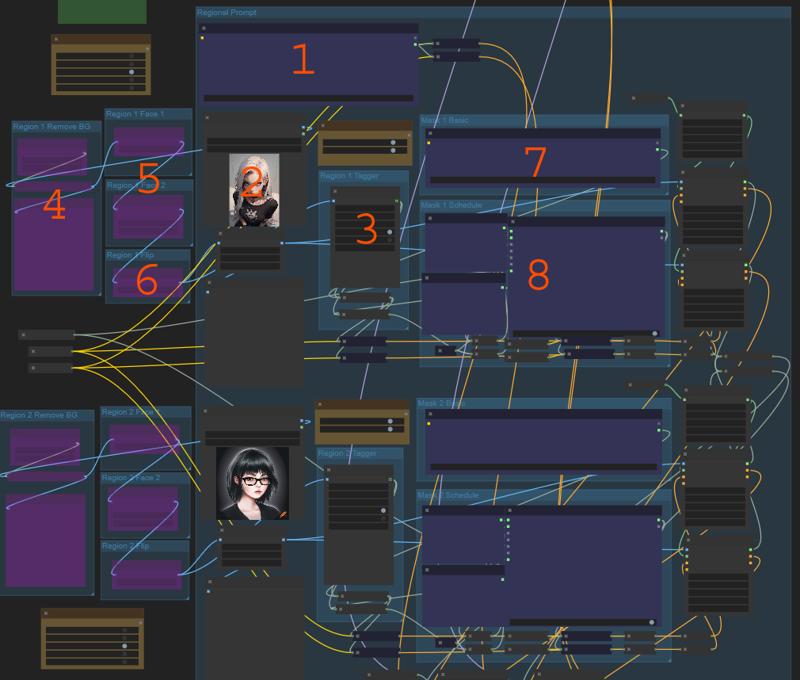
this area allows you to use an ip ref image and prompt for 2 masks loaded in.
This works quite well for what it does.
Memory and generation time go way up using this but it produces good with 2 separate people.
These use mask 1 and mask 2 from the loaders, and require 2 masks loaded to use.
Lets look at the image
Note - All numbers are mirrored below for mask 2. Same settings for both people
Main prompts
this is the main non masked prompt
use this to include backgrounds and details that are not part of the subjects.
Image Load for IP/Tagger ref
This loads an image to use for IP adapter and/or tagger
This Is tagger
This can tag your ip image to add the tags to the basic or scheduled prompt for this mask
Can exclude tags to help.
Remove background
This removes the background of the ip ref image before using.
Crop face 1+2 (1 realistic - 2 anime)
this crops the face of the ip ref image before using
Flip Ref
Allows you to flip you ip image ref to align better with the video.
Main masked prompt
This is the main prompt used for the mask.
Include any details for the subject located in this mask here.
Main scheduled masked prompt
Best Avoided, but does work. Can help with spins, if one of the mask subject turns around.
Increase generation time by the most this flow can. Memory goes up too.
Again schedules are best used in text to video. But its here to play with.
Main Render
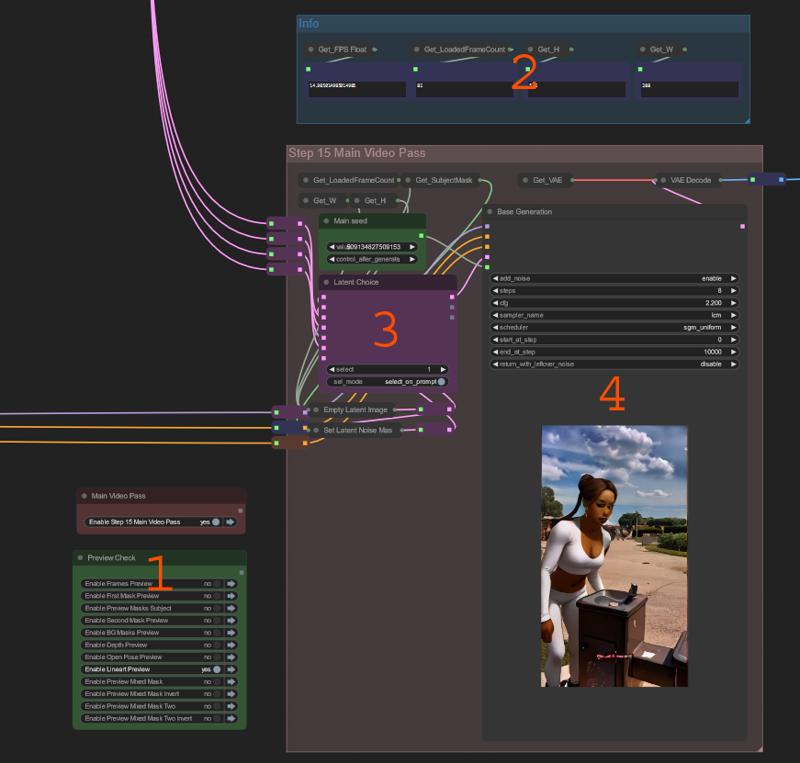
finally the video generation
Lets take a look at the picture
Preview Check
allows you to disable any and all previews from here to speed things up when you render.
Info Boxes
This tells you frame rate, frame counter, H and W of the video to be rendered at this step.
Latent Choices
This allows you to choose the latent to use, mostly used when inpainting to determine what background to inpaint on.
If not inpainting always choose # "1"
Choices
Empty, is a blank latent batch (this is what you want to use if you are not inpainting) If not inpainting ignore the rest.
inpaint Empty will inpaint on an empty latent batch, allowing you to set a white background, can be used to make game assets.
inpaint Original Frames, will inpaint directly on to the original video, keeping the background.
inpaint Static BG, will inpaint directly on to the background you generated
inpaint Video BG, will inpaint directly on to the Video you Loaded
inpaint Cutout, will inpaint directly on to the cutout background you generated
Base K sampler
This is the sampler that runs the base generation of the video.
This is set for LCM, if you dont use that, set the settings here for your choices.
Base steps are 0-8 with CFG 2.2, sgm uniform and lcm sampler
If you disable this group from any of the switches, the flow will run without generating anything, use this to be able to set up all controls/ settings before running a generation. All previews will populate along with info boxes and mask previews.
Save and upscale Choice
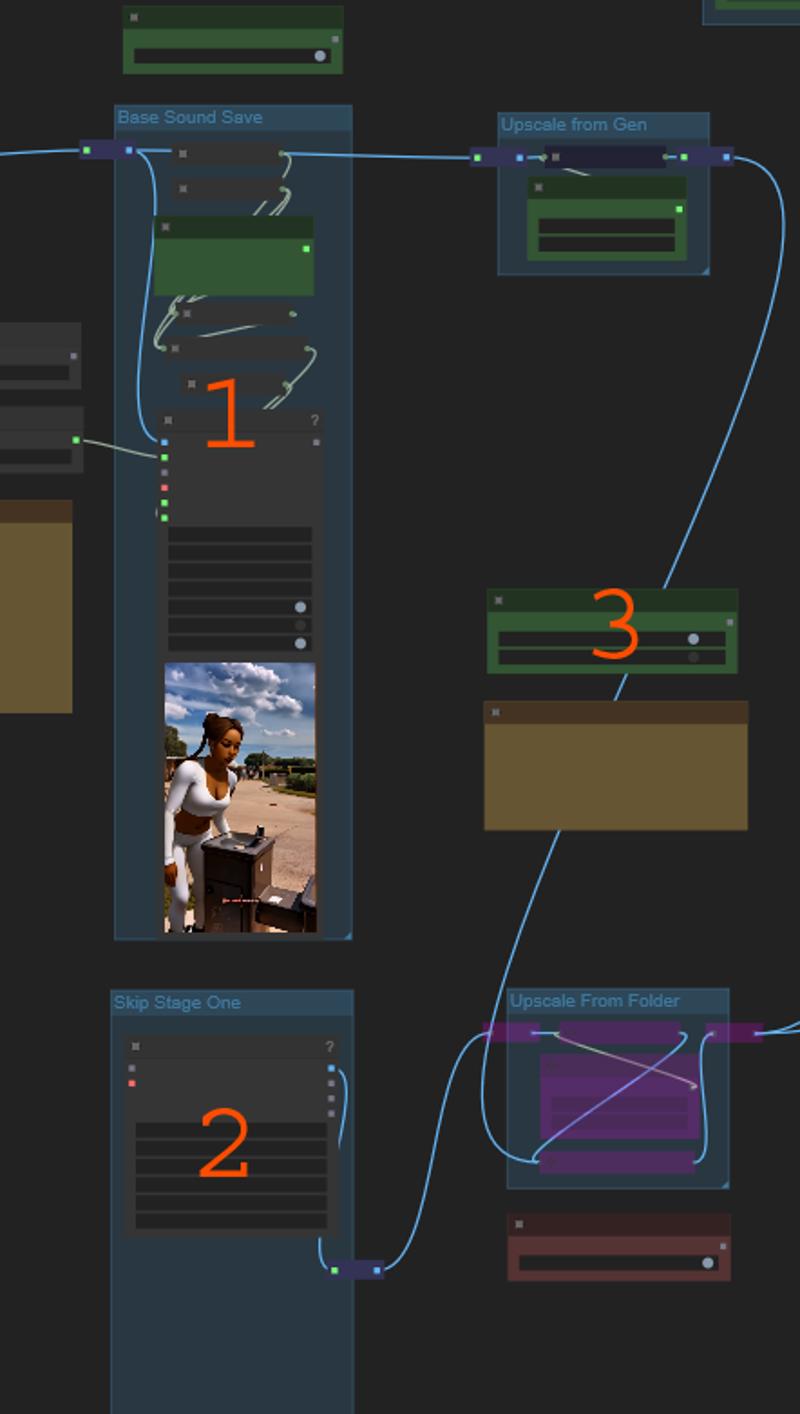
this area saves the base video, and lets you choose to upscale from the generation or from a video saved previously.
Lets look at the image
This is the base video save, it saves to the project\videoname\base folder
If you save with metadata it will save a png you can use to load the flow with the same settings used.
CRF is the compression, lower is less compressed but get quite large.
19 is default, i use 14 for base, then 12 for upscale usually.
This is the loader to load in a video to upscale
this replaces the base generation video with the loaded one.
This allows you to run many base generations then upload only those that you feel are good enough.
This allows you to resume in case of an error of some kind.
Switch to change where to load the upscale from
this allows you easily switch between upscaling the generation or a loaded video
if you load in a video, disable the first pass generation to ensure it does not run first.
Upscale Controls
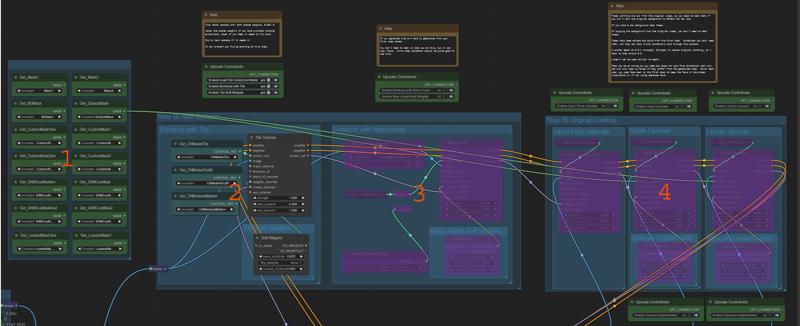
this area contails the upscale controls and masks.
This area may look large but i rarely use any of these controls.
Lets look at the picture
These are all the masks you have generated or loaded. You can connect them to any of the controls if you want.
Subject masks should be used on the old controls if changed the background
If you did not change the background, you dont need masks here for any controls.
Tile Upscaling
This is your tile upscale group
This can be used with soft scaled weights to hold the animation and still enhance.
This is the main control i use if i feel it needs help holding animations through the upscale.
New Lineart Controls
This generates new lineart controls from your first step render.
THis can copy flaws in the first step.
This can do a good job upscaling if your base is a stable decent video.
Original Controls
This is the three main controls brought over for use with the upscale if you feel its needs it.
If you changed the background you need to mask these with subject masks.
If you did not change background no masks are needed here.
Open poses never needs masks
Scaled weights can be used on depth or line to allow a bit more change.
These can help fix base animations that are tricky to animate completely in first step.
Dont go overboard here, controls here increase memory used by A LOT. Try without one first.
Replace Upscale Prompts
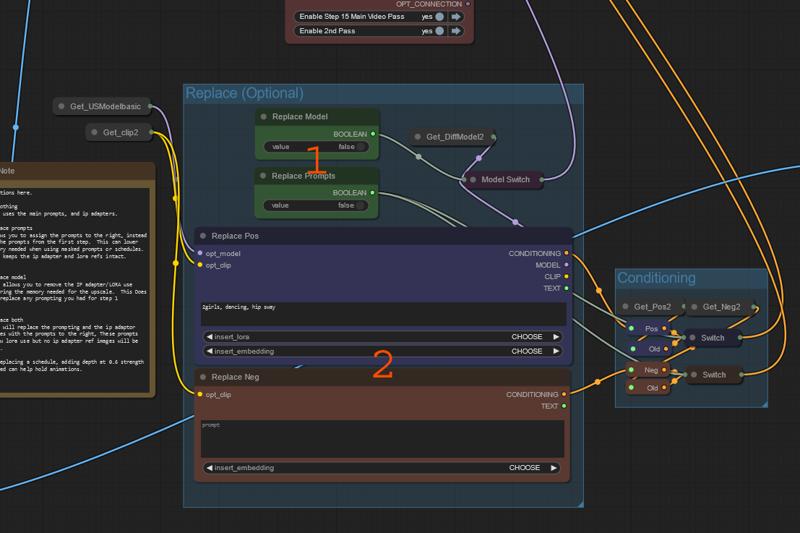
this is not needed, as all prompts are passed from the base over here, this just gives you the option to replace them.
this area allows you to replace the original prompts or the original model(ip adapter ref)
This can lower memory needed by replacing ip/schedules etc.
Most of the time this is not needed, i used this mostly to replace schedule prompts from the first step, because uscaling with them takes A LOT of memory.
Lets look at the picture
Switches for replace prompts, and replace model
You can replace both, one or non. Just change these to true to replace.
These are your replacement prompts if you choose to enable replace prommpts.
Lora and embedding can be used here.
Most of the time i dont use this its for special cases.
Upscale Render
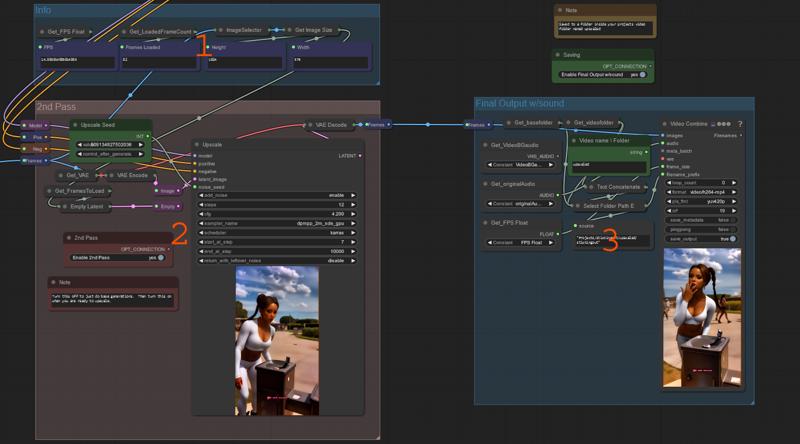
This area renders the final video and saves it to the project folder in a folder "uspscaled"
You can bypass LCM lora for this step, if you wish,
steps 7-12 works without lcm ususally.
Lets look at the image
This is info boxes showing the info for the render to happen in this step.
This is the main upscale render group. It renders the video to pass on to save.
You can bypass this upscale group to only do base renders.
This is the main upscale save, saved to project folder.
You now have your video saved to the project folder like the rest.
I hope this answers some or all of the questions you had about this workflow.
V5 has example videos you can try yourself.
Hope you all have a good day. :)

