Welcome to the World of Diffusion
So you've heard about this thing called Stable Diffusion. Or maybe FLUX. Or maybe you've used Midjourney or DALL-E and you want a bit more control. But where to begin? There's a thousand guides online, many of them outdated or contradictory, and that's assuming you even know the right terms to look for. Well here's one more guide, hopefully it will have what you need 🙂
What this guide is here for:
Helping newcomers to the world of AI image generation to get started.
Lay a basic foundation to build on, providing you with the tools needed to continue exploring on your own.
Providing a roadmap to go from beginner to intermediate
What this guide is NOT for:
An in-depth exploration of all the different tools available. My goal is to create a foundation - to give you enough knowledge that you'll be able to explore these topics on your own.
Video. I just don't have enough experience in this area to offer any advice.
Tech support. I'm truly sorry, but troubleshooting individual setups and problems is a complicated and time-consuming process. If you run into difficulties, I suggest searching for the specific technology or error you're struggling with.
So what is diffusion and how does it work?
Engineer's answer: It's a technology that lets you type a description of something (called a "prompt"), and the computer will attempt to draw it for you.
Scientist's answer: Have you ever seen a cartoon where the characters are looking up at a bunch of clouds, claiming they can see certain shapes within them? And then as you watch the clouds slowly morph into whatever is being described? That's sort of what's going on here. The computer generates a bunch of random noise, and then, using the prompt that you provide, attempts to sort that noise into a coherent image. Step-by-step the noise is "removed" until an image emerges.
I'm interested but totally lost. Where do I even begin?
If you are totally new, your best bet is probably going to be an online service. Midjourney, DALL·E, and CivitAI all offer a way to generate images based on a description. You'll need to create an account to use them, and you'll only be able to create a limited number of free images at a time. There are also many, many other services you can find if you search for them.
For many people, using one of the above services is plenty. But if you want to go deeper, or if you simply dislike relying on a service and want do it yourself, keep reading.
Running Locally
To run a diffusion model locally, you'll need to install a User Interface (UI) and download a model. An analogy I like to use is that of a car. The UI is the car itself - it's the part that you "drive." The model is the engine that powers the car.
Every car has a number of essential features: wheels, an accelerator, a way to steer, etc. These are all part of what make up the car. Beyond these, you have features that aren't technically essential but are extremely widespread and usually taken for granted, such as air conditioning and radio. And then you get into the optional and luxury items: adaptive cruise-control, gps, and so on.
In the same way, each UI has a number of features ranging from the essential to the highly useful to the superfluous-but-nice. I'll cover the basics of each UI first, then later talk a little about the technologies they incorporate.
Minimum Specs
Before we begin, you'll need make sure you can actually run Stable Diffusion. For "normal" installation, refer to the numbers below. If your system is weaker, OldFisherman8 put together a guide to running SDXL models on a "potato" PC here.
If you have a PC, you'll want 16GB RAM and an NVIDIA GPU (eg RTX 3060). There are ways to run Stable Diffusion on AMD or Intel graphics cards, but they are beyond the scope of this guide. You'll also want to check your GPU's VRAM (this is part of the GPU and completely different from your computer's RAM!). You'll want a minimum of:
4GB VRAM (for SD1.5 models)
6GB (SDXL)
8GB (FLUX[dev] - NF4 / GGUF versions )
If you have a Mac, you'll want an M1 chip or newer, and 16GB RAM (SD1.5, SDXL) or 32GB RAM (FLUX).
(If you're confused about the parts in parentheses, don't worry, I'll cover that later. They're just different models you can use.)
If your system can run Stable Diffusion, you can move on to choosing a UI program.
User Interfaces
Mac:
Draw Things: For Macs, this is an easy recommendation - it's a native Mac app, so it runs better than the other UIs on the list. This is especially important because AI is optimized for NVIDIA graphics cards, so every bit of extra speed helps.
It also helps that it's a solid UI in its own right. It's incredibly easy to install, has a decent interface, and it has all the most important tools you'll need as you start moving beyond the basics.
However, if you would prefer one of the others, most of the Windows options listed below also have Mac versions.
Installation: Download from the MacOS App Store and run.
Supported Models:
Stable Diffusion 1.x, Stable Diffusion 2.x, Stable Diffusion XL, Stable Diffusion 3.x
FLUX[dev], FLUX[schnell]
Stable Cascade, PixArt Sigma, AuraFlow, Kwai Kolors
Supported Technologies:
Text-to-Image, Image-to-Image, Inpainting, Hires Fix, Upscaling
Custom Models and LoRAs
ControlNet (SD1.5, SDXL)
IP-Adapter (SD1.5, SDXL)
Notable Omissions:
ADetailer
Regional Prompting
Fewer Schedulers/Samplers
Documentation:
Windows:
StabilityMatrix: Stability Matrix can work as a diffusion UI, but its main purpose is to act as a manager program to help you install, update, and run one or more of the programs listed below. It also helps you to set them up so they can share models (which keeps your hard drive from getting clogged up with duplicates) and outputs (so you don't need to remember which specific program was used to create each image). To install, simply scroll down to the part of the page shown below and download and run the installer that matches your system.
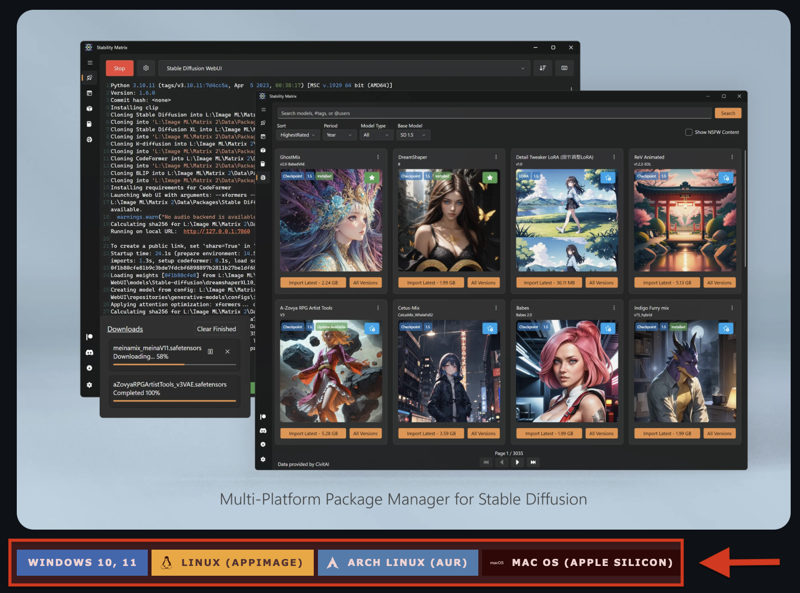
If you're a beginner, I strongly recommend going this route. If you do, you can ignore any of the specific installation instructions and just let Stability Matrix handle it.
Once you've installed Stability Matrix, run the .exe file, then open the "Packages" tab (the box icon on the left). Then click the "Add Package" button and install the one(s) you want.
Forge: This is my recommendation. The interface is a bit unpolished, but highly functional, especially for the basic core function of rendering images based on a text prompt. It includes all the important tools and technologies you'll need. It's also fantastic for doing comparison tests, thanks to a robust and easy-to-use system for creating grids showing lots of image variations.
Forge started out as a fork of Automatic1111, one of the earliest UIs. The original goal was simply to bring in a bunch of performance enhancements and improvements, but it has since diverged quite a bit. There are still many similarities though, so much of the documentation is still relevant.
Installation: Stability Matrix, or follow the installation instructions on the main page.
Supported Models:
Stable Diffusion 1.x, Stable Diffusion 2.x, Stable Diffusion XL, Stable Diffusion 3.x
FLUX[dev], FLUX[schnell]
Stable Cascade, PixArt Sigma, AuraFlow, Kwai Kolors
Supported Technologies:
Text-to-Image, Image-to-Image, Inpainting, Hires Fix, Upscaling
Custom Models and LoRAs
Regional Prompting
ControlNet (SD1.5, SDXL)
IP-Adapter (SD1.5, SDXL)
ADetailer
Documentation:
A1111 page - Not fully compatible, but lots of overlap.
InvokeAI: Invoke is an excellent interface for those who like more direct control over their images. It has a Photoshop-like canvas that lets the user create and manipulate individual layers, and includes a polished, seamless implementation of Inpainting, ControlNet, Regional Prompting, and IP-Adapter. This makes it very easy for the user to make iterative edits and craft the exact image they want over multiple stages.
Installation: Stability Matrix, or follow the instructions on the installation page here.
Supported Models:
Stable Diffusion 1.x, Stable Diffusion 2.x, Stable Diffusion XL, Stable Diffusion 3.x
FLUX[dev], FLUX[schnell]
Supported Technologies:
Text-to-Image, Image-to-Image, Inpainting, Hires Fix, Upscaling
Custom Models and LoRAs
Regional Prompting
ControlNet
IP-Adapter
Notable Omissions:
ADetailer
Fewer base models, samplers, and schedulers than Forge/reForge/Comfy
Documentation:
YouTube channel - contains many helpful studio sessions and tutorials
ComfyUI: Comfy is easily the most powerful and flexible UI, and the one that gets the latest and greatest technologies earliest. It uses a node-based interface, and is great for those who like to tinker with the rendering pipeline itself. The downside is it's more complicated and has a steeper learning curve than other UIs. For this reason, I recommend beginners get comfortable with one or more other UIs first, then start exploring Comfy if they start feeling constrained.
Installation: Stability Matrix, or follow the installation instructions on the main page.
Supported Models:
Stable Diffusion 1.x, Stable Diffusion 2.x, Stable Diffusion XL, Stable Diffusion 3.x
FLUX[dev], FLUX[schnell]
Stable Cascade, PixArt Sigma, AuraFlow, Kwai Kolors
Supported Technologies:
Text-to-Image, Image-to-Image, Inpainting, Hires Fix, Upscaling
Custom Models and LoRAs
Regional Prompting
ControlNet
IP-Adapter
Notable Omissions: None - nearly every major technology comes out on Comfy before any of the others
Documentation:
Other Programs:
Pinokio: An alternative to hub Stability Matrix. Contains a repository of one-click scripts to handle all the dependencies and console commands you would normally need to manage yourself during installation.
SwarmUI: Runs a more "traditional" front end on top of Comfy to make basic workflows easier, while still allowing users to access Comfy's node interface for more complicated workflows. Good for those who want to learn Comfy but may find the nodes difficult to work with.
SD.Next: A UI with a similar feature-set to Forge. It's less well-known and less documented, but has an enthusiastic fanbase.
Krita AI Diffusion: A plugin for Krita, an image-editing program. It allows the user to generate images based off what they have drawn on the screen. You can see a demo video here.
Automatic1111: Also known as A1111. For a long time, this was considered the "default" UI. It hasn't received any recent updates though, and most people have moved on to Forge.
reForge: A fork of Forge that aims to preserve backwards-compatibility with A1111 extensions. Since Forge is more up-to-date, I'd recommend using that unless there's a specific extension you need.
Fooocus: A clean, easy-to use interface that is very accessible to beginners. It also has one of the best Inpainting systems. Unfortunately, it hasn't been updated in a while and may be on permanent hiatus.
Install Your First Model(s)
Once you have your UI, you'll need to download and install a model in order to start drawing images. Some of the above UIs will download a starter model during the installation, others will require you to download one. But which one(s)? The first thing you'll need to understand is the different bases.
Base Models:
SD1.5 - One of the older bases and also one with relatively light hardware requirements. It has a native resolution of 512px, and usually requires using either Hires Fix or ADetailer (see Glossary section for more details) to draw crisp, clean images. It has widespread community support, with high-quality ControlNets and Loras (see Glossary).
SDXL - SD1.5's successor. It increases the resolution to 1024, understands your prompts better, and generally creates more detailed, higher-quality images. It has widespread community support, although not quite as much as SD1.5. Because of the higher resolution, it's also a bit slower.
FLUX - One of the newer models, and not directly linked to Stable Diffusion. It has outstanding comprehension of prompts and strongly prefers descriptions in complete sentences, rather than simply listing a bunch of terms. It has the heaviest hardware requirements.
These are the main ones. Some other models which are helpful to know, but which I wouldn't worry about at this time:
Pony, Illustrious, and NoobAI - Technically, these are all derivatives of SDXL, but they have diverged so much, it's more practical to think of them as different base models altogether. They all have superior understanding of known characters and anatomy, but have noticeably weaker style control (and in the case of Pony, background details). Each of these models also has its own set of quirks that makes them more finicky than regular SDXL models (you can read more on the individual pages), so I'd recommend beginners not start with these.
SD3.5 - SD3 was the much-hyped successor to SDXL. Unfortunately, it had a rocky release and failed to live up to expectations. After further training, version 3.5 was released in both medium and large sizes. At the moment, more community attention is focused on FLUX, so I would hold off on this one for now.
SD1.4, SD2.0, SD2.1 - These are outdated and/or never caught on. Skip unless you're feeling nostalgic.
Stable Cascade, Pixart Sigma, Kwai Kolors, and Aura Flow - Other models that were released around the time of SD3. They saw a brief spike of community interest but then mostly faded into the background. Skip these for now, but keep them in mind in case they see a resurgence (Aura Flow in particular, which is being used as the base for the next Pony model).
Starter Models:
Civitai has thousands of models available, and it's not even the only repository! So which ones should you download? Ultimately, it's up to you, but here's some recommendations to get you started.
SDXL - Assuming your hardware can run it, SDXL is a good starting point. It's a solid base, widely supported, and unlike FLUX, there's no special installation instructions.
Juggernaut XI: An excellent general-purpose SDXL model. Some UIs already default to Juggernaut as a starter. I'd highly recommend starting with this one first, then trying some of the ones below as you get more experience.
Additional models:
RealVis 5.0 (photo)
Black Magic 1.45 (anime)
Painter's Checkpoint 1.1 (artistic)
Cheyenne 1.6 (illustration)
SD1.5 - If SDXL is too much for your system, or you just want to try something else, here's some SD1.5 models.
Dreamshaper 8 - The Juggernaut of SD1.5. Versatile, high quality, and widely used as a default. As above, I'd start with this one, then experiment with others
Additional Models:
epiCPhotoGasm 1.4, Photon (photo)
Mistoon 2.0 (anime)
A-Zovya RPG Artist Tools 3.0 (fantasy/painting)
Arthemy Comics GT Beta (comics)
FLUX
FLUX is one of the most advanced models available right now. Unfortunately, it's also a bit more complicated. If you've ever looked into it, there's a good chance you've you come across terms like "dev", "schnell", or "gguf", and wondered, "Can't someone just point me at a single file to download??"
Almost!
If you're just starting out and/or want to keep things simple, you only need to answer one question: speed vs quality.
Speed - You'll want the FLUX [schnell] model. This will let you render pretty good images in as few as 2 steps!
If you're using Draw Things or Invoke, just look for the default/starter models, and download the FLUX [schnell] (8-bit / quantized) model.
Otherwise, download the flux-schnell-bnb-nf4.safetensors file from this page and install as you would any other model (make sure your UI can run FLUX first)
Quality - You'll want FLUX [dev].
If you're using Draw Things or Invoke, just look for the default/starter models, and download the FLUX [dev] (8-bit / quantized) model.
Otherwise, download the flux-dev-bnb-nf4.safetensors file from this page and install as you would any other model (make sure your UI can run FLUX first)
That's it!
Well, it is if you want. There's a little bit more, but it's totally optional.
The main problem with FLUX is that it's big. Not just in terms of storage space, but also in terms of how much memory it takes to run. To solve this problem, most people don't run the original models. Instead, they run what are called quantized models. You can think of them like an equivalent to jpeg compression - you take a slight hit to quality for a massive reduction in size. The two models I suggested above were the NF4 versions of the model. They're fast, light (relatively speaking), and easy to use. But there's another set of quantized models that will give you more fine-grained control over how much quality you want to give up. Those are the GGUF versions.
I won't go into a ton of detail here. Just know that:
The Q8 model is almost as good as the original, for about half the size.
Q4 is comparable to NF4. If you need to go even lighter, you can do so.
You can find the GGUF models here. You can find detailed installation instructions for Forge on this page. You'll need to adapt them to whichever UI you're using (and as before, make sure it's compatible first).
Roadmap / Lesson Plan
So you've downloaded a UI and a starter model. What now?
Start simple. Enter a prompt into the main prompt box, hit render/generate/whatever, and watch your image appear. Experiment with different prompts. Try different models and see how each one handles the same prompt differently - not just in terms of style, but also in how the image is composed. DO NOT simply look at various images on CivitAI and try to copy them! There are many terrible habits that are circulating because people come across a good image and then copy its prompt without understanding why it worked as well as it did.
Learn to use img2img / Image-to-Image. This lets you provide both a prompt and a source image to guide the generation. Try playing around with the denoise value and observe how it affects the source image's influence.
Learn to use LoRAs. LoRAs are basically micro-models that run on top of your main model, and are used to fill in some sort of "gap" in its knowledge. Each UI has its own method for installing LoRAs, so you'll need to look up the specific documentation
Try installing some style LoRAs like Eldritch Impressionism (SDXL) or Okami Aesthetic (SD1.5) and see how they influence the look and feel of the image.
Try installing some character LoRAs and use them to create characters the main model doesn't know about.
Make sure your LoRAs match your base model. SDXL models can only use SDXL LoRAs, SD1.5 models can only use SD1.5 LoRAs, etc.
Some LoRAs require a trigger word. Check their page to see if you need to add it to your prompt.
Play around with the LoRA's weight setting and see how the LoRA's influence changes. In Forge, this is the number at the end of the text that gets added to your prompt (<lora:lora_name:weight>). Other UIs may modify this number differently.
Learn to Inpaint. This is how you can have Stable Diffusion redraw only a part of an image. This is one of the most useful skills you can learn - you'll rarely get the exact image you want, but if you can get something reasonably close you can use Inpainting to get it the rest of the way.
Learn ControlNet. This will give you much more fine-grained control over the render process.
Learn IP-Adapter. This is very similar to ControlNet, but less rigid. It lets you copy the style, or loose composition, or even a specific face, from your source image.
Learn Regional Prompting. This lets you use assign different prompts to different parts of the image.
Finish all that, and you can consider yourself a solid intermediate user. Where you go from there is up to you!
Hints / Best Practices
Prompting
SDXL and SD1.5 strongly prioritize the earlier parts of your prompt compared to the latter parts. So put the most important stuff first, then fill in the details.
Try to keep your SDXL and SD1.5 prompts under 75 tokens (if you're using Forge, this is indicated by the number in the top-right of the prompt box). The reason for this is that your prompt is processed in 75-token "chunks". If you go over, the next token will start a new chunk, and will be given maximum priority since it's near the beginning. To deal with this, most UIs include a way for you to divide your prompts into pieces and then join them together.
Forge/reForge/A1111 use a BREAK statement. So you would write "piece_1 BREAK piece_2 BREAK piece_3..." You can read more about this here.
In Invoke, you would write "(piece_1).and(piece_2).and(piece_3)"
Other UIs have their own methods, which you should be able to look up.
Avoid lengthy negative prompts. When you first start out, try to generate images using only the positive prompt (aside from "nsfw" if you're worried about the model misbehaving). If you start noticing certain trends, try to correct them as specifically as possible. For example, if "tennis ball" frequently causes the background to become a "tennis court", you could try adding that to the negative. But unless the model was specifically trained to recognize things like "low quality" or "extra fingers", such terms are unlikely to help.
Stable Diffusion Art has a mostly-excellent prompt guide here (I strongly disagree with using a giant "universal" negative prompt but think everything else is great!)
If you find coming up with prompts from scratch tedious or intimidating, consider using a prompt builder like this one. They're basically a cross between a template and a questionnaire - simply fill in the blanks and they'll generate a prompt for you.
Anime models are usually trained on booru tags (warning: main site is nsfw). You can find a list of tags here (Download one of the .csv files and replace the dashes or underscores with spaces when prompting. Use danbooru for anime, e6 for furry, or e6-danbooru for a combined list. The tags are sorted according to number of posts, which loosely translates to a model's ability to recognize them). An example of a prompt you might use for an anime model (in this case Black Magic):
anime screencap, wallpaper, golden retriever, running, ball, park, medium shot, from side, playground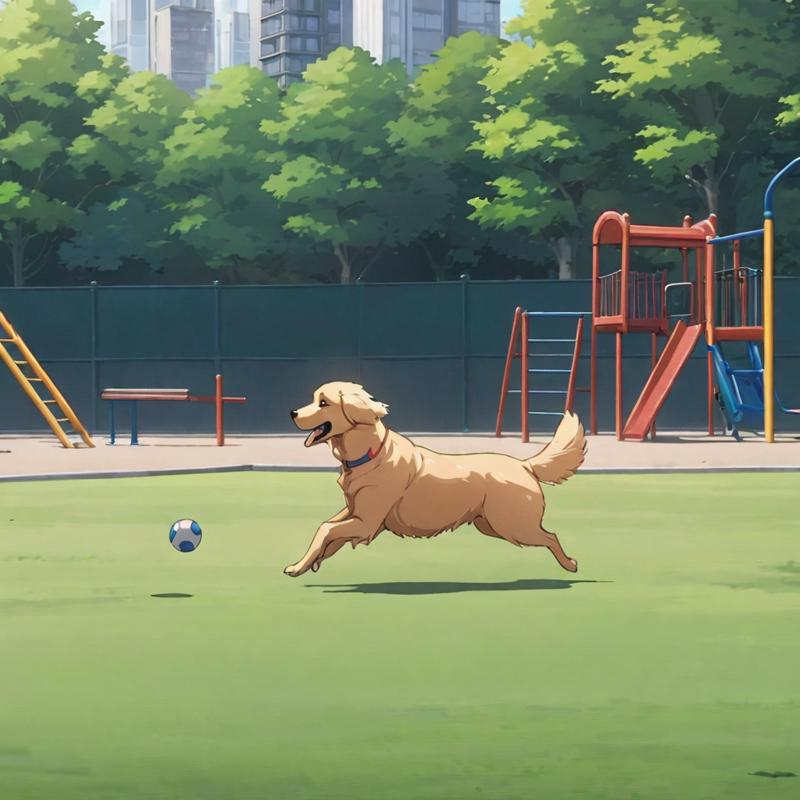
Non-anime models are usually a bit more flexible, and work best with prompts that are somewhere between booru tags and complete sentences. Here's how you might write the above prompt for Juggernaut
wallpaper of golden retriever chasing a ball in a park, profile, side view, medium shot, playground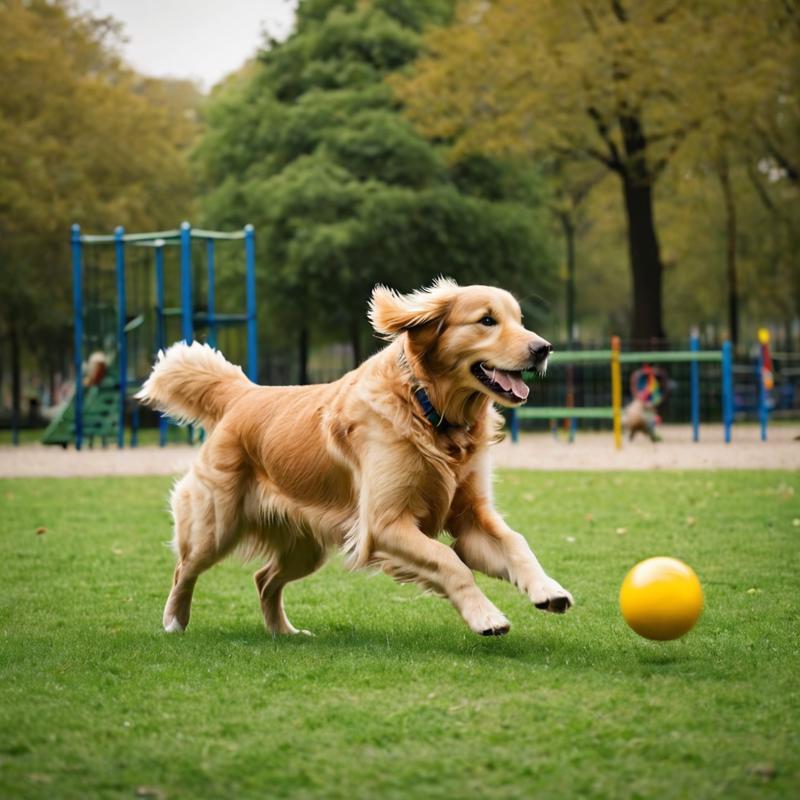
FLUX models are completely different. They prefer complete sentences, are more flexible when it comes to the order of the description, and accept much longer prompts without needing to rely on BREAK or any of the equivalents. They are also much better at understanding specific instructions, giving you much more control over the final image.
Photo of a park. In the background on the left is a swingset. In the background on the right is a playground. Children are playing on the swings and playground. On the left side of the screen is a tennis ball. On the right side is a golden retriever, in profile, facing sideways, chasing after it.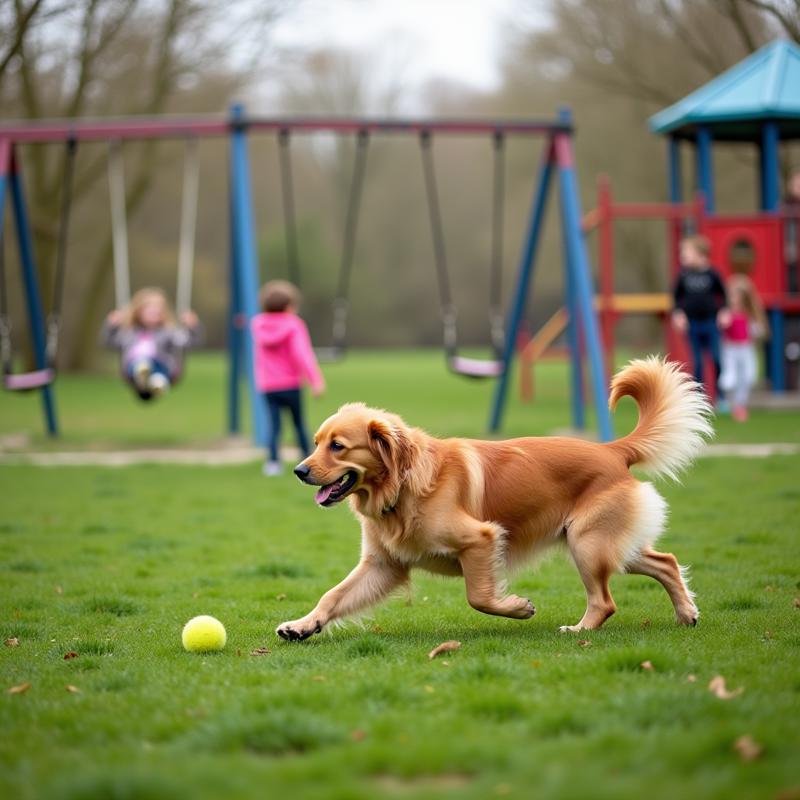
Some people have found it helpful to use an LLM (such as ChatGPT (online) or Llama (local)) to assist them in crafting their FLUX prompts. This is completely optional, but worth exploring if you're struggling with your FLUX images. Try prompting the LLM with the following:
You are a prompt engineer. I want you to convert and expand a prompt for use in text to image generation services which are based on Google T5 encoder and Flux model. Convert following prompt to natural language, creating an expanded and detailed prompt with detailed descriptions of subjects, scene and image quality while keeping the same keypoints. The final output should combine all these elements into a cohesive, detailed prompt that accurately reflects the image and should be converted into single paragraph to give the best possible result.

The prompt is: "add_your_prompt_here"
You may need to tweak the output, but if you're struggling it can give you a good starting point.
Other
When you're first starting out, avoid quality-enhancing embeddings like EasyNegative. These can definitely improve the image quality, but they can often come with side effects like reducing the model's creativity (the amount of variations between generations). In my opinion, it's better to get used to the model first, so that you'll be able to recognize when such enhancers will be helpful.
Don't stray too far from a model's native resolution. If you try to draw a 400x400 image with SDXL, for example, you're likely to get a very low-quality image. And if you try to draw a 1200x1200 SD1.5 image, you'll probably end up with a surreal, trippy image full of hallucinations. If you need to scale up, use either Hires Fix or Upscaling.
Troubleshooting
I know I said this guide wasn't intended for tech support, but I can at least offer some suggestions for some of the most common problems.
My image is gray / soft and desaturated / incredibly noisy and gritty.
This may be a VAE issue. The VAE is what handles the final step in decoding the image. Most models have the VAE "baked-in", so you don't need to worry about it. But some require you to have the VAE installed. You'll need to look up the installation instructions for your particular UI, and then install one of the following, depending on the model:
It takes forever to draw an image.
You may have hit your VRAM limit. If this happens, your computer will switch over to using the CPU to perform the necessary calculations, and they will be much slower. If you're using any LoRAs or ControlNets, try deactivating them and see if your speed returns to normal.
My image looks burnt.
You may have set the CFG value too high. You may also be using a sampler or scheduler that's not fully compatible with your model. Try making some adjustments and see if it helps.
My characters' faces look smushed.
This is usually a problem with characters that are a little bit further away from the camera. If your UI has ADetailer, it can help fix this issue. If not, try upscaling and then inpainting the face.
My FLUX image looks super noisy and distorted.
Unfortunately, there are a LOT of possible causes here. If you're using Forge and you've checked the usual culprits (VAE, scheduler, sampler, etc) and it still looks broken, try checking your prompt for any key words (eg all-caps AND or BREAK). See this post for more details.
Glossary
As with all new technologies, Stable Diffusion adds more weirdness to our collective vocabulary.
I'll cover some of the major terms here, but if you want a more complete list, head over to this page.
Models / Checkpoints: Technically, a checkpoint is only one type of model, but for practical usage, they're basically synonyms. When you hear people talk of models, they're almost always referring to checkpoints. A checkpoint is typically a very large file (ranging from 2GB to more than 20GB!) that contains the data needed to draw images.
LoRAs: Think of these as micro-models that you overlay on top of a regular model. LoRAs are typically used to provide some specialized knowledge that the original model is lacking, such as a specific character, style, or concept. Make sure that you only use LoRAs that have the same "base" as the model you're currently using (ie: SD1.5, SDXL, etc).
Prompt: A written description of the image you want the computer to draw.
Negative Prompt: Usually described as telling the computer what you don't want it to draw. However, it would be more accurate to say that if your positive prompt "pulls" the final image in a particular direction, then the negative prompt "pushes" the image away. The difference is subtle, but important. For example, suppose you wanted to make your images more realistic. You could add "photo" to the positive to make the image more realistic, and "anime, sketch, painting" to the negative to make it less unrealistic/artistic.
Text-to-Image / txt2img: The process of converting a prompt into an image.
Image-to-Image / img2img: In addition to providing a prompt, you also provide a source image. The computer will try to make the final output match both your prompt and this source image.
Inpainting and Outpainting: With Inpainting, you mask out a part of the image and ask the computer to draw something to fill in that space. For example, you might mask out a person's clothes and write a prompt giving them different ones. Or you might want to add something to the scene like an extra tree or another character, or possibly remove something from the scene. Outpainting is similar, except instead of masking out an area inside the scene, you're asking the computer to expand the boundaries of the image. In effect, you are trying to "zoom out" and fill in a part of the scene that is currently cropped.
Denoise: A term often used in conjunction with img2img or Inpainting, this refers to how much the original image should influence the final output. A denoise value < 0.4 means you want the new image to very closely resemble the original. A denoise value > 0.8 means you only care about having a passing resemblance. Most of the time, you will use a value somewhere in the middle, depending on how much freedom you want to give to the computer.
CFG / Guidance: Simplistically, you can think of this as how much creative freedom you're giving the computer vs how insistent you are about following your prompt. If you set it too low, you probably won't get what you want. Too high, and you're likely to get an image that looks burnt and is full of artifacts. For most models, 5-8 is a safe sweet spot.
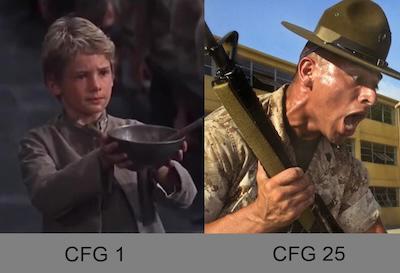
Steps: How many cycles does the computer spend turning the random starting noise into an image. You'll usually want to keep this around 25-30. Sometimes you can get a little more quality by increasing the number of steps, but by this point you're starting to run into diminishing returns where each extra step improves the image by a smaller and smaller amount.
Samplers: The mathematical function used by the computer to convert the noise into an image. Each one has its own strengths and weaknesses. If you want an in-depth guide, here is an excellent one explaining what samplers are and how they work. And here is another one that's a little less technical and which covers some of the ones not covered in the first. If you just want a quick recommendation:
Euler A, DPM++ 2M, and DPM++ SDE are all widely used, safe choices. My own personal favorite is Restart.
Schedulers: You can think of samplers as determining how to convert noise into an image, and schedulers as determining how much per step. Is the progression linear? Or does it start off fast and then slow down, allowing for greater precision during the final steps? Like samplers, there are pros and cons to each. Some UIs combine the schedulers and samplers together, while others let you select each one independently.
When in doubt, if your UI offers it, choose Simple or Automatic.
Karras is usually a safe choice.
Align Your Steps (AYS) is usually very good if the model works with it, but some models produce distorted images with it.
ControlNet and IP-Adapter: If Img2Img is a sledgehammer, this is a scalpel. Instead of using the entire image, these allow you to choose some specific aspect of it. For example, Canny will detect the edges in the source image, which would let you keep the overall composition without also getting any of the style or color influence. OpenPose can detect a character's pose, letting you draw a completely different character in that same pose without taking on the appearance of the original. IP-Adapter can copy a face from the source image, letting you reuse a character in an entirely different context. These are some of the most useful tools available for letting you manually control the final output. Stable-diffusion-art.com has an excellent writeup on the different types of ControlNets and IP-Adapters. It's written for Automattic1111, but the basic principles apply to all the UIs.
Regional Prompting: Wouldn't it be great if instead of trying to describe the entire image in a single prompt, you could use a bunch of smaller, specific prompts to describe different parts of the image, and have them automatically blended together? That's Regional Prompter. It helps ensure that you descriptions go where they're needed, so you can prompt for things like "a blue car" and "a red car" and get two cars that are appropriately colored, rather than a one or two multicolored car(s).
ADetailer: Sometimes the computer will struggle with finer details, especially at a distance. Faces and fingers in particular are prone to getting a "smushed" look. ADetailer will try to locate certain features like faces and hands, and then try to redraw them at a higher resolution to correct this problem
Additional Resources
YouTube Channels:
Stable Diffusion Art - Hosts many excellent long-form tutorials
Prompt Builders - Tools to assist you in constructing prompts. You can think of them like templates or questionnaires. Simply fill in the blanks, and they will generate a prompt for you to put into your
.jpeg)