What is Lora block training?
Lora Block training involves modifying the corresponding block weights during training through U-Net processing. First, let's introduce U-net.
The name "U" comes from its structural shape. It looks like the letter "U", so it is named U-Net.
Although U-Net existed before Stable Diffusion was released, Stable Diffusion modified and implemented its own unique version of it.
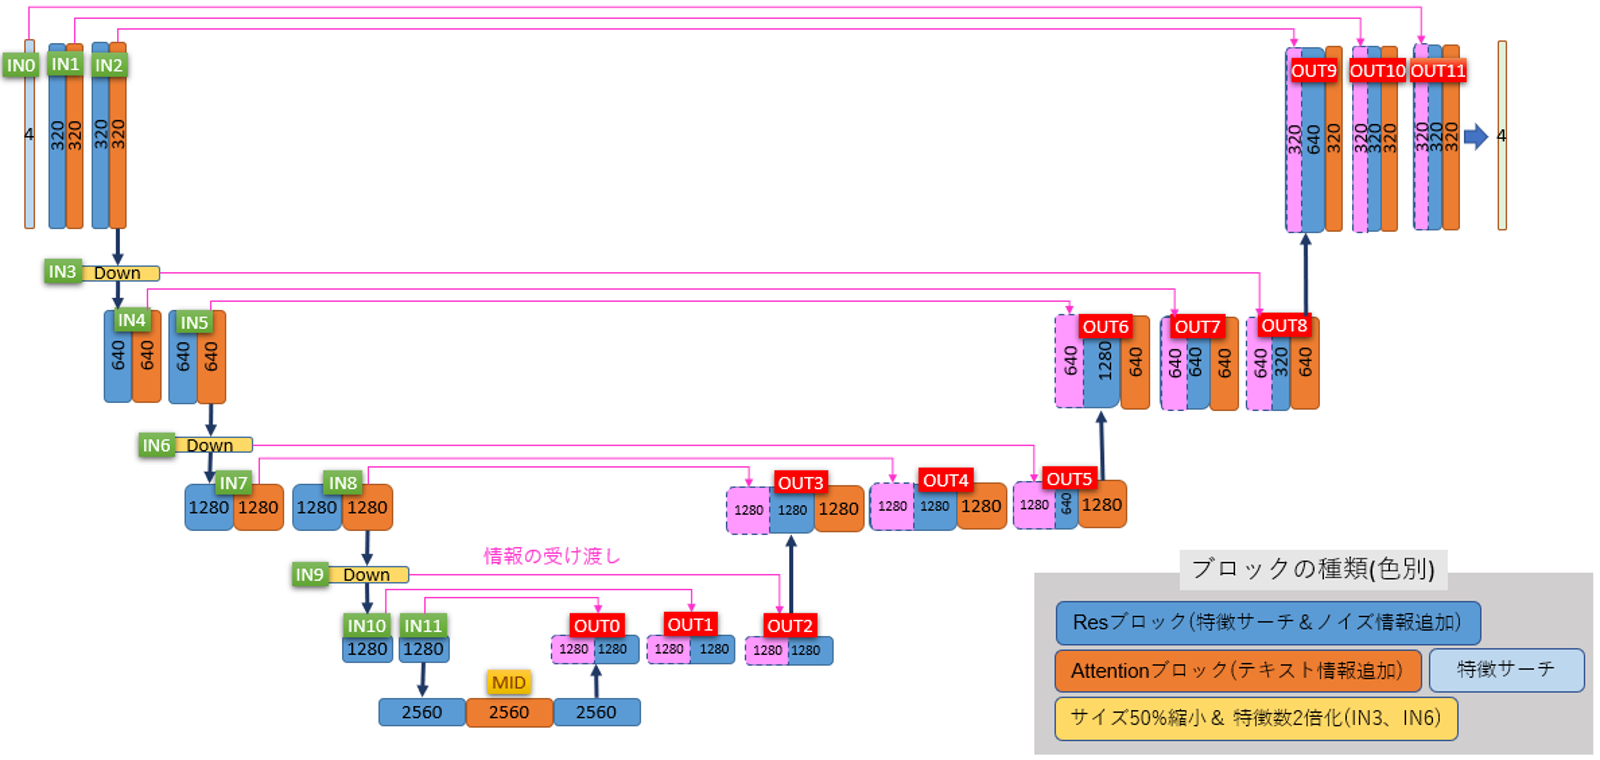
The following image shows the U-Net structure used in Stable Diffusion.
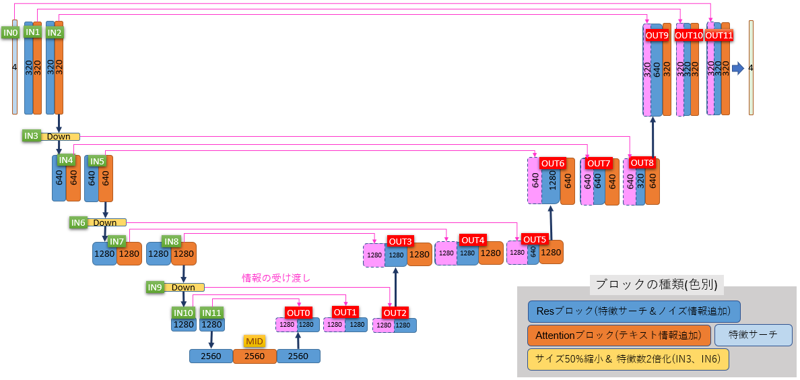
After inputting the image from the top left corner, it will process the image sequentially to the right and then output the result from the top right corner.
The colored blocks represent various processing steps. When they are completed, they pass on data to adjacent blocks like a game of passing-the-parcel.
(Sometimes it skips intermediate parts, as shown by pink lines).
The numbers inside each block indicate "number of image features * 1".
It can be roughly divided into IN Section, MID Section, and OUT Section.
IN Section
The IN section is divided into 12 blocks, ranging from IN0 to IN11.
During this stage, the image is gradually downscaled and various features of the image are extracted. Additionally, processing is done to reflect the given text (prompt) onto the image.
MID Section
The MID section consists of a single independent block .
Here, the image is reduced to its smallest size (1/8 compared to the first image).
OUT Section
The OUT section is divided into 12 block s, ranging from OUT0 to OUT11.
In this stage, the image is gradually upscaled until it returns to its original size. Based on the features extracted in both IN and MID sections, these features are integrated while resizing in OUT section. Interestingly enough, there's an approach that involves "directly using features discovered in IN section." This function allows for direct reception and use of feature information from IN section and is called "skip connection."
The final outputted images from OUT section are what we ultimately want to obtain.
Pink Link
The blocks connected by pink lines are paired blocks, which can directly transmit feature information.
Therefore, the information of those paired blocks becomes very important when applying additional learning segmentation applications such as Lora or LyCORIS (Locon). For example, if the IN0 block is disabled in Lora, it would be difficult for the OUT11 block to reflect the effect of additional learning.
The orange blocks represent Attention layers. The ordinary linear LORA changes feature information through these layers.
The blue blocks represent RES layers. Convolutional loras like lycoris will also affect these layers to achieve better processing of more details.
Important Block
So the blocks that LORA needs to focus on are:
IN1, IN2, IN4, IN5, IN7, IN8
MID
OUT3, OUT4, OUT5, OUT6, OUT7, OUT8, OUT9, OUT10, OUT11
A total of 16 blocks.
The blocks that lycoris need to focus on are:
IN1、IN2、IN4、IN5、IN7、IN8、IN10、IN11
MID
OUT0、OUT1、OUT2、OUT3、OUT4、OUT5、OUT6、OUT7、OUT8、OUT9、OUT10、OUT11
A total of 21 blocks.
Some people may wonder why we don't need to pay attention to the four blocks: IN0,3,6,and 9. This is because in principle these few LORA do not participate in direct operations. Although they will affect the output after blocking due to the pink connection lines causing an impact on corresponding blocks (OUT11,OUT8 ,Out5 and Out2).
IN0 Block
The IN0 block is the first to receive image input*1.
Images are compressed, with their width and height each reduced to 1/8 of the original size. For example, if a 512x512 pixel image needs to be drawn, a 64x64 data input will be sent to the IN0 block . For a 768x512 pixel image, it would be a 96x64 data input.
The first processing step after receiving the input is "convolution." Simply put, convolution is the process of "feature searching." The IN0 block performs this convolution operation only once and sends the processed data to the next block (i.e., IN1 block).
Convolution may sound abstract but can be understood simply as something similar to minesweeping. First, there's a filter specifically designed for feature searching; it scans all parts of an image channel using its slow-moving 3X3 grid while comparing discovered features with searched ones.
For standard SD compressed images with four channels, this results in outputting up to 320 feature searches.
IN3, IN6, IN9 blocks
Similarly, the IN3, IN6, and IN9 blocks are used to reduce the size of images without any processing by Lora.
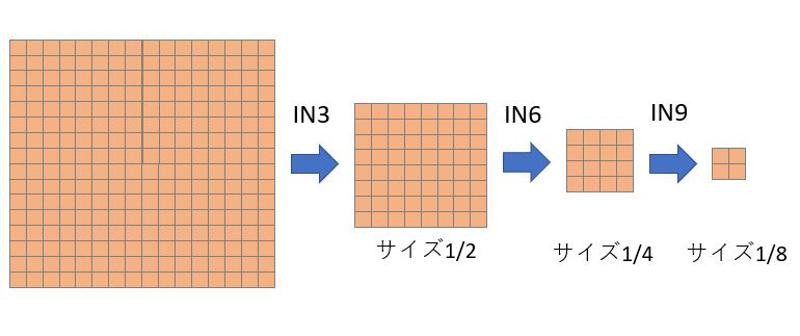
The original 512x512 image is reduced to 64x64 in the IN0 block . Then, as it passes through these three blocks mentioned above, its size is halved each time until it finally becomes a 2x2 image.
Why do we need to reduce the size of images?
In human vision, we look at images from a holistic perspective first and then zoom in to see the details.
However, in U-net, it's the complete opposite. It uses 3x3 filters to scan and detect local features such as hair and textures initially (IN0, IN1, IN2).
At this scale, it is impossible to search for overall features like gestures, expressions, spatial relationships or backgrounds.
Just as humans zoom in on details, U-Net does the reverse by shrinking down to view the whole picture. Therefore layers 3、6、9 correspondingly reduce by half so that global related features can be captured.
U-Net starts by extracting detailed parts from an image and gradually extracts rough overall information through downsizing the image.
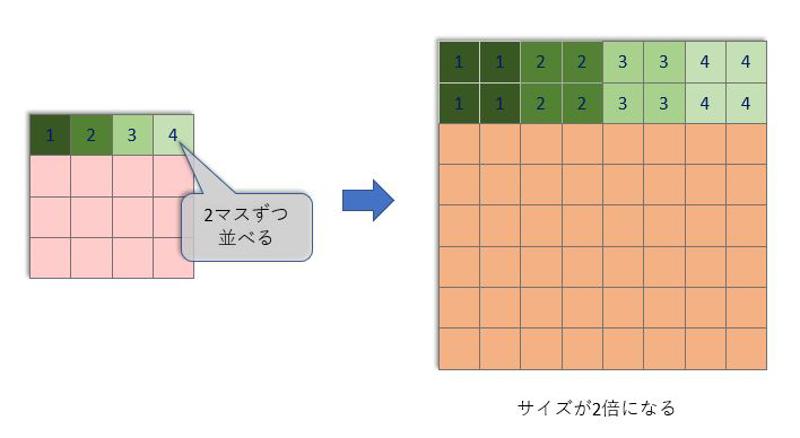
Correspondingly, amplification will be carried out on blocks paired with IN3, IN6, and IN9, which are OUT8, OUT5, and OUT2.
During scaling down no additional processing is needed; however, when scaling up it's necessary to supplement the information and enhance feature processing. Therefore, only the three blocks of IN3, IN6, and IN9 are ignored here.
So, the most important question is, how do we determine which block affects a certain feature? For example, the common character's face - why are preset templates for all blocks except OUT3, OUT4, and OUT5?
Because the standard cowboy shot usually occupies about 1/8 to 1/3 of the original image canvas.
Therefore, OUT3, OUT4, and OUT5 blocks, more consideration is given to the background and overall picture rather than focusing on the character's face.
So for a specific feature-affected block, it mainly considers the proportion of the feature itself occupying the canvas so that AI can recognize it accordingly.
For example, a close-up of a face occupying 100% of the canvas would not be suitable for preset templates in OUT3, OUT4 or OUT5.
The conclusion is: if there isn't much change in proportion between features and canvas size during testing, then tested templates can be universally applied. Otherwise, retesting is needed to assess how changes in proportions affect results.
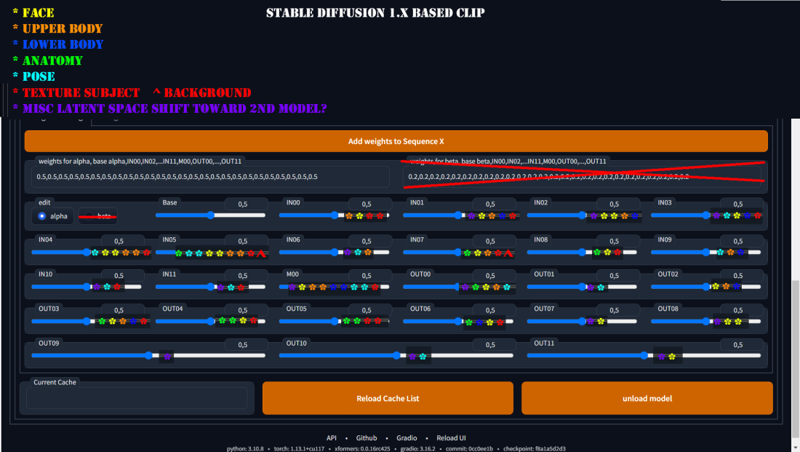
Let's talk about Lora block training.
First, use the proportion of various features in the dataset to find a similar LORA. (Generally speaking, character LORAs can be found with similar composition; actions and styles follow the same principle – just find one with the same canvas ratio)
Use the Effective Block Analyzer of lora-block-weight plugin to calculate the impact of each block.
https://github.com/hako-mikan/sd-webui-lora-block-weight
The method for performance analysis is simple: open the performance analysis page of the plugin, and add :XYZ after your desired LORA.
This will generate a corresponding XYZ graph.
Record modules that have significant impacts on your required features.
Then fill in weights accordingly during block training.
block training
In principle, there is no significant difference between using the lorablockweight plugin and block training. However, considering the inevitable loss brought by directly using blockweight, I prefer to use the block training method to align the fitting interval during concept training.
Taking a lora of 30 clothes that I trained myself as an example, the main features of a character (face, hair, etc.) will inevitably be trained multiple times and are very prone to overfitting. On the other hand, clothing and background only undergo single training sessions. Therefore, I tested out corresponding blocks for facial features on my own and manually reduced face-related block weights during training. This approach leads to more ideal final results.
An ideal LoRa should be able to switch between base models while retaining basic conceptual features without too much impact. After using a hierarchical structure, even an anime-style LoRa can freely switch to a real photo style.
image Reference source from


