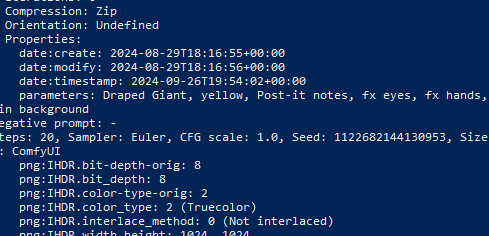
AI-generated images often contain embedded metadata that is invaluable for replication, archiving, and troubleshooting. In this guide, we'll explore two effective methods for extracting this metadata:
Using PowerShell and ImageMagick: A command-line approach for deep metadata extraction and automation.
Using SD Prompt Reader: A user-friendly tool designed specifically for reading metadata from AI-generated images.
1. Extracting Metadata with PowerShell and ImageMagick
If you're handling a collection of AI-generated images and need to examine metadata such as prompts, generation parameters, and technical specifications, ImageMagick is an excellent tool. Coupled with PowerShell, you can automate and customize the extraction process efficiently.
Direct Metadata Extraction Using ImageMagick
For quick metadata retrieval from a single image, use the following command in your PowerShell terminal (Please replace your <path> with your own):
magick identify -verbose "E:\comfyUI\renders\flux\aidmaFlux\Flux.1 [Dev.]-20-2024-08-29-103055-3.png"This command outputs detailed metadata for the specified image, including file format, dimensions, color space, and AI generation parameters like prompts, steps, and sampler settings.
Understanding Metadata Labels in Different AI Tools:
Flux: Metadata is found under the line starting with
parameters:.Midjourney: Metadata is labeled under
Description:
Properties:
  parameters: steampunk, complex, Knickerbocker, full body, laboratory, 3D render, advanced cinematic perfect light still, elaborate
  Negative prompt: -
  Steps: 20, Sampler: Euler, CFG scale: 1, Seed: 552593748149923, Size: 1024x1024, Model: Flux.1 [Dev]
Extracting Only the Prompt Text
If you want to extract just the parameters: line (or Description: line for Midjourney), you can filter the output using PowerShell's Select-String cmdlet.
Extracting the parameters: Line:
magick identify -verbose "E:\path\to\your\image.png" | Select-String "parameters:"Extracting and Cleaning the Prompt Text:
$promptLine = magick identify -verbose "E:\path\to\your\image.png" | Select-String "parameters:"
$promptText = $promptLine -replace '.*parameters:\s*', ''
$promptText = $promptText.Trim()
Write-Host $promptText
For Midjourney Images (Using Description:):
$promptLine = magick identify -verbose "E:\path\to\your\image.png" | Select-String "Description:"
$promptText = $promptLine -replace '.*Description:\s*', ''
$promptText = $promptText.Trim()
Write-Host $promptText
Automating Extraction for Multiple Images
You can create a script to process all images in a directory and extract the prompt text.
PowerShell Script:
# Define the folder containing your images
$folderPath = "E:\path\to\your\images"

# Retrieve all .png files in the folder
$images = Get-ChildItem -Path $folderPath -Filter *.png

# Loop through each image and extract the prompt
foreach ($image in $images) {
    $imagePath = $image.FullName

    # Try to find the 'parameters:' line (Flux)
    $promptLine = magick identify -verbose "$imagePath" | Select-String "parameters:"

    if (-not $promptLine) {
        # If not found, try 'Description:' (Midjourney)
        $promptLine = magick identify -verbose "$imagePath" | Select-String "Description:"
        if ($promptLine) {
            $promptText = $promptLine -replace '.*Description:\s*', ''
        } else {
            Write-Host "No prompt found in $($image.Name)"
            continue
        }
    } else {
        $promptText = $promptLine -replace '.*parameters:\s*', ''
    }

    $promptText = $promptText.Trim()
    Write-Host "Prompt for $($image.Name): $promptText"
}
Running the Script:
Save the Script:
Open a text editor.
Paste the script into the editor.
Save the file with a
.ps1extension, e.g.,ExtractPrompts.ps1.
Execute the Script:
Open PowerShell.
Navigate to the directory containing your script:
cd C:\path\to\your\scriptRun the script:
.\ExtractPrompts.ps12. Extracting Metadata Using SD Prompt Reader
For a more user-friendly approach, the SD Prompt Reader tool allows you to view metadata from AI-generated images through a simple drag-and-drop interface.
Using SD Prompt Reader
Install the Tool:
Download SD Prompt Reader from the receyuki/comfyui-prompt-reader-node: The ultimate solution for managing image metadata and multi-tool compatibility. ComfyUI node version of the SD Prompt Reader (github.com)
Follow the installation instructions provided.
Extract Metadata:
Launch the application.
Drag and drop your image into the SD Prompt Reader window.
View the extracted metadata, which includes the prompt, negative prompt, steps, sampler, CFG scale, seed, size, and model.
Example Output:
Prompt: "steampunk, complex, Knickerbocker, full body, laboratory..."
Negative Prompt: "-"
Steps: 20
Sampler: Euler
CFG Scale: 1
Seed: 552593748149923
Size: 1024x1024
Model: Flux.1 [Dev]
Advantages of SD Prompt Reader
User-Friendly: No command-line knowledge required.
Quick Access: Ideal for inspecting individual images.
Specialized: Tailored for AI-generated images, focusing on relevant metadata.
Choosing the Right Method
PowerShell and ImageMagick:
Pros: Best for batch processing and automation. Offers customization and handles multiple AI tools.
Cons: Requires familiarity with command-line interfaces and scripting.
SD Prompt Reader:
Pros: Easy to use with a graphical interface. Perfect for quick, individual checks.
Cons: Less efficient for processing large numbers of images.
Conclusion
Extracting metadata from AI-generated images is crucial for reproducing results, analyzing generation parameters, and managing digital assets. By utilizing the methods above:
Automate and customize metadata extraction using PowerShell scripts and ImageMagick.
Quickly view metadata with the user-friendly SD Prompt Reader tool.
Incorporate these techniques into your workflow to enhance productivity and gain deeper insights into your AI-generated imagery.

