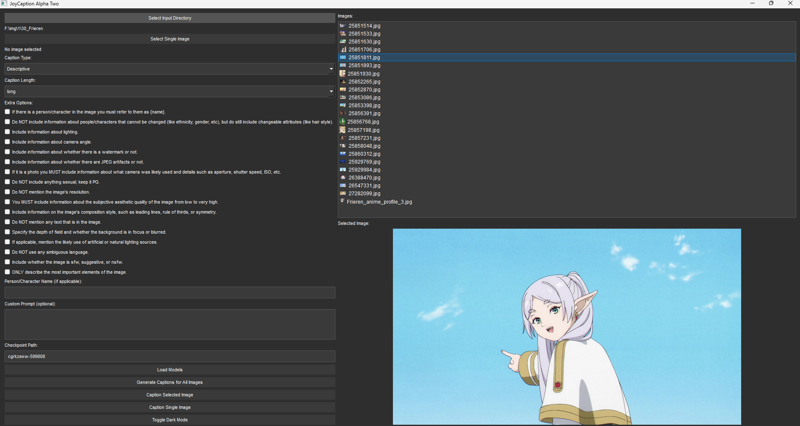
Hi, created a gui mod for joycaption alpha two.
Installation Guide
Updated one click installer- https://civitai.com/articles/7801/one-click-installer-for-joycaption-alpha-two-gui-mod
Manual install:-
git clone https://huggingface.co/spaces/fancyfeast/joy-caption-alpha-two
cd joy-caption-alpha-two
python -m venv venv
venv\Scripts\activate
Download the files and place them in the joy-caption-alpha-two folder
(If you want to use 4-bit version , please rename adapter_config_4bit.json to adapter_config.json and copy and replace that file in - joy-caption-alpha-twoc\cgrkzexw-599808\text_model)
pip install -r requirements_new.txt
Running:-
cd joy-caption-alpha-two
venv\Scripts\activate
python Run_gui.py
Key Features and GUI Options
JoyCaption Alpha Two boasts a suite of features meticulously crafted to cater to both novice users and seasoned professionals. Below is a comprehensive list of its available GUI options:
Select Input Directory
Functionality: Allows users to choose a directory containing multiple images for batch processing.
Interface Elements:
Button: "Select Input Directory"
Label: Displays the path of the selected directory.
Select Single Image
Functionality: Enables users to select a single image for individual captioning.
Interface Elements:
Button: "Select Single Image"
Label: Shows the name of the selected image.
Choose Caption Type
Functionality: Offers various predefined captioning styles to tailor the output to specific needs.
Options Include:
Descriptive
Descriptive (Informal)
Training Prompt
MidJourney
Booru Tag List
Booru-like Tag List
Art Critic
Product Listing
Social Media Post
Interface Elements:
ComboBox: Dropdown menu populated with caption type options.
Choose Caption Length
Functionality: Provides flexibility in the verbosity of the generated captions.
Options Include:
Any
Very Short
Short
Medium-length
Long
Very Long
Numerical options ranging from 20 to 260 words in increments of 10.
Interface Elements:
ComboBox: Dropdown menu with caption length choices.
Select Extra Options
Functionality: Allows users to fine-tune caption generation by selecting additional descriptive parameters.
Available Options:
If there is a person/character in the image you must refer to them as {name}.
Do NOT include information about people/characters that cannot be changed (like ethnicity, gender, etc), but do still include changeable attributes (like hair style).
Include information about lighting.
Include information about camera angle.
Include information about whether there is a watermark or not.
Include information about whether there are JPEG artifacts or not.
If it is a photo you MUST include information about what camera was likely used and details such as aperture, shutter speed, ISO, etc.
Do NOT include anything sexual; keep it PG.
Do NOT mention the image's resolution.
You MUST include information about the subjective aesthetic quality of the image from low to very high.
Include information on the image's composition style, such as leading lines, rule of thirds, or symmetry.
Do NOT mention any text that is in the image.
Specify the depth of field and whether the background is in focus or blurred.
If applicable, mention the likely use of artificial or natural lighting sources.
Do NOT use any ambiguous language.
Include whether the image is SFW, suggestive, or NSFW.
ONLY describe the most important elements of the image.
Interface Elements:
CheckBoxes: Each extra option is represented as a checkbox for multiple selections.
Input Name for Person/Character
Functionality: Allows users to specify a name for any person or character present in the image, enhancing personalization in captions.
Interface Elements:
LineEdit: Text input field for entering the name.
Input Custom Prompt(Currently not working i think)
Functionality: Offers the flexibility to override predefined settings with a user-defined prompt for more tailored captioning.
Interface Elements:
TextEdit: Multi-line text input area for custom prompts.
Specify Checkpoint Path
Functionality: Enables users to define the path to the model checkpoint directory, ensuring the application uses the correct models for caption generation.
Interface Elements:
LineEdit: Text input field pre-filled with the default checkpoint path ("cgrkzexw-599808").
Load Models
Functionality: Initiates the loading of necessary models required for the captioning process, preparing the application for operation.
Interface Elements:
Button: "Load Models"
Generate Captions for All Images
Functionality: Processes all images within the selected input directory, generating individual captions for each.
Interface Elements:
Button: "Generate Captions for All Images"
Caption Selected Image
Functionality: Generates a caption for the image currently selected in the image list, allowing targeted processing.
Interface Elements:
Button: "Caption Selected Image"
Enabled State: Activated only when an image is selected.
Caption Single Image
Functionality: Creates a caption for a single, specifically chosen image, independent of the input directory.
Interface Elements:
Button: "Caption Single Image"
Enabled State: Activated only when a single image is selected.
Image List with Thumbnails
Functionality: Displays a list of all images in the selected directory with thumbnail previews, facilitating easy selection and navigation.
Interface Elements:
ListWidget: Shows image names with corresponding thumbnail icons.
Image Preview Display
Functionality: Provides a larger view of the selected image, allowing users to visually confirm the image before captioning.
Interface Elements:
Label: Displays the selected image scaled appropriately.
You can support me if you feel like it here-
(Havn't added anything , don't really know how it works, saw some people doing it so putting here :P )