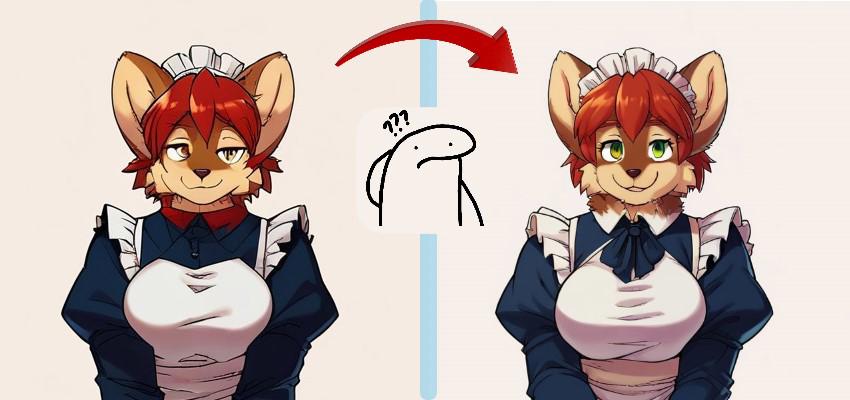
Many of Civitai's users (including me) don't have a very powerful computer to create/generate local images, so we use Civitai quite frequently and in the latest updates to the site we noticed some tools that may be strange for many users, so I decided to write this article to help them understand and improve image processing using Civitai's tools.
Step by step
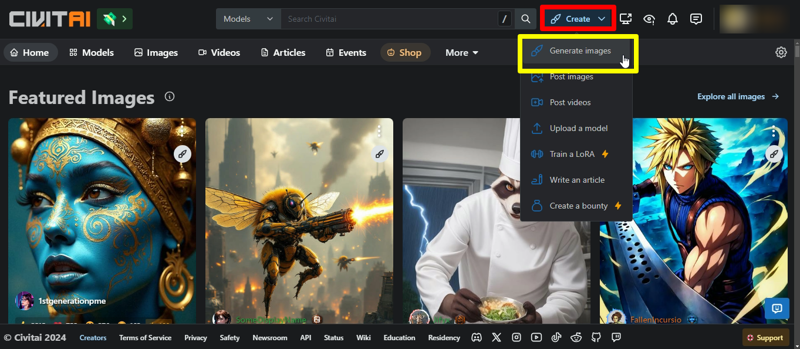
1) First of all let's start at the beginning (redundant expression lol), first go to Create > Generated Image to start creating your images
2) After the image is generated, when you hover your mouse over the image you will see several icons that I will explain:
- The first icon with the 3 dots (where the mouse is) is a hidden shortcut that will show the following options:
Remix
Remix (with seed)
Delete
Face fix
Hi-res fix
Upscale
Variations (img2img)
Copy Job ID
Open in New Tab
In this article we will focus only on the "Hi-res fix" option
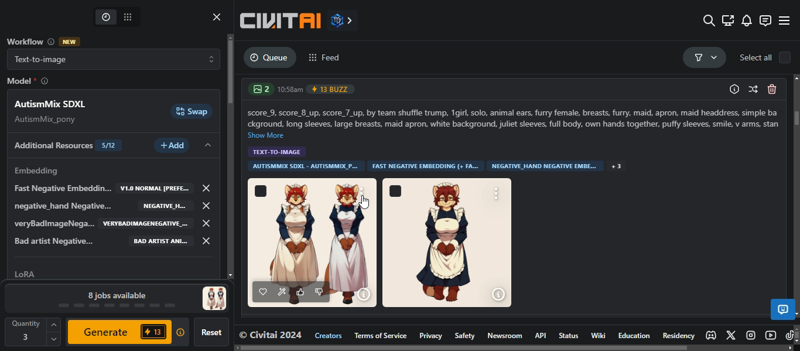
3) Note that in the image there are other icon options and I will also explain what they mean:
- Favorite the image
- Magic Wand icon which is a quick shortcut with options
Face fix
Hi-res fix
Upscale
Variations (img2img)
- Like (earn blue buzz)
- Dislike (option with feedback to adjust the image generator)

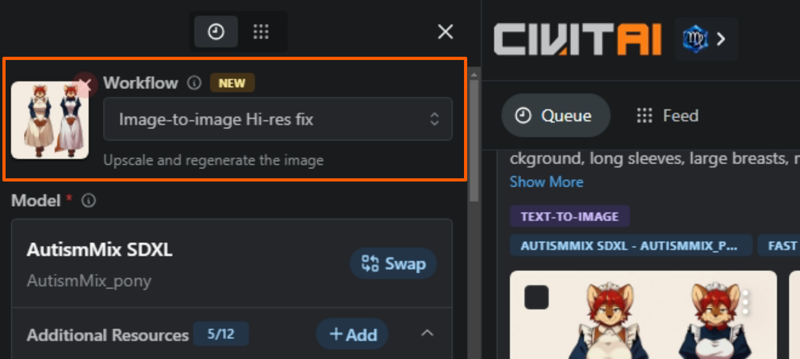
4) It's up to you to choose which of the options, but in this article prioritize Hi-res fix. After choosing this option, check that the following option will appear in the upper left part of the screen:
- The image you chose will appear in a small icon
- Below the name WORKFLOW, the Text-to-image selection box (default option) will change to Image-to-Image Hi-res fix
- Check the following description: Upscale and regenerate the image
5) When you scroll down to the bottom of the page of this menu (left menu), you will see that the DENOISE option has appeared with a slider that goes from 0.0 to 0.75.
So you ask me: "What the hell is this Denoise thing?", is it some kind of food? No, my friend, I will explain to you what this means in AI image generation.
Denoise is a tool that removes noise from images, that is, noise is those crooked eyes, poorly drawn hair or an imperfect face. In short, noise is imperfections that your image can generate (long prompt, multiple Loras, excess steps, model incompatible with the sampler, etc.).
So we have a slider that 0.0 means that we will not have any changes, above 0.0 to 0.75 we can modify something simple like the character's eyes, to the point of significantly modifying the entire structure of the face (not radical) so that it looks as good as possible in the image generation.
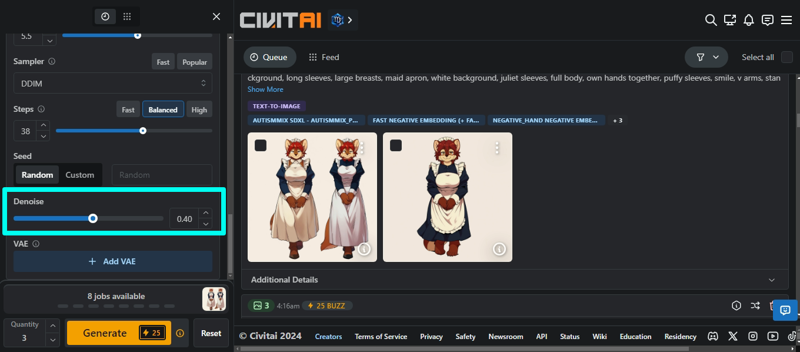
6) In this case, it is up to you to choose the best option that fits your image. Preferably, choose 3 of the generated images so you can make a comparison and choose the best image. It is unlikely that a single image will come out good the first time.
7) One of the tips I recommend (it is not mandatory and may not work in all cases) is the addition of a VAE, if you don't know what a VAE is, here is a summary:
VAE (Variational Autoencoder) is a type of artificial neural network that stands out in generating new ones, citing some examples:
- Create more realistic images like faces, landscapes and objects
- Filling in missing data such as restoring damaged images or completing information in images
- Detection of anomalies to identify data that does not fit into the normal pattern (strange anatomy of a character, excess fingers and toes, duplication of body limbs, etc.).
For Pony models in my tests, my recommendation is to use this VAE (SDXL VAE) which corrects many problems related to character faces (mainly furry's) and adds small details such as iris and eye brightness, proportion and pattern, etc.
If you are in doubt or found this VAE bad, check the best choice and see the description and recommendations of the VAE author, it is a powerful tool for fine adjustments in image processing.
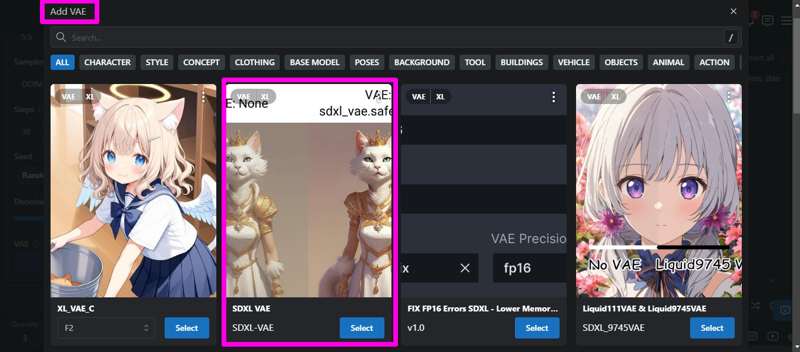
8) End of the article and you already know how to adjust the image and... Ahhhhh... before I forget I will explain in this topic all the functions that I presented to you, let's go:
Terms and Explanations
- Remix: "Copy" data from an image, including model, prompt, style, Lora, sampler, steps
- Remix (with seed): "Copy" data from an image, including all information. At this point you will see that the SEED option (below the Steps option) will be marked with the CUSTOM box and a random number, then you ask me: "What is this for?" This is to copy "exactly" the image including even the character's pose, however there will be few details that will change even keeping all the original settings (unfortunately nothing is perfect)
- Delete: Delete the Civitai image
Image-to-image workflows
- Face fix: Generates new images by fixing only the face, and can include small additions such as details in the hair, iris in the eye, mouth or more detailed teeth.
- Hi-res fix: increases the resolution of the generated images. In other words, it allows you to create images with more detail and sharpness, scaling the original image to a larger size without losing quality
- Upscale: is the term used to describe the process of increasing the resolution of an image. This means making the image larger without losing quality, adding more detail and sharpness.
For example: if the image is in 1024x1024 resolution, the Upscale method will double its size to 2048x2048 resolution. In other programs (ComfyUI / A1111 / Forge), this Upscale setting is customizable (1x / 1.5x / 2x / 3x), however Civitai defaults to 1.5x
- Variations (img2img): allows you to take an existing image as a starting point and create new variations from it. It's like going a step further than upscaling, allowing you to not only increase the resolution, but also modify the style, details and even the content of the image.
- Copy Job ID: A job ID in Civitai is a unique identifier that allows you to locate and access a specific model, be it a checkpoint, an image, a Lora or any other type of resource available on the platform. In this case, it is a unique identifier for an image.
- Open in New Tab: Open an image in a new browser tab


