Intro
Hi again, Updated to include photos of the flow to go through
This article will go over the beginning steps of video to video generations for my video to videos workflows. The main topics will be
Creation of main video source
Creation of video control nets
Creation of subject or object masks
This article is in reference to my video2video workflows here
https://civitai.com/models/271305/video-to-video-workflows
There are 2 ways to do video to video.
Copy
Change
There is a différance. Copy can be done MUCH easier. Change requires you to know what is possible to change and what is not with current video controls.
This article will go over CHANGE only. Copy... is done with just strong controls to hold the video to the original.
Use depth and line art realistic and copy a video, no masks needed. 1.0 strength.
Copy can change styles, colours, and small details, but can't change hair, or baggy clothing to skin tight or a dress to pants. This is why I rarely try to full copy a video. I want my subjects to be entirely different from the original most of the time, mostly because full copies are almost too easy.
Changing can be done with just less strict controls, but... this allows your backgrounds to morph and allows MUCH less control over how much you can change. Masking is needed if you want to actually have a coherent change.
Changing the video is done with masking and selectively controlling control nets to copy any parts needed for the animation, but not copy details like clothing lines, or face or hair features. This can allow you to fully change a subject.
Example is in the attachments called follow
First thing we do is choose a video to copy, the example I use here is following a girl walking down a path, passing other people. She is a brunette with her hair up and is wearing a skirt, and tank top.
First we decide what to change this too. For this example, I will change the clothing and subject. We will change her to a blonde hair woman with white spandex pants, and a blue sweater. Leaving the skirt would be quite easy, so here we will learn to remove the skirt lines to allow pants.
Now we open the control net workflow to generate
Main video to copy
line art
open pose
depth
any others you want
Masking can be done here, but I recommend using Sam 2 masking due to it just being much better and able to separate more. (Separate flow)
This is done to allow you to generate these once. And not need to do this anytime you load up to generate the video. Doing these on the fly in the video's flow works but takes more memory and would need to be redone anytime you wanted to try to copy the video again. I dislike doing things twice.
This workflows newest release has streamlined most things and removed the things no longer in the video's flow. There is a small map below the loaders that allows you to just enable the things you want from there.
I save my controls and masks for use later.
Loading area
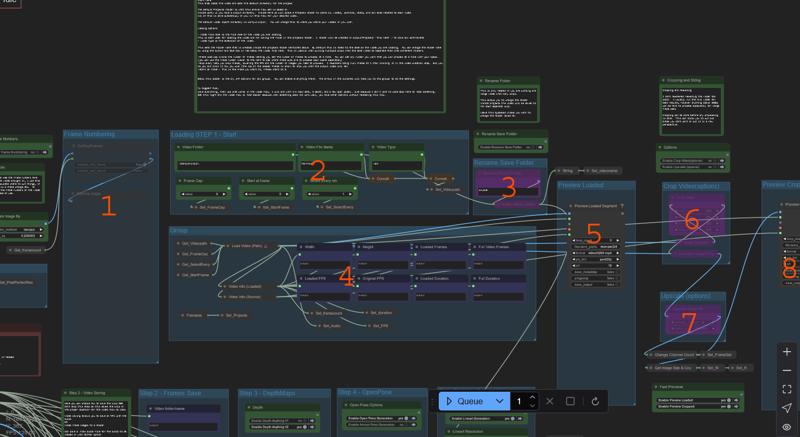
First thing that needs to be done is load the video and crop/resize your video to your desired sizes.
The default Projects folder is what this entire flow set is based on.
Inside comfy ui you have a output directory. Inside here we will place a Projects folder to store ALL videos, controls, masks, and all else related to each video
All of this is done automaticly if you run this flow for your desired video.
The image shows the control flow loading area
Frame numbered previews. This shows you the images from the video with frame numbers embedded into the frames. I used this often to determine where to cut videos, or when a scene change is etc. Enable only if you need it.
This video path area. It contains
Video folder - This is the directory where you store your videos. It defaults to .\ComfyUI\input\ but you can use full paths here C:/yourfolderpath/
Video name - This is used 2 ways, first it is the name of your video you are loading, and second it is the name of the folder inside the projects that will be created when the flow saves.
Video type - mp4/.gif
Frame Load cap - limits the number of frames letting you set the number of frames to process at a time. You can set any number you want that you can process at a time with your specs. (you can use the frame number viewer to the left to see where frame cuts are to process each scene seperately)
Skip every - lets you skip frames, lowering the FPS and the number of images you need to process. I recommend doing full frames at 1 then limiting it in the video creation step. But you do you and limit it how you wish (the fps of the loaded frames is shown to show you what the output video will be)
Start at frame - This is the frame you start at, frames start at 0.
Rename save folder - This is only needed if you are making multiple clips from one source video. This allows you to change the folder name the clip is stored in, allowing you to change the folder name for each clip.
This is info and the loaders. This takes your paths from above and loads the video and displays any info it has, FPS, frame counts, H, W etc.
the preview of the video you have loaded, I use this to ensure i have the proper number of frames and everything loaded properly.
Crop Video - This allows you to crop your video, This can allow you to cut out areas you dont want or put it in a new perspective.
Resize video - I dont recomened rescaling the video too small. I usually run the full video for best results, however anything above 1080p can be hard to process expecially for large frame sets.
The preview of the cropped video before processing, use this to set your cropping/sizing properly before you begin processing.
The workflow allows you to crop the video to better isolate a person or zoom in to allow better renders. Trying to copy a person who is in the bottom corner is possible, but its harder as they appear smaller, and videos have the same problem with this as images. If the person is not a close up faces and details get blurred.
Next, you can resize your original video to a more manageable size for your video card/pc.
Size is up to you, I have used 1080p videos, but they will crash my 3060 with too many frames.
Keep this as large as you can, but the larger the video, the more pc resources you will need to load it in both the masking and the video workflows.
720p works quite comfortable for me for 400-500 frames, but shorter can be larger and longer can be smaller.
The workflow has a save for the RGB video after you crop and resize to your liking
This is important to save here, as it save the video to the project's folder in a video folder named the same as the video name you are processing. This is used in masking and the videos flow.
Options and saving area
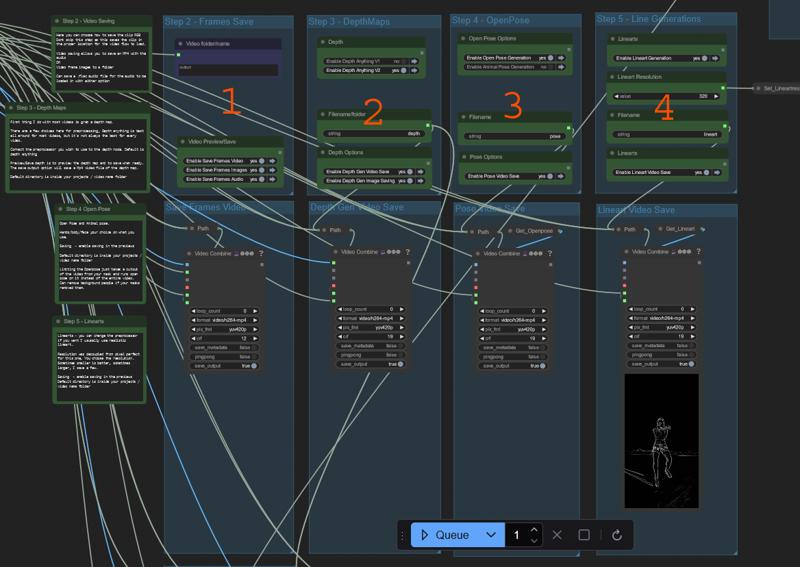
Next you can create your controls for the video
All saves are done in the previews, ensure saving is enabled to save them, or off if you want to just preview or test.
In the image here are the groups
Frame saving, audio saving, image folder saving
This is important to save the video here. It saves the video to the proper folder for use by the other flows.
You can save audio as .flac, and load that in the videos flow
You can try to avoid video compression arifacts by saving RGB PNG image frames to a folder. This can help artifacting from compression.
Depth saving and generations
This saves depth map for use in the videos flow.
2 Choices, depth anything 1 or 2, ... Use 2.. just use 2.
Depth can be saved as images instead of a video to again help with compression. Depth is most suseptable to this, even more so than rgb.
Can change the crf of the video preview/save to lower compression on this control
Open Pose saving and generations
This saves open pose OR animal pose.
settings/models/detections are below
This has the option to load a mask to limit openpose to it. More below.
Lineart saving and generations
This saves lineart, realistic. But you can use any model, or res.
Lower res can be better sometimes try to make it close to what you plan to render the base video at.
The main controls are line art, depth, and open pose
Here are why to use and not use each control
Depth
This is the main control I use to copy videos. It is nearly always used unless I need to do LARGE sweeping changes like male to female transformations.
Depth copies physics like hair flips, spins, turns, bouncing, clothing manipulations
Depth at 0.6 strength can offer good flexibility in changing the subject, however it will copy clothing outer lines like shapes of skirt or pants if not masked properly.
Depth will copy exterior clothing lines and hair lines if not masked. Meaning, you will have a hard time changing a skirt to pants.
Depth can be masked away from clothing via masks. Its good to do this if you want to change the clothing lines. Pants to skirt requires you to not use depth on the skirt area. This can be done by using subject masks -(minus) the skirt mask
If they are using skin tight clothing, depth can be used at stronger strengths in those areas, even if you are putting a sweater on where a tank top was. Expanding is much easier than contracting the depth area. If the depth sees an object, it will try to draw it. If there is nothing there, it can put something there.
Line art
This is the best control for full copies, used on full video this can copy most things on its own.
Changing things is hard to do with this. This copies not only exterior lines of clothing hair, but interior lines like shirt stripes and hairstyles.
Masking this to areas you want to not change from the original works really well to hold animations. Adding this to backgrounds or things like objects your subject is interacting with holds them to the object they should be.
Masking this to hands works to hold hand animations well, when combined with depth
Masking to face can copy most of the face animations, but can't full copy without help from things like open pose face, and face mesh. It does hold the face in the proper place to use Live portrait easier after the conversion.
Open Pose
This is the only control you can fully change a subject. This works wonders for most IMAGES. But videos are a whole other thing. With videos, if just a few frames are off, they can mess up entire videos. Open pose does great for 90% then you will get an arm in the wrong spot or a leg ... It's very hit or miss and is dependent entirely on your source video quality.
If you get a full useable open pose, this will animate alone but will produce choppy motions usually. It's just not a stable reference. But adding other controls will stabilize it normally. Ad motion, outfit to outfit, depth or line art all combine well with this, with the open pose taking most of the strength 0.9-1 and the other control(s) you choose at 0.4-0.6 strength.
Using just face and/or hands works well. If you can't get the body to work, hands can help animate them with depth, or face can help hold the face where it needs to be for the lip sync after.
Preprocessors Models / Options
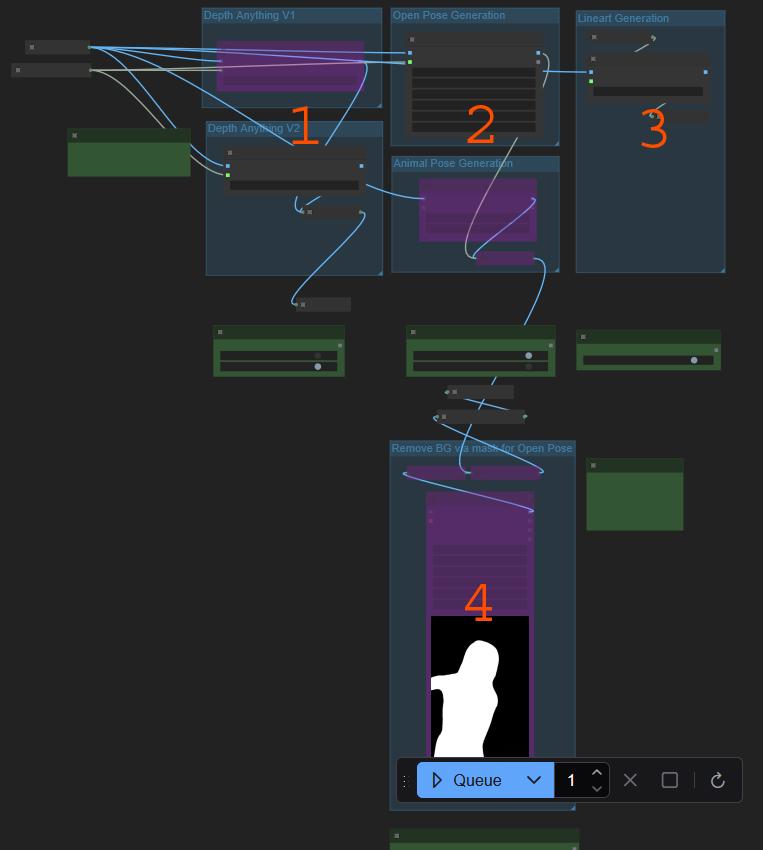
This image is the generation area, contains the models used and preprocessors
Depth anything v1 and 2, you can change the models here if you wish
Open pose and animal pose
you can change the model used, torchscripts are fastest but slightly less accurate.
Can detect hands/body/face, can do all and save them all up to you.
Lineart preprocessor - Here you can change this to any lineart, or any preprocessor. It should save the same if you use normal maps, or any other.
This is a custom mask loader, If you have a mask you can limit the openpose to that mask. This can help remove background people from openpose, or I have used this to limit open pose to just legs, or just torso. It will limit by any mask you provide it.
Masking (optional)
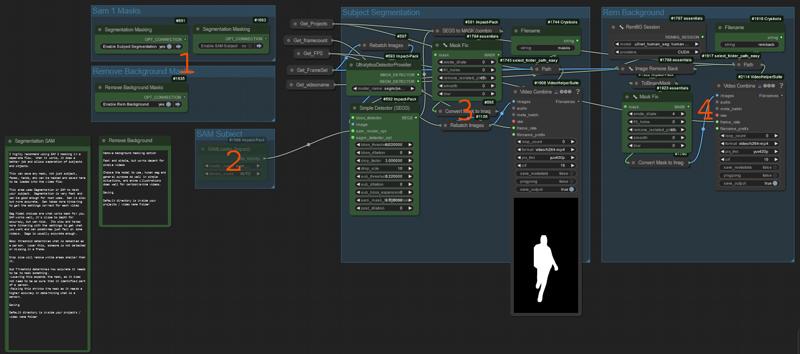
In the photo
This is the options for sam 1 or background remove masking
This is the sam 1 model used to mask if enabled. Segmentation models do not need this, but all can use it. IT slows the detections A LOT. but its much more accurate
This is the sam 1 settings
Bbox threshold determines what is detected as a person. Lower this, someone is not detected or missing in a frame.
Drop size will remove white areas smaller than it.
Sub Threshold determines how accurate it needs to be to mask something.
Lowering this expands the mask, as it does not need to be as sure that it identified part of a person.
Raising this shrinks the mask as it needs a higher accuracy in determining what is a person.
Mask fixing can erode, dilate, blur, smooth, and many other things that can help when making masks.
This is background removal masking
This is hit or miss, it fails on most complex things, but simple things it can work well.
Many model choices, general purpose, human seg, and anime work best.
The video example - attachment
I have provided a video that I have masked and generated the controls for, all masks and controls are provided, but you may want to just try to generate everything yourself. It takes 2-10 min depending on your cpu and gpu.
in my next Articles i will be using it to explain sam masking, and run through the videos flow with all settings
Next is SAM 2 masking
If you generated SAM 1 masks and are happy, you can skip this. I have not used Sam 1 since I figured out how to mask videos with Sam 2.
Latest version is here 2 in 1 flow
https://civitai.com/models/271305/video-to-video-workflows
Old
https://civitai.com/models/670195/simple-sam-masking
https://civitai.com/models/670195?modelVersionId=750225
Next article will go over Sam 2 masking to mask any parts of a video you want.

