The Ancient Scroll says, "In the journey to be a PRO Proompter, one need to create at least 1 Model mix." And that's what this article covers. Be aware, that this is a "Dummy's guide". Means I won't be going into the "Nerd region". Use this guide to create a good first model mix of yours, and maybe share it if you like it.

What?
A Model mix is, as the words say it, is a mixture of multiple models merged together to have attributes of both models into a new one.
For example, maybe you like the pastel look of one model and line art of another. And you want to have both. Maybe if you try merging them, you can get what you want.
Getting Models
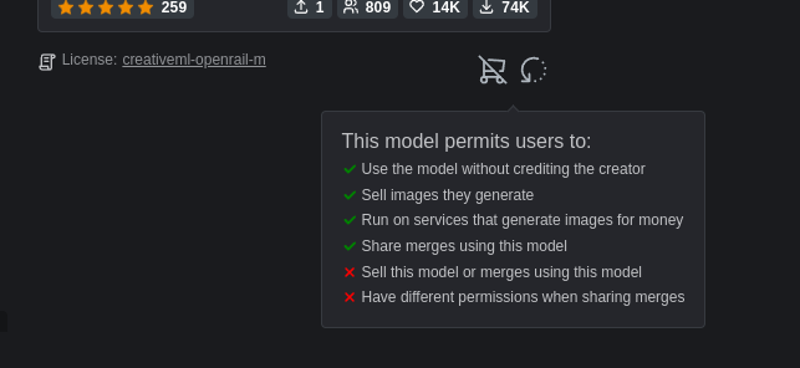
First off, let's hunt for models on civitai for our social Experiment. Now, be careful when choosing models for merging. Many models do not give permissions for merging. Or may have other restrictions. Always make sure to check permissions before merging them. To be more ethical. You can always look at permissions on the model page below the details card.
For example, these are the permissions of Pastel-Mix [Stylized Anime Model]. It gives permissions to allow merging.

For Model 1, I'm going to use Pastel-Mix [Stylized Anime Model]

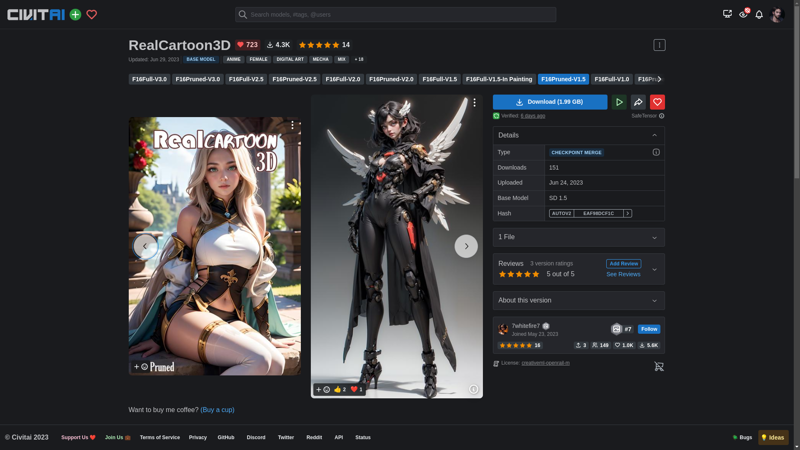
For Model 2, lets use RealCartoon3D. I'm using version 1.5 of it since I like that version more

How?
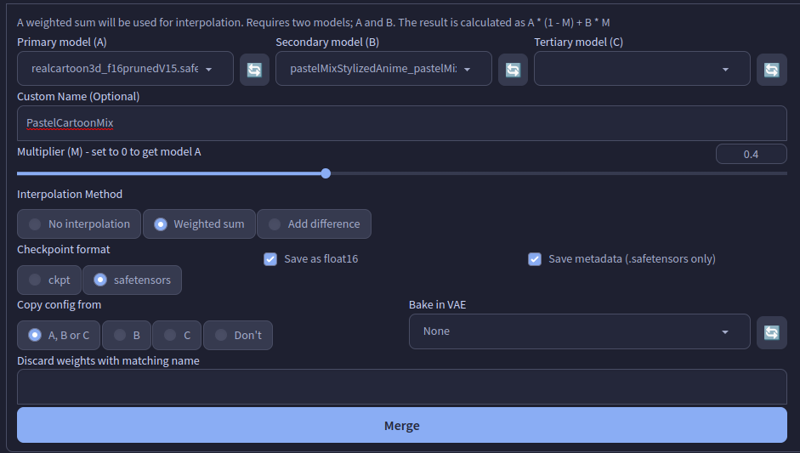
If you're using Automatic111 webui, it comes with inbuilt model merger.

Chop Chop, time to work.
First Load Model 1 (or 2 depending on mood) Im going to load Real 3D

Next load the 2nd model, If you want to merge 3, you can add it as well, But I prefer to merge 1-on-1 to have better control. And also with 3, things will be a bit different.

Add name for your new shiny mix

Now set multiplier. This is an important part since it defines how much of which model will be added to new. I'll just go for 0.4

Since we want to merge stuff, we'll use Weighted Sum in the interpolation model. For checkpoint format, I prefer safetensors. I always check save as float16. And for copy config just leave it as A, B or C. Select vae if you want to bake in any.

Now hit merge and wait for a few seconds. You'll see the following message on the right side when it's finished.

Full Image

Test
Next step is to test what did it give, and if It's what you desired or not. Try running some xyz plots to compare the results.
Test 1
(highly detailed:1.3),
1girl, upper body, looking at viewer, light smile, white hair, blue eyes,highly detailed eyes,arms behind back, wearing a woolen sweater,hair ornaments,
Ultra-detail,(highres:1.1),best quality,(masterpiece:1.3),cinematic lighting,
Negative prompt: (worst quality:2,low quality:2),(zombie,sketch,interlocked fingers,comic),
Steps: 32, Sampler: DPM++ 2M Karras, CFG scale: 5, Seed: 3358386930, Size: 512x768, Denoising strength: 0.4, Clip skip: 2, RNG: CPU, Hires upscale: 2, Hires steps: 10, Hires upscaler: 4x-UltraSharp, Version: v1.4.0
Test 2
(highly detailed:1.3),
landscape,(scenic),(vibrant colors),(lush greenery),(majestic mountains),(serene lake),(flowing river),(sunlit meadows),(peaceful),(tranquil),(breathtaking view),(sunrise),(sunset),(floral abundance),(towering trees),(rolling hills),(clear blue sky),
Ultra-detail,(highres:1.1),best quality,(masterpiece:1.3),cinematic lighting,
Negative prompt: (worst quality:2,low quality:2),(zombie,sketch,interlocked fingers,comic),
Steps: 32, Sampler: DPM++ 2M Karras, CFG scale: 5, Seed: 3358386930, Size: 768x512, Denoising strength: 0.4, Clip skip: 2, RNG: CPU, Hires upscale: 2, Hires steps: 10, Hires upscaler: 4x-UltraSharp, Version: v1.4.0
Test 3
(highly detailed:1.3),
(fractals),(vibrant colors),(geometric patterns),(abstract),(neon lights),(contrast),(symmetry),(gradient),(shadows),(reflection), Explode colors across the canvas with forceful brushwork and splatters, resulting in a chaotic and vibrant burst of energy that demands attention and evokes a sense of excitement,Limeade Green color,Rave Green colorBlaze Coral color,
Ultra-detail,(highres:1.1),best quality,(masterpiece:1.3),cinematic lighting,
Negative prompt: (worst quality:2,low quality:2),(zombie,sketch,interlocked fingers,comic),
Steps: 32, Sampler: DPM++ 2M Karras, CFG scale: 5, Seed: 3358386930, Size: 512x768, Denoising strength: 0.4, Clip skip: 2, RNG: CPU, Hires upscale: 2, Hires steps: 10, Hires upscaler: 4x-UltraSharp, Version: v1.4.0
Bonus
You can also create an inpainting version of your new checkpoint.
Select sd 1.5 inpainting checkpoint in model A
Select your checkpoint
Select sd 1.5 base checkpoint in model C
Add a name for your new model, make sure to add '-inpainting' at the end of the name or else it won't work.
Set Multiplier to 1
Select Interpolation Method to Add Difference.
And hit generate.
The generated model will be a checkpoint to be used for inpainting.

Conclusion
And this is it. That's how you can create your own Model mixes and start sharing them with other's if they are good.


