Warning! This extension does not work with versions past 1.5.1 If you are a newer version, you will need to check out the older version of webUI.
If you don't have v1.5.1 or earlier:

`

run line by line in terminal:
cd /path/to/stable-diffusion-webui
git reset --hard 68f336bd994bed5442ad95bad6b6ad5564a5409a
pip install -r requirements.txt
The next time you start webUI, you will be on version 1.5.1 and the mov2mov extension tab is available.
What can I make with this guide?
This article explains how to create videos with mov2mov. It can replace faces, accessories, and clothing, change body features, colors and so on with sufficient continuity to create an appealing result. Kpop dancing videos work especially well for this.
This guide recommends using img2img with canny. The guide for img2img is available here.
Installing:
Get the Mov2Mov extension here. In AUTOMATIC1111 Install in the "Extensions" tab under "URL for extension's git repository".

Install FFmpeg.
Downscale the video
If the input video is too high resolution for your GPU, downscale the video. 720p works well if you have the VRAM and patience for it.
You can use FFmpeg to downscale a video with the following command:
ffmpeg -i input.mp4 -vf "scale=-1:720" output.mp4In this example:
ffmpegis the command to start the FFmpeg tool.-i input.mp4specifies the input file, in this caseinput.mp4.-vf "scale=-1:720"adjusts video's height to 720 pixels and will automatically adjust the width to maintain the aspect ratio. For vertical videos, use 1280 pixels for the height.output.mp4is the output file.
Remember to replace
input.mp4andoutput.mp4with your actual file names.
Create the flipbook
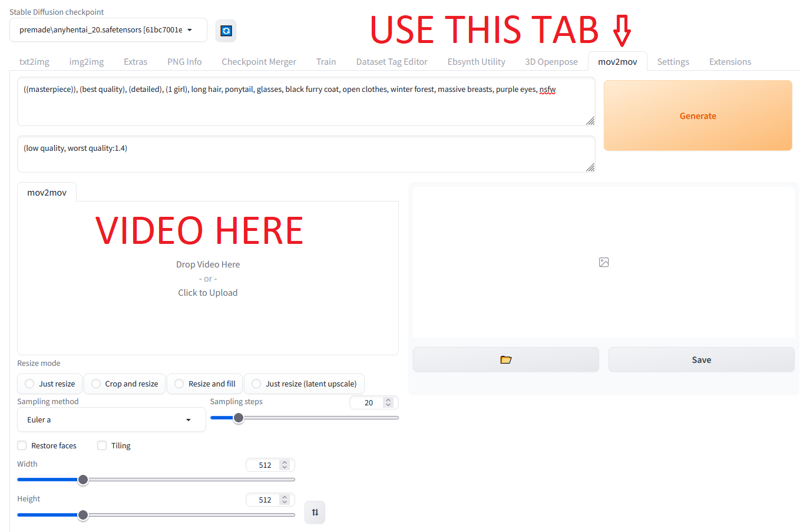
Drop the video in the Mov2Mov tab in AUTOMATIC1111

Set width and height to the same resolution as the input video
Set sampler and number of steps
Set prompt/neg prompt. You can use LoRAs and embeddings as normal, but the interface doesn't make the list available on this tab, so it is necessary to click between the txt2img and mov2mov tab to copy the model names.
Optional, but recommended: Use Canny controlnet to generate the image.
In-depth guide on canny and img2img can be found here
Controlnet settings (1280x720 input video):
Enable: Checked
Guess Mode: Checked
preprocessor: canny
model: control_canny-fp16 (available for download here)
annotator resolution: 768
canvas width: 1024 (720 for 720x1280 video)
canvas height:720 (1024 for 720x1280 video)
other canny settings are beyond the scope of this article, but denoising slider generally controls how strongly the prompt is applied. Higher values = stronger prompt.
Generate. A preview of each frame is generated and outputted to
\stable-diffusion-webui\outputs\mov2mov-images\<date>if you interrupt the generation, a video is created with the current progress
Expect a 30 second video at 720p to take multiple hours to complete with a powerful GPU.
Final Video Render
You can view the final results with sound on my twitter.
The mov2mov video has no sound and is output to \stable-diffusion-webui\outputs\mov2mov-videos Now, restore the audio track from the original video.
Here's an example command:
ffmpeg -i generatedVideo.mp4 -i originalVideo.mp4 -map 0:v -map 1:a -c:v copy -c:a aac output.mp4This command does the following:
take the video stream from the first input (
0:v, where0refers togeneratedVideo.mp4) and the audio stream from the second input (1:a, where1refers tooriginalVideo.mp4).-c:v copytellsffmpegto copy the video stream directly from the source (no re-encoding is done), and-c:a aactellsffmpegto encode the audio stream to AAC format.output.mp4: the name of the output file.
Enjoy! Please share feedback on what works, what doesn't, and anything you might have learned along the way.
Next steps?
Try using EbSynth to interpolate keyframes for a bigger challenge!


