
Intro
I prefer to post high-resolution versions of the images I create. I've experimented with a variety of different methods and combinations of tools but I've finally settled on a process that I'm consistently happy with so I'm posting it here.
I should say right up front that this is an Automatic1111 workflow. It cannot (currently - October 2024) be reproduced in ComfyUI because of a missing ControlNet model in that system. I wish I could do this in ComfyUI - it would be a one-step automated thing instead of a series of steps, but so it goes.
Other tools needed:
ControlNet extension with Inpaint models installed
Ultimate SD Upscale script with models installed: 4x-UltraSharp and optionally 8NMKDFaces160000G_v10 and/or 1x-ITF-SkinDiffDetail-Lite-v1
This will be a 2-step process with an optional "Step Zero" for ADetailer face fixing if you want it. Plus lots of explanation of why I arrived at the settings I'm using so you can have some basis for your own experimenting from here.
Warning: This procedure works best for an image that you either created yourself within Stable Diffusion or that you can recreate very very closely using prompts. The first step is like a refinement upscale step that will preserve your original image very closely, but can introduce changes if the prompt doesn't match the original image. If you want to upscale a photo from your phone or something you found online, this procedure may not give you the best results, but might give you a good starting point for experimentation.
Step One
This is counter-intuitive, but trust me for a minute. The first thing you need to do is pick an SD1.5 checkpoint that renders images in a similar style to your target image. Personally, I mostly create images of people with a realistic photographic style and my own merge checkpoint VoluptuousMix (https://civitai.com/models/618381) does a great job of producing the kind of output I'm interested in: it has good detail, a mix of lighting and realistic skin and fabric textures, and so on. You must choose an SD1.5 model EVEN IF YOUR ORIGINAL IMAGE WAS SDXL. Your prompt will be fine - any XL Loras in your prompt will be ignored in the 1.5 render, it'll be ok I swear.
Don't forget to select an SD1.5 VAE.
Load your image into the img2img tab in Automatic1111. If I haven't just created the image I'm enlarging, I normally load the image into the "PNG Info" tab instead in order to retrieve all the creation data, then I use the "Send to Img2Img" button to set up all the prompts and steps and so on. Once your image is ready in img2img and all the settings are as close to the original as possible, you're ready to make a few tweaks for the first upscale step.
Prompt: No change
Steps: No change (same steps as original image creation if possible)
Resize By: as big as your hardware can handle, see below for details
Batch count and size: 1
CFG Scale: No change
Denoising strength: 0.8
Seed: No change
ControlNet:
Enable, choose "Inpaint". In the Preprocessor selector, choose "inpaint_global_harmonious". Model should be selected for you, but you should use "control_v11p_sd15_inpaint".
Control Weight: 0.5
Starting step and Ending step: 0 and 1 (no change from default)
Control Mode: Balanced
Script: None
Those are all the settings you need. Click to render this image. While it's working, I'll explain a few of the settings.
The ControlNet "global harmonious" model is the key to this step. It only works with SD1.5 checkpoints, which is why you need to choose one of those to use for this step even if your source image was an SDXL image. This model is also not available in ComfyUI, which is why I can only do this in Automatic1111. This inpaint model is what allows you to choose a very high denoise value without wrecking your image in the resize. It draws in fine details but otherwise preserves the whole image for you.
HOWEVER, if your prompt is different from the original, this step will cause some changes in your image. This can work to your advantage. For example, I often add a token to the positive prompt "pretty eyes" near the beginning of the prompt to help guide this inpaint step to boost the eye detail. This works at least as well as any "perfect eyes" Lora I've used.
What size should you choose? As big as your hardware can manage without tiling and other fancy tricks. This step will give you the best detail and results without adversely changing textures and so on, so you want to get as much as you can out of this first step. I have an NVidia 3060 with 12GB of VRAM, so my biggest target size in this step is usually in the range of 1600 - 1800 pixels on the long edge. Just make your own choice for your own hardware. You want the image creation to struggle a bit, but not crash.
When the image is done, expand it to full size (100% zoom) and look around to make sure you're happy with it. If everything looks good, click the "Send image to img2img tab" icon below the preview picture. You are now ready to upscale even further.
Step Two
Restore your checkpoint selector to the original checkpoint that was used to create the image. I usually do this for two reasons: first, it's polite; second, if your original checkpoint was SDXL, this step will work a little better with an SDXL checkpoint. It's polite because the checkpoint that created this image is at least as responsible for it as you are with your prompt. It's nice to give credit for the image to the checkpoint that was behind it all, so I try to remember to revert to the creation checkpoint for this step to make sure that name is left behind in the metadata at the end.
Don't forget to reset your VAE if needed!
Hint: Automatic1111 has a setting that lets you cache checkpoints ("Maximum number of checkpoints loaded at the same time" - set to 2 at least), you can set how many historical ones to cache. It's helpful when you're swapping back and forth between an SD1.5 checkpoint and another one as you resize images.
Adjust the image2image settings as follows:
Prompt: No change
Steps: 15 (a higher number won't change the result much and will just be slower)
Resize By: choose the scale multiplier to reach your target size. I usually go for 2500 - 3000 pixels on the long side.
Batch count and size: No change
CFG Scale: No change
Denoising strength: 0.15
Seed: No change
ControlNet: DISABLE
Script: Ultimate SD Upscale
Upscaler: 4x-UltraSharp (see below for info)
Type: Chess
Tile width: 1024 if using SDXL checkpoint; 768 if using SD1.5 checkpoint
Tile height: 0 (default)
Mask blur: 32
Padding: 64
Seam fix: None (default)
Click to generate this image. It will take a little time.
Ideally, your resize scale for this step should be the same as or lower than the scale in step one in order to achieve the best detail in your final image. If you find the final version is too different from your result from step one, either in colors or details or whatever, you can adjust Denoising strength down to 0.5 or even 0.1 (if you've changed your Automatic1111 config to allow it).
The Ultimate SD Upscale model is the most difficult choice in this whole process. I've eventually settled on 4x-UltraSharp as my favorite, but there are pros and cons to other choices. I think the "8NMKDFaces160000G_v10" model gives the best skin texture output while at the same time doing an ok job of preserving other textures in the picture. However, that model always washes out the colors by quite a bit and nothing I've tried was able to correct it. I tried tweaking all the different settings to different values and even adding prompt cues like "high saturation, rich vibrant colors" and so on, but no help. The 4x-UltraSharp model doesn't give quite as much texture detail as the others I mentioned at the top of this guide, but it does at least preserve the colors and I decided that's more important to me in most cases. You can play around and make your own choices.
That's it! Sorry for the very long-winded explanation for a two-step procedure. When you've done it several times, it boils down to this in summary:
Load picture in img2img, get all prompts and seed and so on to match original image
Adjust settings for step one. Pick an SD1.5 checkpoint, set the VAE, set the resize by and the denoise, turn on ControlNet global harmonious inpaint
Render!
Load the result of step one into your img2img source
Reset the checkpoint to your final choice, don't forget the VAE, set the resize, steps, and denoise, turn off ControlNet, turn on Ultimate SD Upscale
Render! Save!
These steps have given me consistent quality results over many images. I'm including some clips and examples below to show what you could expect from each step.
Example images
From the Civitai image pages, right click each image and choose "Open in image in new tab" or whatever your browser chooses to call that. You can then see the full image at maximum resolution.
Original image: https://civitai.com/images/37110121
After step one, upscaled with inpaint-global-harmonious: https://civitai.com/images/37110141
Final version, after upscaling with 4x-UltraSharp: https://civitai.com/images/37110331
Comparison between SD Ultimate upscalers; on the left is the "faces" upscaler and on the right is the "4x-UltraSharp" upscaler.
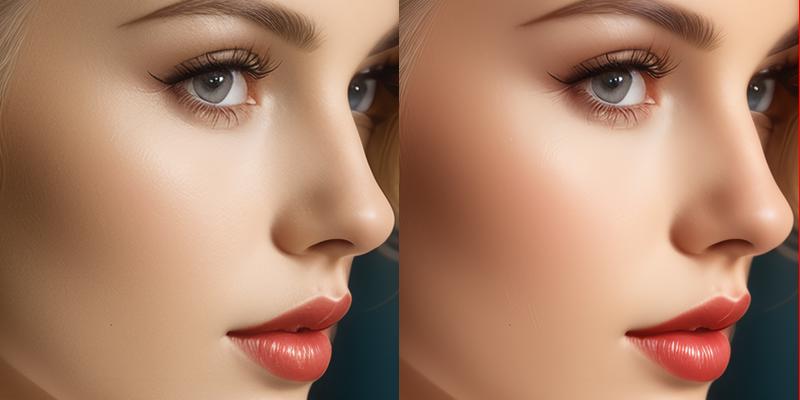
You can see the Faces version is paler, all the colors have lower saturation. However, the skin textures are finer and more detailed. In this particular image, that's mostly visible in the lips, but in other images it may be even more apparent throughout. For my personal taste, I decided to sacrifice a little of that detail to get the color accuracy of the UltraSharp upscaler, but it's your choice for your images.