
Wolfie’s Ultimate(light) Guide to Image Generation on Civitai: Mastering Prompts, Weights, and Detail
Welcome to my step-by-step guide on creating powerful, high-quality images on Civitai. This approach breaks down the process, from prompt structure to post-processing, and includes tips to refine every element for optimal results.
1. Structuring Your Prompt
I structure my prompts in four main sections, each separated by “BREAK;” to organize the image details and help Civitai's model interpret each part effectively.
Prompt Structure Breakdown:
Image Scores & Key Descriptors:
Example:
score_9, score_8_up, score_7_up, score_6_up, extremely detailed, source_anime, face focus, foreshortening, color theory, warm tonesPurpose: Set the base style, details, and color tones for high-quality, well-scored images.
Character Description:
Example:
Ana the werewolf, short fluffy white hair, wolf ears, tan lines, fluffy white wolf tail, large full breasts, open fur-lined jean micro jacket, oversized fur jacket collar, red metal collar with a gold jewel, leash, white fur thigh highs, white fur elbow sleeves, large steel-toed leather boots, skindentation, colored sclera, gold irises, red glowing eyes, cybernetic eyesPurpose: Describe character details and distinctive features. Here, I include attributes such as hair, clothing, accessories, eye color, and any specific themes.
Actions & Interactions:
Example:
Posing, model walk, strut, adjusting clothes, blowing kissPurpose: Define the character’s behavior or pose. This adds context and movement, ensuring they engage with the scene.
Background & Environment:
Example:
The background is a futuristic, cyberpunk cityscape, ornate, neon trim, sci-fi, indoorsPurpose: Set the scene and ambiance. This example creates a cyberpunk cityscape with neon and futuristic elements to immerse the character in a relevant environment.
Pro Tip:
Each prompt element should flow in a logical sequence. Avoid excessive detail in a single prompt, as models can overfit and distort details. Think of each section as enhancing, not overwhelming, the character and setting.
2. Setting Weights and Exploratory Generations
Weights determine the emphasis of each prompt component, and finding the right balance through exploratory generations ensures high-quality output.
Step-by-Step Weight Testing:
Initial Exploratory Runs:
Start with minimal content focusing on the character, testing how well the LoRA or model interprets the base prompt. Begin with neutral weights, noting which features stand out.
Gradual Score Integration:
Add the “score” tags gradually (
score_9,score_8_up, etc.) to refine the level of detail and ensure the model focuses on the right attributes without overloading.
Batch Testing Across CFG and Steps:
CFG Scale: Run small batches across different CFG (Classifier Free Guidance) scales to balance creativity with prompt adherence.
Step Count: Run another batch adjusting steps to optimize for clarity, detail, and overall aesthetic. Note the steps with the highest consistency.
Final Batch of 10 Images:
After identifying promising settings, create a batch of 10 images using the ideal weights, steps, and CFG scale. This gives a strong variety of options to select the best output.
3. Post-Processing: Face Fixes, High-Res Fix, and Upscaling
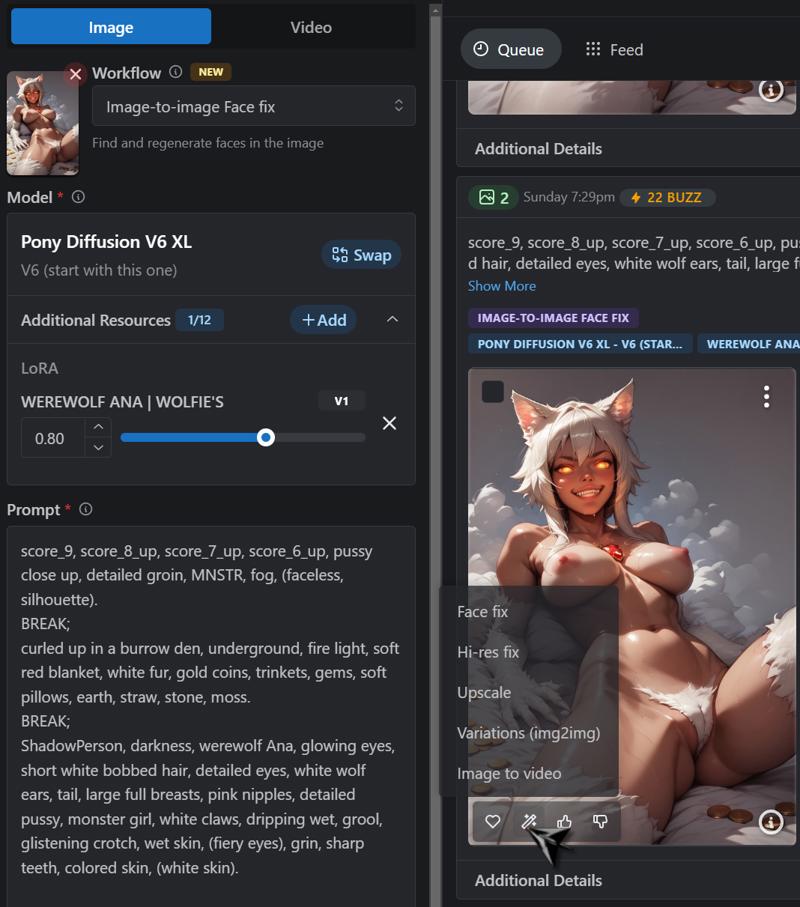
(You can see here in this image, there is a magic wand on the image that lets you chose what you would like to do to the image. We have Face Fix, Hi-Res, Upscale, Variations and img2vid.)
Once I have my best images, it’s time to refine them using post-processing techniques.
Step-by-Step Post-Processing:
Face Fixes:
Focus on face detailing first, as it’s often the focal point of the image. Use face correction tools to sharpen or adjust features. Sometimes I use high rez fix first and then face fix or opposite depending. Sometimes the face is good enough and I don't need face fix.
High-Resolution Fix (High-Res Fix):
Apply a high-res fix to add depth and clarity, making fine details like fur texture or metallic reflections pop. This step improves image quality, especially in complex scenes with intricate elements.
Upscaling for Final Output:
Upscaling Tools: Use the upscale feature for high-quality upscaling. Select a scaling factor that balances file size with resolution, typically 3x for sharp, crisp images.
Final Touch-Ups:
Add subtle adjustments in photoshop like contrast, saturation, and lighting tweaks to achieve a polished, professional finish. (Completely optional step.)
4. PONY Tags:
Pony Diffusion models utilize a variety of tags to guide image generation, encompassing quality scores, sources, safety ratings, and specific character identifiers. Here's an overview of these tags:
Quality Score Tags: These tags indicate the aesthetic quality of training images:
score_9score_8_upscore_7_upscore_6_upscore_5_upscore_4_up
Including higher score tags in your prompt can enhance the quality of generated images.
Source Tags: These tags influence the style or origin of the generated content:
source_ponysource_furrysource_animesource_cartoon
Utilizing these tags can steer the model toward specific artistic styles.
Safety Rating Tags: These tags control the explicitness of the generated content:
rating_saferating_questionablerating_explicit
Applying these tags helps manage the content's appropriateness.
5. PONY Diffusion Prompt Generation Scores:
In the context of PONY (Prompt Optimization Neural Yield) scores like Score_9, Score_8_up, etc., these scores are essentially labels representing the quality of images in the training dataset. They help set a standard for the quality level used for both training and prompt generation, allowing greater control over the desired outcomes.
Score_9 (Top Quality Tier)
Score_9 represents the highest quality images available in the dataset, generally curated from the top 10% based on factors like visual quality, accuracy, and adherence to the intended style.
These images are the "gold standard" during training, and using Score_9 in prompts aims to produce the most refined, precise, and visually consistent results.
Score_8_up (High Quality Tier)
Score_8_up includes images that are still of high quality—typically falling into the upper-quality range but not quite as flawless as Score_9.
These images are used for training to maintain a high standard but with slightly more tolerance for minor imperfections, which helps balance precision and natural variation.
Score_7_up, Score_6_up, etc. (Mid to Lower Quality Tiers)
Score_7_up, Score_6_up, and subsequent lower tiers represent progressively lower quality images.
Score_7_up may include images that have more visible imperfections, such as slightly incorrect proportions or inconsistent lighting, but are still useful for training purposes.
These lower-tier images add valuable diversity to the dataset, which helps expand the scope and variety of styles that the model can generate.
How They’re Useful
These scores act as filters that help determine the quality of images used for training or generating outputs.
Training exclusively with Score_9 and Score_8_up ensures a focus on higher-quality outputs but may reduce the diversity of styles.
Incorporating images from the lower-quality tiers can increase the variety in generated images, which is often beneficial when creative exploration and versatility are prioritized.
Quick Overview
Score_9: Top-tier images, used for achieving the most refined and precise generation results.
Score_8_up: High-quality images, nearly as good as Score_9, suitable for general use with slight imperfections.
Score_7 and Below: Images with visible flaws, suitable for increasing the variety and coverage of the training data.
These scores are a powerful tool for guiding the training process and tailoring prompt generation to achieve different levels of quality and stylistic diversity based on your project’s specific goals.
6. Community Tips for Fine-Tuning and Optimization
Based on insights from popular guides on Civitai, here are additional tips to enhance your workflow:
Prompt Simplification: Popular Civitai guides emphasize keeping prompts clear and direct. Avoid using too many conflicting descriptors, which can result in distorted features.
Use of Tags: Many creators use tags to control style and composition. Try tags like “cinematic lighting,” “lens flare,” “bokeh,” and “soft glow” to enhance atmosphere without overwhelming the primary subject.
Negative Prompts: Include negative prompts to remove undesired elements. For example, using tags like “blurry,” “low-quality,” or “deformed” in the negative prompt can help reduce unwanted artifacts and improve consistency.
Batch Organization: Organize batches based on theme or style for easy comparison. Label each batch with CFG scale, step count, and key descriptors to quickly identify the most successful combinations.
7. Wolfie’s Top Recommendations for Experimentation
To keep improving, embrace a spirit of experimentation with these final tips:
Explore Different Lighting Styles: Play around with “dramatic lighting,” “soft shadows,” or “rim lighting” to create striking visuals that capture attention.
Incorporate Environmental Effects: Try adding “smoke,” “fog,” “rain,” or “vapor trails” to create an immersive, atmospheric feel.
Experiment with Composition: Use rule-of-thirds or leading lines to direct the viewer’s gaze and create dynamic, visually interesting compositions.
Try Various Models for Specific Styles: Models often have unique strengths; experiment with those optimized for your theme, whether it’s anime, cyberpunk, or realistic styles.
Ready to Dive Deeper? Join the Pack! 🐺
Thanks for checking out my guide! If you found it helpful, why not explore some of my own creations? You’ll find a collection of images packed with the cyberpunk, anime-inspired, and futuristic vibes that inspired this guide. Don’t forget to drop a like if something catches your eye—your support keeps the creativity flowing!
If you’re feeling extra generous and want to fuel future projects, consider supporting me on Ko-fi. Every contribution helps me push the boundaries and bring even more unique content to the Civitai community.
Happy generating, and welcome to the Wolfie experience. Let’s create something legendary! 🌌🐺✨
Check out my Advanced(LIGHT) guide on Weights! Ko-Fi Maybe?