Preface
When I had the idea of writing an upscaler for my AI generated images, the first question was whether I wanted to use just the terminal or whether I wanted to use the terminal together with a graphical user interface (GUI).
I decided to write a Python script and I decided to write a GUI for the image management. There are some ways to realise a GUI in Python. Finally I decided to use Gradio.
The advantage of Gradio is, that any browser can be used as web UI. The disadvantage is, as with all other Python modules, there will some limitations.
In this article, I describe how a problem with images can be dealt with. One reason is that my Internet research did not really provide a quick answer to my problem. There were hints, but they were not directly related to images.
I then solved my problem by inspecting the Gradio source code, the Gradio documentation and over trial and error scripting.
Introduction
For my Upscaler UI, I wanted to preserve the Exif metadata in order to keep them for the image file to be written. To realise this, I needed the original image file, to be able to extract the Exif metadata from this file.
The Gradio Image component works in my case using jpg images with a numpy array. In a numpy array there are no longer Exif metadata. This was my first problem. From the numpy array it was not possible to infer the original image file name. This was my second problem.
How to overcome both problems is shown below. I am starting the the presentation of a demo web UI. Afterwards I explain the solution using my demo Python code.
Simple Gradio Web UI Demo
Web UI Start
On starts the local server for setting up the Web UI by following command:
hades@olymp:~$ python3 image_filename_demo.pyAfterwards one sees in the Terminal window something li8ke this:
* Running on local URL:  http://127.0.0.1:7861

To create a public link, set share=True in launch().
The server runs on localhost using port 7861:
http://127.0.0.1:7861

http://localhost:7861
Using one of the given URL in an arbitrary Browser the Web UI is started.
Empty Initialised Web UI
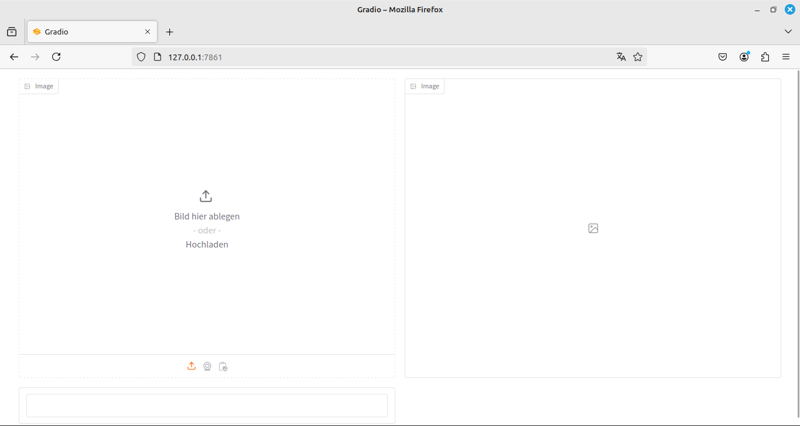
For this demo, the Gradio user interface to be created should be as simple as possible, but should show what it is all about. I created a UI, where we have three components. An input frame for the input image, an output frame for a cloned version of the input image and a textbox, where the name of the original image file can be found in.

Figure 1: Simple gradio web UI demo
Web UI with Loaded Image
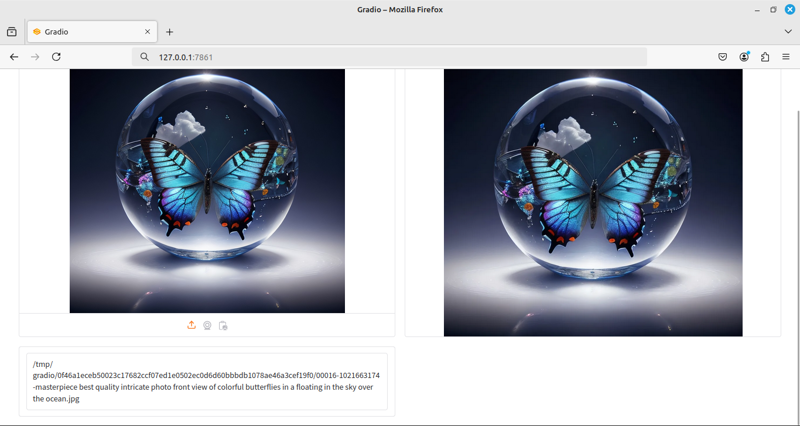
I used drag and drop to put an image in the UI. After doing this the UI looked like the image below shows.

Figure 2: Simple gradio web UI demo with loaded image
Cross Check
In the textbox one can find a path like this:
/tmp/gradio/0f46a1eceb50023c17682ccf07ed1e0502ec0d6d60bbbdb1078ae46a3cef19f0/00016-1021663174-masterpiece best quality intricate photo front view of colorful butterflies in a floating in the sky over the ocean.jpgThis image is shown in the left input image frame. The image in the right output image frame is the graphical representation of a numpy array.
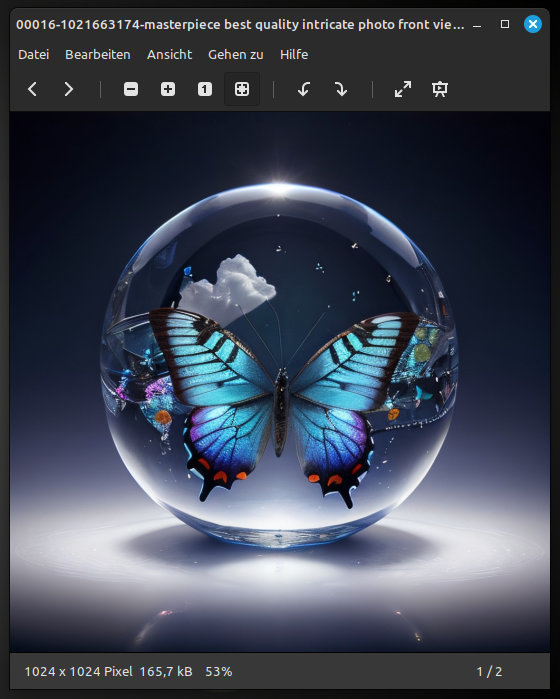
If one uses the path together with an arbitrary image viewer one can check, that this image is really the original image.

Figure 1: Simple gradio web UI demo
When reading the image Gradio makes a temporary copy of the original image file and puts this temporary copy in my case in a subdirectory of the tmp directory.
Python Script
Raw Python Source Code
This Python script is attached to this article. With this more or less simple script one realises the above presented GUI.
#!/usr/bin/python3

import gradio as gr
import numpy as np
from PIL import Image

with gr.Blocks(css="footer{display:none !important}", fill_width=True) as webui:
    with gr.Row():
        with gr.Column():
            image_input = gr.Image(type='filepath', height=512)
            file_name = gr.TextArea(lines=1, show_label=False)
        with gr.Column():
            image_output = gr.Image(height=512)
    def output_image(img_fileobj):
        pilImage = Image.open(img_fileobj)
        numpyImage = np.array(pilImage)
        filename = img_fileobj
        return [numpyImage, filename]
    image_input.change(
        output_image,
        inputs=[image_input],
        outputs=[image_output, file_name]
    )

if __name__ == "__main__":
    webui.launch()
I am using in the source code numpy as well as PIL like Gradio do too. This css style
css="footer{display:none !important}", fill_width=Trueremoves the Gradio footer from the web UI.
The script declares one block, with one row and two columns in it.
Parameter type and Value filepath
The important line in the script is:
image_input = gr.Image(type='filepath')image_input is the identifier for the Image component. By using type='filepath' in the declaration of the Image component, one has to deal with (in my case) a jpg image.
Event Listener
Following Event Listener waits up the point an image is loaded e.g. per drag & drop.
image_input.change(
        output_image,
        inputs=[image_input],
        outputs=[image_output, file_name]
    )
Called Function
After the image is loaded into the left image, the function output_image is called. This function
def output_image(img_fileobj):
    pilImage = Image.open(img_fileobj)
    numpyImage = np.array(pilImage)
    filename = img_fileobj
    return [numpyImage, filename]
need an addition step, that one is able to work with the loaded image. One has to convert the jpg image (image & file object) in a numpy array. This numpy array can be outputted to the right output image frame.
One internal behaviour of Gradio is, that an declared component like e.g. image_input is used as input for a function. Then this component is interpreted in the function output_image with its value. In other cases this behavior is important to understand. In our case the value is the file path to the cloned image.
File Path
With this file path one can work within the web UI (in the Python script) or in a separate Terminal window (see also Figure 2 and Section Cross Check).
E.g. use exiftool in a terminal
exiftool "/tmp/gradio/0f46a1eceb50023c17682ccf07ed1e0502ec0d6d60bbbdb1078ae46a3cef19f0/00016-1021663174-masterpiece best quality intricate photo front view of colorful butterflies in a floating in the sky over the ocean.jpg"results in my original Exif metadata:
ExifTool Version Number         : 12.40
File Name                       : 00016-1021663174-masterpiece best quality intricate photo front view of colorful butterflies in a floating in the sky over the ocean.jpg
Directory                       : /tmp/gradio/0f46a1eceb50023c17682ccf07ed1e0502ec0d6d60bbbdb1078ae46a3cef19f0
File Size                       : 162 KiB
File Modification Date/Time     : 2024:11:16 08:24:06+01:00
File Access Date/Time           : 2024:11:16 08:24:06+01:00
File Inode Change Date/Time     : 2024:11:16 08:24:06+01:00
File Permissions                : -rw-------
File Type                       : JPEG
File Type Extension             : jpg
MIME Type                       : image/jpeg
Exif Byte Order                 : Big-endian (Motorola, MM)
User Comment                    : masterpiece, best quality, intricate photo, front view of colorful butterflies in a floating in the sky over the ocean glass sphere, Background blue cloudy sky, hyper realistic, highly detailed, sharp focus, high resolution, 8K, <hypernet:GlassSphereHypernet:0.6>.Negative prompt: cartoon, painting, drawing, sketch, anime.Steps: 25, Sampler: DPM++ 2M, Schedule type: Karras, CFG scale: 7.5, Seed: 1021663174, Size: 512x512, Model hash: 463d6a9fe8, Model: absolutereality_v181, Denoising strength: 0, Hires upscale: 2, Hires upscaler: 4x-UltraSharp, Version: v1.10.0
Image Width                     : 1024
Image Height                    : 1024
Encoding Process                : Baseline DCT, Huffman coding
Bits Per Sample                 : 8
Color Components                : 3
Y Cb Cr Sub Sampling            : YCbCr4:2:0 (2 2)
Image Size                      : 1024x1024
Megapixels                      : 1.0
Conclusion
It could be shown, that one can use an original image to work with instead of a black box, which is given by Gradio per default.
Finale Words
Have a nice day. Have fun coding. Be inspired!


