Update 26/12 : I have just installed Kohya GUI and managed to run SegmentAnything2 in ComfyUI recently. So expect some updates to this article in the near future, as I'm making some powerful workflows that I think will be better than the forge extension. Also, users trying to launch the masked training in Kohya found it tricky so I'm gonna review this with the GUI now
Purpose & tools used
This tutorial will show you how to make Loras that do not alter the face of the other Lora character they are being used with. But the same technique can be applied for other purposes (isolating concepts, removing backgrounds, etc).
Here I show realistic examples but it does work for Anime and is not model-specific (flux, pony, etc)
After releasing many Non-Face Altering Loras, I had to share my workflow with the community. At first my workflow was involving a lot of manual work but I recently found a tool that allows me to generate almost perfect face masks.
The extra work required on a rather small dataset (40 – 50 pictures) after some practice and the adequate tools explained here is now like 10 minutes. So I believe all Loras should be trained to be Non Face-Altering 😊
I will be referring to Auto1111 / Forge extension SegmentAnything :
Download it here : https://github.com/continue-revolution/sd-webui-segment-anything
Refer to my article "SegmentAnything : create masks for Lora Training or Img2img" for installation & first steps https://civitai.com/articles/9000
...and Kohya scripts for training (SD3 Branch).
Let me know in comment if you know any equivalent tools.
EDIT : I found out SegmentAnything has been adapted for ComfyUI and even SAM2. Need to review them before updating this tutorial
EDIT : I've added the main scripts I use and refer to in the attached files section. They're provided "as is", ok to explain but don't rely too much on me for full in-depth explanations of how they work as I didn't even code them ;-)
The issue
Why do Loras alter the character’s face ? LoRas alter faces because datasets contain them, updating model layers related to faces and resulting in an “averaged” loraface. This disrupts compatibility with other LoRas.
What can we do ? There’s a few solutions:
Cropping: Remove faces from images, though impractical when the face is central.
Painting Over Faces: Ineffective; the underlying data remains.
Using Masks: The most effective method. Masks exclude unwanted areas from training.
Masks vocabulary
They come by different names but that’s more or less the same thing
Binary Masks: Include (1) or exclude (0) areas.
Loss Masks: Guide training by masking specific areas.
Alpha Masks: Add masks as an alpha layer in PNGs, controlling inclusion through opacity.
Grayscale Masks (Used here): Use black (included), white (excluded), and gray (partial inclusion).
So what does it looks like ?
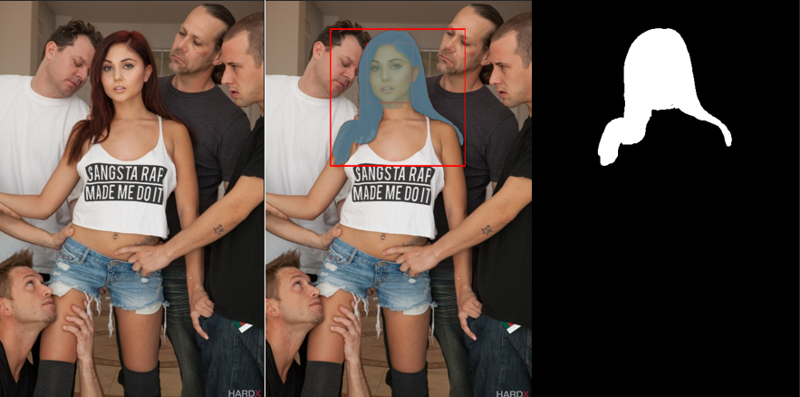
Left = Original picture
Middle ("the blend") = Detection & Segmentation
Right = Resulting greyscale mask including (white) face and hair only. It will need to be inverted
SegmentAnything Basics
Please refer to https://civitai.com/articles/9000 about the SegmentAnything extension installation and basics
Batch generating masks for the whole dataset
Now that we’ve covered the basics, let the magic begin 😊
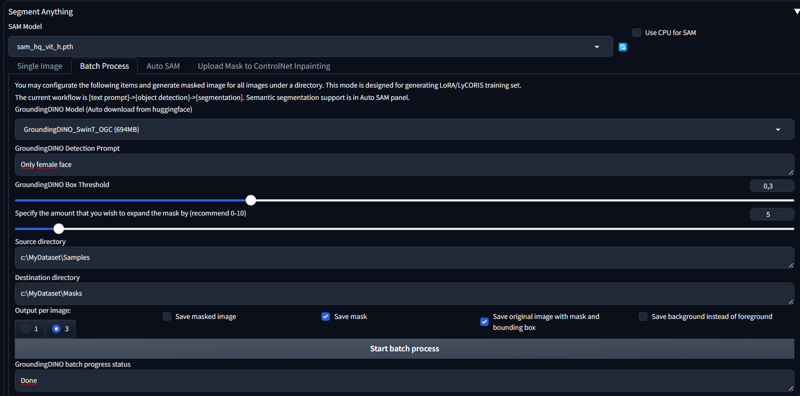
Go to the Batch process tab
Pick up the GroundingDino model (I recommend SwinT_OGC)
Put the prompt that you’ve tested before (i.e. “Only female face”)
Specify the amount you wish to expand the mask : this one is rather important for batch generation, because SegmentAnything is not perfect and will often leave pixels out. It is best that you try different settings yourself, but I’d say for faces use it, it’s most of the time better to mask a bit too much than too little. If masking something precise like eyes for examples then it’s another story
Output per image : I find it crucial to use “3” because as you will see after, in many cases it will save you from having to either discard the picture from your dataset or fix the mask. For learning the tool you can set 1 though.
Save masked image : Generally not using that
Save mask : Obviously ticked
Save original image with mask and bounding box : Tick it, this is the “blend”. Without it, it is very difficult to know if the mask are right or not (and which)
Save background instead of foreground : I personally untick it because I prefer to make my selection of the masks before as you will see, before inverting them. Ticking this gives you already inverted masks, it can be useful as well.
NB : What I mean here regarding invertion, is that for the extension, the generated masks are what you prompted to DETECT & INCLUDE, not what you actually want to EXCLUDE.
Start batch process and it will output everything in the folder you’ve specified.
NB : I’ve found out that, annoyingly, after generating masks the GDINO/SAM models are not properly unloaded from memory so you might want to restart Auto1111/Forge to fully free your VRAM.
Picking up the masks for the dataset
You will get something like this in your output folder
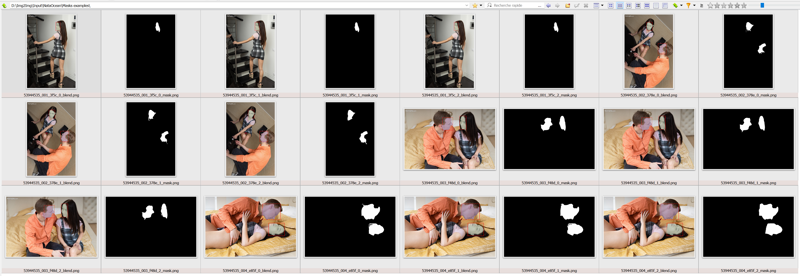
The blends filenames are [original filename]_[blendnumber]_blend.png
The masks filenames are [original filename]_|blendnumber]_mask.png
Where blendnumber is 0, 1 or 2 (remember, we’ve ticked Output per image = 3)
NB : If you used the "Output number = 1" option then you don't have to choose masks because you will get only 1 per original picture. Just check the blends, move them, rename the masks.
What you want now is pick up for every picture the best mask.
+ isolate the bad ones to either
remove the pic from your dataset (lazy guy option)
re-generate that mask alone using the single pic process (serious guy option)
fix it manually using a picture editor (courageous guy / ValentinKognito365-style).
The goal is to have a Mask folder with all the masks of all the pictures of your dataset with the exact same filename as the corresponding pictures in the dataset.
OK here I use this tool I’ve made myself (Choose masks.py) because otherwise this part was really annoying.
EDIT : it's an "under development" stuff provided "as is" for the moment. Current version of the script needs to be executed in the folder with all the resulting files (blends and masks), with the original pictures files in the parent folder (important only if using the "Delete All" button which actually should be renamed "Exclude this pic for now").
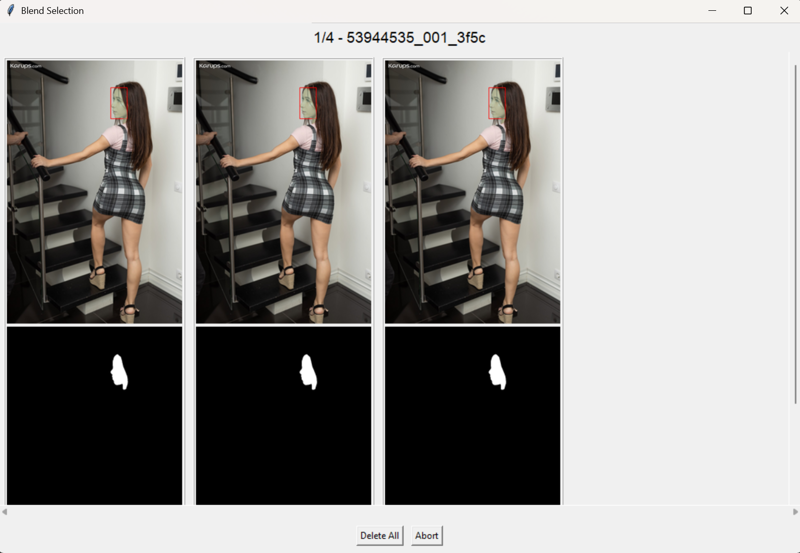
Quick guide to the Blend Selection tool
The tool allows to check all three sets and when I click on either the blend or the mask from a set then it deletes the two others sets. That's how the mask generation & selection can be done in under 10 minutes 😉
I always keep the blends so I can review later.
It is useful to see BOTH the blends and the mask itself cause
the box+colored zones thumbnail helps locate where is/are the mask(s)
the B&W mask thumbnail shows where some pixels could be missing and what is actually the difference between them
If I click on “Delete All” that means all 3 masks suck so they’re all deleted and the original picture is moved to an “Excluded” folder. This way I know this one has an issue and can decide what to do.
Further development ideas for this tool :
I also done a button to fill black pixels surrounded by white pixels but currently it doesn’t work properly.
I would also like to turn it into a GUI
I would like to be able to combine masks. For example do a first pass to generate face masks then another one to generate mouth masks, then substract the mouths from the faces masks… then invert everything… Thus having masks that would exclude the whole face but not the mouths. This is the type of stuff I’ve done before for some LoRas like blowjob or ahegao.
Tips about masks
For non-face altering Loras, I never mask the hair, on purpose. It acts as a delimiter of the masked face. I never had any issue with my LoRas not letting me prompt what hair I wanted. But you can try, tell me how it goes then.
For LoRas It’s OK if the masks are not perfect. It’s ok if some bits of the neck are in. It’s ok if there’s an ear, or some hair. It’s ok if there’s some small bits of the face included. It’s ok if there’s some rogue pixels.
For img2img however obviously you DO want perfect masks😉
What you want is to remove almost everything from the face. Use common sense. Anything you want to exclude must absolutely not have any patterns of it in the dataset, or the very least possible.
Masks with both the guy and the girl faces : OK as well, not worth fixing. Although I’ve made a LoRa recently where most of the guys faces were masked and some guys not. It seems the remaining guys “have won” and now appear frequently. I think ideally it would be best to be consistent, either never include guys faces, or always, but YMMV. For safety's sake I would rather remove every single face.
Colors you see in the blends just mean they were identified as different segments, they will end up as white pixels the same :
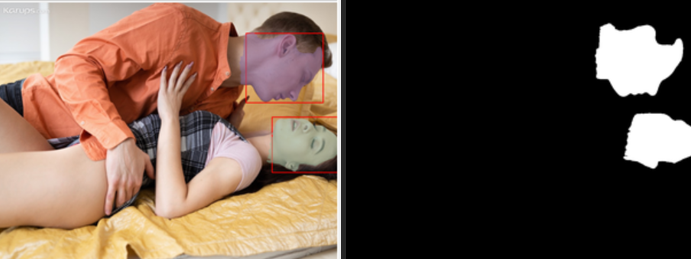
Last but not least : Use ChatGPT to make you scripts for whatever operations you need to do with masks. That’s what I’ve done, including the tool for selecting the masks. I did not code anything myself.
Final dataset verifications before training
ALL your dataset pictures have a corresponding mask, even the ones where you didn’t mask anything. I generate fully white mask of the same dimension of these pictures using the "create_white_masks.py" script (does that for file in its folder)
=> I may be paranoid here but in Kohya scripts, I’ve found out enabling masks seems to be a ON or OFF thing for the WHOLE dataset. I have tried to turn on masks for only data subsets but then I couldn’t define the mask location for that subset only so I just assumed this is not working.
Make sure your masks are inverted (white = will be trained, black = will not be trained) ! I’ve trained two LoRas just to realize I had masked everything but the faces. I use a python script to do the inversion (invert_masks.py), but otherwise you can also use the previous option to generate mask for the background
Make sure all your masks have the exact same dimensions as the corresponding pictures. Which mean resize them together if you have to, and then check !
Make sure the filenames are the exact same (disregarding the extension), the trainer must be able to find the mask… No _n_blend or _n_mask stuff. For the moment the Choose mask scripts doesn't do the renaming
My check_dataset.py script checks that in all subfolders, every picture has a .txt caption with the same filename and has also a mask with the same dimensions in the Masks subdir
According to @272727 masks need to be in a RGB color scheme because Kohya scripts read the red channel (PNG files with alpha channel are another working way though)
You also need to use a .toml file to enable alpha_mask = true at the dataset level
Launching Kohya Script training with masks
You have to add these two options to the command line :
--alpha_mask
--conditioning_data_dir [path_to_the_folder_with_your_masks]
NB : Currently there is no way of telling from Kohya scripts logs if the masks have been correctly loaded, so I’ve added myself loggers to the training script \library\train_utils.py to be sure. See below (this is just the two logger.debug lines, the rest is unmodified)
I prefer to delete all the cached latents (.npz files) from the dataset folder if they exist before launching training, so it forces the script to rebuild them including alpha_masks in the process
def load_images_and_masks_for_caching(
    image_infos: List[ImageInfo], use_alpha_mask: bool, random_crop: bool
) -> Tuple[torch.Tensor, List[np.ndarray], List[Tuple[int, int]], List[Tuple[int, int, int, int]]]:
    r"""
    requires image_infos to have: [absolute_path or image], bucket_reso, resized_size

    returns: image_tensor, alpha_masks, original_sizes, crop_ltrbs

    image_tensor: torch.Tensor = torch.Size([B, 3, H, W]), ...], normalized to [-1, 1]
    alpha_masks: List[np.ndarray] = [np.ndarray([H, W]), ...], normalized to [0, 1]
    original_sizes: List[Tuple[int, int]] = [(W, H), ...]
    crop_ltrbs: List[Tuple[int, int, int, int]] = [(L, T, R, B), ...]
    """
    images: List[torch.Tensor] = []
    alpha_masks: List[np.ndarray] = []
    original_sizes: List[Tuple[int, int]] = []
    crop_ltrbs: List[Tuple[int, int, int, int]] = []
    for info in image_infos:
        image = load_image(info.absolute_path, use_alpha_mask) if info.image is None else np.array(info.image, np.uint8)
        # TODO 画像のメタデータが壊れていて、メタデータから割り当てたbucketと実際の画像サイズが一致しない場合があるのでチェック追加要
        image, original_size, crop_ltrb = trim_and_resize_if_required(random_crop, image, info.bucket_reso, info.resized_size)

        original_sizes.append(original_size)
        crop_ltrbs.append(crop_ltrb)

        if use_alpha_mask:
            if image.shape[2] == 4:
                alpha_mask = image[:, :, 3]  # [H,W]
                alpha_mask = alpha_mask.astype(np.float32) / 255.0
                alpha_mask = torch.FloatTensor(alpha_mask)  # [H,W]
                logger.debug(f"Load images and masks : Included alpha mask for image: {info.absolute_path}")
            else:
                alpha_mask = torch.ones_like(image[:, :, 0], dtype=torch.float32)  # [H,W]
                logger.debug(f"Load images and masks : Included alpha mask for image: {info.absolute_path}")
        else:
            alpha_mask = None
        alpha_masks.append(alpha_mask)

        image = image[:, :, :3]  # remove alpha channel if exists
        image = IMAGE_TRANSFORMS(image)
        images.append(image)

    img_tensor = torch.stack(images, dim=0)
    return img_tensor, alpha_masks, original_sizes, crop_ltrbs
Conclusion
I hope you have found this article interesting, and that you will make some awesome stuff with it : non-face altering LoRas, cool img2img, training stuff more efficiently because you removed unnecessary stuff, etc.
There is clearly more to say about masking in further articles. Feel free to comment what you thought of this article and any knowledge your might have on the matter 😊
If I can ask only one more thing 😉 When you upload your LoRas, could you state somewhere obvious that you removed the faces from training please ?
This way I might download them :-p
Thanks for reading !

