Note 1: Like this guide? Consider tipping this article some buzz or consider supporting or commissioning me at https://www.patreon.com/MetalChromeX or http://www.fiverr.com/s/VY34o4m so I can continue making cute anime girl models (and hopefully better pay off the crippling college debt I am about to be enduring after I graduate next year)!
Note 2: This is a work in progress. Comments with constructive suggestions to improve this article are welcome!
A no-nonsense guide for training character LoRA on Google Colab
Have you become proficient at designing images and would like to create models? Maybe you've dabbled in making character models directly on CivitAI and would like an alternative option. If so, here is a pretty straightforward method that works quite well. The best part is that it doesn't require a high-end PC!
I'd consider this guide a spiritual part 2 to the 'A simple, beginner's guide on training character LoRA using CivitAI's trainer' guide I wrote (see the link above). I'd make sure you skim it over and be familiar with the contents, as there is overlap that I'll only briefly skim over with the assumption you are familiar with the basics. Additionally, I'd like to dedicate this guide to fellow creator and internet friend Rule34Diffusion, as this guide is based mainly on what they taught me about this method (with my own thoughts and takes sprinkled in).
What you'll need
A PC. It doesn't need to be particularly powerful; it just needs to be reliable and with internet capabilities (i.e., most modern PCs)
A dataset. If you do not know what this means, see my 'A simple, beginner's guide on training character LoRA using CivitAI's trainer' article.
A Google account (for Google Drive)
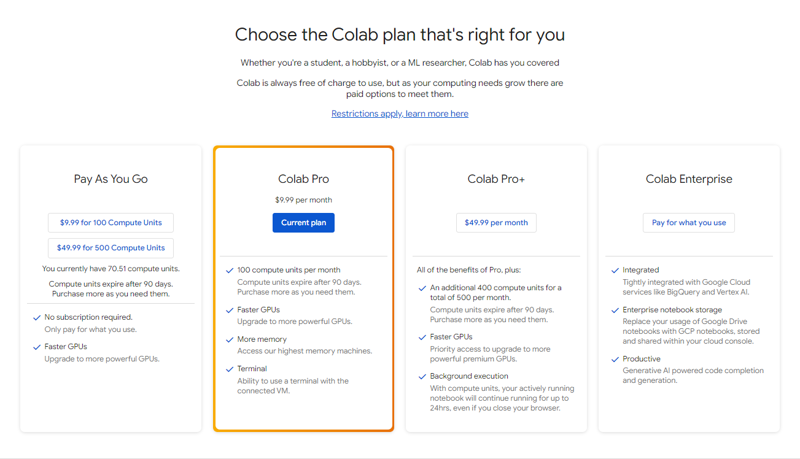
A pro Google Colab subscription for the Google Colab trainer. Otherwise you will be massively limited. Per a user on CivitAI: "The max I got training loras on free Collab was 22 epochs with like 1400 steps with like 4 hours of usable time."
So what even is Google Colab?
Per Google"s official colab.google page: "Colab is a hosted Jupyter Notebook service that requires no setup to use and provides free access to computing resources, including GPUs and TPUs. Colab is especially well suited to machine learning, data science, and education."
In short, the trainer we will be using is a notebook hosted on Google Colab that will let us make an SDXL character LoRA
Firstly, you'll probably want to get computing units to speed up the process. Computing units are the "currency" Google Colab uses to utilize its platform. I recommended trying out the Colab Pro, as it instantly gives you 100 compute units. If you don't like the platform and want to use CivitAI or whatnot, you can just cancel, and you're only out $10 USD (or whatever your local currency is). As of writing this, I currently jump between CivitAI and Google Colab.
Getting started with TagGUI
Presuming you've prepared your dataset, you will want to tag your images. On my previous guide, I showed how to do this on CivitAI; since, of course, this method doesn't use CivitAI (minus publishing your model), you are left with three choices: don't tag your model (not recommended), manually tagging your model (way too tedious), or use an application. I believe in a 'work hard and smart, not just hard' methodology, so let's go with the third option. TagGUI is an excellent, straightforward application that enables you to tag images as you can directly on CivitAI automatically.
After downloading TagGUI from the link above and extracting it, you'll be prompted to load a directory. You will want to navigate to where your dataset is located. Once you've navigate to the location, you'll be presented with a screen that will look something like this:
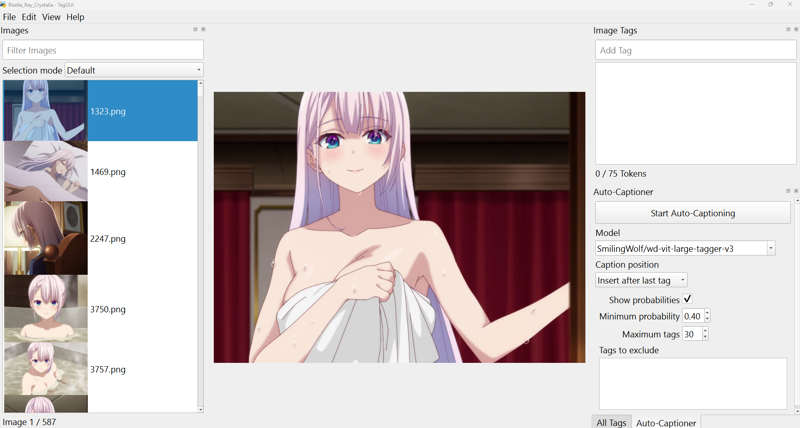
From here, you'll want to tag your images. For specific outfits, I'd recommend tagging it with a keyword. For instance, for this Riselia Ray Crystalia model, you may want to add 'Riselia uniform outfit' to all images including her uniform. Just type it out and slap that Enter button.
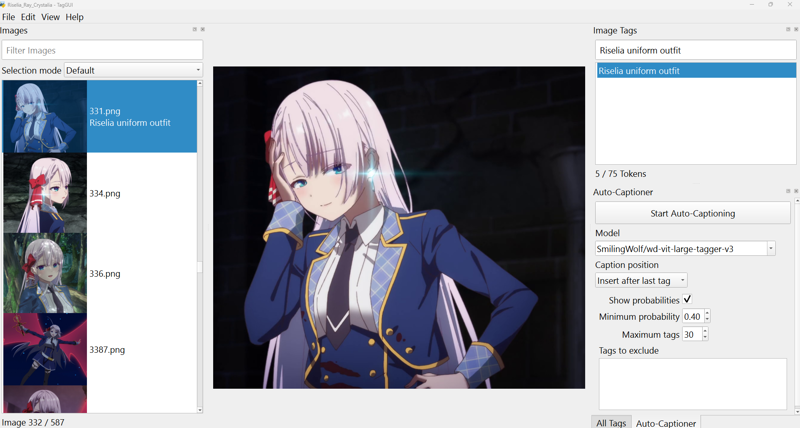
You can also Shift-Click or Control-A to select multiple images and mass-add a tag.
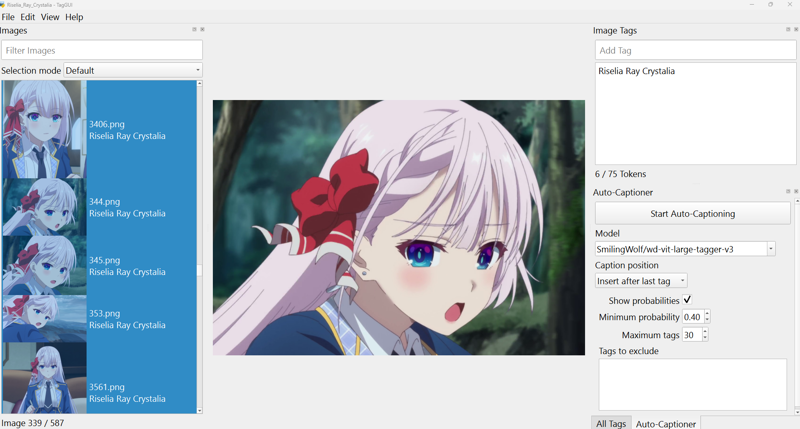
Ok, let's make everything else easier now once you've gotten all your specific tags. Once that's all good, select the image or images in question and click the 'Start Auto-Captioning' button. This'll automatically start detecting the elements in your photo. TagGUI will start to create a .txt file that pairs with all your images. You can manually delete any unneeded tags by selecting them from the menu on the top-right and clicking the delete key (or manually opening the accompanying .txt file and manually deleting and saving it).
Saving Your Dataset to Google Drive
Once your dataset has been prepped, save them all into one folder. The folder structure should be (name of the character as one word; you can use underscores and whatnot) > dataset (this is the folder where you, of course, save your images and .txt files). This is the structure that the Google Colab online trainer uses, and it won't work otherwise.
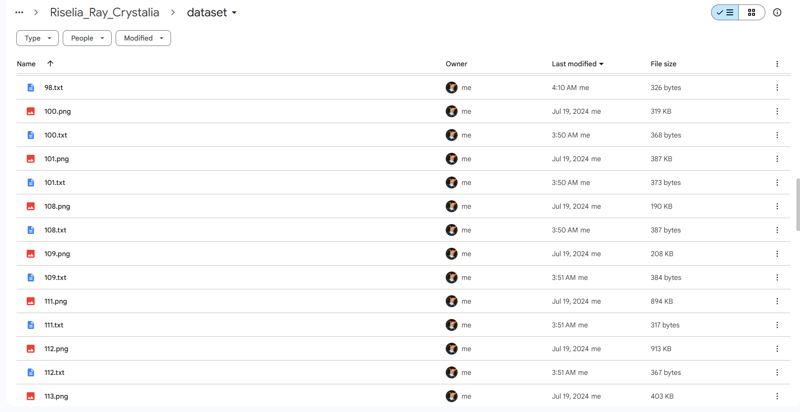
Using the Google Colab Online Trainer
Once you have this done, you are almost done. Next, go to Lora_Trainer_XL.ipynb - Colab. What you'll want to do first is type in your project name; this will be the root folder that you named before.
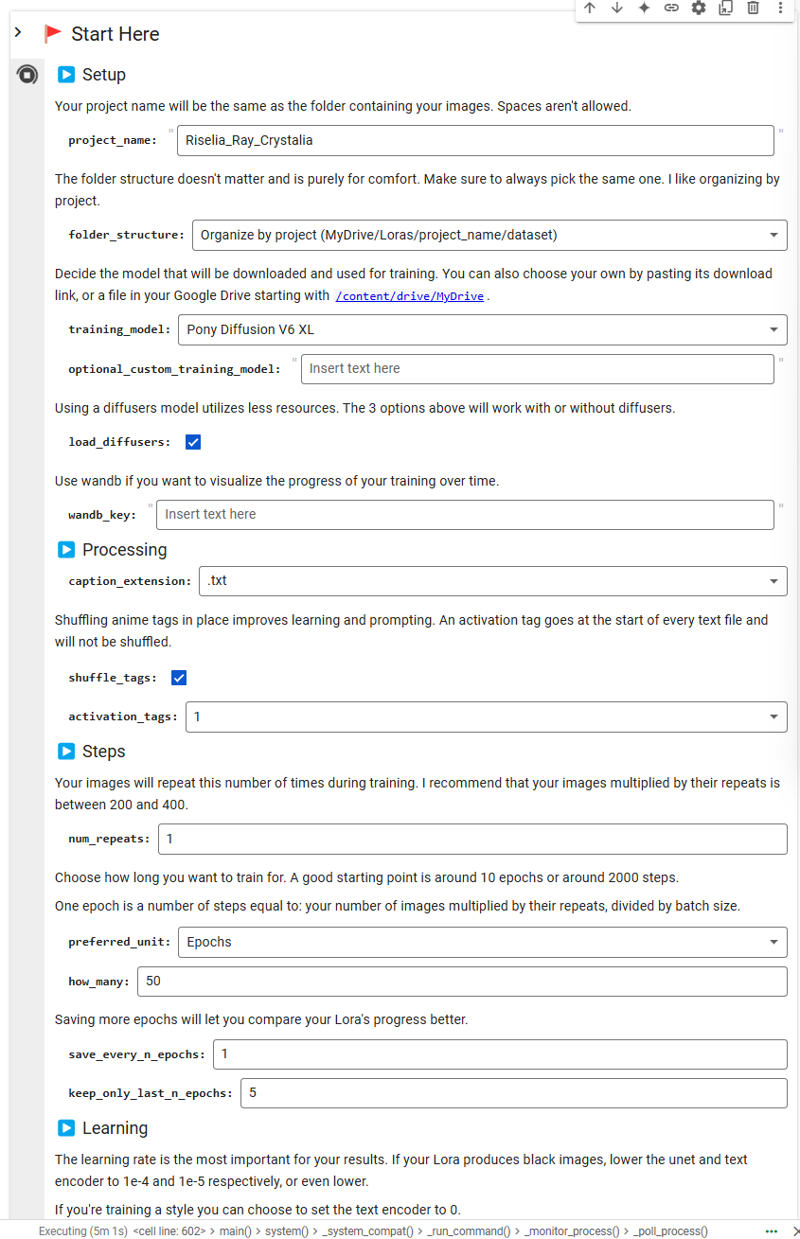
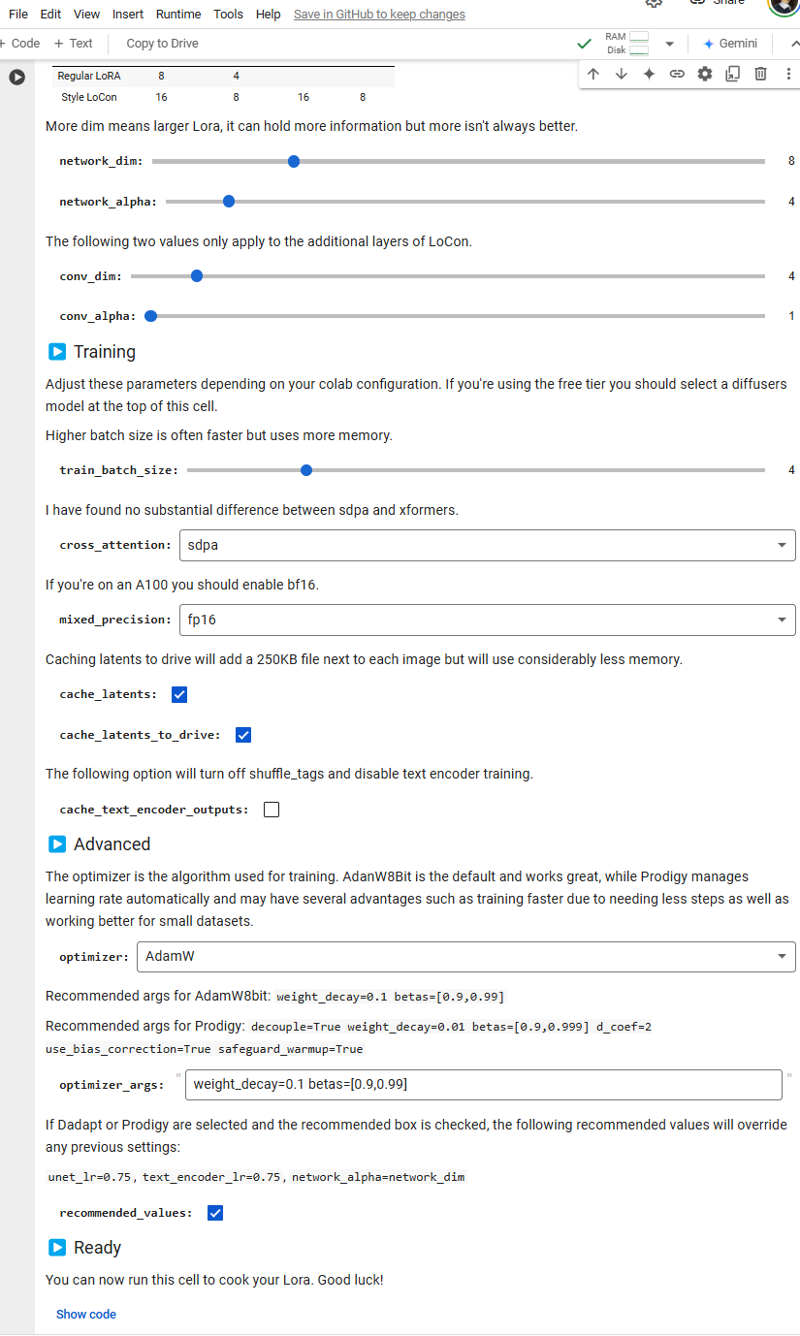
Some other suggestions before we run are to add more epochs; in general, more epochs usually equate to better results (though eventually, there will be diminishing returns). I usually do 50 because I can, and I feel the results typically look good. What I've learned is that it is better to have more epochs and fewer steps when training.
You may also want to change the dim and alpha, which may or may not change your LoRA's quality. I've tested some models with 8 and 4 and 32 and 16 for dim and alpha, respectively, and did not immediately notice any massive differences. The default 8 and 4 should be fine if you are making a simple character model.
Lastly, consider changing the optimizer. I've used AdamW8bit, Prodigy, and AdamW; I thought AdamW looked the best when I tested, though your results may vary. To be blunt, I am not knowledgeable enough to know the differences and intricacies between all the optimizers; any comments below that explain this in layman's terms would be appreciated!
Ok, we should be good to "cook" now. Call up Walter White (but don't, actually!), and let's cook a LoRA! You'll need first to link your Google account where you saved your dataset on Drive. It should be straightforward: authorize and ensure all boxes are checked. Then click the little gray play button on the top left. If all is well, everything should be training as it should!
Final steps:
Go back to your Google Drive and look at the output folder. There should be some model files in this folder (the number will depend on the amount you choose to keep). Of course, you should download this file and test it out. If all is well, then you are good to go! If not, play around with the settings on the online trainer.

(here's a sample of what it'll look like)
My Final Thoughts
I only recently started using this "professional" method; therefore, this article may be subject to change. Any constructive feedback is appreciated! However, my recent models have ended up just as good, perhaps better, than using the CivitAI online trainer. The good thing about Google Colab is that their premium membership is reasonably cheap (currently $10 a month), and you can do more than train LoRA with it.
