Introduction
Hey there!
In case you don't know who I am, I'm a LoRA Creator who accidentally stumbled upon it by accident. I always thought the whole process of LoRA creation to be very technical and difficult, but I realized I'm very wrong after messing around on CivitAI's generator.
So currently, I have been a creator for Pony content for awhile. Then I expanded more into Illustrious more recently.
To be honest, most of the heavy lifting is done by CivitAI. When I created my first few LoRAs, it's just the matter of follow some basic principles which I will share below.
This article has been something I've been wanting to write for a long time now, and I believe some people have been interested in how I have been creating LoRAs.
So in this article, I'll break down everything from the start to the finish and list down my thoughts and my processes as well.
For this example, I'll be using my Bratty LoRA as an example as I'm creating that LoRA at the same time I'm writing this article. So when this is posted, the LoRA is already live so you can see the finished results.
Note: I still consider myself a beginner in the whole AI generation space, so if any experts out there notices an error or if I'm doing something wrong, please feel free to correct me in the comments!
Note 2: I will be keeping the images here as SFW as possible, so no nudity or nipples will be shown. BUT, some pictures might be questionable in nature so take note of that
Change Log
21/11/24: Guide is published!
9/2/25: Editing this a few months after writing and now just started with Illustrious models. Just want to say that this guide is mostly me creating with just Pony LoRAs. So with other models like Illustrious,SDXL, FLUX or any others, the prompting and all will be different. However, the idea is roughly still the same!
28/5/25: Edited to include Illustrious help for relevant point since it's been increasingly popular and that I've been favoring more Illustrious too.
Step 1: Sourcing photos
First of all, the basic principles are simple: Having the right number of pictures and the best quality pictures of the model you want to train.
What is the right number of pictures?
My ideal range I would train my model is a minimum of 30 to 50 pictures. The closer to 50, the better. I usually benchmark to the 50 picture mark, but I have created some of my LoRAs with 20-30 pictures so it is definitely possible.
However, remember that 30 quality pictures will beat 100 pictures of subpar quality.
For my Bratty LoRA, it is somewhere about the 50 pictures range.
What are quality pictures?
I would say something that looks as close to the model as possible. For my models, I usually want it as close to the source material as possible unless it's in another style you want to create it.
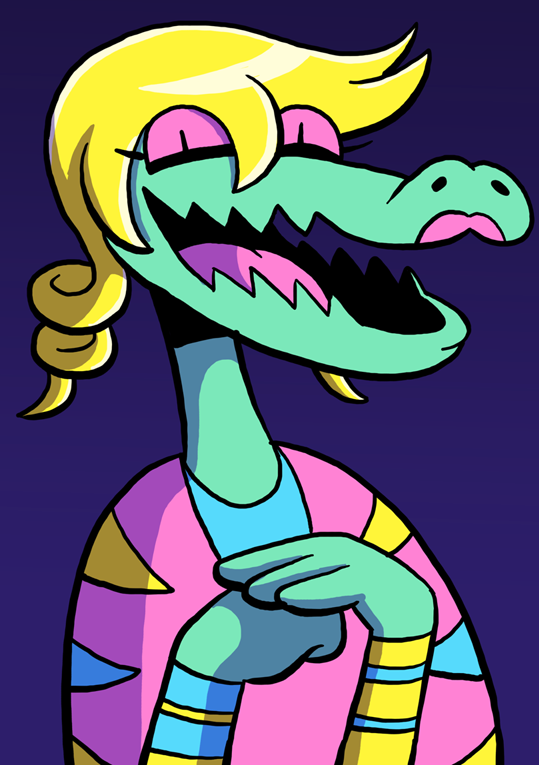
For the Bratty LoRA, I'll be trying to create her as closely as possible to how she looks like. So for example, she looks like in the image shown:
Some pictures I would use:
Close to source material
As long as it looks like the character
Make sure that their body can be seen. The best pictures are the ones with whole body and not blocked by objects/other characters.
Head shots, top half body shots are all okay if you mix in with the rest.
Pictures that define the characters (Any accessories, scars, prominent features that make that character look like that character)
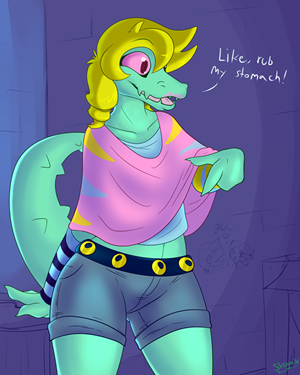
Positive Examples:
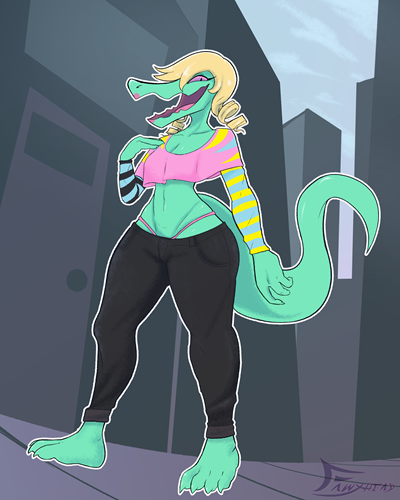
Some pictures I wouldn't use:
If only a small portion of the character can be seen (blocked by objects/characters)
Heavy fetish pictures that distort their images (i.e Inflation)
Doesn't look remotely close to the original character
Character is too small in the picture (Referring to any picture with multiple characters, but the character you want to train is too tiny.
Uncolored pictures/sketches (unless this is what you want to go for)
Negative Examples:
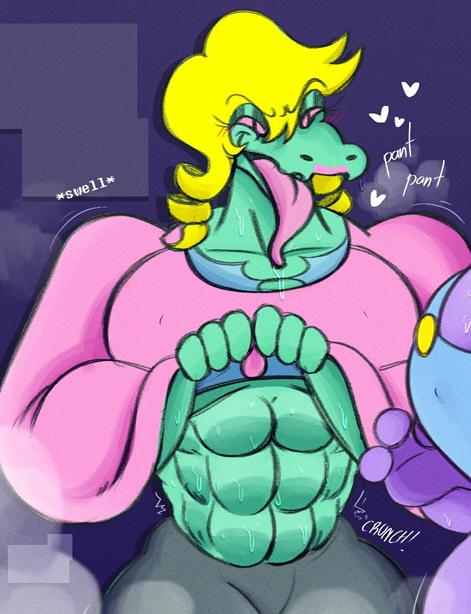
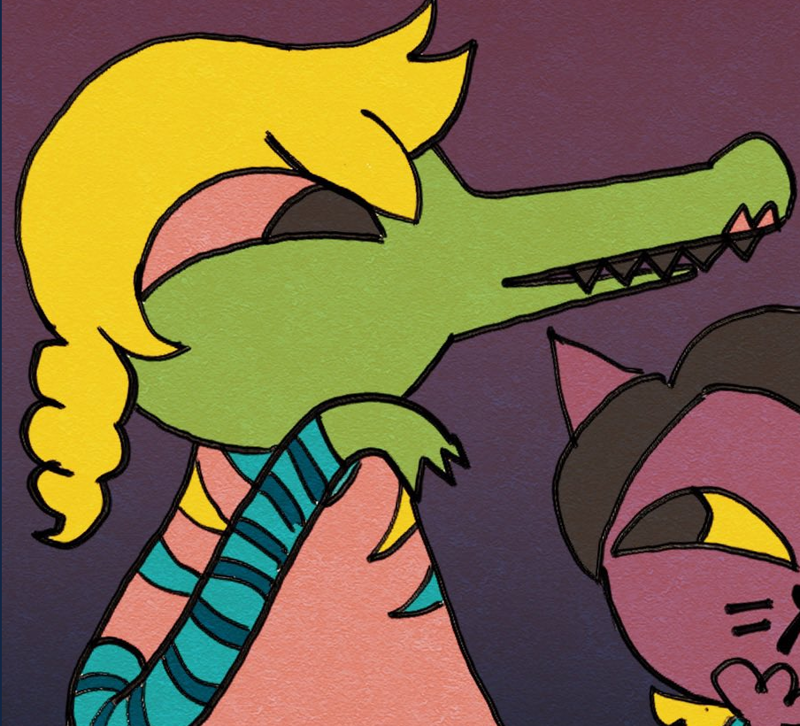
Other details to note
Regarding size of pictures: No hard and fast rule, but as long the pictures aren't all 200x200 px I think you will be fine.
Training on AI art: I generally do not recommend it unless you're intending on something
Limit of pictures: Generally the more pictures, the better the quality
Multiples characters in the LoRA: Can be done if possible like what I did with this one, but if you're new stick to one character per LoRA first. This can be easily done and trained with tagging (see step 3 for more details)
Where I find my pictures:
Google images (For example for this, I search "Bratty Undertale" )
Furaffinity (For furry pictures)
Deviantart (For all kinds of art)
Derpibooru (Any pony related stuff)
Pixiv (For more Anime/Japanese related stuff)
Danbooru (For Anime/Japanese related stuff. More for Illustrious too)
Beware that all these sites have NSFW! Filter accordingly just in case you are in an environment that you shouldn't be doing NSFW!
Step 2: Cleaning up pictures
First thing first I'll go through the pictures I've downloaded and double check for quality assurance.
Secondly, I'll try to isolate the character especially if you have pictures with multiple characters like this one:
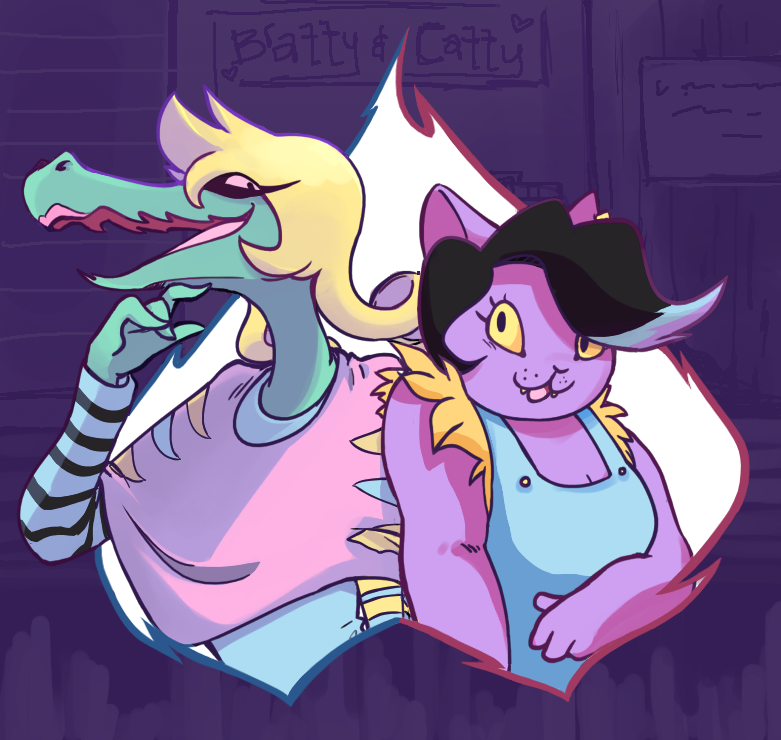
So I'll crop the picture to just focus on the character itself as much as possible. Generally if you can, use pictures that are just solo on the characters are best. But at times when there isn't much training material, use pictures like above but crop it as best as you can, something like this:
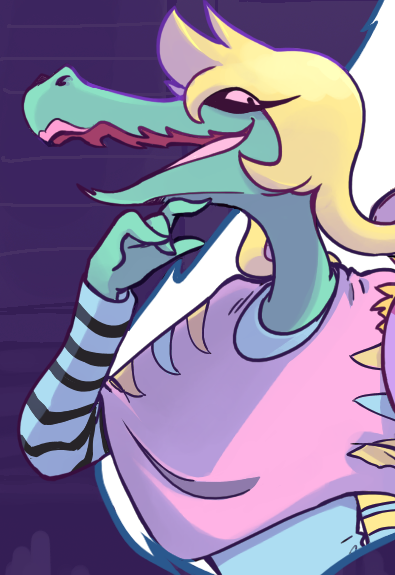
As long most of their features can be seen and not blocked by other characters (like their body, wings, tail, etc) then you should be fine using it. Generally, the picture should still look like the character itself.
Step 3: Upload and Tagging
Now we've come to a crucial part of the process of tagging. This will probably be the make-it-or-break-it step in my opinion
Name your LoRA
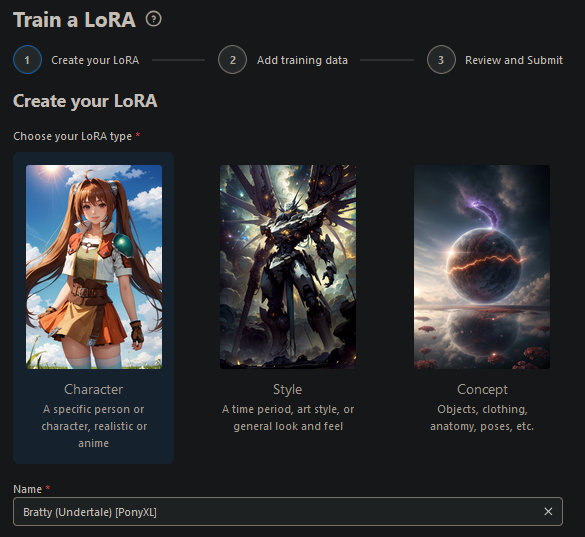
Go to the creator page and click Character.
Under the Name, specify the Character's name, originals and the model you're intending to train. For me, I mainly train Furry models so I make sure to tag it as Pony so people know what they're coming across.
With so many new models like Flux, Illustrious and many upcoming ones, make sure to name accordingly!
The clearer your information, the easier for it for people to see. You can use my naming process if you want "Character name (Where they're from) [Model you are training For]"
So for this, it'll be
Bratty (Undertale) [PonyXL]and when Updated for Illustrious:
Bratty (Undertale) [PonyXL/Illustrious]Tags to use & Trigger words
For this LoRA, these are my tags:
bratty_undertale, crocodile, green scales, tail, blonde hair, pink lipstick, female, 1girl, pink eyes, anthro"I generally put the character name underscore and the source. For example, I don't want to use 'bratty' as a tag as it could tag out a bratty human or something. I remember seeing someone with a toothless LoRA used a trigger word of 'Toothless' and the model kept coming up without tooth.
The other tags, I use it as a descriptive of the characters. Some things you can use
scales/fur/skin (and color)
Type if not human (eg. dragon, snake, crocodile, etc)
tail
wings
horns
hair color (blonde hair, red hair)
eye color (pink eyes, yellow eyes, blue eyes)
female/1girl, male/1boy (Either one, or intersex if you're doing Futa)
accessories
anthro/feral (If it is a furry)
For the above tags, I'll use the auto tagger later to tag it onto all the pictures then adjust accordingly after that. Write out the prompts like what I did first as you'll need it for the next step.
Note for Pony: If you need to learn about tagging, take a look at e621 or Derpibooru as the model uses booru tags. Take a look at the picture, and see how the picture is tagged and use it as a reference. However, don't stress too much as a lot of work is done by the auto tagging in the next step.
Note for Illustrious: Model uses Danbooru tagging more instead of e621/Derpibooru.
Uploading your Pictures & Auto Tagging
Next page, upload all your pictures then click on the Auto Tagging box.
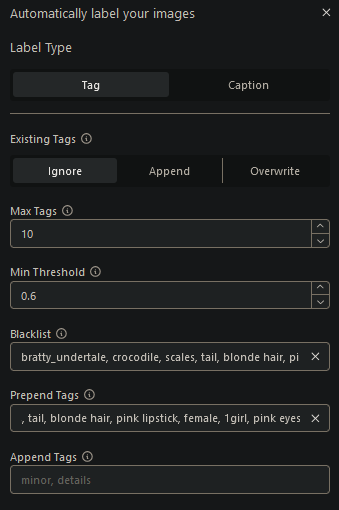
CivitAI recently updated with the Trigger word Box that seem to make things a lot easier. You can put trigger words here if they're used on ALL the pictures.
But the way I do it, I still like to do it the old school way where I put my trigger words in both Blacklist and Prepend tags so that it doesn't double tag.
If you use the Trigger box, you can technically put the "bratty_undertale, crocodile, scales" in those boxes. But for simplicity sake, i'll share my old method since some of my 'trigger words' are not applicable for all the pictures (I'll share what I mean in a bit below)
For the settings:
We'll be using "Tag" instead of "Caption" since I'm training for Pony & Illustrious. Caption will be more relatable for models like Flux.
For the Existing Tag, leave it on ignore. If you want to re-tag everything again for some reason, then click on Overwrite
I leave max tags at 10 - 12
Min Threshold at 0.6
Blacklist words will be the tags that I'll be using for the character (This is so that you won't get double tagged for the same prompts)

After that, wait awhile and you'll get the auto tags on the pictures. Grab a coffee or a toilet break while this loads as sometimes it may take some time especially if you have a lot of pictures.
When this is done, it should look something like this. This is where the tough part starts.
Manually tagging your picture & Removing inappropriate tags
Now, go through every picture to make sure it's tagged appropriately.
My golden rule is, "Tag what you see". That means if you see something, you tag it. So if you don't see a tail, don't tag tail. If you see a wing, tag a wing.
I would say mistagging one or two pictures won't be the end of the world, but you want to tag it as appropriately as possible. I noticed auto tagging like to tag Pokemon and Digimon a lot so remove those if you aren't doing any of those
So while I've applied the general tags of what I stated above, I also want to tag her clothing as well as it is vital for the character.
The extra tags that I manually applied to each picture was "pink top, striped stockings, striped arm sleeves" which are used as the optionals in my LoRA"
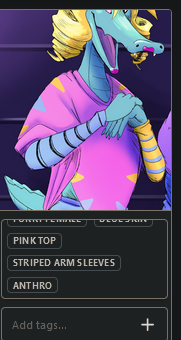
Once you finish combing through all the pictures and tagging, make sure to download your training data first before hitting 'Next' just in case of issues!
MAKE SURE TO DOWNLOAD YOUR TAGGING! If you run into issues, you will lose all your tagging data if you don't download it first!
So.. click next and let the data set upload... then we're up to the next step!
Step 4: Refining results
This is the part where you need to put in the right perimeters for training! However, you don't need to do much really!
Base Model for Training (NEW: ADDED ILLUSTRIOUS)
Now that I do Illustrious too, I edited to create a new section below so you can read for both Models. For the previous section, the same tagging will work for both models so you can literally create the same LoRA for Pony and Illustrious with just the same tagging.
If you're new to the guide, read through the Pony version first for my thought process then the Illustrious one for my prompt
1. Training for Pony
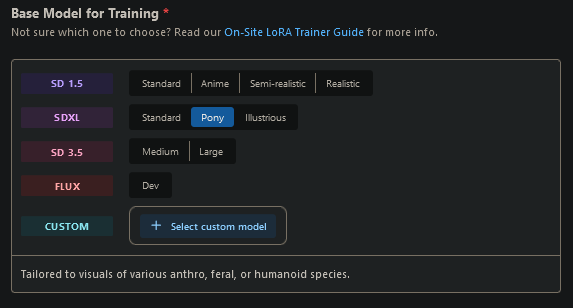
This is the part where you'll need to select the right model. Make sure you do this and select properly because there's no back button once you submit the LoRA for training.
For me, I do Pony models, so I click Pony model. Very simple.
You can also click Custom and train on a certain LoRA that you're used to if you're trying to achieve a certain result or style.
Personally, I just use the base Pony model (i.e Pony Diffusion v6) for training so that it is compatible with as many other models as possible like Pony Realism which you notice is my main model I personally use. However, that's not the same for everyone which is why I don't train on Pony Realism.
Sample Image Prompts
This part will be slightly crucial because this will show you what images come up during the training process!
As such, you'll want to input the tags as though as you're creating the images like as though you're generating a picture
Here's how to put them into the box:
Base prompts + Character prompts + Optional Prompts
My Base prompts
SFW:
score_9, score_8_up, score_7_up, score_6_up, score_5_up, score_4_up, masterpiece, high quality, realistic, detailed, best quality, white bed, solo, rating_safe, source_furry, bedroom, smiling, seductive, looking at viewer, on bed, full bodyNSFW:
score_9, score_8_up, score_7_up, score_6_up, score_5_up, score_4_up, masterpiece, high quality, realistic, detailed, best quality, solo, rating_explicit, source_furry, bedroom, looking at viewer, lying on bed, lying on back, full body, nude, pussyNote for both SFW and NSFW: (Change source_furry to 'source_anime' or 'source_cartoon' depending on what you are making)
For SFW, I like to test for 'standing' poses and a 'lying on back' pose for NSFW. Last one is up to you.
You can copy my base prompts to generate if you want!
So for this example, these are my character prompts which you've seen above already:
bratty_undertale, crocodile, scales, tail, blonde hair, pink lipstick, female, 1girl, pink eyes, anthroAnd my optional prompts for Bratty:
pink top, striped stockings, striped arm sleevesSo put everything together into one line and you'll get something like this
SFW:
score_9, score_8_up, score_7_up, score_6_up, score_5_up, score_4_up, masterpiece, high quality, realistic, detailed, best quality, white bed, solo, rating_safe, source_furry, bedroom, smiling, seductive, looking at viewer, on bed, full body, bratty_undertale, crocodile, scales, tail, blonde hair, pink lipstick, female, 1girl, pink eyes, anthro, pink top, striped stockings, striped arm sleevesNSFW:
score_9, score_8_up, score_7_up, score_6_up, score_5_up, score_4_up, masterpiece, high quality, realistic, detailed, best quality, solo, rating_explicit, source_furry, bedroom, looking at viewer, lying on bed, lying on back, full body, nude, pussy, bratty_undertale, crocodile, scales, tail, blonde hair, pink lipstick, female, 1girl, pink eyes, anthroSo here's what it'll look like:
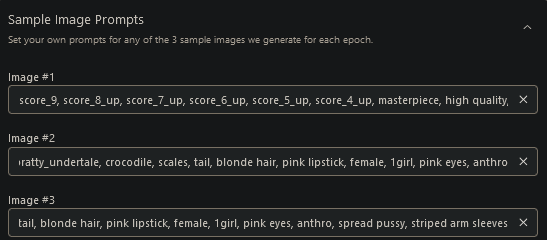
PS. If you tag wrongly or miss out some tags, I would say it is generally fine. You'll go to the last step of testing to make sure it actually works. There were times I missed out the character tags and it generates something random, but the LoRA still worked in the end. So if it works in the end, it's fine
2. Training for Illustrious
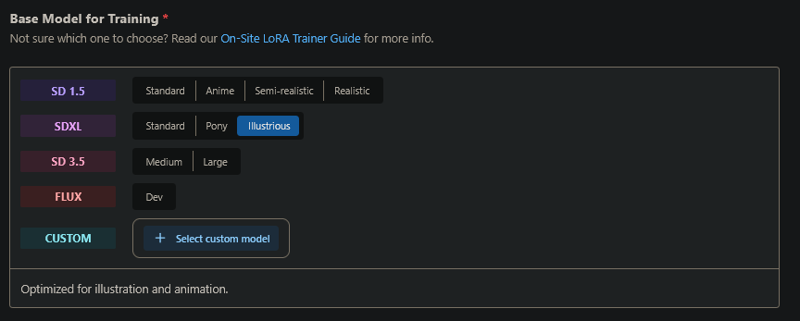
Largely the same as pony, except you have to understand that the prompts are mostly used from Danbooru instead of e621 like for pony. So if you want the model to recognize a certain term, search up Danbooru and tag it according.
I learned about Illustrious with this guide by Wolf999, where you can check it out. I'll have a condensed version of that here for just training, but you can read the rest if you are prompting which will help you.
The method of doing is still the same as pony, just with slightly different variation of prompts. Here's mine for illustrious:
My Base prompts
SFW:
1girl, highres, absurdres, newest, masterpiece, best quality, furry, furry_female,

standing, seductive_smile, luxurious detailed room, bright room, day scene, professional lighting, white bed, solo, bedroom, smiling, seductive, looking_at_viewer, masterpiece, safe, close up
NSFW:
1girl, highres, absurdres, newest, masterpiece, best quality, furry, furry_female,

nude, breasts, pussy, pussy_juice, (on_back, lying on back:1.1), seductive_smile, luxurious detailed room, bright room, day scene, professional lighting, white bed, solo, bedroom, smiling, seductive, looking_at_viewer, masterpiece, explicit, close up
For both SFW and NSFW: Remove furry and furry_female if you aren't doing furry of course. I also put 'quaduped, feral' when training for ferals like dragon.
For character prompts, I remove 'male' and 'female' for Illustrious. I remember reading somewhere that it doesn't really matter since 1girl and 1boy has higher weightage. So using the same set of prompts:
bratty_undertale, crocodile, scales, tail, blonde hair, pink lipstick, pink eyes, anthro, 1girlAnd the same optional prompts for Bratty:
pink top, striped stockings, striped arm sleevesSo put everything together into one line and you'll get something like this to put in the sample image prompts:
SFW:
1girl, highres, absurdres, newest, masterpiece, best quality, furry, furry_female, bratty_undertale, crocodile, scales, tail, blonde hair, pink lipstick, pink eyes, anthro, pink top, striped stockings, striped arm sleeves, standing, seductive_smile, luxurious detailed room, bright room, day scene, professional lighting, white bed, solo, bedroom, smiling, seductive, looking_at_viewer, masterpiece, safe, close upNSFW
1girl, highres, absurdres, newest, masterpiece, best quality, furry, furry_female, bratty_undertale, crocodile, scales, tail, blonde hair, pink lipstick, pink eyes, anthro, nude, breasts, pussy, pussy_juice, (on_back, lying on back:1.1), seductive_smile, luxurious detailed room, bright room, day scene, professional lighting, white bed, solo, bedroom, smiling, seductive, looking_at_viewer, masterpiece, explicit, close upFew things to note:
Remove the extra 1girl in the character prompt, it's there so you can put it on your LoRA page later for people to use it.
In my base prompts above, I left a line gap. That's to put your character prompts in between and to respect tag order. See the illustrious guide here and search for tag order for what I mean (IMO i feel like i'm doing it wrongly still but it has worked for me so far)
For testing of Anthros, the poses I do are 'standing', 'lying on back', 'on_fours'
For testing of Ferals, the poses I do are 'standing', and 'lying on back' for both feral and the anthro version of the same character.
For Ferals, add 'quadruped' as helps greatly in terms of generation and CivitAI recognition. A dragon that is naked with quadruped is still PG, but one without could be R in rating.
Training Perimeters
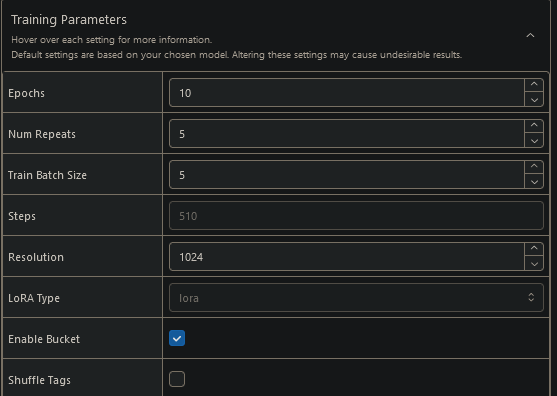
This is the intimidating part of the process, but all I can say is that you can generally don't touch any settings. As a complete beginner, I didn't touch any settings at all and the LoRA still turned out fine.
The only thing I meddle with now is the 'steps' by just adjusting the Epoch and the Num Repeats.
If I have only about 20-30 images, I usually want more steps (700-800) which I will toggle up the Num repeats so the total steps hit that desired number.
If I have 50+ images, I generally leave it at 400-500 steps and it still turns out fine. The more steps you train (>1K), you will be charged more buzz as well so take note of that. Only use this if you are generally training on little amount of pictures.
But like I said, you don't need to touch these settings really. This is what I mean by CivitAI does the heavy lifting for you. One of my best performing LoRAs was leaving the training perimeters untouched.
Note: Part 2 will be coming out soon where I'll delve into all these settings since I've learned a lot more since writing this guide. Especially useful if you're training low dataset (>10 pictures), stay tuned.
Things you need to note:
You don't need multi-training, just a waste of buzz IMO. Unless you're doing A/B testing or something.
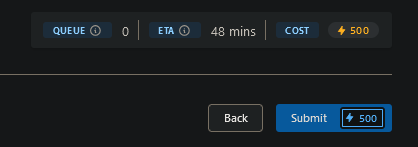
There's an option to prioritize your training, costs like 100 buzz more or so. Don't need it unless the queue is super busy. Even if so, I just chill until it's completed even if it takes a longer time.
Make sure you have the buzz for it. Blue buzz can be used as well if you've been farming it and not used it for picture generation. As you seen in the picture, I'm purely using Blue Buzz to pay for this training
And once you're done looking through the settings (AND MAKING SURE YOU SELECT THE CORRECT MODEL), click submit and confirm.. then now.. sit back and wait!
Once you're done...
Step 5: Seeing Your Results
Waiting...
In case you need to find the page again, it is under the training tab (On desktop, click your profile pic then the dropdown)
Once you've submitted your LoRA, you should see something like this below. If it shows processing and progress 0/10 means you've successfully started.

Over time, you'll see it progress slowly towards 10/10 where mean it's done!
When it's done, it'll show like this:

Selecting Your Model
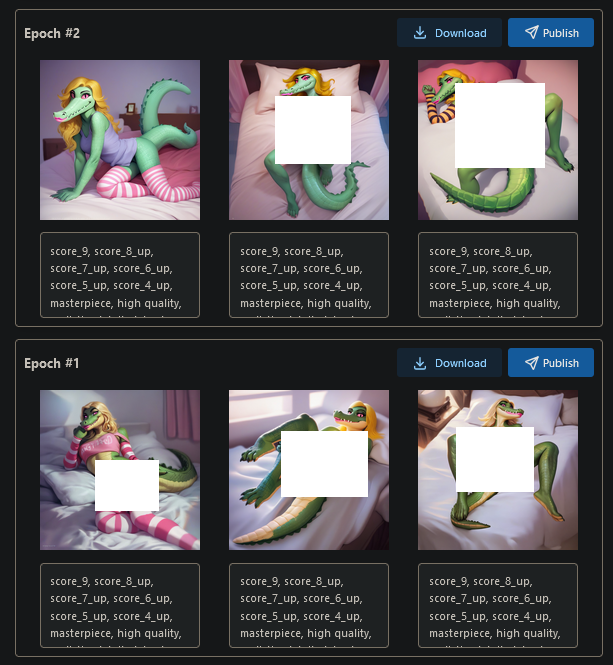
Note: White boxes are just censors and doesn't appear in your generations lol.
When you click in, you should see 10 epoch worth of pictures if you set it to 10 epoch. If you see the generations in real time, it'll generate from Epoch 1 to Epoch 10. Take note if you do larger epoch (like 15-20 or more) then CivitAI will not display all epoch and may display results every 2-3 epoch only.
I generally stick with 10 epoch for my generations so this isn't an issue.
Anyway, the first few epoch will look very shabby which is absolutely normal. If it looks something like the shape of the character, it means it is generally quite ok already. Looking at what I have above, it's already quite good.
Here's what you see on Epoch 9-10:
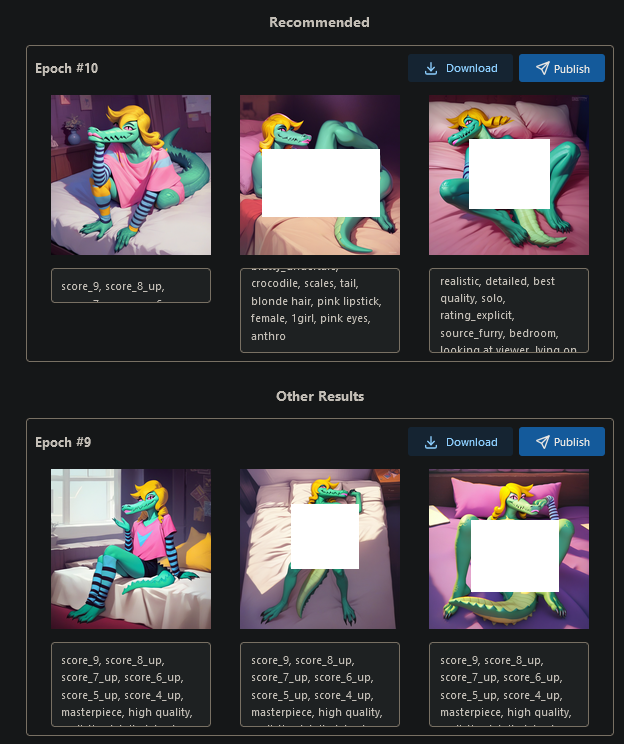
For some reason, Epoch 10 seem to have some deformities in the generations for 2/3 pictures. This is a sign that maybe I might not want to use Epoch 10 and use Epoch 9 instead.
My recommendation: Epoch 8 to Epoch 10 are usually the best results for a LoRA. If anything, post the LoRA first and test and don't base how good the LoRA is on these generations. Even for Epoch 10, the process I would have done is to post it first and do some testing to make sure it works at all. If you are getting weird/cursed generations then you can always unpublish it and then go to Epoch 9 etc.
Another note: You can actually download every epoch to get the safetensor file where you can directly upload the LoRA to CivitAI. Once you click publish, you will lose the safetensor files for the other generations so be sure to download other epoch if you think you may face issues (like for me in this scenario, I would publish 9 but download 8 and 10 just to be sure. Worse case scenario, I have to retrain the model again meaning I'll pay the 500 buzz again)
Once you've selected the right epoch, click Publish.
Edit Your Model
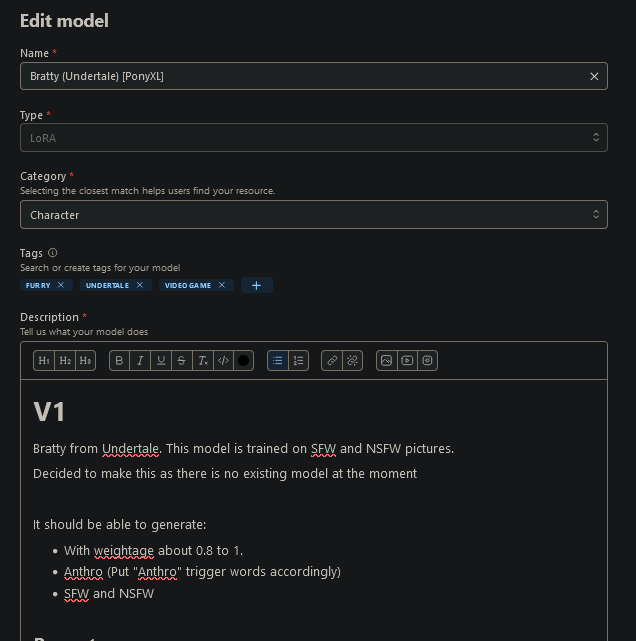
In this section, this is where you put in details of your model. The Name and Category should already be filled in since this is done when you start.
You need to add the appropriate tags to your model. I think the most important ones are that if your model is furry, tag 'furry'. If it's anime, then tag 'anime'
For description, this is where you tell the world what your model is. Typically what I put inside here are:
Description of the character
How to generate the character
Prompts
Notes (Where I write out after testing my model on things to note while using)
You can come up with a certain style, or copy my style if you want to start with something.
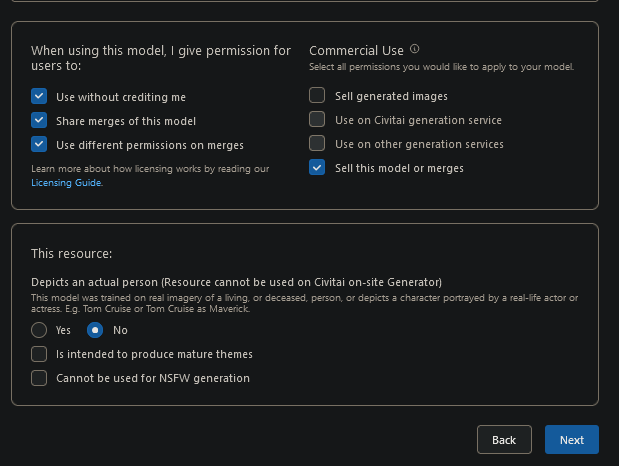
As for this portion, I would only touch the box at the bottom.
If it is a actual person, you will need to tick yes so you can't generate NSFW content with it.
Also the other 2 checkboxes, I typically leave it unchecked if your model is capable of SFW. As for my Bratty model, it is able to do SFW as well so I would leave these two unchecked.
The only time where I did use this was for my Horizontal Cloaca Model (NSFW WARNING!) where it was purely for NSFW.
Click Next once you're done
Edit Model
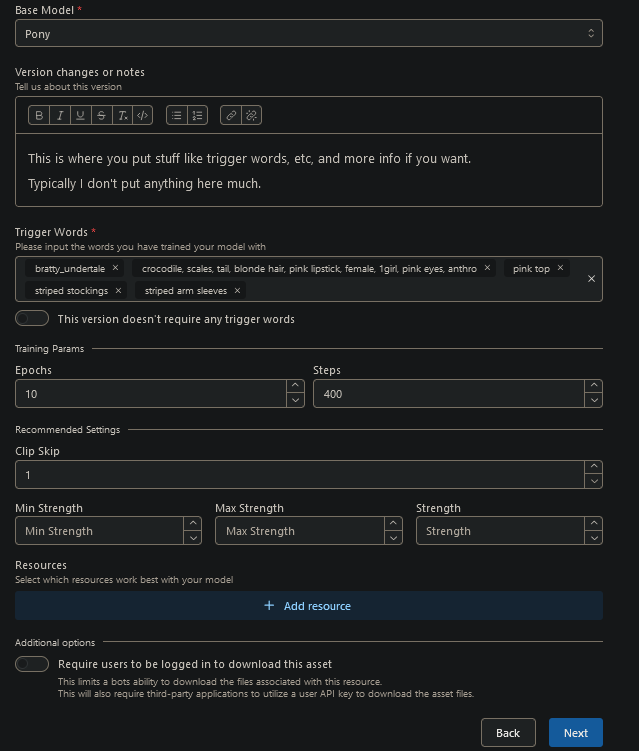
So under version changes or notes, this is where you can put things like trigger word stuff and notes about your model.
Most important one to fill in are your trigger words, where you separate it accordingly. I typically bunch stuff together if you'll need those words to help generate the model.
Typically main trigger words are the character's name, then the other words to reinforce that tag so it doesn't generate a human for some reason.
For the additional option, I usually leave that un-ticked by default for people to download the asset.
Edit Post
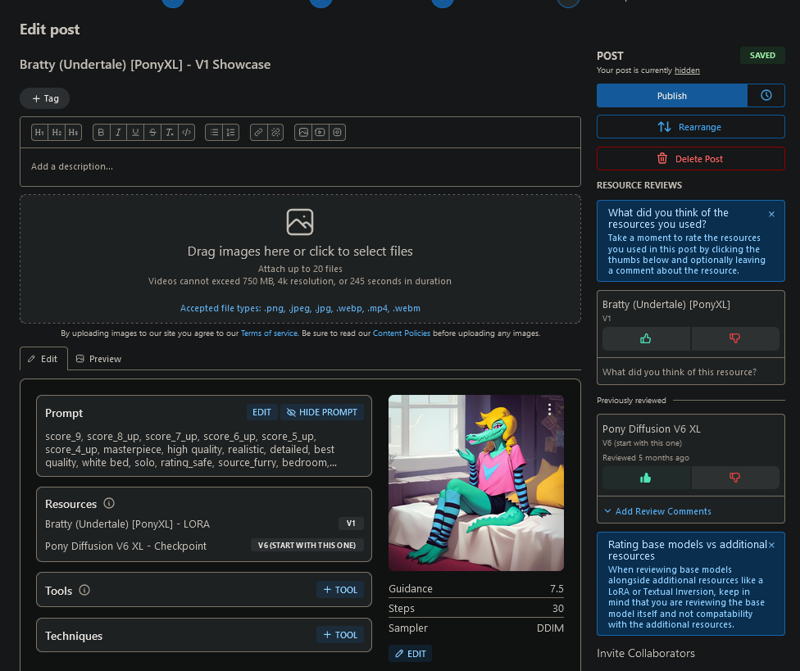
The last part is actually just publishing your post, as though like you're creating a post for images. The images will auto-populate from your epoch generations, so you can just go ahead and publish.
Personally I delete all the pictures except for one, but it doesn't matter because of the next step.
And you're kind of done with creating a LoRA, so congrats! But, we're not done yet.
Step 6: Testing Your LoRA
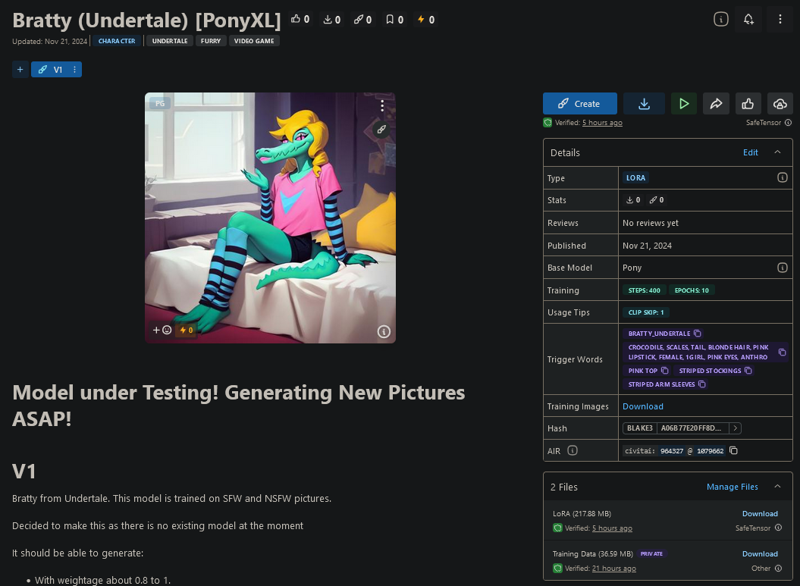
The last part is actually testing your model! This is to make sure that it is working properly!
You can always go back and edit your model in step 5 if anything by clicking the 3 dots on the top right hand of the above picture.
If you want to edit your picture post, then click the 3 dots on the picture itself to open the post itself.
It may take awhile for the 'create' button to appear and depends on CivitAI server load to index your LoRA. It usually takes seconds, but it can take up to hours if the site is facing issues. So if you face issues with using your LoRA, usually the solution is just to wait.
But now.. let's generate some pictures!
Why Test My LoRA? It seems fine already! I don't want to waste buzz anymore!
First of all, you want to make sure it's working properly especially if your character has finer details.
Secondly, this will create confidence for people who might want to use your LoRAs. I tend to generate 20 pictures (because that's the cap for posts) to show that my LoRA actually works with the proper trigger words and all.
Think about it, would you use a LoRA with barely any description or trigger words? Or would you pick one that has a lot of pictures shown that looks like what you want to generate?
That's the same for your audience!
This is also especially if you're creating the same character when there's already existing LoRAs for it.
If I have to pinpoint how I grew my account to where I am now, it's because I make sure the quality of my LoRAs are at least above average. And even creating a character LoRA that already existed is still fine because my audience know and trust the quality of my LoRAs.
And yes, I did unpublish a few LoRAs and also retrain LoRAs because the quality wasn't good. That could be tagging issues, or advanced setting issues. If it doesn't work well, I don't publish it.
So.. Let's get testing your LoRAs
If you've been publishing pictures so far, then this step will be familiar to you. You can use all your other LoRAs you usually use when generating your pictures,
Note that you can only post 20 pictures per post, so usually i'll like to test my model and generate up to 20 pictures so people can see how the model works in different pose.
You can use different LoRA styles or stick to the one that you are familiar with. Personally, I use Pony Realism a lot more for Pony and WAI-NSFW-Illustrious-SDXL v11 for Illustrious
Like for Bratty, I chose to use another of my somewhat signature style instead as it generates her better. Pony Realism seem to generate her hair straight all the time, and doesn't exactly look like the character, while the Illustrious version worked very well for her
If you want to see the prompts of the pictures I used, go directly to my post here to get some ideas.
Personally what I would generate
Several SFW pictures (4-5 pictures)
NSFW pictures (the bulk of it). I do a few poses such as the front and back to show the model is capable of it.
What I'm looking for when I'm testing
Test the different weightage. I typically generate at 0.8, so if it doesn't work well then go down to 0.7 or 0.6... or maybe turn up to 0.9 to 1.0
Does the character turns out like it's supposed to?
While generating the different poses, are there any issues?
Any other glaring issues such as something that may be not generating as consistently?
Or if the model is generating well, you should note down as well.
You can edit your page later to include all these details and let people know how the model is after your test.
One thing to note
On your post, your first picture will be the cover photo for your LoRA. So choose something appropriate that will hook people's attention. Think about what would make you click a LoRA picture, and that will help you.
Also if you want to rank in the leaderboards for LoRA creation, your cover photo post needs to be SFW as well as NSFW automatically disqualify you for most leaderboards. Nothing much, unless you want to be competitive!
Having a SFW cover photo also is beneficial since there are people on CivitAI green as well, so your LoRA will be cross posted on both websites. Keep this in mind if you want to attract more people to use your LoRAs
Step 7: Complete!
Congratulations! You've now successfully created your first LoRA!
What's next?
I'll say.. if you enjoy the process of creating LoRAs, then you'll probably start making more just like me. Ever since I figured out how easy the process was (like what I detailed everything above), it's just repeating it over and over again and you can now create the characters that you like but aren't on the platform itself.
Of course, buzz could be an issue itself especially if you aren't a sub. I recommend the $10/month sub which easily gets you a lot of buzz per month when you're starting out.
If you're serious in LoRA creation, you'll eventually reach a point where you'll generate enough buzz to pay for your next LoRA. Basically the more people who use your LoRA, the more buzz you get.
Now to finish this off, thank you for reading this long ass article! Let me know if you have any questions or just want to share a LoRA you created after reading this article. I would love to see what you create :)
PS. A short 'part 2' will be coming soon for troubleshooting LoRAs. Long day, long article, I'll write it another day lol
PPS. Editing this, my part 2 will more be for advanced LoRA making. Remember the Training perimeters I told you to skip? We're going there.

