
PolyPhaze | Generate reality @ PolyPhaze | Patreon
Are you ready to take your AI image generation to the next level? In this guide, we’ll explore the Redux Advanced Node—a powerful tool that combines reference images and advanced properties to create visuals that push the boundaries of creativity. Whether you're an artist, developer, or AI enthusiast, this guide will walk you through the workflow and show you how to unlock incredible results.
What Is the Redux Advanced Node?
The Redux Advanced Node leverages Flux Redux technology, allowing users to transfer specific characteristics from reference images into generated content. Imagine combining the style, color, or subject of a reference image with a creative prompt—this node makes it possible.
In simple terms, it’s your go-to assistant for blending inspiration with innovation.
Key Features and Properties
The Redux Advanced Node offers a range of customizable properties to give you full control over your image generation:
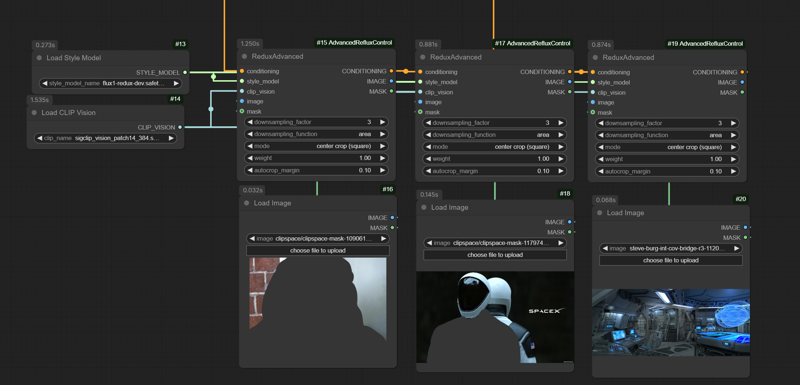
Downsampling Factor
Controls how much the reference image is resized.
Lower values preserve more detail but increase processing time.
Downsampling Function
Determines the method of resizing, affecting sharpness and clarity.
Mode
Defines how the node interprets the reference image (e.g., focusing on color, style, or specific features).
Weight
Adjusts how much influence the reference image has on the final output. Higher weights mean more prominence in the result.
Autocrop Margin
Automatically crops the reference image to focus on the subject, removing unnecessary background.
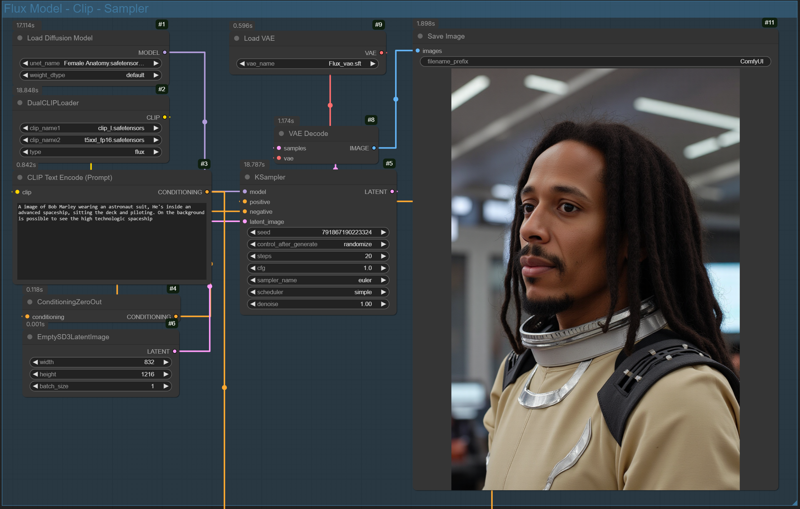
How to Build the Workflow
Here’s how you can incorporate Redux Advanced Nodes into a powerful workflow using ComfyUI:
Start with a Prompt
Write a text prompt describing your vision. This will guide the AI on the main concept of the image.Add Redux Advanced Nodes
Connect your reference images to the nodes.
Customize the properties (e.g., Downsampling Factor, Weight) to achieve the desired effect.
Combine with Flux Redux Model
Link the outputs from the Redux Advanced Nodes and your text prompt to the Flux Redux Model. This merges your creative vision with the characteristics of the reference images.Balance the Settings
Experiment with the node properties to find the perfect balance. Think of it as a recipe—too much of one ingredient might overpower the others.
Tips for Success
Experimentation is Key: Don’t be afraid to tweak settings and try different reference images. Every combination can lead to a new, unique outcome.
Focus on Quality References: Use high-resolution images that match the style or elements you want to include.
Layer Multiple Nodes: Add depth by combining more than one Redux Advanced Node, each with different settings or references.
Why Redux Advanced Nodes Are Game-Changers
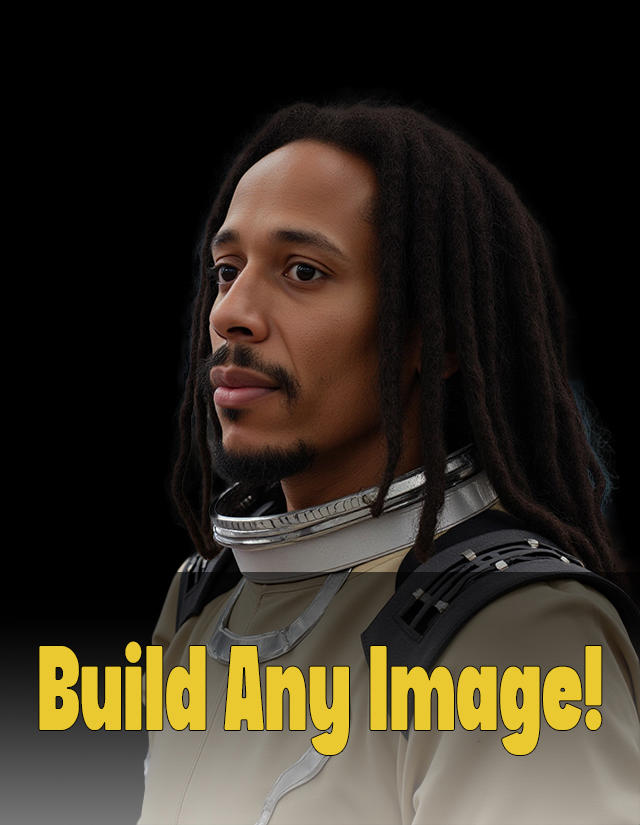
By integrating Redux Advanced Nodes, you’re no longer limited to generic outputs. You can create highly personalized and imaginative visuals, such as:
A baby Spider-Man zooming on a jet ski.
Baby Superman skateboarding through a futuristic spaceship.
Any other wild idea you can imagine!
These nodes empower artists and creators to merge styles, details, and inspiration into cohesive, stunning images.
Final Thoughts
The Redux Advanced Node is a must-have tool for anyone serious about AI image generation. Whether you’re a hobbyist or a professional, it opens up a world of possibilities by giving you control over the creative process.
If you found this guide helpful, leave a comment to share your experience or questions! You can also support my work on Patreon to gain access to exclusive workflows, tips, and resources. Let’s push the boundaries of AI creativity together!