Massive thank-you to NanashiAnon for the constructive feedback. If you like this article, consider supporting me or commissioning your very own LoRA on Ko-fi!
Preamble
This is a guide I wrote for a Discord server I’m in, and I thought sharing it to the public might be useful for any total beginners into the LoRA-training space who wish to have a little deeper understanding of the whys behind it all, while also at the same time not overloading you with a TED Talk into the creation process.
To go along with this guide, I used the dataset behind my LoCon for Illustrious-XL, Beholder Vision, and used the settings outlined later in the article to remake it as a Pony LoRA. The LoRA generated the art and cover used in this article!
I hope this is helpful to anybody who reads it!!

Introduction: No Terminals, No Hassle
If you’ve spent even five minutes messing around with AI art, chances are you’ve thought, “Okay, this is lovely, but I wish it felt more like… me.”
You’re not wrong. Sure, the default base models are fun to play with, but they don’t really get what you’re going for. Maybe you want to teach a base model how to mimic a specific style or you’ve been dying to create a character that’s been living rent-free in your head for decades. Whatever the case, it might feel like you’re staring down a mountain of coding and terminal commands if you want to make it happen. But (good news!) that’s not the case: this is LoRA training.
LoRA (shorthand for Low-Rank Adaptation) might sound like something overly technical, but trust me, it’s not nearly as intimidating as it sounds. It’s basically like giving your base model a quick crash course in whatever style, subject, or character you want it to learn. And the best part? Thanks to some genius tools on the internet, anyone can train a custom LoRA model from scratch. Seriously, if you can organize some images and click buttons on a webpage, you’re halfway to having a custom AI model trained by you. No warehouse-sized computers required.
Now, this guide will focus on getting you through LoRA training the easy way. No deep dives into neural network theory, no talk of things like LoCon (trust me, that’s way more complex and definitely not what we’re here for today). This is pure, simple, functional LoRA creation.
On The Critical Role of Datasets and Why They Matter
Before we continue, let's take a moment to go into the powerhouse behind any successful LoRA training project: the dataset. It doesn’t matter how perfect your parameter settings are or how much time you spend tweaking optimization—if your dataset flops, so will your results. Let’s talk about why datasets are important and what makes a good one.
What Is a Dataset, Anyway?
When we talk about a dataset, we’re simply referring to the collection of images your AI will study during training. Think of it as the AI’s homework. Through the images in your dataset, your AI learns the specific concepts, styles, or characters you want it to replicate. Without a solid dataset, your LoRA won’t have the foundation it needs to learn effectively.
Imagine trying to teach someone how to paint in a particular style, but you only show them blurry artwork or random doodles—they’re not going to learn what you’re aiming for. The same principle applies here, which is why your dataset is everything.
Dataset Size: Quality > Quantity
One of the biggest misconceptions about LoRA training is that you need thousands of images to get good results. The reality? A well-curated dataset of 30-50 images can blow a poorly curated collection of 500+ images out of the water. It’s all about having the right kind of data.
Here’s the deal:
For specific character training, you’ll want 20-50 images showcasing different angles, expressions, and poses. This helps your AI generalize the appearance of the character without getting stuck on one particular shot.
For style training, try 30-100 images representing the artistic aesthetic you want to teach (e.g., watercolor, grunge, vaporwave). Be sure to avoid including styles or themes that you don’t want the AI to learn.
For concept training, aim for 50-100 images that clearly depict the object, clothing style, or theme you’re going for. Consistency here is king: don’t mix too many unrelated items in a single concept dataset (e.g., adding cowboy hats to a futuristic helmet dataset probably won’t end well).
The goal is to strike a balance between having enough variation for generalization and not so much that your AI loses focus.
How to Curate Your Dataset
Building a solid dataset takes a little effort, but the payoff is huge. Here’s a quick checklist to ensure yours is up to par:
Is the quality high?
Avoid images with heavy compression, watermarks, or low resolution (1024 pixels or higher is ideal).
Is it consistent?
If you’re making a LoRA for a style, all your images should reflect that style. Similarly, aim for uniform lighting, color grading, and framing wherever possible.
Is it relevant?
Double-check every image to make sure it aligns with your training goal. Extraneous visuals (e.g., logos, random text) can clutter your data.
Is my dataset diverse enough?
For styles and characters, include different angles, actions, or lighting conditions while still adhering to the overall theme.
Your Dataset Changes the Game
At the end of the day, the quality and curation of your dataset determine whether your LoRA turns out stunning or subpar. With a great dataset, training can feel almost effortless—your LoRA will learn faster, generalize better, and produce incredible results. A weak dataset, on the other hand, will leave you scratching your head, wondering why your output isn’t hitting the mark.
So take the time. Collect with purpose. Tag with intention. And watch your training results go from subpar to superb.
Step-by-Step: Training a LoRA on Civitai
So, you’ve got your concept in mind, you’ve collected your dataset, and you’re ready to teach your AI how to vibe with it. Whether you’re aiming for anime aesthetics, painterly styles, or something completely out of left field, this walkthrough will get you set up and ready to roll—all without breaking a sweat (or their GPUs).
Open the “Train a LoRA” Tool
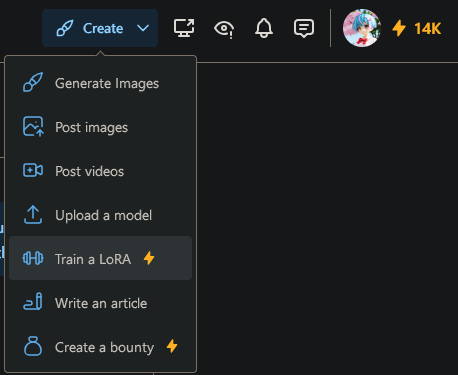
To get started, head to the top of the screen and click the Create button. A dropdown menu will appear with several options. Find “Train a LoRA” (you know, the one with the cute dumbbell icon) and select it. This takes you to the page where all the excitement happens.
Choose the Type of LoRA You Want to Make
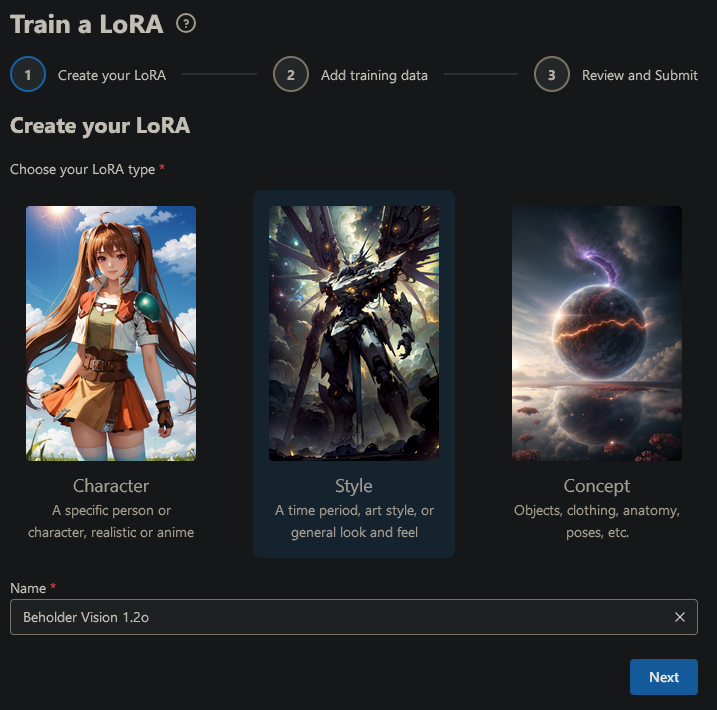
At this stage, you’ll pick what kind of creative LoRA you want to train. You’ve got three main options:
Character: Focused on teaching your AI how to recreate the likeness, style, or unique flair of a single character. Ideal for anime, game characters, or even portraits.
Style: For teaching your AI how to emulate a particular artistic vibe, like surrealism, impressionism, or cel-shading. This is perfect for creating a general “look.”
Concept: Tackles more specific subjects like clothing, objects, poses, or themes.
Once you’ve selected the type of LoRA, you’ll be prompted to name your project. This might seem like a minor detail, but as NanashiAnon pointed out, it’s vital to ensuring your training process goes smoothly. Keep these tips in mind when naming your model:
Avoid problematic characters. Certain typographical characters (like slashes
/, backslashes\, colons:, and others that can't be used in file names on every desktop OS) will automatically be stripped from your LoRA's name. Additionally, spaces will be converted to underscores (_), which can be jarring if you're not expecting it.Make the name informative. It’s extremely helpful to give your LoRA a clear, descriptive name so you can identify its purpose at a glance. Be specific about what the model represents.
For example, instead of naming your model something generic like “Style1,” try “Sakura Character LoRA” or “kawaii vision.” These would be converted to “Sakura_Character_LoRA.safetensors” or “kawaii_vision.safetensors” respectively, with each epoch having its own file name (e.g., “kawaii_vision-000003”).
Avoid non-English or non-standard characters. Some local generation setups can have issues with non-English characters (e.g., Japanese, Cyrillic, or special unicode symbols) in file names. The page name (the name displayed on Civitai) can be changed later at any time, so feel free to include special characters or a Japanese name there for better searchability.
Keep it short and sweet. Extra-long file names can sometimes cause issues with Civitai’s automatic virus scanner, preventing your LoRA from being properly uploaded.
Once you’re happy with the name, select Next to continue.
Review the Dataset Attestation
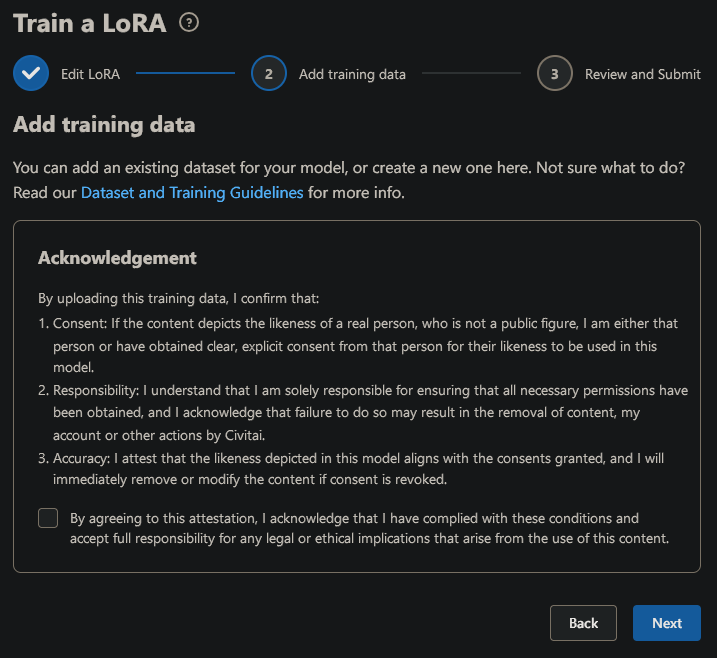
Before uploading your dataset, you’ll be prompted to confirm some ethical and legal terms. Basically, this step ensures we’re all being responsible creators:
The images in your dataset must either belong to you or have the proper consent/permissions.
You’re agreeing to be accountable for the content you upload and any potential implications it might have.
Check the box to confirm your agreement, then hit Next.
Upload Your Training Dataset
Now it’s time to bring in your secret sauce: your training images! This is the core of your LoRA’s learning process, so don’t skip the prep work here:
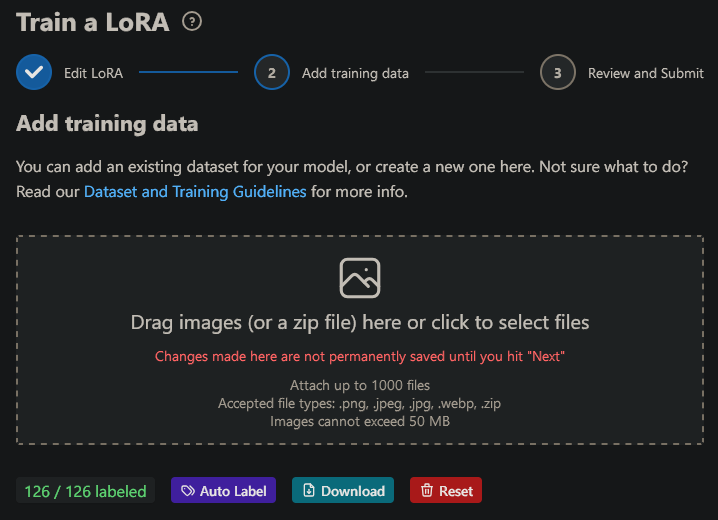
Click to drag and drop your images (or a ZIP file) directly into the upload box.
You can upload up to 1,000 images at a time. Remember, quality matters more than quantity—use clear, high-quality images that represent the style, subject, or concept you want to teach.
Once all your files are uploaded, double-check the count to ensure everything’s good to go. If you need to start over, hit Reset. When satisfied, click Auto Label.
Tag Your Dataset
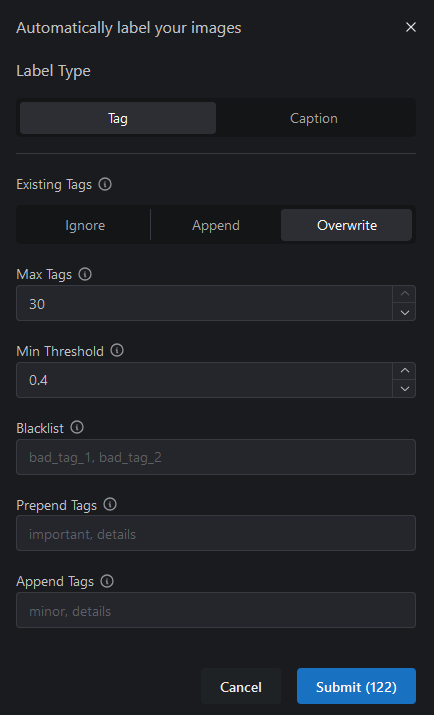
Tagging your dataset is like writing notes for your AI to study. It’s how your images “tell” the AI what they represent. This step helps the model learn more effectively. Here’s how to handle it:
Tags & Captions: You can automatically add descriptive tags (e.g., “cottage, sunset, watercolor”) using Civitai’s handy tagger. Captions are handy for more nuanced, natural-language captioning, in other words, FLUX LoRAs.
Options for Tagging:
Ignore: Skips tagging completely. Only do this if your images already include metadata or tags or you have no tags at all.
Append: Adds tags to existing ones in the dataset.
Overwrite: Replaces any existing tags with new ones automatically added.
Fine-Tune Your Tags:
Max Tags: Limit tags per image to prevent overloading the training process. Keep this at 30 for most cases.
Threshold: Helps the tagger exclude irrelevant tags. Stick with 0.4 as a safe baseline.
Blacklist, Prepend, & Append Tags: It’s safe to ignore these for now.
After setting everything the way you like it, click Submit to finalize your dataset.
Next, we’ll take another short detour to talk about trigger words, also known as activation tags.
On Trigger Words, Rare Tokens, and Overthinking (Just Enough)
The quiet directors behind the scenes of your AI art productions. If you’ve ever typed something like “forest, 4k, cinematic lighting” into a prompt and gotten results that didn’t… quite click, there’s a chance you might be missing out on their potential. Trigger words are absolutely clutch when it comes to training high-functioning LoRA models, and if your dataset has been curated with care, they’re the secret sauce that brings everything together.
Trigger Words: A Short Explanation
A trigger word is essentially a shorthand that activates the LoRA’s specialized learning. Think of it as the AI’s mental bookmark for everything it studied during training. Want your AI to draw in a painterly style? Train it with the trigger word “painterly.” Want a unique aesthetic inspired by vaporwave sunsets paired with vintage film grain? Use “vaporwave-grain” during training, and you’ve got yourself a magical button for summoning that exact vibe.
When you upload your dataset and go through tagging (please do), you can prepend each image with a word or phrase that will act as this trigger. This step makes your LoRA more controllable and helps it stay contextually focused when generating images.
Rare Tokens: The “Why” Behind Strange Trigger Words
Rare tokens make the best trigger words. Instead of tagging your images with something generic like the “painterly,” mentioned above, you want a term that won’t accidentally mix its signals with pre-existing data in the AI. Why? Because built-in models already have knowledge associated with common words. The word “watercolor,” for example, might produce blended results that pull from its original training data, even with your awesome LoRA in place.
Instead, get creative:
Use nonsense words, like “fl0rb1nexus.” (Is it goofy? Absolutely. But it’s effective because it has no prior associations in the model’s brain.)
Rare tokens exploit the AI’s underlying tokenization system. A quick peek under the hood would reveal how your trigger is chopped into subword fragments, the building blocks of your LoRA’s understanding. But don’t worry. You don’t need a PhD in linguistics for this: a funky, made-up word does the trick.
At its core, playing with trigger words and rare tokens is a power move that swings the training process in your favor. It’s about steering clear of clutter, creating clean associations, and giving your AI the freedom to solely focus on your vision. Even though the idea of tokens could inspire a long-winded TED Talk (which I am clearly not restraining myself from writing), the truth is, you don’t need to overthink this part. Just pick a word, keep it rare, and let the technology handle the rest.

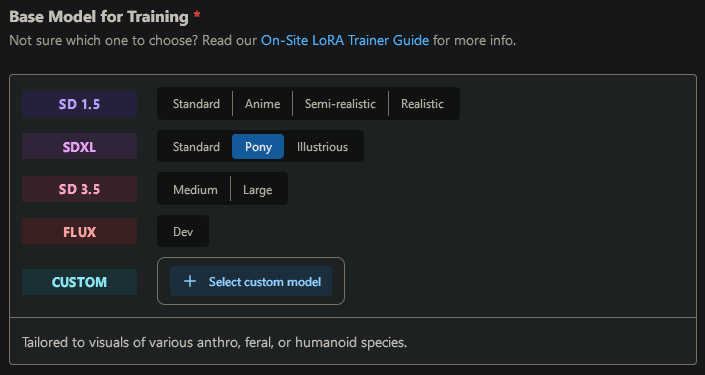
Pick Your Base Model
This is the final stop before actual training begins. Here’s where you pick the pre-trained model your LoRA will build upon. For beginners, I highly recommend Pony. It’s a versatile base, great for learning both styles and concepts and my recommendation for a beginner as that’s where I got my start in LoRA-making. Select it from the options, and you’ll be all set.
Once you’re here, congratulations, your LoRA is almost ready to start training! The next phase involves tweaking advanced parameters and letting your base model learn from the dataset you’ve so lovingly prepared. Let’s continue.
The Art of Tweaking: Setting Up Your Training Parameters
Alright, now that we’ve gotten past the introduction, let’s dive into the part where you actually tell your LoRA what to do. Don’t worry, this won’t require a computer science degree or a dissertation on machine learning theory. But it will require a quick look at some parameters that make a big difference in how well your model learns.
TL;DR: Set Your Training Parameters Like This
Take a glance at these images to guide you with the parameter settings. This is your control panel for training your LoRA. Simply follow the highlighted options, and you’ll be good to go:
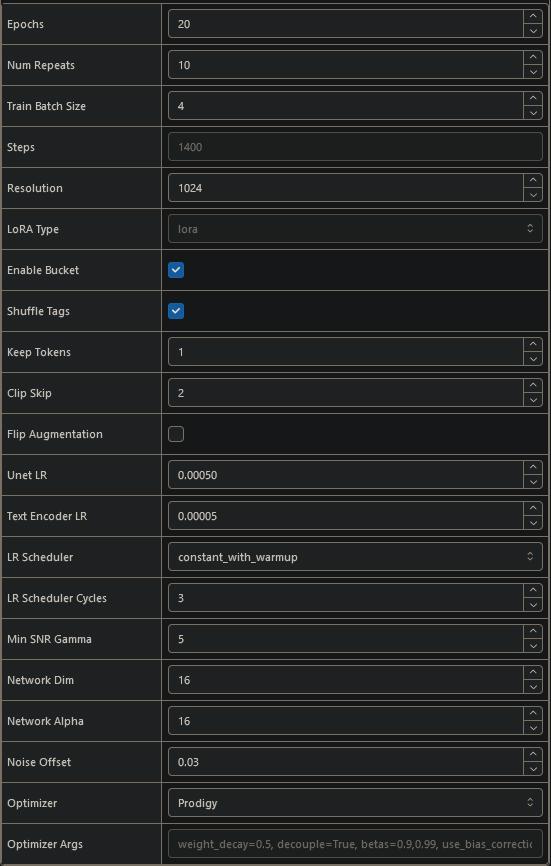
In the next section, I’ll walk you through the important settings with enough explanation to make you feel like a professional, but not so much that your eyes glaze over. Think of this as giving your AI a set of rules for a really intense study session; but instead of textbooks, it’s poring over your carefully curated images.
Deep-Dive Into Advanced Training Parameters
Epochs: 20
Think of epochs as how many times your AI will loop through and “study” your dataset. 20 is a solid starting point: enough to teach your model what it needs to learn, but low enough to avoid overcooking the data.
Repeats: 10
Repeats control how many times your model goes over each image per epoch. Setting this to 10 strikes a nice balance. It’s like making sure the AI isn’t just glancing at the images, but it’s not staring at them long enough to start tracing them, either.
Batch Size: 4
Simply put, batch size determines how many images the AI processes at a time. A size of 4 works well for most beginner-level setups: efficient, manageable, and gets the job done.
Steps: 1,000-2,000
Steps are the total number of backpropagation updates made during training—and if that sounds intimidating, let me simplify it. Backpropagation is the process of the AI looking at an image, figuring out where it screwed up, and correcting itself. If epochs are like how many times your AI reads a book, steps are like how many notes it takes while reading. Keep it between 1,000-2,000 for well-rounded results without frying your model’s brain (because yes, overtraining an AI is a thing).
Backpropagation: Important Concept
Okay, time for a little “fancy” chat: this is a mathematical method of adjusting network weights by propagating the error (difference between prediction and target) back through the model. Think of this as the AI grading its own paper, learning from mistakes, and updating itself in real time to get closer to the right answer. This is happening behind the scenes automatically, so you don’t have to do anything fancy yourself—just kind of cool to know how the magic works.
Shuffle Tags: On
Randomizes the tag order, which helps your AI avoid learning patterns it shouldn’t. Turning it off would be like showing your AI the same postcard 50 different ways; it gets repetitive and confusing. Just trust me, shuffle those tags.
Keep Tokens: 1
This one’s straightforward but crucial. Keep Tokens set to 1 ensures your activation tag is maintained properly during training. Forget about this once it’s set—it’s basically a housekeeping setting that will save you headaches later. Set it to 0 if you’re not using an activation tag.
Resolution: 1024
The resolution of your images directly affects the details your AI picks up. At 1024, you get a nice sweet spot: detailed enough for nuanced textures, especially for realism and semi-realism styles, yet flexible enough for anime styles too.
Clip Skip: 1-2
Here’s where things get interesting. Clip Skip controls how deep into the model’s layers your training data is processed. For anime art or anything stylized, set it to 2 (this helps pick up those clean, sharp aesthetics). For realism, stick to 1 to retain more natural textures and tones.
Learning Rate Scheduler:
constant_with_warmupThis sets the pace at which your AI learns. With
constant_with_warmup, your AI gets a gentle start ("a warm-up lap," if you will) before cranking into full training mode. It’s like stretching before going ham at the gym—essential for smooth results.
Min SNR Gamma: 5
Okay, we’re dipping our toes into "advanced-yet-manageable" territory here. This just controls the signal-to-noise ratio while your AI learns. It keeps your training results clear and cohesive. Without going too deep into the weeds, setting Min SNR Gamma to 5 helps stabilize training, ensuring your LoRA learns the big picture first before picking out the finer details.
Network Dim: 16
Think of this as the “width” of your training model’s internal layers. Increasing this value allows your LoRA to learn more detailed patterns, but it can also increase resource demands and the final filesize of the LoRA.
Network Alpha: 16
Alpha adjusts the overall strength of the training process. A balanced value ensures smooth learning without overwhelming your model. For most cases, 16 or 8 is perfect. If needed, alpha can be tweaked to make small, incremental adjustments to model performance.
Optimizer:
ProdigyThis setting chooses how your AI adjusts its internal weights during training.
Prodigyis a newer optimizer (which is, to put it simply, like having a personal trainer that makes your learning process both effective and efficient), and let me just say, it lives up to its name. It’s efficient, sharp, and gets the job done without wasting resources. Plus, it’s especially good for smaller datasets (10-30 images), which works perfectly for the sake of our training.
And Hit “Submit”!
These parameters should give you smooth, consistent results no matter what style you’re training. If you feel like experimenting down the line, definitely do, but for now, stick to these to avoid accidentally training a LoRA that’s just a bit off. (Yes, that’s happened to all of us, and no, it’s not pretty.)
Once everything is set, you’re ready to hit that “Submit” button and gg, you did the thing! Now comes the hardest part: waiting. But hey, while you wait, you could check out the lovely Civitai community!
We’ll go over how to test your fresh-out-of-the-oven LoRA in the future. But for now, I recommend gauging the quality of your LoRA based on the sample outputs you get from each epoch (found in the “Training” tab on your profile).
Addendum: Prodigy Optimizer
I briefly mentioned Prodigy as the recommended optimizer for beginner LoRA training. Let’s dig a bit deeper into why it’s such a fantastic choice and how it differs from alternatives.
What Is an Optimizer, Anyway?
Think of an optimizer as the AI’s “personal trainer.” Its job during training is to guide the AI in adjusting its internal weights to minimize errors in its predictions. Different optimizers have unique training methodologies that directly affect how your LoRA learns, how fast it converges (i.e., learns the solution), and how smooth the final results look.
Many traditional optimizers are based on gradient descent, which reduces errors layer by layer, but newer developments like Prodigy have revolutionized this process for LoRA-specific training.
Why Choose Prodigy?
Efficiency with Small Datasets:
Unlike general-purpose optimizers,Prodigyis built to shine in scenarios where data volume is limited. Think 20-50 images. Since LoRA training often relies on concise, curated datasets (especially for individual characters or niche styles),Prodigyaligns perfectly with this use case.Faster and Smarter Learning:
Prodigy uses advanced scheduling techniques to balance learning speed with understanding. This means faster convergence (your model reaches its “stride” faster) without sacrificing detail. Its learning approach adapts dynamically, which reduces the risk of overtraining your LoRA and often leads to cleaner, sharper results.Smoothing Out the Loss Curve:
One hallmark ofProdigyis how effectively it stabilizes training mid-way through. Traditional optimizers often introduce noise or jitter (tiny spikes and dips on the loss curve) as they process increasingly complex training loops. This can lead to suboptimal results or wild variations between epochs. With Prodigy’s stability, the loss curve glides more smoothly, resulting in consistent, high-quality updates across training.
When (and Why) Prodigy Outperforms the Alternatives
While other optimizers like AdamW or Lion are popular for general model training, they’re not always the best for fine-tuning or adaptation-focused projects. Prodigy’s advantages become apparent specifically in:
LoRA Training: Its stability and resource efficiency make it the go-to for small-to-medium-scale personalization tasks.
Smaller Datasets: When working with restricted data sizes, Prodigy avoids overfitting while still extracting enough from fewer samples to create coherent results.
Intermediate/Advanced Users:
Prodigyrequires minimal tweaking, making it beginner-friendly but versatile enough for seasoned trainers looking to streamline workflows.
Changelog
12/12/2024
Fixed a stray bullet point.
12/10/2024
Changed the name from “Crash-Course in LoRA Training” to “LoRA-Training Fundamentals.”
Expanded the section for naming your file based on constructive criticism.
Added a section on
Prodigyoptimizer.
12/8/2024
Restructured and reformatted the whole article, did some minor spelling and grammar corrections, and incorporated some feedback. Will do a full rewrite in the coming days.

