I will divide notes into chapters and I'll write in the comments when new updates are avaible.
If you want to stay up to date leave a comment to get notified.
Please comment if you notice anything wrong or if you have theories that contradict what's written, so that we can all benefit from it. This is very important in this early stage of Hunyuan madness!
I will continue to share and update this post as i discover infos that worth to be shared,
I also encourage you to share any relevant information about this model here so that everyone can have everything organized in one central place.
Day: Dec 4 2024.
Mark this date on your calendar because it represents the moment humanity truly began to solve local videos gens
A huge milestone in the open-source video model space has just landed, and it definitely deserves a post here!
I’ve shared some workflows as well, but due to constant updates of this new nodes many users were unfortunately unable to run them yet. I’ll be updating those too.
There’s some confusion around to clear up.
Recently, Comfy added native support to Hunyuan; However, if you switch to other more advanced nodes, you'll need to download some additional files.
Be sure to follow the installation instructions provided on the GitHub page of each nodes that are not the comfy native ones.
If you are just starting now in Hunyuan I would suggest to begin with basic native workflows
and then eventually move to more advanced nodes (like those provided by Kijai on this link or Zer0int nodes link ) .
In the meantime, you can use my tips, studies, and notes to apply them to your workflows
Some chapters of this guide refer to nodes from Kijai and Zer0int,
but they are easy to recognize through the screenshots so if you can't find the settings in native comfy nodes you know why.
I'm using a 3090 so if you see data around referring to generation duration or timings, they are related to this GPU.
If you have less than 24GB gpu you should consider tryin smalled gguf models avaible here,
wich allow to gen videos even on a 12gb vram gpu.
Before we start, let me tell you that reading this was really helpful and confirmed a lot of my theories afterwards.. as usual I play around with things before even reading the user manual!🤣🤦♂️
So, if you intend to get serious with this model and aim for incredible results, I strongly recommend reading that first.
Happy reading!
These are just my personal considerations after several tests.
Don't take my words as law or scientific truth 🗿
||||||| Last Update: March 03 2025 |||||||
Fast Hunyuan
15-Dec-2024 .
A faster Hunyuan model is released.
17-Dec-2024 .
You can get the fast fp8 model or the lora here and swap it from the original model.
The lora is supposed to be the difference between the fast minus the vanilla, so you can use that loaded in the vanilla/fp8. However the result may not be the same as using the fast model itself.
With the fast model you can now lower steps to 7.
They suggest to raise guidance above 6.
This seems to work a little better on higher resolution, like 480 or above.
I must acknowledge that while there is a decrease in quality when using lower resolutions, the trade-off is often worthwhile. The speed gained can be significant.
I was able to generate VID2VID in 53 seconds inference time with this settings:
-249 frames = ~10 seconds video
-size: 720H x 400W
-steps: 7
-denoise: 0,5
If anyone sees a jaw around, it's mine, I lost it again ffs 🤯
Artefacts/Jittering:
By using the FAST model, I initially had a hard time figuring out the correct settings, resulting in flickering, jittering, flashy artifacts (call them what you want), but after many experiments, I understood why.
It’s all about the combination of flowshift, denoise, guidance, prompting, and LoRAs.
In VID2VID, the issues are more evident, and the more freedom you give the model to modify the initial input, the less vibrating results you’ll probably get.
I think one of the causes of the flickering may be that the model tries to move away from the input, but the flowshift and denoise are not optimally set. Since it operates with a very small number of steps, this is what happens. As a result, the model tries to return to the original pixel positions at each frame, causing weird vibrations.
We’re talking about things like "hands vibrating," not glitches.
Glitches are something entirely different and are related to the FAST model,
which complicates things further in v2v if you do not have enough experience with the FAST model settings. The fast model itself thend to glitches if no lora are loaded in.
Native nodes handle the number of steps differently compared to Kijai and Zer0 nodes.
When you set 7 steps in native nodes, you will always get exactly 7 steps, regardless of the denoise value. This behavior is consistent in all cases.
In contrast, with Kijai nodes, the effective number of steps is lower when lowering denoise.
For this reason, in v2v workflows, you might want to try reduce the steps to 4 or 5 when using native nodes, to mimic with the behavior observed in Kijai nodes.
Glitches/Fried results:
The best suggestion i can give is to experiment and use my following tips to avoid artefacts,
you'll get it! :
When using this model, the operational threshold between a poor result and a great result narrows significantly since the amount of steps to operate is very low , wich is tricky expecially when using vid2vid.
Every small change in the settings can take you from a perfect result to a total disaster, sometimes even by shifting the value by just one point.
Tt can be hard to find a balance and it can easily result in flashy marmelade artefacts.
To avoid this artefacts in both txt2vid / vid2vid you can try ONE of this solutions:
-swap model with the regular model and add the fast lora at+0,7
I often switch between the fast model and the standard model, especially when I’m not using certain LoRa models. The fast model tends to produce more glitches if no LoRa is loaded.
Therefore, using the standard model along with the fast LoRa allows me to achieve nearly the same results of using the fast model alone.
That being sayd I'm going to modify all workflows i shared and swap the model,
inverting the lora strenght from -0,3 to +0,7 , so people have less headache.
in short:
Fast model + Fast lora at -0,3 gives practically almost the same results as:
Regular Model + Fast lora at 0,7
this are the two combination i use more often
The second one seems the more intelligent at this point.
the fast model tend to glitches. Glitches use to stop when an additional lora is loaded in.
so by swapping the fast model with the regular one, and adding the fast lora on top, seems to help.
-add fast lora at negative value: it can be that for your particular setting the model show all muscles and prove to be glitchy as being a fast model. Adding FAST LORA at negative value of -0,3 / -0.5 fixed my issue multiple times.

-change guidance scale: In mutiple occasions i noticed that lowering guidance to 4 or simply changing the value at a different even higher value fix the glitchy result.
-raise flowshift: change value to something above 9.
just to say, in some occasions i had to raise it to 30 to avoid flashy artefacts..
-add cfg node, value2
(this seems to remove the artefacts completly but raise the gen times a little)
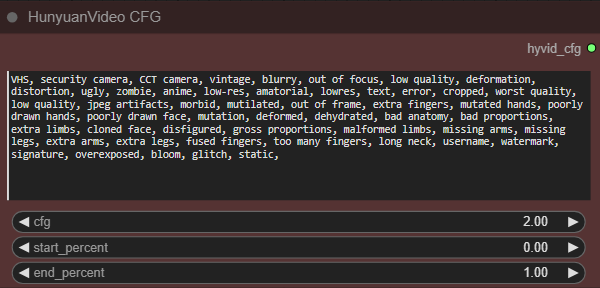
-Longer prompts are better, same as with Flux. However, you can always reduce Guidance to 7 or 8. Making sure to use "realistic" and "natural lighting" helps a lot too. Precise prompting helps and reduce artefacts.
-Try switch smaplers. Someone found BetaSamplingScheduler better than BasicScheduler
-The vanilla model will always perform better, but slower. If you do not have patience to master the fast model and really struggle getting decent results you can always switch back to vanilla and add the Fast lora to lower the steps amount.. Its kind of a middle way between quality/time
-be sure to read this pdf, section 3.2 "annotiation" explain how to prompt for better results:
here some extreme low res examples, took 15 to 20 seconds to generate each clip,
all put togheter messy and consecutive without a criteria 😁
Ghosting effect:
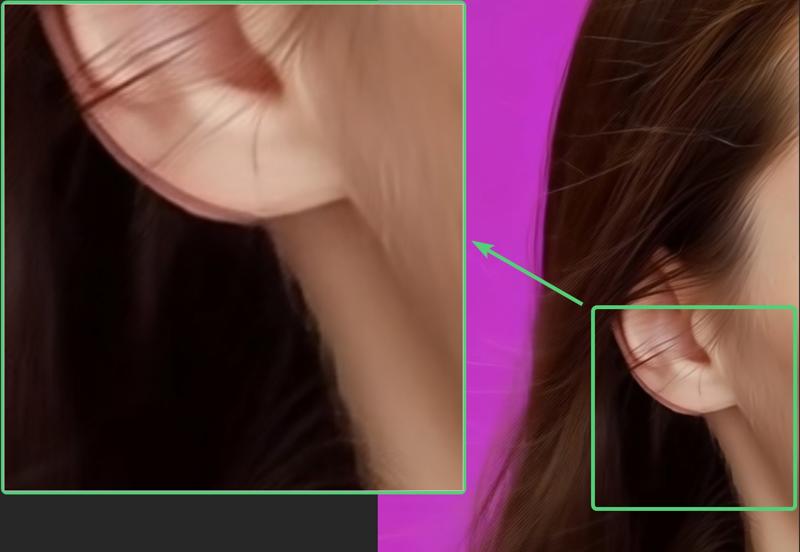
Some users have complained about this ghosting effect during the upscaling process.
Clearly, they have never dealt with latent upscaling before.
So, let me explain:
This ghosting effect usually occurs when attempting upscaling using latent upscale.
As many already know from past experiences with other AI models for images (FLux, SD..),
latent upscaling is not the most accurate or proper way to enlarge an image before sending it to inference. However, it is very fast.
So, finding a balance between denoise and steps can save a lot of time in upscaling.
When performing latent upscaling, you can speed up processing by passing latent data directly from one node to another, avoiding the need for decoding/resize image/encoding.
As result the process is much faster, but at the cost of potential ghosting issues.
Lets talk about how to handle latent upscaling and ghosting:
To fix ghosting, simply increase the denoise value (e.g., to 0.5 or 0.6) and raise the number of steps. This applies to all upscaling workflows I have shared suche as Advanced and Ultra setups.
In these workflows, I have also included more appropriate upscaling methods for less experienced users and for those who want a one short secure upscale at cost of extra time.
For exaple, in UTLRA workflow i included two different upscaling approaches:
A fast method – which is precisely latent upscaling before inference.
A slower but more refined method – where the latent space undergoes decoding, image enlargement, and re-encoding before being passed to the next sampler for upscaling inference.
Once you're aware of how to adjust settings and what to choose, based on your prompt and workflow, solving these issues becomes straightforward.
To help you understand, here’s a brief demonstration of the types of latent upscaling available and the results they produce if we were decoding the latent without any inference:
As you can see, they are quite artifact-heavy, with many enlarged blocky patterns, but the fact remains: latent upscaling is a very fast method to enlarge latent space.
If managed with sufficient denoise, the details are preserved well enough to upscale an image effectively.
In a video workflow, where every second saved matters, this approach prevents slowdowns when working with heavy AI video models.
It may seem imperfect, but in practice, it is an efficient way to work.
Quality enhancements
-Enhance-A-Video is now supported through Kijai nodes, it significantly improve the video quality and has a very slight hit on inference speed and zero hit on memory use.
It's absolutely worth using.
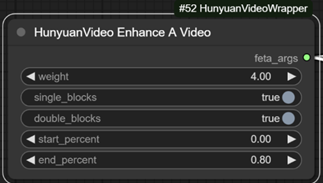
-CFG node
As i wrote in Fast Hunyuan chapter above, connecting this CFG node (avaible through Kijai nodes) allows to achieve incredible results in terms of quality.
You can easily transition from a blurry, detail-lacking result to a very detailed one.
Try it to believe it!
TIP:
you can set it to stop the CGF node influence earlier and save some inference time.
i found that even setting end_percent at 0,01 can help a lot and save extra time than having it at full power value of 1

The dataset 🤔
This may be seen as a weird conspiracy theory, or maybe not...
I began my journey with Hunyuan by testing the model using the fastest possible settings:
low resolutions and minimal steps, just to see what it was capable of.
After many tests, I noticed that if I exceed certain resolutions (usually above 250/300px), the output changes completely, and the prompt behaves differently.
Some results were more diverse, more interesting, and had more variety when generated at a very small size.
Then i saw this:
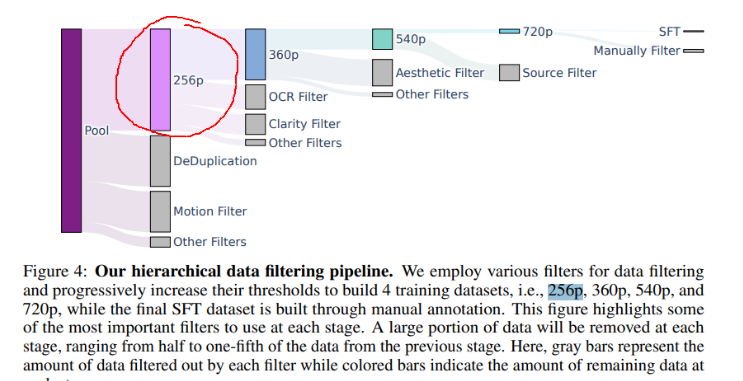
This part in their PDF clearly states that the largest and least filtered dataset is the one with the smallest resolution, which was containing a greater variety of content.
I was still not 100% sure if these two things were related, or if the model is capable of transferring those details from the smallest dataset directly into the final model...
so I wrote on Tencent's GitHub, asking "how to aim correctly to that particular dataset", expecting an answer like "hey you are wrong, you can't aim to a particular dataset"
but then.. I received this answer directly from Jacob:

here the discussion: link
Sure, there may be uncertainties and misunderstandings. Perhaps I'm interpreting it wrong (?),
but in my mind and based on my tests, I am still convinced that by using the same prompt, different results can be obtained depending on certain resolution thresholds used.
These could be that there are four dataset to aim depending on resolutions,
or it could just be just a big misunderstanding.
If anyone knows more, please.. Help me remove the colander from my head 🤣
Loras
update12 dec 2024.
We've been able to see some first examples in action that are shocking and very promising.
-mixing multiple LoRAs
this is what i'vefound in a post, still havent tested this yet:
*When mixing multiple LoRAs or setting LoRA weights very high, it's recommended to use only double blocks to improve the results (though it's fine to always use this setting). Here's how to do it:
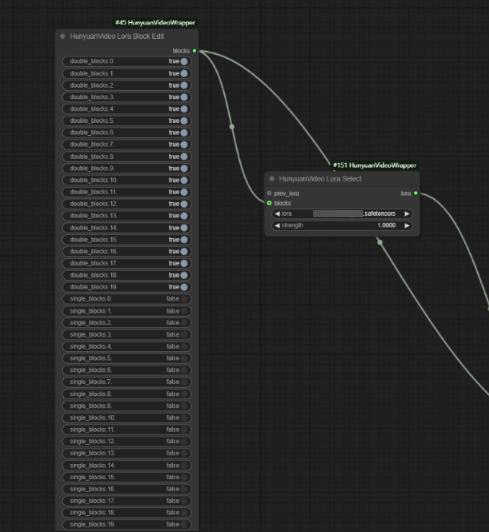
-A custom LoRA-loading node designed to prevent issues such as blurriness and other artifacts when loading multiple LoRAs in HunYuan Video is avaible here: https://github.com/facok/ComfyUI-HunyuanVideoMultiLora
LORA Training
I won’t explain how to do it online using cloud services, I'm sorry, I'm allergic to cloud services.
Runpod or similar might help you achieve such goal
BUT If you're looking for a way to train Loras locally (now we are talking 😏)
there's no need to search around because I've already gathered all the useful information, including user comments from everywhere.
It's all written here for you. Take it:
-There is currently a method to create loras here and here
-a guide and also this guide
-This user shared a wsl ubuntu system backup, which contains diffsion-pipe for mixed video lora training. Just download and import it into the system, and you can start training.
-This user made a fork the diffusion-pipe repository and added a gradio interface to make it easier, it may be an option for some.
He commented: "You need to have a dataset that can have both images and videos, the videos need to have between 33 and 65 frames in total, some people did some tests and concluded that it helps a lot to have the captions well described, but you can try with just one trigger word, it works too, that is, for each file in your dataset you create a txt file and put a caption + a trigger word or just one trigger word, the training using diffusion-pipe is in epochs, in the field in the interface there is the formula to know how many steps there will be in the end, for characters 2000 steps is enough or even less, adjust the settings to reach the amount of steps you need, the learning rate that people like to use the most is 0.0001, optimizer can leave the default or use adamw, anyway that's it"
Some cloud training found around (again, i don't know NOTHING about cloud services, this are just link i found around:)
-ComfyOnline Lora training for Hunyuan
-Someone mentioned TripleX wich is a tools for downloading videos, scene detection, frame analysis and dataset creation for model training.
Still no easy life for windows users so i would wait some days more on this.
Probably soon we will start to see a more simplified UIs
The following are copy-pastes of comments and testimonials from people who managed to do lora training succesfully:
"Settings used for 2 confirmed good loras: Steps: 6,682 Epochs: 40, lr = 2e-5, i try to keep it around 50-150 3 second clips. it took about 15-24 hours. 224 res"
"Due to the limitaion of frame number to train, it is hard to train long-term motion"
"You can train on both images or videos"
"I trained on a video with resolution 244, num frames 17"
"I only have 16gb vram, so I had to set resolutions=244 and frame_buckets=[17] by changing ./examples/dataset.toml. The length of videos for train should be about 1 sec, so I sliced my videos before training"
"I found that, for training motion, you dont have to use so high resolution, and for training face, you have to train on higher resolution like 512. I trained that lora for about 4 hours, 2000steps"
"Too big dataset may cause overflow of vram. I trained on 17 videos"
"The video will automatically shorten into frame number you set in setting"
"If you want to choose exact moment in the videos, you should slice the video and choose them"
"I used default setting,lr: 2e-5 9128 steps * 4 batch size"
"for captionin I used a similar style to what you'd use for Flux i.e. natural language. JoyCaption would be the tool I'd suggest"
"you'd probably want to have at least 16gb VRAM when training using images"
"A rank 32 LoRA on 512x512x33 sized videos should fit under 23GB VRAM usage"
"Dataset was prepared with the help of the TripleX scripts on GitHub and the LoRA was trained using finetrainers"
Training while avoiding Face Bias
A user experimented with training by censoring faces, and the results were significantly better compared to his previous training sessions using uncensored faces.
This approach effectively eliminated any potential bias related to the faces present in the dataset. This technique was already known and applied by some users during the training of other image generation models, and it appears to work well with HunYuan as well.
The tool used for this process is: (link) or this
He modified for the amount of blur at first, then changed the blur shape to a circle
Clip and LLM multiplier
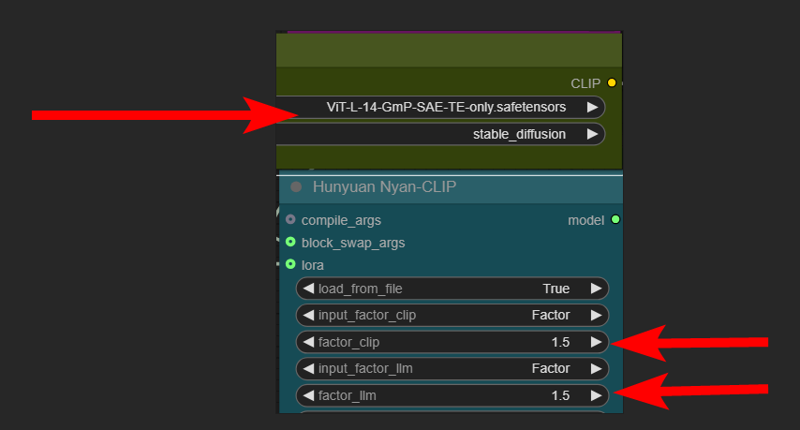
An interesting way to manipulate the strength of Clip and LLM by factors is now available by using Zer0int nodes ( link )
I strongly suggest you play with these nodes and give feedback on his post and also this newer post
Or, at least, try swapping the Clip_l with this clip or this as he suggests, which seems to provide more accurate results and/or allow more tokens in the prompt.
I've been having so much fun with his nodes lately.
You don't really need to install Zer0's nodes if you just want to swap the clip
Hunyuan as image or dataset generator (set to 1 frame)
Kijai added the ability to go as low as 1 frame minimum!
We can now even use this model as an image generator,
after all, isn't this a 13B-parameter model?
It should not be underestimated that this video model have a general understanding of how the physics of things work, consistency during time and space, sizes and camera movements..
This gives it an edge, making it a strong candidate to be considered as a dataset generator, expecially now that Hunyuan LORA are possible.
The results of the single image is certainly not on par with models dedicated solely to generating images in terms of details, it definitely needs some treatments to improve the results with img2img, but it is still worth considering.
This feature also benefits Vid2Vid. Before start a video to video, set it to 1 frame, make all the adjustments to the settings, and preview the results before running it on multiple frames at once.

examples at 1280x1280 | 30 steps | 1 Frame

I wrote a guess game on Reddit, just for fun. I really want to see if people can guess it😁
FLOW_SHIFT

Asked Kijai, he says that "time shift" mentioned in the pdf is the flow_shift,
something that gave me so much confusion for days.
This flowshift not only allow to inference earlier, like those lcm sampler or sort of that,
but it act in a particular peculiar way that can be really usefull in vid2vid.
It kinda regulate the amount of pixels the model is allowed to look at and shift away from their original position.
The pdf says that (assuming a pure state scenario of txt2vid) that timeshift (flowshift) should be set as 7 for 50 steps and increased to 17 when steps are smaller than 20.
According to my tests, keeping a very low FLOW_SHIFT (2 to 4) when generating low-resolution videos helps avoid the grainy effect around edges, hair, and details in general.
But you may probably need more steps to get proper inference (at least 20..?).
Results are really interesting in many cases and the quality boost is often really noticeable,
so I recommend experimenting between that range when doing TXT2VID.
In short:
lower flowshift and higher steps SHOULD be the best choice if you are aiming for quality
Of course😒all this talking about values now (18 december 2024) doesnt make much sense cause the new 8x faster model is out, wich allow to go as low as 7 steps.. and this screw all proportions i was using. i need to find new values.
i guess now even lower steps are usuable when doign vid2vid! crazy... !
In VID 2 VID the use cases are various and interesting too.
Keeping it low will help the output stick more closely to the structure of the input video.
You’ll notice that as flow shift increases, the model is allowed to make more drastic changes.
For example when upscaling a very low resolution video:
when the goal is just to upscale the previously generated lowres video but NOT making structural changes in it, lowering flowshift and raising denoise will keeps the scene intact and coherent, much similar to the video input, this is really a powerfull tool when the goal is to do upscaling and mantaining the shapes of the video by adding some quality.
Lowering flowshift will also require less steps to inference correctly pixel that are already in wanted place, since theres not much to change but only adding details for the upscale task.
A different scenario applyes when the goal is to get structural changes in vid2vid,
in that case setting a higher flowshift can help.
The combination of denoise and flowshift allow to achieve really powerfull results.
TXT2VID
I see many people using full denoise at high resolution, which takes forever.
Sure, the results are better, but who on earth has the time and patience to wait for something when you don’t even know how it’ll turn out?
So, to save generation time while still getting decent-quality videos in TXT2VID,
here’s a "double-pass" method that works well:
Generate small, fast videos first:
You can start by generating only one frame and explore how the model perform with the prompt and settings. Resolution alost matter A LOT. Different resolutions can give very different results.
Once you find a good balance of every settings you can start raise the frames amount
here's my settings i kinda use often:
Resolution: 320x240 (or similar)
Steps: 7 to 15
Flow shift: 2 to 17
Frame count: 45 to 65 (adjust to your liking)
It takes around 5 to 20 seconds per video. This lets you quickly check the "vibe" of the video before committing to a high-res version.
Pick a "winner" video and upscale it in Video2Video:
Target resolution: 832x624 (or similar)
Denoise: 0.4 to 0.6
Steps: 10
Flow shift: 3 to 5
again: all this are my personal cosiderations after hundreds of tests, don't take it as scientific truth🤣
This method lets you get high-resolution videos in less than 1 minute instead of wasting 20+ minutes on a guess..
Avoid this mistake I made:
Don’t send videos to the encoder when doing TXT2VID, even if you set the denoise value to 1, the video will still get encoded, and it’ll take longer to process something you’re not even going to use = wasted time and energy.
This often happens if you were previously working with Video2Video and forgot that the video loader is still attached to the encoder.
Resolutions in Video2Video
Denoise and flow shift behave differently at various resolutions.
This is to be expected when changing the number of pixels to analyze and modify.
Here's the key insight:
The same denoise value is more transformative/destructive at lower resolutions.
This happens because there’s less pixel detail for the model to work with, so it "moves" things around more.
Keep this in mind when switching between resolutions:
a denoise of 0.5 at 320x240 behaves very differently from 0.5 at 832x624.
so you may want to consider this as another way to transform a video to another video.
As a sort of downscaling before inference, you can try to do video2video multiple times
(i like to call this method "multiple pass")
were the first pass is a denoised low res version, then do second pass to reach the final resolution.
Vid2Vid "multiple pass" tips:
When trying to transform a video with Vid2vid while keeping the scene and movements intact but changing elements like the characters, it is often necessary to use multiple passes (do vid2vid multiple times) with low denoise, or go for a RF (Rectified Invertion) workflow
(more on this below).
For example, in the scene I shared in the workflow, there is a woman playing a guitar who later becomes a man ➡️https://image.civitai.com/xG1nkqKTMzGDvpLrqFT7WA/ba2fbc83-d725-4309-8f30-5e0a674ef448/transcode=true,original=true,quality=90/241206100500%20(2).webm https://civitai.com/images/43963196
. To do this correctly while preserving the hand movements, it was necessary to use three passes with low denoise. This allows the changes to be introduced gradually rather than too abruptly. It’s a bit like the process used in img2img with models like SD or flux, when a ControlNet was not available yet.
However, what I’ve noticed when following this process with the Hunyuan model is that it tends to shift the color tone, often toward a dark red. To counter this, you can use this node, which helps maintain the original colors of the video
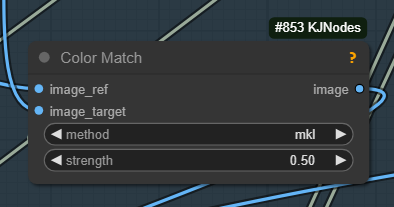
EDIT: the red tint shift is due to some nodes that are not related to hunyuan.
Still investigating about it.
But anyway, this node is really useful in case you need to match colors
RF edit
As some of you may already know, RF edit (Rectified invertion) is a method we've already seen works very well in FLUX, which applyed to Hunyuan is very useful for keeping the initial video scene almost intact and only modifying what you want through prompts.
What I have noticed is that it's easier to add or modify details but not change their size or remove details completely. I might need to insist with the settings, but anyway, more RF edit pass seem to be more effective than doing a multiple pass of simple vid2vid denoise.
At least the scene stays intact, and many details are preserved WAY MORE than doing vid2vid normally.
Vid2Vid with short clips as input
When trying to do vid2vid but the input video is too short for the task (this can happen when, for example, a video is generated and you want to extend it or work more on that pattern),
you just need to add these nodes to create a reversed and duplicated loop to feed in
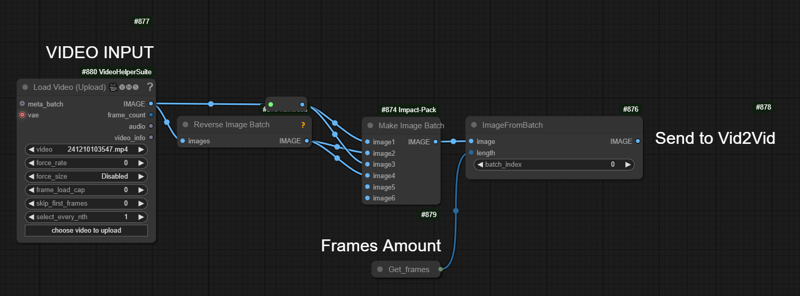
this method is really handy for static camera shots with repetitive actions/motions, or eg: a closeup of someone staring in the wind.
the result is a way longer video wich resamble the initial loop but it keep continue to the desired lenght and change and add variations during time.
This is very powerfull and honestly... my fav way to animate simple concepts🤍
Vid2Vid low denoise to raise other video models quality:
Recently, I've been experimenting with using this model to enhance the quality and stability/consistency of generations made with other models, particularly LTX,
which is very fast and practical to use.
By doing video-to-video with LOW FLOWSHIFT (2-3) and 0,5 to 0,7 denoise, it's possible to keep the scene intact and significantly improve all the details and artifacts,
especially the eyes, which LTX tends to mess up.
Compression in video nodes
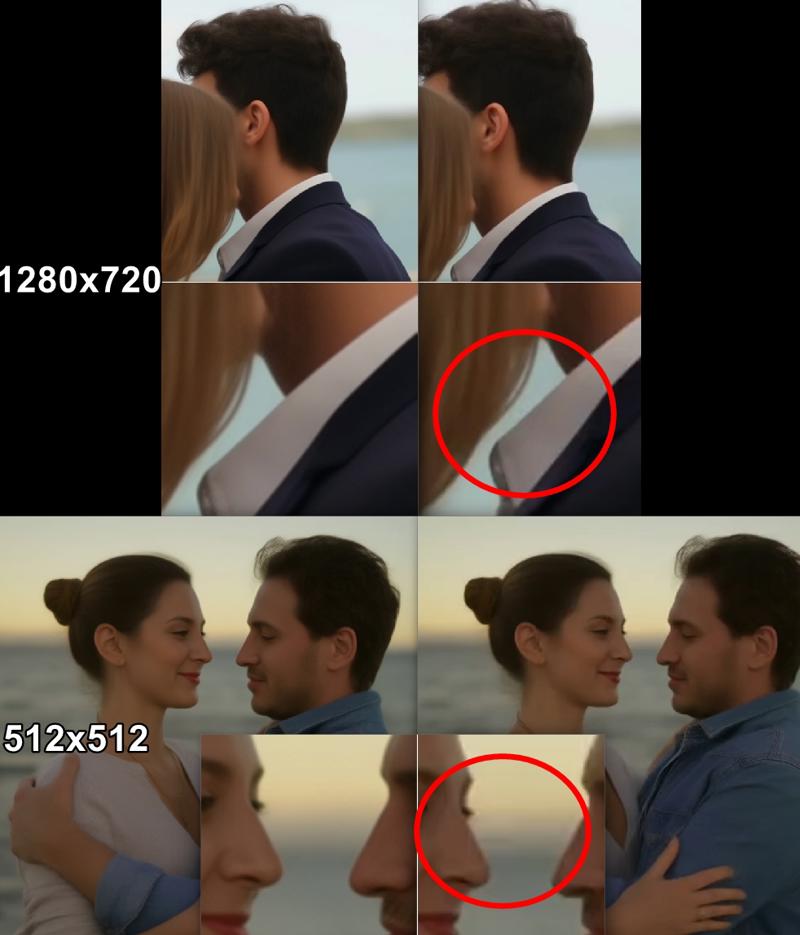
I personally enjoy low resolutions a lot more, both for speed and fun. At such scale it's essential to keep in mind that the fewer pixels there are, the lower the compression factor should be. Otherwise, you get noticable artifacts, especially when using encoding formats like the popular h264/mp4.
At low resolutions, each pixel becomes more important, so pay attention to the compression factor of the video module. The standard value of 19 in "Video Combine 🎥🅥🅗🅢" node for mp4 is too high for this resolution.
I recommend staying below 12 and not exceeding that threshold in low resolution, deciding later, once the work is finished, how much to compress the video. Personally, I even go below 12, sometimes down to 5 if I’m generating videos at 512px, or down to 0 if I’m working around 320px or below.
I know, a factor of zero makes the file heavier, but if you care about the details… it's your choice.
Ram / Vram / OOM
Start with this:
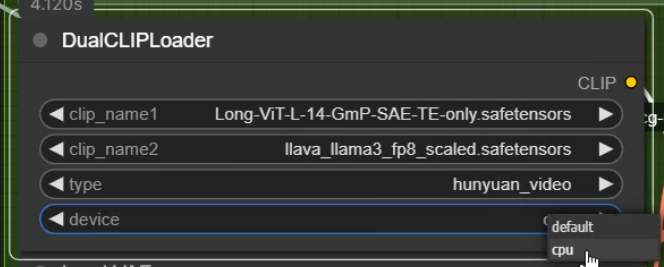
latest Comfy update allow to right click on Clipl loader, choose "advanced" and select CPU.
this make me save 8gb Vram.
I've been struggling with RAM overloads for time by using this model, despite having 64GB of DDR5 RAM, it would still fill up completely at times for some reasons, no matter how many times i install and reinstall Comfy.
I finally found a solution, a small but powerful tool that monitors and manages RAM usage automatically. You can set a usage limit. Once that limit is reached (I set mine to 85%), the tool clears and frees up some RAM automatically. Since configuring it this way, I haven't experienced any more full-RAM issues or comfy stuck.
If you've faced similar problems, this tool might be worth a try.
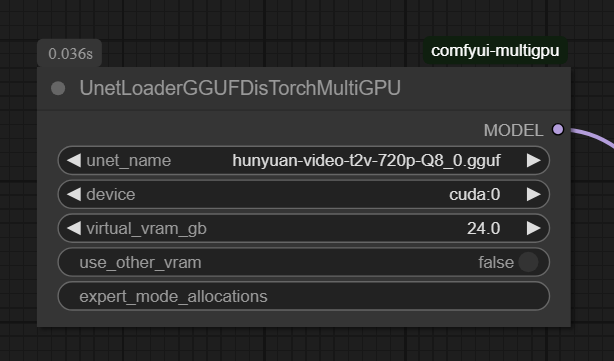
-you can also try this node for Virtual vramasdiscussed here, wich also allow for longer videos and bigger size
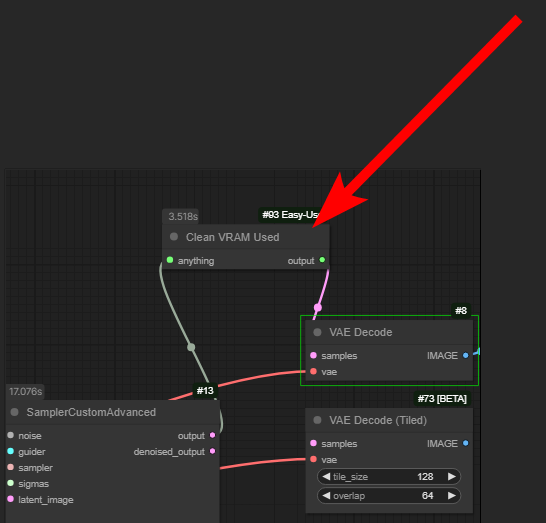
Another thing may be usefull is this node here
-TeaCache nodes may use more Vram
-If you get OOM or comfy stuck and fill all vram:
be sure to use HunyuanVideo BlockSwap and also HunyuanVideo Decode
set Auto_tile_size to OFF then lower spatial_tile_sample_min_size to 128 or 64.
with the settings above I've been able to successfully do 249 frames with Kijai nodes.
Native nodes wont allow me to go over 101 frames, even on a 3090.
size used: 720H x 400W
steps: 7
inference time: 53 seconds (vid2vid 0,5 denoise)
I think i can do even more but the wait is... nah
Unsolved Mysteries
These are strange phenomena that happened to me, and I think it’s very important to write them here so that if they happen to you as well, and maybe you find a solution or understand why they happen, we can all talk about it and benefit from shared informations:
1° Case
I was using native comfy nodes with a fairly long and descriptive prompt, getting very good results. Then I switched to Kijai nodes to see speed differences and results.
With the exact same prompt and settings, this was the result:

a marmelade overload fried blob.
All it took to solve this issue was deleting a few words from the prompt,
and everything returned to normal.
This phenomenon is still unknown to me. I even tried changing the clip, but nothing worked except changing the prompt lenght.
The simple removal of a few words from the prompt solved every problem.
This really needs further investigation.
2° Case
I noticed something strange while doing v2v.
10 consecutive results had glitches so Instead of trying the classic methods I've already recommended above, I started by adding a random LORA.
The glitches completely disappeared in all subsequent generations.
i thought is just a case, i tryed another lora and another again:
same results. no glitches.
Very strange, but it worked in that case and with those settings.
It may vary from settings to settings? i don't know.
There may be something related to loras that trigger some magic and stops the glitches.
It needs further investigation
3° Case
With the latest workflow I shared, which uses Comfy's native nodes, I wanted to try increasing the number of frames again to see if it crashes, after adding two nodes to handle tiles.
Increasing that threshold was not possible for me before (I had to use Kijai's nodes, with which I surpassed 250 frames without issues).
Now it works fine while staying under 18GB VRAM.
Honestly, I don’t know what the limit is, nor do I want to find out. The waiting time is too long with my current hardware.
I started right away by testing 201 frames, and to my surprise, five consecutive results came out almost in a perfect loop. By this, I mean the ending and the beginning connect almost seamlessly.
This is very strange and doesn’t happen with a different number of frames.
I don’t understand why it happens.
Right after i was talking about this with a guy, he reported that this also happened at 129 frames. At this point, I think that going beyond 101 frames makes this event more likely to happen, still worth investigating. I’ll try different number of frames when I have more time, cause this test require a lot of time, and..more patience.
Samplers
Recently found that dpmpp_2m beta give very special and different results in vid2vid, sometimes more defined, wich can be really handy.
It must be used with caution and looks like it likes more steps than usual.
It also takes a little bit longer.
I'm using Euler normal and Euler BETA, wich this last seems to follow better long prompt expecially with fast model.
If you have any experiences with other samples please write it in the comments below
Save Extra time
Recently, I discovered and tested this nodes extensively:
TeaCache: https://github.com/TTPlanetPig/Comfyui_TTP_Toolset?tab=readme-ov-file#teacache-sampler-integration-for-hunyuan-video
First Block Cache: https://github.com/chengzeyi/Comfy-WaveSpeed?tab=readme-ov-file#dynamic-caching-first-block-cache
which are a bit peculiar to use. Combined with the Fast model (need to raise steps a bit) are very useful, expecially during the upscaling process in its most extreme mode (like teacache 3x). If used in Text-to-Video are tricky when combined with fast model, the result can be too much blurry of lacking of consistency/details so require to add some extra steps than usual. However, if you use these nodes during the upscaling process with a low denoise factor, the result is an incredibly fast scaling process. truly unmatched compared to traditional methods.
That's why I implemented TEACACHE in a new workflow
Random notes
-The current situation is that the Fast model, when used alone, may cause artifacts. However, when used in combination with LoRAs, it works really well.
So my advice is:
Use the Fast model (which allows for a low number of steps, as low as 6 to 9) only if you are also using LoRAs together.
In all cases where the LoRA is not compatible (eg: Kijai's node do not accept all loras) or the Fast model causes artifacts, it's recommended to switch to the standard model and increase the number of steps to at least 15 or more. (25 to 30 steps is a good choice)
So, not all LoRAs are compatible with Kijai's nodes, so it's up to you to test which ones work.
There's also a FAST LoRA, which can be loaded onto the standard model. Unfortunately, that one isn’t compatible with these Kijai's nodes, and no one has bothered to convert it yet to make it work.
I don’t know how to convert it.. otherwise, I would have done it myself.
A lot of things would be much simpler by now.
here a link if you want to try convert: https://github.com/kijai/ComfyUI-HunyuanVideoWrapper/issues/234#issuecomment-2613766792
-I constantly switch between the full model and the fast model. I found that when loading the fast LoRA on top of the full model, it should be loaded normally and not in double blocks.
I see people saying that using 'double blocks' is better when combining multiple LoRAs, but in my extensive testing, it seems to really depend on the LoRAs and settings. Some LoRAs, when loaded in double blocks, work poorly or don’t work at all. So, it really depends on the specific LoRA and settings.
-After a crazy amount of daily tests, I found myself generating at around 65 frames.
It seems to be a sweet spot where things work as they should. 🤷
I keep changing resolutions but mostly 320x480 or 384x512 or something around this dimensions.
ITs rare that i generate pure txt2img at higer resolutions than this. I f i really want to go higher i rather gen lower then upscale in vid2vid
-when i use the FAST model i tend to load the fast lora too on top,
but in negative value of -0,25 ~ -0,35.
To me that fast model looks a little but overcooked. This seems to help most of the time.
-A new method for image-to-video using a LoRA has been released, available at this link. I tried it and was about to make a dedicated post, but then I realized the results are not that great.
The concept is good, but the training was done in low quality, they wrote: "
budget is quite small. If anyone would like to help train a higher res chekpoint and has some spare compute, please reach out!.
However, if you'd like to try the workflow I was experimenting with, I managed to get better results by loading a workflow made by Kijai and change settings a bit.
https://civitai.com/models/1180764
*you will need Kijai custom nodes. Please consider Support Kijai for his work
LeapFusion I2V
I noticed that at higher resolutions, consistency with the input image increases. For example, a resolution of 608x432 seems to be a good threshold—below this, there’s a higher chance of the video deviating too much from the input image/character, resulting in less consistency.
I would really like to go back to using Kijai’s nodes and use only those, however, there are two issues to consider:
The fast LoRa is not compatible; someone would need to convert it. (I’m surprised no one has done this yet. I’ve looked into it, but it’s beyond my skills.)
I also remember starting to use native nodes more often because some LoRa models wouldn’t work on the wrapper
A user wrote in Kijai’s help section:
“Converting the LoRa using https://github.com/kohya-ss/musubi-tuner/blob/main/convert_lora.py seems to have done the trick.”
So I expect and hope that someone will eventually convert that fast LoRa.Kijai's nodes require a specific input: if connected, it acts as an encoder, and if not connected, it generates its own latent space. I haven’t found any switch that allows for no input without giving an error, so building a complex workflow around those nodes is proving quite challenging, especially now that it seems to take the input even at denoise 1 to enable the use of I2V.
Why am I saying this?
Well, Kijai’s nodes allow for much more flexibility, and the speed is also dynamic.
Personally, even without Triton enabled, using Kijai’s nodes on SDPA seems slightly faster.
I installed Triton back in november to use it with mochi, but even without it, Kijai’s setup runs slightly faster in most cases.
TOOLS
-HunyClip is a particularly useful tool, a small video-cutting utility created by Tr1dae.
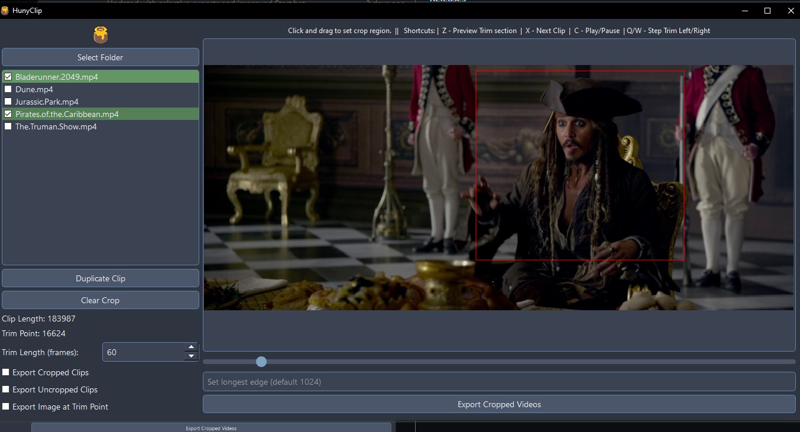
As someone who regularly works with professional editing software like DaVinci Resolve and Premiere, I find this tool incredibly handy. It’s lightweight, easy to use, and eliminates the need to open heavy software just for quick video trims and crop.
This tool was developed by a highly skilled user who has been contributing significantly to my Discord server, sharing valuable insights and expertise from his professional background.
Official I2V
The official image-to-video model has just been released. I've already created a workflow with all the necessary files links. Included in the 1.5 update pack, and also in a dedicated post.
You can download it here:
https://civitai.com/models/1007385/hunyuan-allinone?modelVersionId=1378643
First impression on day one, after intensive use and some comparisons between this and LeapFusion.
I notice that I can't maintain input image consistency much. In fact, I get much more pleasant and efficient results with LeapFusion, which also works at lower resolutions and with all the existing Loras. On the other hand, this newly released model requires running at 720p, making it slower to use.
Here are two comparisons:
center: I2V model right: LeapFusion V2
at 720p:
and at 512x384:
In both cases, LeapFusion seems to maintains more image consistency.
I strongly invite you all to do your tests and please confirm my theory.
For the average user with a consumer GPU who just wants to load a Lora and animate an image without suffering absurd wait times, LeapFusion remains an excellent option
(and personally my favorite).
I’ll leave it to you to decide which is better to use.
I’m not considering SkyReels i2v into this equation because it’s slower, so automatically goes outside my radar 😔
Maybe I’ll do a more in-depth comparison later, including SkyReels.
For now, I’m sticking with my reliable LeapFusion, at least for use cases involving the already available Loras.
UPDATE:
Tencent released an update on the I2V model!
you can find it here already converted in fp8 by kijai
https://huggingface.co/Kijai/HunyuanVideo_comfy/tree/main

