


Verified: 5 months ago
Other


The FLUX.1 [dev] Model is licensed by Black Forest Labs. Inc. under the FLUX.1 [dev] Non-Commercial License. Copyright Black Forest Labs. Inc.
IN NO EVENT SHALL BLACK FOREST LABS, INC. BE LIABLE FOR ANY CLAIM, DAMAGES OR OTHER LIABILITY, WHETHER IN AN ACTION OF CONTRACT, TORT OR OTHERWISE, ARISING FROM, OUT OF OR IN CONNECTION WITH USE OF THIS MODEL.
UPDATE - July 20th, 2025
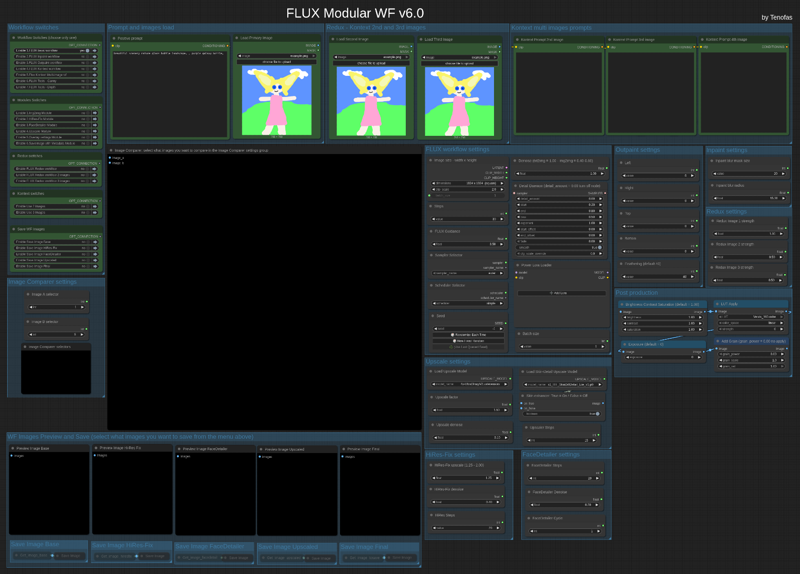
The new version v6.0 is out today!
Version 6.0
The new Flux Modular WF v6.0 is a ComfyUI workflow that works like a "Swiss army knife" and is based on FLUX Dev.1 model by Black Forest Labs.
 The workflow comes in two different edition:
1) the standard model edition that uses the BFL original model files (you can set the weight_dtype in the “Load Diffusion Model” node to fp8 which will lower the memory usage if you have less than 24Gb Vram and get Out Of Memory errors);
2) the GGUF model edition that uses the GGUF quantized files and allows you to choose the best quantization for your GPU's needs.
Press "1", "2" and "3" to quickly navigate to the main areas of the workflow.
You will need around 14 custom nodes (but probably a few of them are already installed in your ComfyUI). I tried to keep the number of custom nodes to the bare minimum, but the ComfyUI core nodes are not enough to create workflow of this complexity. I am also trying to keep only Custom Nodes that are regularly updated.
Once you installed the missing (if any) custom nodes, you will need to config the workflow as follow:
1) load an image (like the COmfyUI's standard example image ) in all three the "Load Image" nodes at the top of the frontend of the wf (Primary image, second and third image).
2) update all the "Load diffusion model", "DualCLIP LOader", "Load VAE", "Load Style Model", "Load CLIP Vision" or "Load Upscale model". Please press "3" and read carefully the red "READ CAREFULLY!" note for 1st time use in the workflow!
In the INSTRUCTIONS note you will find all the links to the model and files you need if you don't have them already.
This workflow let you use Flux model in any way it is possible:
1) Standard txt2img or img2img generation;
2) Inpaint/Outpaint (with Flux Fill)
3) Standard Kontext workflow (with up to 3 different images)
4) Multi-image Kontext workflow (from a single loaded image you will get 4 images consistent with the loaded one);
5) Depth or Canny;
6) Flux Redux (with up to 3 different images) - Redux works with the "Flux basic wf".
You can use different modules in the workflow:
1) Img2img module, that will allow you to generate from an image instead that from a textual prompt;
2) HiRes Fix module;
3) FaceDetailer module for improving the quality of image with faces;
4) Upscale module using the Ultimate SD Upscaler (you can select your preferred upscaler model) - this module allows you to enhance the skin detail for portrait image, just turn On the Skin enhancer in the Upscale settings;
5) Overlay settings module: will write on the image output the main settings you used to generate that image, very useful for generation tests;
6) Saveimage with metadata module, that will save the final image including all the metadata in the png file, very useful if you plan to upload the image in sites like CivitAI.
You can now also save each module's output image, for testing purposes, just enable what you want to save in the "Save WF Images".
Before starting the image generation, please remember to set the Image Comparer choosing what will be the image A and the image B!
Once you have choosen the workflow settings (image size, steps, Flux guidance, sampler/scheduler, random or fixed seed, denoise, detail daemon, LoRAs and batch size) you can press "Run" and start generating you artwork!
Post Production group is always enabled, if you do not want any post-production to be applied, just leave the default values.
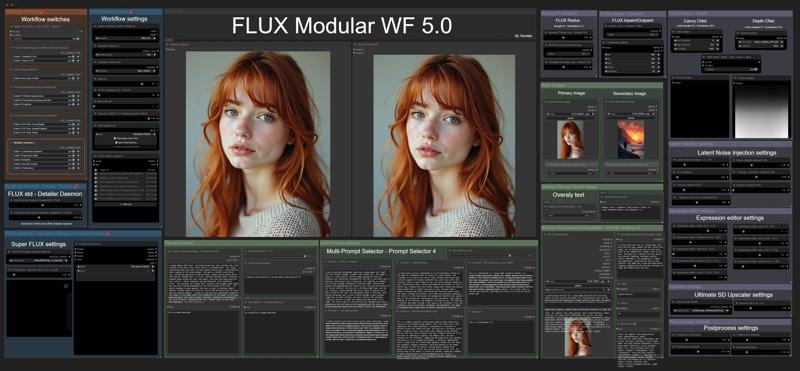
Old version: V5.0
 You can use the original model files or the GGUF versions.
There are two different basic workflows for generating an image: the standard FLUX workflow (with the optional Detailer Daemon nodes) and the Super-FLUX workflow (inspired by Olivio Sarikas' workflow). The Super-FLUX wf just split the total steps into three distinct sampler generations (1/3 of the total steps on each sampler) bringing more details to the image (sometimes even too much!).
The FLUX tools are all available: Redux (IP-Adapter), Inpaint/Outpaint, and Depth/Canny (ControlNets).
Prompt management is extremely powerful: you can use JoyCaption 2 for captioning an image and generate a detailed prompt; there is a local LLM (running on ComfyUI itself!) for LLM prompting generation; you can keep up to 6 different prompts for easy and quick use; last but not least you can create an image-database of your most used prompts: save the images you like in a specific folder, and use them as prompt-database. Just upload the image you want and the prompt you used for that image (and all the metadata saved with it) will be available for your next job.
The Modules available are the following:
1) Latent Noise Injection - improve the details of the image;
2) Expression Editor - to modify the expression of your subject in portrait images;
3) ADetailer - to improve quality and detail of hands, eyes, and faces;
4) Ultimate SD Upscaler - to upscale your images with the upscale models you like;
5) Postprocess - the final retouch to your images: saturation, contrast, sharpen, grain, and apply LUT.
The workflow needs ComfyUI with Python 3.11, as the latest version of ComfyUI is based on Python 3.12 and some custom nodes are not working with 3.12. On my YouTube channel, you can find a workaround if you have windows_portable ComfyUI with Python 3.12 and want to revert back to 3.11.
If you have trouble (Out of memory errors) with the original FLUX Dev model, I suggest you to try the GGUF version of the model: Q8 is almost the same as the original one, Q6.K or Q4.K are good alternatives.
Use the following keys to navigate the Workflow: "1" for the frontend; "2" for the explanation notes and links to models to download; "3" for the backend (usually you will need this just for the first use).
How to use the workflow
The first time you upload the workflow you will need to install 35 custom nodes (unless you use some of them already for other workflows or you already used my old workflows like the v.4.3).
I suggest installing one custom node at a time, restarting ComfyUI to make sure the installation was successful, and then installing the next custom node.
Once you have the workflow ready with all the custom nodes, you will need the models files (unet, vae, gguf, clip, clipvision, stylemodel, upscale model, sam model, bbox detector, LUT...). In the workflow's notes (press "2") you will find all the links if you need to download them or if the ComfyUI Manager does not have them available for installation (always check ComfyUI Manager first!).
Before you run the workflow, you need to do one last thing: upload the images for Input Images (Primary and Secondary) and the Prompts & parameters DataBase group. You can use any image you want to run the workflow, it's just because those nodes need an uploaded image to work. Otherwise, the workflow may get stuck.
The Worflow video-guide on my YouTube channel:
Coming soon...
Important
If you like my workflow and you want to share images you create with it, I would really appreciate it if you post them in the Gallery below, just click on "+ Add Post" button.
Thanks
Tenofas