Download
1 variant available


!日本語の説明は下部にあります!
A Workflow Easily Customized in a Modular Format.
Features
A workflow similar to StableDiffusion WebUI (HiresFix, UpScale, ADetailer, PingInfo saving)
A modular structure that makes extending and swapping workflow components easy
Ability to save prompts in PingInfo
Custom nodes are carefully selected to a set of four (rgthree, ImpactPack + Subpack, PromptReaderNode)
Concept
 Terminology
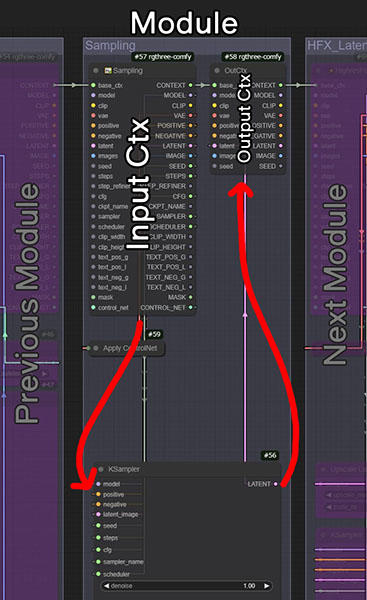
Module: A grouped set of nodes that provides a self-contained function.
Input Context: A node that receives parameters from preceding modules and passes them to the nodes within the module.
Output Context: A node that takes the final output from within the module and passes it to subsequent modules.
Context: A node that aggregates multiple parameters to make managing the flow easier. It serves the same purpose as the "Pipe" in other custom nodes.
This workflow has been designed with clarity and extensibility in mind. Each function is built as a module arranged vertically, and by restricting module inputs and outputs to rgthree’s context nodes, the connections between modules are organized into a single link.
It leverages the characteristic of context nodes where an empty input slot reuses an existing value, but if a connection is made, it will override with the connected value. Note that you must be aware of the output from the previous module and understand what is being passed into each module’s input parameters.
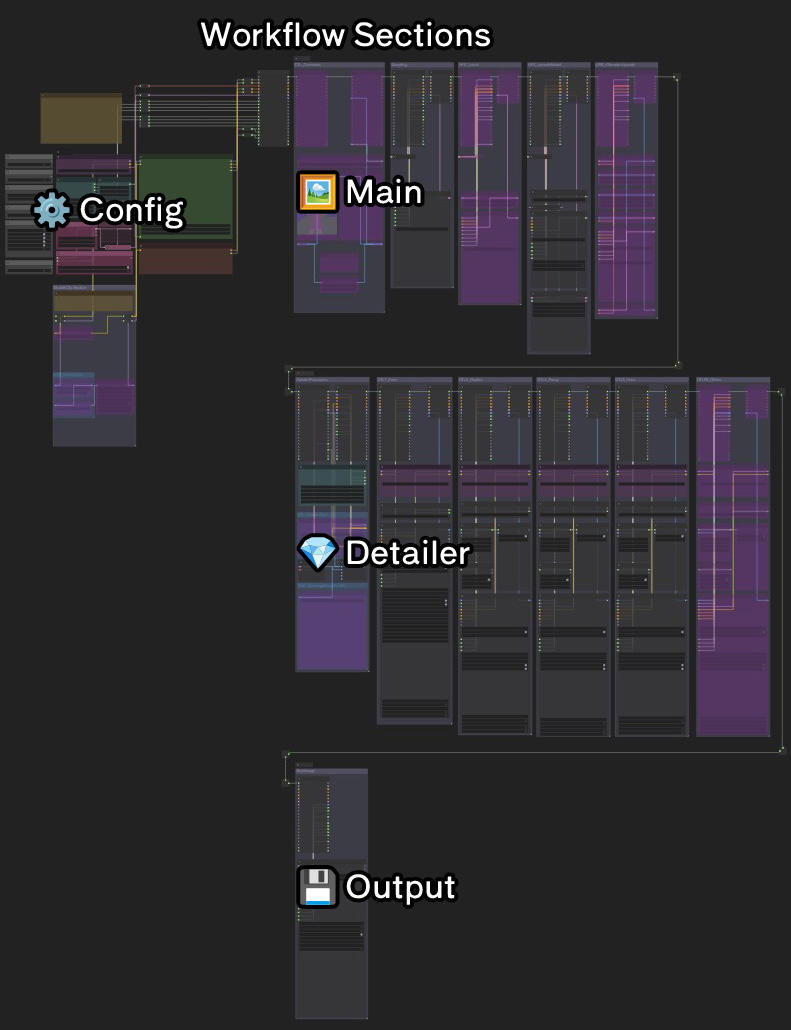
Description of Each Section
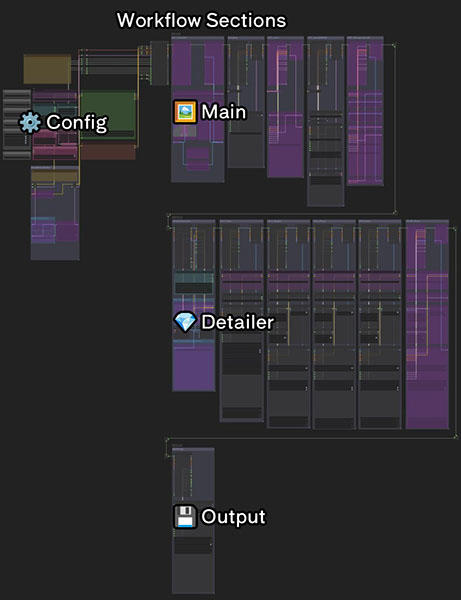 Below is an explanation of each section within the workflow. Press the number keys 1 to 4 to quickly navigate to each section.
⚙️ Config Section
This section contains various settings for image generation. On the left side, Fast Groups Bypasser nodes are arranged to toggle each module ON/OFF.
In the prompt input section, under the ImpactWildcardEncode node’s lower UI, you can add wildcards and Lora. For detailed usage, please refer to the official repository.
The
refiner_stepin KSampler Config is treated as the step count for HiresFix.Within the Model & Clip Modifier group, you can adjust both. By default, V-Prediction and Kohya Deep Shrink nodes are connected.
If you wish to use a larger latent size, enable the Custom Empty Latent node. You can easily switch it using the Empty Latent Selector.
🖼️ Main Section
This is the primary area for image generation. It supports ControlNet, HiresFix, and post-Hires upscale.
HiresFix has two methods: one that directly upscales in latent space (similar to the WebUI) and another that uses an Upscaler model. Switch between them as you prefer.
If you experience VRAM overflow with UPS_KSamplerUpscale, try changing VAE Decode to VAE Decode (Tiled). It should automatically retry with tiled mode upon a decode failure even without manual switching.
Regarding the Apply ControlNet node:
If the ControlNet module is disabled, executing this node will result in an error; therefore, it is not connected by default. To apply ControlNet, connect its output slot to KSampler.
If you want to fully utilize ControlNet, please prepare comfyui_controlnet_aux along with the necessary models as needed.
💎 Detailer Section
This section adds details to the generated image. You can specify dedicated sampler configurations and checkpoints.
For facial detail enhancement, the FaceDetailer node is used.
For other areas, Detailer (SEGS) is employed to allow filtering and reordering of detected regions.
If you need to add detail processing to additional areas, simply duplicate an existing module and place it alongside.
By default, the following detection models are used:
💾 Output Section
This section handles image saving. By default, images are saved in png format within folders sorted by date.
Currently, model and VAE names are not saved. For more details, please refer to the "Limitations" section.
How to Extend the Workflow
If you wish to add a new module, follow these steps. For better visibility of connections during workflow editing, it is recommended to set the link drawing mode to "Spline".
Identify the location where you want to add a module and move subsequent modules to create space.
Create input and output context nodes.
Add the necessary nodes, arrange them vertically, and connect them.
Connect the output of the final node to the output context node.
It is recommended that the group name for any new module be prefixed with a three-letter string (e.g., CTL_, EXT_). Existing groups use this prefix to determine which ON/OFF toggle node they appear in.
Tips
You can quickly navigate to the beginning of each section by pressing the number keys 1 through 4 (using rgthree’s bookmark node).
If the bookmark shortcut does not work, switching to a different browser tab briefly should resolve the issue.
If the view does not adjust properly after navigating, open the bookmark node at the top left after the transition and adjust the zoom value.
Dragging the group name field moves all nodes contained within the group. If you hold down Ctrl after moving slightly, only the group will be moved.
When creating nested groups, always create the parent group first. Since there is no method to adjust the front/back order of groups, creating them in reverse order may render the child group unselectable.
Limitations
Saving the Model Name to PingInfo
The current workflow does not save the model name in PingInfo. As a workaround, you can insert the SD Parameter Generater node from the prompt-reader-node and connect MODEL_NAME to enable saving. However, I decided not to adopt this node due to the following three concerns:
Even if the parameters are fixed, the SD Parameter Generater node executes from the beginning of the workflow every time.
It does not support the seed input for ImpactWildcardEncode, meaning the same prompt is generated even if the seed value changes (the ImpactPack side is not yet updated).
If the checkpoints (safetensors) on the file system increase or decrease, an error may occur during image saving, preventing the image from being saved. This issue is only resolved by restarting ComfyUI (likely due to a design flaw in ComfyUI).
Similarly, the VAE name is not saved. This is because the context node lacks a slot for it and SDXL is generally assumed to use either an integrated model or the standard VAE. If you frequently use a fixed VAE, you can write it directly into an additional parameter to have it saved.
Constraints of the Context Node
While the context node covers almost all parameters required for image generation, but it cannot handle parameters specific to video generation or custom nodes. For example, there is no slot available for the Document type used in sd-ppp, so it cannot be connected.
Currently, if you want to pass custom parameters to subsequent modules, you need to build it as a single module, or pass them to the subsequent module using the Reroute node.
Included Workflow Variations
sdxl_moduler_txt2img.json
Basic workflow for generating images from prompts.
sdxl_moduler_mask_detailer.json
Workflow that applies the Detailer to masked areas.
sdxl_moduler_sd-ppp_inpaint.json
Detailer workflow utilizing the sd-ppp custom node.
⚠You need the latest version of Photoshop to run
Links for Custom Nodes Used
モジュール形式でカスタマイズが容易なワークフロー
特徴
StableDiffusion WebUIに近いワークフロー(HiresFix, UpScale, ADetailer, PingInfo保存)
モジュラー構造でワークフローの拡張、入れ替えが容易
PingInfoにプロンプトの保存が可能
カスタムノードは四つに厳選(rgthree, ImpactPack+Subpack, prompt-reader-node)
コンセプト
 用語
用語
モジュール:単体で完結した機能を持つ、グループで囲まれた一連のノード
入力コンテキスト:前方のモジュールからパラメータを受け取り、モジュール内のノードに渡すためのノード
出力コンテキスト:モジュール内の最終出力を受け取り、後続のモジュールに渡すためのノード
コンテキストとは:複数のパラメータをまとめてフローを管理しやすくするためのノード。他のカスタムノードで「パイプ」と呼ばれているものと役割は同じ
見やすさと拡張性を重視したワークフローを構築しました。
各機能をモジュールとして縦方向に構築し、モジュールの入力と出力をrgthreeのコンテキストノードに制限することでモジュール同士の接続が一本で済むように組んでいます。
コンテキストノードの特性である入力スロットが空なら既存の値を流用し、繋がれていればその値で上書きするという動作を利用しています。
注意点として、前のモジュールの出力結果を把握し、モジュールの入力部に何が流れてくるかを意識する必要があります。
各セクションの説明
 以下はワークフロー内の各セクション説明です。
1 ~ 4の数字キーを押すことでそれぞれのセクションに素早く画面遷移できます。
⚙️Configセクション
画像生成のための各種設定を行う区画。左側には各モジュールのON/OFFを切り替えるためのFast Groups Bypasserノードを並べています。
プロンプト入力の ImpactWildcardEncode ノードの下部UIからワイルドカードとLoraの追加が出来ます。詳しい使い方は公式リポジトリを確認してください
KSampler Configの
refiner_stepはHiresFixのステップ数として扱っていますModel&Clip Modifierのグループ内でclipとmodelに変更を加えられます。デフォルトではV-PredictionとKohya Deep Shrinkのノードを接続しています
大きめのLatentサイズを使いたい場合はCustom Empty Latentノードを有効にしてください。Empty Latent Selectorで簡単に切り替えられます
🖼️Mainセクション
画像生成のメインとなる区画。ControlNet、HiresFix、Hires後のアップスケールに対応しています。
WebUIのようにLatentで直接アップスケールするモジュールと、Upscalerモデルを使ったモジュールの二つを用意しています。お好みに合せて切り替えてください
UPS_KSamplerUpscaleでVRAMが溢れる場合は、VAE DecodeをVAE Decode (Tiled)に変更してみてください
そのままでもデコード失敗時に自動的にTiledで再試行するはずです
Apply ControlNetノードについて:
Controlnetモジュールが無効の場合、このノードの実行時にエラーになるのでデフォルトでは接続していません。ControlNetを適用したい場合は出力スロットをKSamplerに接続してください
ControlNetをフル活用したい場合は comfyui_controlnet_aux と必要なモデルを適宜用意してください
💎Detailerセクション
生成後の画像の細部にディテールを追加する区画。専用のサンプラーコンフィグやチェックポイントを指定出来ます。
顔のディテール追加にはFaceDetailerノード、それ以外は検出領域のフィルターと並び替えが出来るようにDetailer (SEGS)を採用しています。
ディテール処理を追加したい領域がある場合、既存のモジュールを複製して横に並べれば簡単に追加できます。
デフォルトでは以下の検出モデルを使用しています。
💾Outputセクション
画像を保存する区画。デフォルトでは日付毎のフォルダーにpng形式で保存されます。
現在、モデル名とVAE名は保存されません。詳細は「制約」の内容を確認してください。
ワークフローの拡張方法
新しくモジュールを追加したい場合は、以下の手順で行ってください。接続の視認性確保のため、ワークフロー編集時のリンク描画モードはスプラインがお勧めです。
モジュールを追加したい場所を特定し、後続のモジュールを移動させスペースを設ける
入力と出力のコンテキストノードを作成する
必要なノードを追加し、縦方向に並べ接続していく
最後のノードの出力を出力コンテキストノードに接続する
新しく追加したモジュールのグループ名は三文字の接頭辞(CTL_, EXT_など)を付けることを推奨します。
既存のグループはこの接頭辞でどのON/OFF切り替えノードに表示するか判定をしています。
Tips
数字キーの1 ~ 4で各セクションの先頭に素早く遷移できます(rgthreeのブックマークノード利用)
ブックマークのショートカットが効かない場合は一度別のブラウザタブに切り替えると効くようになります
遷移後の画面がフィットしない場合は遷移後の左上にあるブックマークノードを開き、zoom値を調整できます
グループの名前欄をドラッグすると内包しているノードも一緒に移動します。少し移動させてからCtrlを押すと、グループのみ移動させることが出来ます
入れ子になったグループを作成する場合、必ず親の方から先に作成してください。これはグループの前面背面を変更する手段がないので、逆の順番で作成すると子グループを選択できなくなります
制約
PingInfoへのモデル名の保存について
現在のワークフローはPingInfoにモデル名を保存できません。解決方法としてprompt-reader-nodeのSD Parameter Generaterノードを配置し、MODEL_NAMEを接続すれば保存されます。
ただし、以下の3つの懸念からこのノードの採用は見送りました。
SD Parameter Generaterノードはパラメータを固定しても毎回ワークフローの最初から実行されてしまう
ImpactWildcardEncodeのシード入力に対応していないので、シード値が変わっても同じプロンプトが生成される(ImpactPack側が未対応)
ファイルシステム上のチェックポイント(safetensors)が増えたり減ったりすると、画像保存時にエラーが発生し保存されない。ComfyUIを再起動しないと解消しない(おそらくComfyUIの設計上の問題)
VAE名も同様に保存しません。これはコンテキストノードにスロットがない事と、SDXLは基本的にモデル内蔵か標準のVAEを利用する想定なので含めていません。
もしよく利用する固定のVAEがある場合、追加パラメータに直接記述すると保存出来ます。
Contextノードの制約について
Contextノードは画像生成に必要なパラメータはほぼ網羅していますが、動画生成やカスタムノード独自のパラメータは扱えません。例として、ClipVisionモデルやsd-pppのDocument型のスロットは用意されてないので接続出来ません。
現状、独自のパラメータを後続のモジュールに渡したい場合は一つのモジュールとして構築するか、Rerouteノードで後続に渡す必要があります。
同梱ワークフローのバリエーション
sdxl_moduler_txt2img.json
プロンプトから画像を生成する基本ワークフロー
sdxl_moduler_mask_detailer.json
マスクした範囲にDetailerを適用するワークフロー
sdxl_moduler_sd-ppp_inpaint.json
sd-ppp カスタムノードを利用したDetailerワークフロー
⚠実行するには最新版のPhotoshopが必要です