
🌟Struggling to Get That Perfect Low-Angle Shot?
This model makes it effortless to capture extreme upward facial perspectives at low angles. Whether you’re training a LoRA or building a 3D model, this tool is the perfect solution.
------------------------------------------------------------------------------------------------------
✨ I’ve already prepared a ready-to-use online workflow with the Model LoRA — no setup, no hassle.
Just click below and you can start experimenting right away, free and in one click:
https://www.runninghub.ai/post/1958140213614825474/?inviteCode=rh-v1216
Enter invitation code: rh-v1216. Sign up through this link to instantly get 1,000 RH coins, plus 100 extra coins every day just for logging in.
That’s enough to create hundreds of high-quality images with zero cost 🎁
Your creative ideas deserve to come to life — anytime, anywhere. Start now!
------------------------------------------------------------------------------------------------------
2025/11/14 Update Notice (Must Read):
Due to several significant model updates and a better understanding of the workflow, I have optimized the latest workflow. It is recommended to run it on RunningHub. The new version ensures both speed and high quality. For example, this workflow achieves better results in just 5 steps compared to what used to take 10 steps three months ago.
Key enhancements include:
High-noise phase: The newly added 1030 lightx LoRA is essential, improving prompt adherence and reducing convergence steps.
https://huggingface.co/Kijai/WanVideo_comfy/resolve/main/LoRAs/Wan22_Lightx2v/Wan_2_2_I2V_A14B_HIGH_lightx2v_4step_lora_v1030_rank_64_bf16.safetensorsLow-noise phase: FastWAN combined with LightX21 allows convergence in just 2 steps.
https://huggingface.co/Kijai/WanVideo_comfy/resolve/main/FastWan/FastWan_T2V_14B_480p_lora_rank_128_bf16.safetensorsBoth high-noise and low-noise phases now use the best high-order samplers, achieving excellent results with a 3+2 step configuration.
This approach can be applied to any workflow.
🎯 How to Use:(The parameter settings in the following old instructions are for reference only and may no longer be up to date.——2025/11/14)
1️⃣ Choose any subject photo shot from a horizontal or slightly above-horizontal perspective.
2️⃣ Load both the high-noise and low-noise models into your image-to-video workflow. (I tested high-noise strength between 0.4–1.0, which runs stably; low-noise works well around 0.45.)
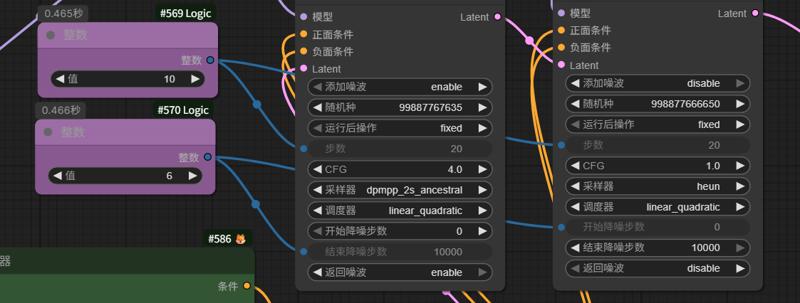
If you’re aiming for absolute consistency, use the following parameter in the image-to-video workflow. It will increase the runtime, but you’ll achieve the strongest character consistency in ComfyUI.
At the same time, you can lower the LoRA strength for high-noise model to 0.65 or below to minimize its impact on facial consistency. In my tests, setting the LoRA strength to 0.5 doesn’t affect camera movement smoothness and improves facial consistency.
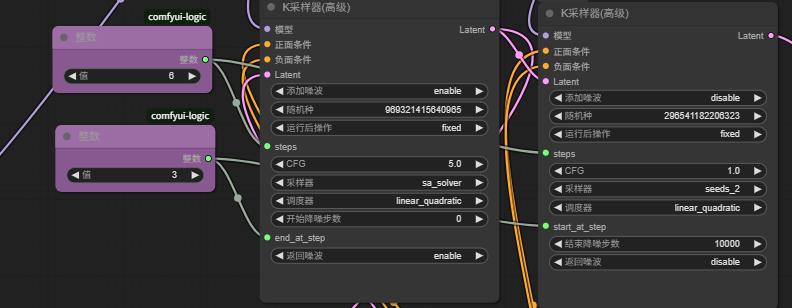
Of course, if you want to maximize speed while maintaining good consistency, you can use the following sampler combinations. Among all the fastest sampler setups, it perform the best consistency.
3️⃣ Input the trigger word “(弧降仰底)” — a cinematic low-angle crane-like motion.
4️⃣ For more control, try prompt templates like these (replace the subject as needed):
“The camera starts moving forward from eye level, then tilts down vertically, shifting the perspective into a full low-angle shot. Finally, it approaches the ground, capturing a full-body close-up of the man from below.”
“The camera starts at eye level, then tilts vertically downward, moving the perspective into a complete low-angle view. At the end, it closes in on the chin, finishing with a dramatic low-angle facial close-up.”
💡 To achieve more precise shot control, you can specify that the chin or face appears alongside any other point where you’d like the camera to arrive at the end. This prevents the shot from focusing solely on the endpoint, allowing it to remain centered on the face throughout and linger at your designated positions.
🌟 还在为获取刁钻的低角度仰视镜头而发愁吗?
这个模型可以轻松捕捉人物极限仰视角度的面部素材。如果你有 LoRA 训练 或 3D 模型构建的需求,它将是再合适不过的选择。
🎯 使用方法:
1️⃣ 选择任意主体的水平或高于水平视角的照片。
2️⃣ 在图生视频 workflow 中加载 高噪模型 和 低噪模型(我测试过,高噪强度 0.4–1.0 稳定运行;低噪在 0.45 左右即可)。
当然,如果你想要以尽可能快的速度并保持较好的一致性,可以采用 以下这两种采样器组合,在所有的速度最快的采样器组合中,这两种采样器在一致性上表现最佳,ddim我没有测试太多,但它的效果也让我比较满意,或许它就是图生视频综合速度和一致性最好的采样器;euler_a则是我过去一段时间最常用的采样器,在所有的情况下,它都表现比较优异;er_sde能够表现出最优秀的复杂指令理解能力,但在一致性上欠缺一些,如果你对及其复杂的指令遵循和画面有需求可以采用它。
lora强度到0.65或者更低,以尽可能减少lora对于一致性的影响,在我的测试中lora强度设置成0.5不会影响运镜的流畅性,而且提高了面部一致性
3️⃣ 输入触发词 “(弧降仰底)” —— 一种类似升降机位的仰视运镜效果。
4️⃣ 为了更好地定向输出效果,可以参考以下提示词模板(可替换主语):
“镜头从视平线向前推进,然后垂直向下倾斜,逐渐转变为仰视全景,最终贴近地面,从下往上捕捉男人的全身特写。”
“镜头从视平线开始,逐渐垂直下倾,从正面转换为完整的仰视视角,最后贴近下巴,以仰视角度收尾,呈现面部特写。”
💡为了取得更好的镜头控制效果,你可以指定让下巴或脸与其他任意你希望相机停留在的位置一同出现,这样镜头就不会只聚焦于最后的位置,而是全程围绕面部为中心并停留在你想要它停留的位置。