
This is a collection of custom workflows for ComfyUI
They can generate multiple subjects. Each subject has its own prompt.
They require some custom nodes to function properly, mostly to automate out or simplify some of the tediousness that comes with setting up these things.
To install any required custom nodes, the best way is to get the ComfyUI Manager, then go to Manager, and click "Install Missing Custom Nodes". If you're still missing nodes, refer to the dependencies listed in the "About this version" section for that workflow
Recently updated workflows:
Latent Couple Pose (renamed from LoRA Latent Couple) - new workflow but user experience-wise it is very similar to Region LoRA and Region LoRA+, just using the newer, better methods that allow you to hook LoRA models to conditioning areas so everything can be done in 1 sampling rather than having each area be sampled separately. If you used those before it's going to be basically the same. This workflow makes Region LoRA, Region LoRA+ and Interaction OpenPose workflows redundant by being able to do everything they did all-in-one but better and as such they will be discontinued.
Latent Couple - updated to work with current ComfyUI and custom node versions. Added LoRA support. Since this has area-conditioned LoRA now it was confusing to keep the above workflow name as LoRA Latent Couple so that was changed.
Reworking Latent Couple I realized the two active workflows are very similar at this point and could be combined into one without much issue, however I ultimately decided against it to avoid adding pathing logic and keep the workflows more focused.
Here's a demo video of using Latent Couple Pose:
Latent Couple is temporarily marked as deprecated as I work on an updated version.
Please download from the model version, not "Update Notification Push" as I delete and recreate it every time I release a new version to push notifications and deleting a version removes statistics, reviews and comments made on it.
Latent Couple vs Latent Couple Pose
At this point both of these workflows are very similar and only differ in that we use the OpenPose ControlNet for additional guidance in Latent Couple Pose. The additional complication it seems to have at first glance comes from the fact that by default we try to first generate an image to pass through an OpenPose Preprocessor to get the ControlNet image without needing to load any external assets which requires adding on a basic T2I workflow at the start, but this can be easily replaced with an image loader for a prepared pose image.
The Pose version is capable of generating more precise images in more complex scenarios, however the same complex scenarios are harder for the preprocessor to accurately extract pose data from so paradoxically letting the AI run more loose with the more basic Latent Couple can return better results by pure chance. That is comparing to using the default method of extracting poses from an image in the workflow, but providing a pre-made pose from an OpenPose editor for Latent Couple Pose will always be superior. I wanted to integrate such an editor into the workflow as it would be a massive improvement, especially if we could supply the initial poses and a background image (as stick figures can be hard to judge properly) in the workflow, but sadly not a single one seems to be properly maintained anymore.
Workflows:
Latent Couple
Allows for more detailed control over image composition by applying different prompts to different parts of the image.
From my testing, this generally does better than Noisy Latent Composition.
This is pretty standard for ComfyUI, just includes some QoL stuff from custom nodes
Noisy Latent Composition (discontinued)
Generates each prompt on a separate image for a few steps (eg. 4/20) so that only rough outlines of major elements get created, then combines them together and does the remaining steps with Latent Couple.
This is pretty standard for ComfyUI, just includes some QoL stuff from custom nodes
Character Interaction (Latent) (discontinued)
First of all, if you want something that actually works well, check Character Interaction (OpenPose) or Region LoRA. This doesn't, I'm leaving it for archival purposes.
This is an """attempt""" at generating 2 characters interacting with each other, while retaining a high degree of control over their looks, without using ControlNets. Extremely inconsistent and unreliable.
We do this by generating the first few steps (eg. 6/30) on a single prompt encompassing the whole image that describes what sort of interaction we want to achieve (+background and perspective, common features of both characters help too).
Then, for the remaining steps in the second KSampler, we add two more prompts, one for each character, limited to the area where we "expect" (guess) they'll appear, so mostly just the left half/right half of the image with some overlap.
I'm not gonna lie, the results and consistency aren't great. If you want to try it, some settings to fiddle around with would be at which step the KSampler should change, the amount of overlap between character prompts and prompt strengths. From my testing, the closest interaction I've been able to get out of this was a kiss, I've tried to go for a hug but with no luck.
The higher the step that you switch KSamplers at, the more consistently you'll get the desired interaction, but you'll lose out on the character prompts (I've been going between 20-35% of total steps). You may be able to offset this a bit by increasing character prompt strengths.
Latent Couple Pose
This should come after the next section about Character Interaction (OpenPose) and Region Lora, but this description is long enough as is and it's more visible up here, and the workflows below are deprecated anyway.
This workflow employs very similar methods to those described below and images showcased there also apply here. The main difference is that we're no longer using Regional Sampling in favor of newer and much superior LoRA hooks which allow for the whole image to be sampled at once instead of having to sample each LoRA area separately.
Character Interaction (OpenPose) (discontinued)
Another method of generating character interaction, except this time it actually works, and very consistently at that. To achieve this we simply run latent composition with ControlNet openpose mixed in. To make it more convenient to use, the OpenPose image can be pregenerated, so there is no need to hassle with inputting premade ones yourself. As a result, it's not too complicated as compared with a normal generation. You can find instructions in the notes in the workflow itself after importing it into ComfyUI.
From a more technical side of things, implementing it is actually a bit more complicated than just applying OpenPose to the conditioning. Because we're dealing with a total of 3 (or more!) conditionings (background and both subjects) we're running into problems. Applying ControlNet to all three, be it before combining them or after, gives us the background with OpenPose applied correctly (the OpenPose image having the same dimensions as the background conditioning), and subjects with the OpenPose image squeezed to fit their dimensions, for a total of 3 non-aligned ControlNet images. For that reason, we can only apply unchanged OpenPose to the background. Stopping here, however, results in there being no ControlNet guidance for our subjects and the result has nothing to do with our OpenPose image. Therefore, now we crop parts of the OpenPose that correlate with subject areas and apply that to the subject conditioning for each subject before combining them into the final conditioning. Only then can we generate the final image.
The following image demonstrates our resulting conditioning:
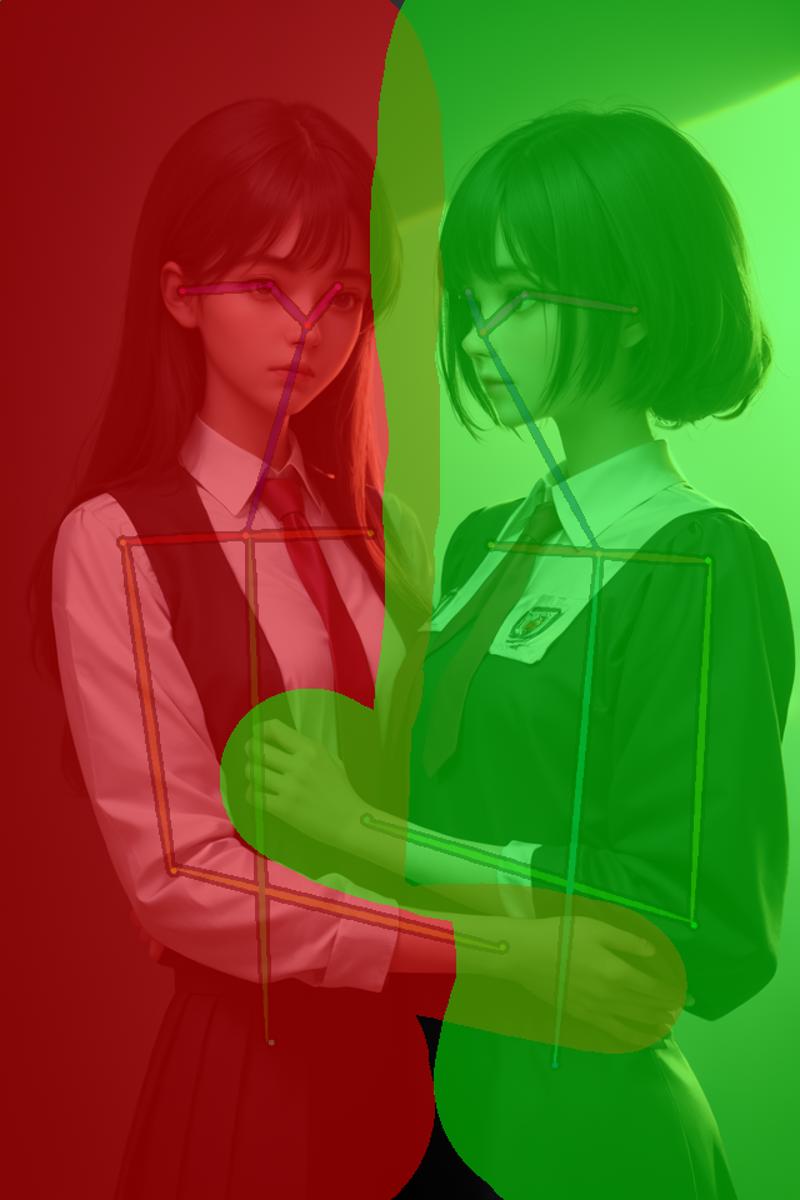 btw the workflow will generate similar ones for you :)
Background conditioning covers the entire image and contains the entirety of the pose data.
Subject 1 is represented as the green area and contains a crop of the pose that is inside that area.
Subject 2 is represented as the blue area and contains a crop of the pose that is inside that area.
The image itself is generated first, then the pose data is extracted from it, cropped, applied to conditioning and used in generating the proper image. This saves you from having to have applicable OpenPose images on hand.
And here is the final result:

This includes a second pass after upscaling, face restoration and additional upscaling at the end, all of which are included in the workflow.
A handy preview of the conditioning areas (see the first image) is also generated. Ideally, it would happen before the proper image generation, but the means to control that are not yet implemented in ComfyUI, so sometimes it's the last thing the workflow does. Sadly, I can't do anything about it for now.
Some more use-related details are explained in the workflow itself.
Region LoRA/Region LoRA PLUS
As the name implies, these workflows will let you apply Lora models to specified areas of the image.
You can, for example, generate 2 characters, each from a different lora and with a different art style, or a single character with one set of loras applied to their face, and the other to the rest of the body - cosplay!
How does Region LoRA differ from Region LoRA PLUS?
Region LoRA is limited to 2 regions - you draw a single mask, the masked area is region 1, everything else is region 2.
With Region LoRA PLUS you can have as many regions as you want, but you need to draw the region for every single one of them (much like in Interaction OpenPose)
Therefore, if you only need 2 regions, the base version is simpler to use, and guarantiess that the regions will be aligned perfectly.
Additionally, the PLUS variant currently can't use region sampling after upscaling as there are some crucial nodes missing for now and a workaround would massively complicate it.
How does it work?
The secret are the Regional Sampling nodes from Impact Pack and Inspire Pack by ltdr.data. It allows us to generate parts of the image with different samplers based on masked areas. That means we can put in different Lora models, or even use different checkpoints for masked/non-masked areas. This is the central piece, but of course, it's not actually as simple as just using that. The full workflow is as follows:
First, we generate an image of our desired pose with a realistic checkpoint and pass it through a ControlNet OpenPose Preprocessor:
 The next step is in a Preview Bridge (another node from Impact Pack), which is essentially a preview image node with image and mask output that you can draw masks on. This is where the the above image ends up. Once it is there, we stop the image generation, and open this image in the MaskEditor, where we can draw a mask over one of the characters like so:
 Next, we crop the controlnet image along the mask boundries and apply it to the region's conditioning. Thanks to the controlnet, our image will remain consistent in perspective, and we can achieve interaction between characters in different regions. These region masks also determine the sampling regions that are responsible for the clean LoRA separation.
Final Result:
 Left:
Left: