Download
1 variant available


4.5K
274.6K


You don't need to download anything, this is a guide with online tools. Click "Show more" below.
You can find an updated version of this guide in my new website, a comfy place where experienced AI artists and model creators can share their work.
🏭 Preamble
Even if you don't know where to start or don't have a powerful computer, I can guide you to making your first Lora and more!
In this guide we'll be using resources from my GitHub page. If you're new to Stable Diffusion I also have a full guide to generate your own images and learn useful tools.
I'm making this guide for the joy it brings me to share my hobbies and the work I put into them. I believe all information should be free for everyone, including image generation software. However I do not support you if you want to use AI to trick people, scam people, or break the law. I just do it for fun.
📃What you need
An internet connection. You can even do this from your phone if you want to (as long as you can prevent the tab from closing).
Knowledge about what Loras are and how to use them.
Patience. I'll try to explain these new concepts in an easy way. Just try to read carefully, use critical thinking, and don't give up if you encounter errors.
🎴Making a Lora
It has a reputation for being difficult. So many options and nobody explains what any of them do. Well, I've streamlined the process such that anyone can make their own Lora starting from nothing in under an hour. All while keeping some advanced settings you can use later on.
You could of course train a Lora in your own computer, granted that you have an Nvidia graphics card with 6 GB of VRAM or more. We won't be doing that in this guide though, we'll be using Google Colab, which lets you borrow Google's powerful computers and graphics cards for free for a few hours a day (some say it's 20 hours a week). You can also pay $10 to get up to 50 extra hours, but you don't have to. We'll also be using a little bit of Google Drive storage.
This guide focuses on anime, but it also works for photorealism. However I won't help you if you want to copy real people's faces without their consent.
🎡 Types of Lora
As you may know, a Lora can be trained and used for:
A character or person
An artstyle
A pose
A piece of clothing
etc
However there are also different types of Lora now:
LoRA: The classic, works well for most cases.
LoCon: Has more layers which learn more aspects of the training data. Very good for artstyles.
LoHa, LoKR, (IA)^3: These use novel mathematical algorithms to process the training data. I won't cover them as I don't think they're very useful.
📊 First Half: Making a Dataset
This is the longest and most important part of making a Lora. A dataset is (for us) a collection of images and their descriptions, where each pair has the same filename (eg. "1.png" and "1.txt"), and they all have something in common which you want the AI to learn. The quality of your dataset is essential: You want your images to have at least 2 examples of: poses, angles, backgrounds, clothes, etc. If all your images are face close-ups for example, your Lora will have a hard time generating full body shots (but it's still possible!), unless you add a couple examples of those. As you add more variety, the concept will be better understood, allowing the AI to create new things that weren't in the training data. For example a character may then be generated in new poses and in different clothes. You can train a mediocre Lora with a bare minimum of 5 images, but I recommend 20 or more, and up to 1000.
As for the descriptions, for general images you want short and detailed sentences such as "full body photograph of a woman with blonde hair sitting on a chair". For anime you'll need to use booru tags (1girl, blonde hair, full body, on chair, etc.). Let me describe how tags work in your dataset: You need to be detailed, as the Lora will reference what's going on by using the base model you use for training. If there is something in all your images that you don't include in your tags, it will become part of your Lora. This is because the Lora absorbs details that can't be described easily with words, such as faces and accessories. Thanks to this you can let those details be absorbed into an activation tag, which is a unique word or phrase that goes at the start of every text file, and which makes your Lora easy to prompt.
You may gather your images online, and describe them manually. But fortunately, you can do most of this process automatically using my new 📊 dataset maker colab.
Here are the steps:
1️⃣ Setup: This will connect to your Google Drive. Choose a simple name for your project, and a folder structure you like, then run the cell by clicking the floating play button to the left side. It will ask for permission, accept to continue the guide.
If you already have images to train with, upload them to your Google Drive's "lora_training/datasets/project_name" (old) or "Loras/project_name/dataset" (new) folder, and you may choose to skip step 2.
2️⃣ Scrape images from Gelbooru: In the case of anime, we will use the vast collection of available art to train our Lora. Gelbooru sorts images through thousands of booru tags describing everything about an image, which is also how we'll tag our images later. Follow the instructions on the colab for this step; basically, you want to request images that contain specific tags that represent your concept, character or style. When you run this cell it will show you the results and ask if you want to continue. Once you're satisfied, type yes and wait a minute for your images to download.
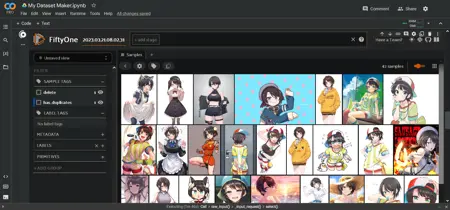
3️⃣ Curate your images: There are a lot of duplicate images on Gelbooru, so we'll be using the FiftyOne AI to detect them and mark them for deletion. This will take a couple minutes once you run this cell. They won't be deleted yet though: eventually an interactive area will appear below the cell, displaying all your images in a grid. Here you can select the ones you don't like and mark them for deletion too. Follow the instructions in the colab. It is beneficial to delete low quality or unrelated images that slipped their way in. When you're finished, send Enter in the text box above the interactive area to apply your changes.
4️⃣ Tag your images: We'll be using the WD 1.4 tagger AI to assign anime tags that describe your images, or the BLIP AI to create captions for photorealistic/other images. This takes a few minutes. I've found good results with a tagging threshold of 0.35 to 0.5. After running this cell it'll show you the most common tags in your dataset which will be useful for the next step.
5️⃣ Curate your tags: This step for anime tags is optional, but very useful. Here you can assign the activation tag (also called trigger word) for your Lora. If you're training a style, you probably don't want any activation tag so that the Lora is always in effect. If you're training a character, I myself tend to delete (prune) common tags that are intrinsic to the character, such as body features and hair/eye color. This causes them to get absorbed by the activation tag. Pruning makes prompting with your Lora easier, but also less flexible. Some people like to prune all clothing to have a single tag that defines a character outfit; I do not recommend this, as too much pruning will affect some details. A more flexible approach is to merge tags, for example if we have some redundant tags like "striped shirt, vertical stripes, vertical-striped shirt" we can replace all of them with just "striped shirt". You can run this step as many times as you want.
6️⃣ Ready: Your dataset is stored in your Google Drive. You can do anything you want with it, but we'll be going straight to the second half of this tutorial to start training your Lora!
⭐ Second Half: Settings and Training
This is the tricky part. To train your Lora we'll use my ⭐ Lora trainer colab or the 🌟 XL Lora trainer colab depending if you want to train for a SD1.5 model or an SDXL model. They are very similar, and they consist of a single cell with all the settings you need. Many of these settings don't need to be changed. However, this guide and the colab will explain what each of them do, such that you can play with them in the future.
Here are the settings:
▶️ Setup: Enter the same project name you used in the first half of the guide and it'll work automatically. Here you can also change the base model for training. There are 2 recommended default ones, but alternatively you can copy a direct download link to a custom model of your choice. Make sure to pick the same folder structure you used in the dataset maker.
▶️ Processing: Here are the settings that change how your dataset will be processed.
The resolution should stay at 512 this time, which is normal for Stable Diffusion. Increasing it makes training much slower, but it does help with finer details. (SDXL has a default of 1024)
flip_aug is a trick to learn more evenly, as if you had more images, but makes the AI confuse left and right, so it's your choice.
shuffle_tags should always stay active if you use anime tags, as it makes prompting more flexible and reduces bias.
activation_tags is important, set it to 1 if you added one during the dataset part of the guide. This is also called keep_tokens.
▶️ Steps: We need to pay attention here. There are 4 variables at play: your number of images, the number of repeats, the number of epochs, and the batch size. These result in your total steps.
You can choose to set the total epochs or the total steps, we will look at some examples in a moment. Too few steps will undercook the Lora and make it useless, and too many will overcook it and distort your images. This is why we choose to save the Lora every few epochs, so we can compare and decide later. For this reason, I recommend few repeats and many epochs.
There are many ways to train a Lora. The method I follow nowadays involves balancing these values to produce 250-1000 steps depending on the amount of images. Note that styles may need to train for more epochs with a smaller learning rate. If you're training in XL you need around half as many repeats. Here are some examples for XL:
10 images × 10 repeats × 10 epochs ÷ 2 batch size = 500 steps
20 images × 5 repeats × 10 epochs ÷ 4 batch size = 250 steps
100 images × 1 repeats × 10 epochs ÷ 4 batch size = 250 steps
1000 images × 1 repeat × 6 epochs ÷ 8 batch size = 750 steps
▶️ Learning: The most important settings. However, you don't need to change any of these your first time. In any case:
The unet learning rate dictates how fast your Lora will absorb information. Like with steps, if it's too small the Lora won't do anything, and if it's too large the Lora will deepfry every image you generate. There's a flexible range of working values, specially since you can change the intensity of the lora in prompts. Assuming you set dim between 8 and 32 (see below), I recommend 5e-4 unet for almost all situations. If you want a slow simmer, 1e-4 or 2e-4 will be better. Note that these are in scientific notation: 1e-4 = 0.0001
The text encoder learning rate is less important, specially for styles. It helps learn tags better, but it'll still learn them without it. It is generally accepted that it should be either half or a fifth of the unet, good values include 1e-4 or 5e-5. Use google as a calculator if you find these small values confusing.
The scheduler guides the learning rate over time. This is not critical, but still helps. I always use cosine with 3 restarts, which I personally feel like it keeps the Lora "fresh". Feel free to experiment with cosine, constant, and constant with warmup. Can't go wrong with those. There's also the warmup ratio which should help the training start efficiently, and the default of 5% works well.
▶️ Structure: Here is where you choose the type of Lora from the 2 I mentioned in the beginning. Also, the dim/alpha mean the size of your Lora. Larger does not usually mean better. I personally use 16/8 which works great for characters and is only 18 MB.
▶️ Ready: Now you're ready to run this big cell which will train your Lora. It will take 5 minutes to boot up, after which it starts performing the training steps. In total it should be less than an hour, and it will put the results in your Google Drive.
🏁 Third Half: Testing
You read that right. I lied! 😈 There are 3 parts to this guide.
When you finish your Lora you still have to test it to know if it's good. Go to your Google Drive inside the /lora_training/outputs/ folder, and download everything inside your project name's folder. Each of these is a different Lora saved at different epochs of your training. Each of them has a number like 01, 02, 03, etc.
Here's a simple workflow to find the optimal way to use your Lora:
Put your final Lora in your prompt with a weight of 0.7 or 1, and include some of the most common tags you saw during the tagging part of the guide. You should see a clear effect, hopefully similar to what you tried to train. Adjust your prompt until you're either satisfied or can't seem to get it any better.
Use the X/Y/Z plot to compare different epochs. This is a builtin feature in webui. Go to the bottom of the generation parameters and select the script. Put the Lora of the first epoch in your prompt (like "<lora:projectname-01:0.7>"), and on the script's X value write something like "-01, -02, -03", etc. Make sure the X value is in "Prompt S/R" mode. These will perform replacements in your prompt, causing it to go through the different numbers of your lora so you can compare their quality. You can first compare every 2nd or every 5th epoch if you want to save time. You should ideally do batches of images to compare more fairly.
Once you've found your favorite epoch, try to find the best weight. Do an X/Y/Z plot again, this time with an X value like ":0.5, :0.6, :0.7, :0.8, :0.9, :1". It will replace a small part of your prompt to go over different lora weights. Again it's better to compare in batches. You're looking for a weight that results in the best detail but without distorting the image. If you want you can do steps 2 and 3 together as X/Y, it'll take longer but be more thorough.
If you found results you liked, congratulations! Keep testing different situations, angles, clothes, etc, to see if your Lora can be creative and do things that weren't in the training data.
Finally, here are some things that might have gone wrong:
If your Lora doesn't do anything or very little, we call it "undercooked" and you probably had a unet learning rate too low or needed to train longer. Make sure you didn't just make a mistake when prompting.
If your Lora does work but it doesn't resemble what you wanted, again it might just be undercooked, or your dataset was low quality (images and/or tags). Some concepts are much harder to train, so you should seek assistance from the community if you feel lost.
If your Lora produces distorted images or artifacts, and earlier epochs don't help, or you even get a "nan" error, we call it "overcooked" and your learning rate or repeats were too high.
If your Lora is too strict in what it can do, we'll call it "overfit". Your dataset was probably too small or tagged poorly, or it's slightly overcooked.
If you got something usable, that's it, now upload it to Civitai for the world to see. Don't be shy. Cheers!
Check out my new website, a comfy place where experienced AI artists and model creators can share their work: https://arcenciel.io