Download
1 variant available


My Introduction:
In my inaugural article for CivitAI, I explore the capabilities of SDXL ComfyUI, focusing particularly on its potential with just a few nodes to generate photorealistic output, a pursuit I've primarily pursued for sharing on Instagram.
Embarking on this journey has been immensely gratifying, as I've navigated through various models, LoRA's (Language-Optimized Rendering Algorithms), and other resources. This led me to feel compelled to share my insights through this initial article, with many more to come in the future.
While I typically design workflows for my personal use, I recognized the importance of contributing to the Civitai Community. Much of what I've learned stems from utilizing this website, watching YouTube tutorials, and of course, gaining insights from my wife. Some nodes within the workflow may appear collapsed, as they serve as connector nodes without requiring specific values.
Regarding the focus of this article, we will delve into how this particular workflow excels in producing clear and sharp images solely within ComfyUI, without the need for additional tools. (You can see what it is capable of by checking my Gallery images out!). More than 1,000 images...
A quick note:
If you utilize the default configuration of this workflow (which is configured for a single model input and no LoRAs), the processing speed is fast. However, if you begin adding LoRAs in the Positive Prompt, it will slow down. The same slowdown occurs if you use "embedding" in either the Positive or Negative Prompt. By default, it's configured to utilize a "TURBO & LIGHTNING" model. You have the option to adjust the Steps & CFG to use standard SDXL models. However, for optimal quality, it's advisable to customize the settings. Once you've fine-tuned them to your liking, simply press and hold the "Queue Prompt" button on the ComfyUI Manager to specify the number of times you want the prompt to run. Alternatively, you can configure the Batch value to obtain the same number of images.
The Ultimate 24-bit SDXL ComfyUI Workflow:
1. 20-30 seconds per image (*not including upscaling which is also quick*).
2. Image is 24-bit by default (*you can change this by changing the main multiplier value from 2 to 1*).
3. All images are in "lossless" PNG format with all "EXIF data embedded".
4. Most images are between 20-30Mb in size, this gives the best quality and clarity.
6. Dual SDXL Model Merge Ratio built-in.
7. Dual SDXL Lora Merge Ratio built-in.
8. Dual SDXL CLIP Slip control per Model.
9. Dual Lora Selectors.
10. Dual Model Selectors.
11. FreeU V2 built-in.
12. Supports all SDXL "Turbo" & "Lightning" Models, as well as standard SDXL.
13. Supports "Preview" image on "KSampler Node (Advanced)" and Upscale "Preview". This allows you to stop waiting for failed image creation if you notice a failed image render. It can be "cancelled" in the "Comfy Manager" by deleting the current processing image or delete the follow up jobs if you have any queues, and make prompt adjustments, etc.
Tailored for users ranging from novices to experts, this workflow is versatile and accommodating, allowing for the seamless addition of extra nodes to further expand its capabilities. It is fast, and I tend to use "Turbo" and "Lightning" models with it. I only alter the steps and CFG slightly, if any images have defects.
Includes FreeU V2 (Optimized in this workflow)
If you haven't used FreeU before, there are plenty of resources on the settings of this and what each one does. It also shows before/after images so you can understand it's functions with AI. I used it since version 1, and upgraded the node to version 2, on release.
Copyright belongs to FreeU to this image preview.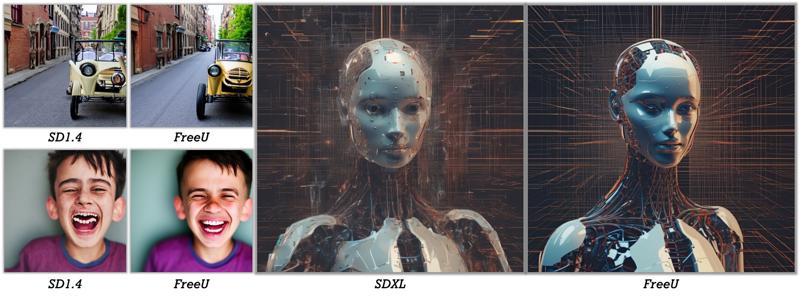
In my exploration, which encompassed workflows devised both by myself and my wife, I've recognized a fundamental truth: despite the myriad of workflows available, individuals often gravitate towards the familiar, where they understand its intricacies and potential. When I desire additional functionalities, I typically augment my existing workflow.
Today, I opted to integrate the "CLIP skip node" into my setup. However, owing to my configuration, I found it necessary to incorporate two "CLIP skip Nodes." This is because I utilize Merge Model Nodes and Merge LoRA Nodes, enabling simultaneous use of two distinct Models, facilitating swift operation. Typically, I allocate a 75% ratio to the first Model and 25% to the second, providing greater control over model usage and enhancing creativity. Integrating the LoRA Merging Node offers further control over the overall output. A ratio of 1.0 in the Mergers selects Model 1 and LoRA 1, whereas a ratio of 0.0 selects Model 2 and LoRA 2. To utilize both models and LoRAs simultaneously, setting both mergers to a ratio of 0.5 is advisable, ensuring appropriate adjustment of LoRA weights. Disabling LoRAs is achievable by setting all values to 0.00.
The only thing I have not added yet is the ability to load VAE's, mainly because I haven't needed the use of VAE's, because most SDXL Models have VAE burned into them. If I see a reason to add it then I would at a later date, in the future.
What struck me was the influence CLIP Skip not only had on the foreground but also on the background in certain instances (bear in mind I even used a CLIP Skip value of "16"). This also differs with your FreeU V2 settings (this I added as a default in the workflow), mainly for better detail.
Using an image featuring a cyborg as my experimental subject, I applied "CLIP Skip" with varying values, resulting in notable alterations to its clothing, stance, and occasionally, facial features and background elements. Employing a "Turbo" model facilitated swift execution of this testing process.
It's noteworthy that there's a prevalent belief surrounding the use of "CLIP Skip" within SDXL, suggesting it enhances face formations if the value is set to "2", and rectifies other imperfections. However, I've observed that its effectiveness can be influenced by factors such as image ratio and the specific model and lora's utilized.
All the images below were generated using the same prompt and settings, with the only variance being the adjustment of the "CLIP Skip" value by increments of 1. As you can discern, even this small change yields significant differences.
I wanted to share this setup, which initially began with no nodes at all, and has evolved into its current state. All the images below I will make available in my gallery so the settings can be seen in each case.
Additional Informative Resources:
Online SD Image Information Reader
Just drop your image on this website to view all details of your AI Image. I always have this site open on a tab.
FreeU - Full details on how to use this great add-on.
Additional Credits:
@owly247 - Workflow design (main layout)
FreeU
ComfyUI