Overview of the Workflow
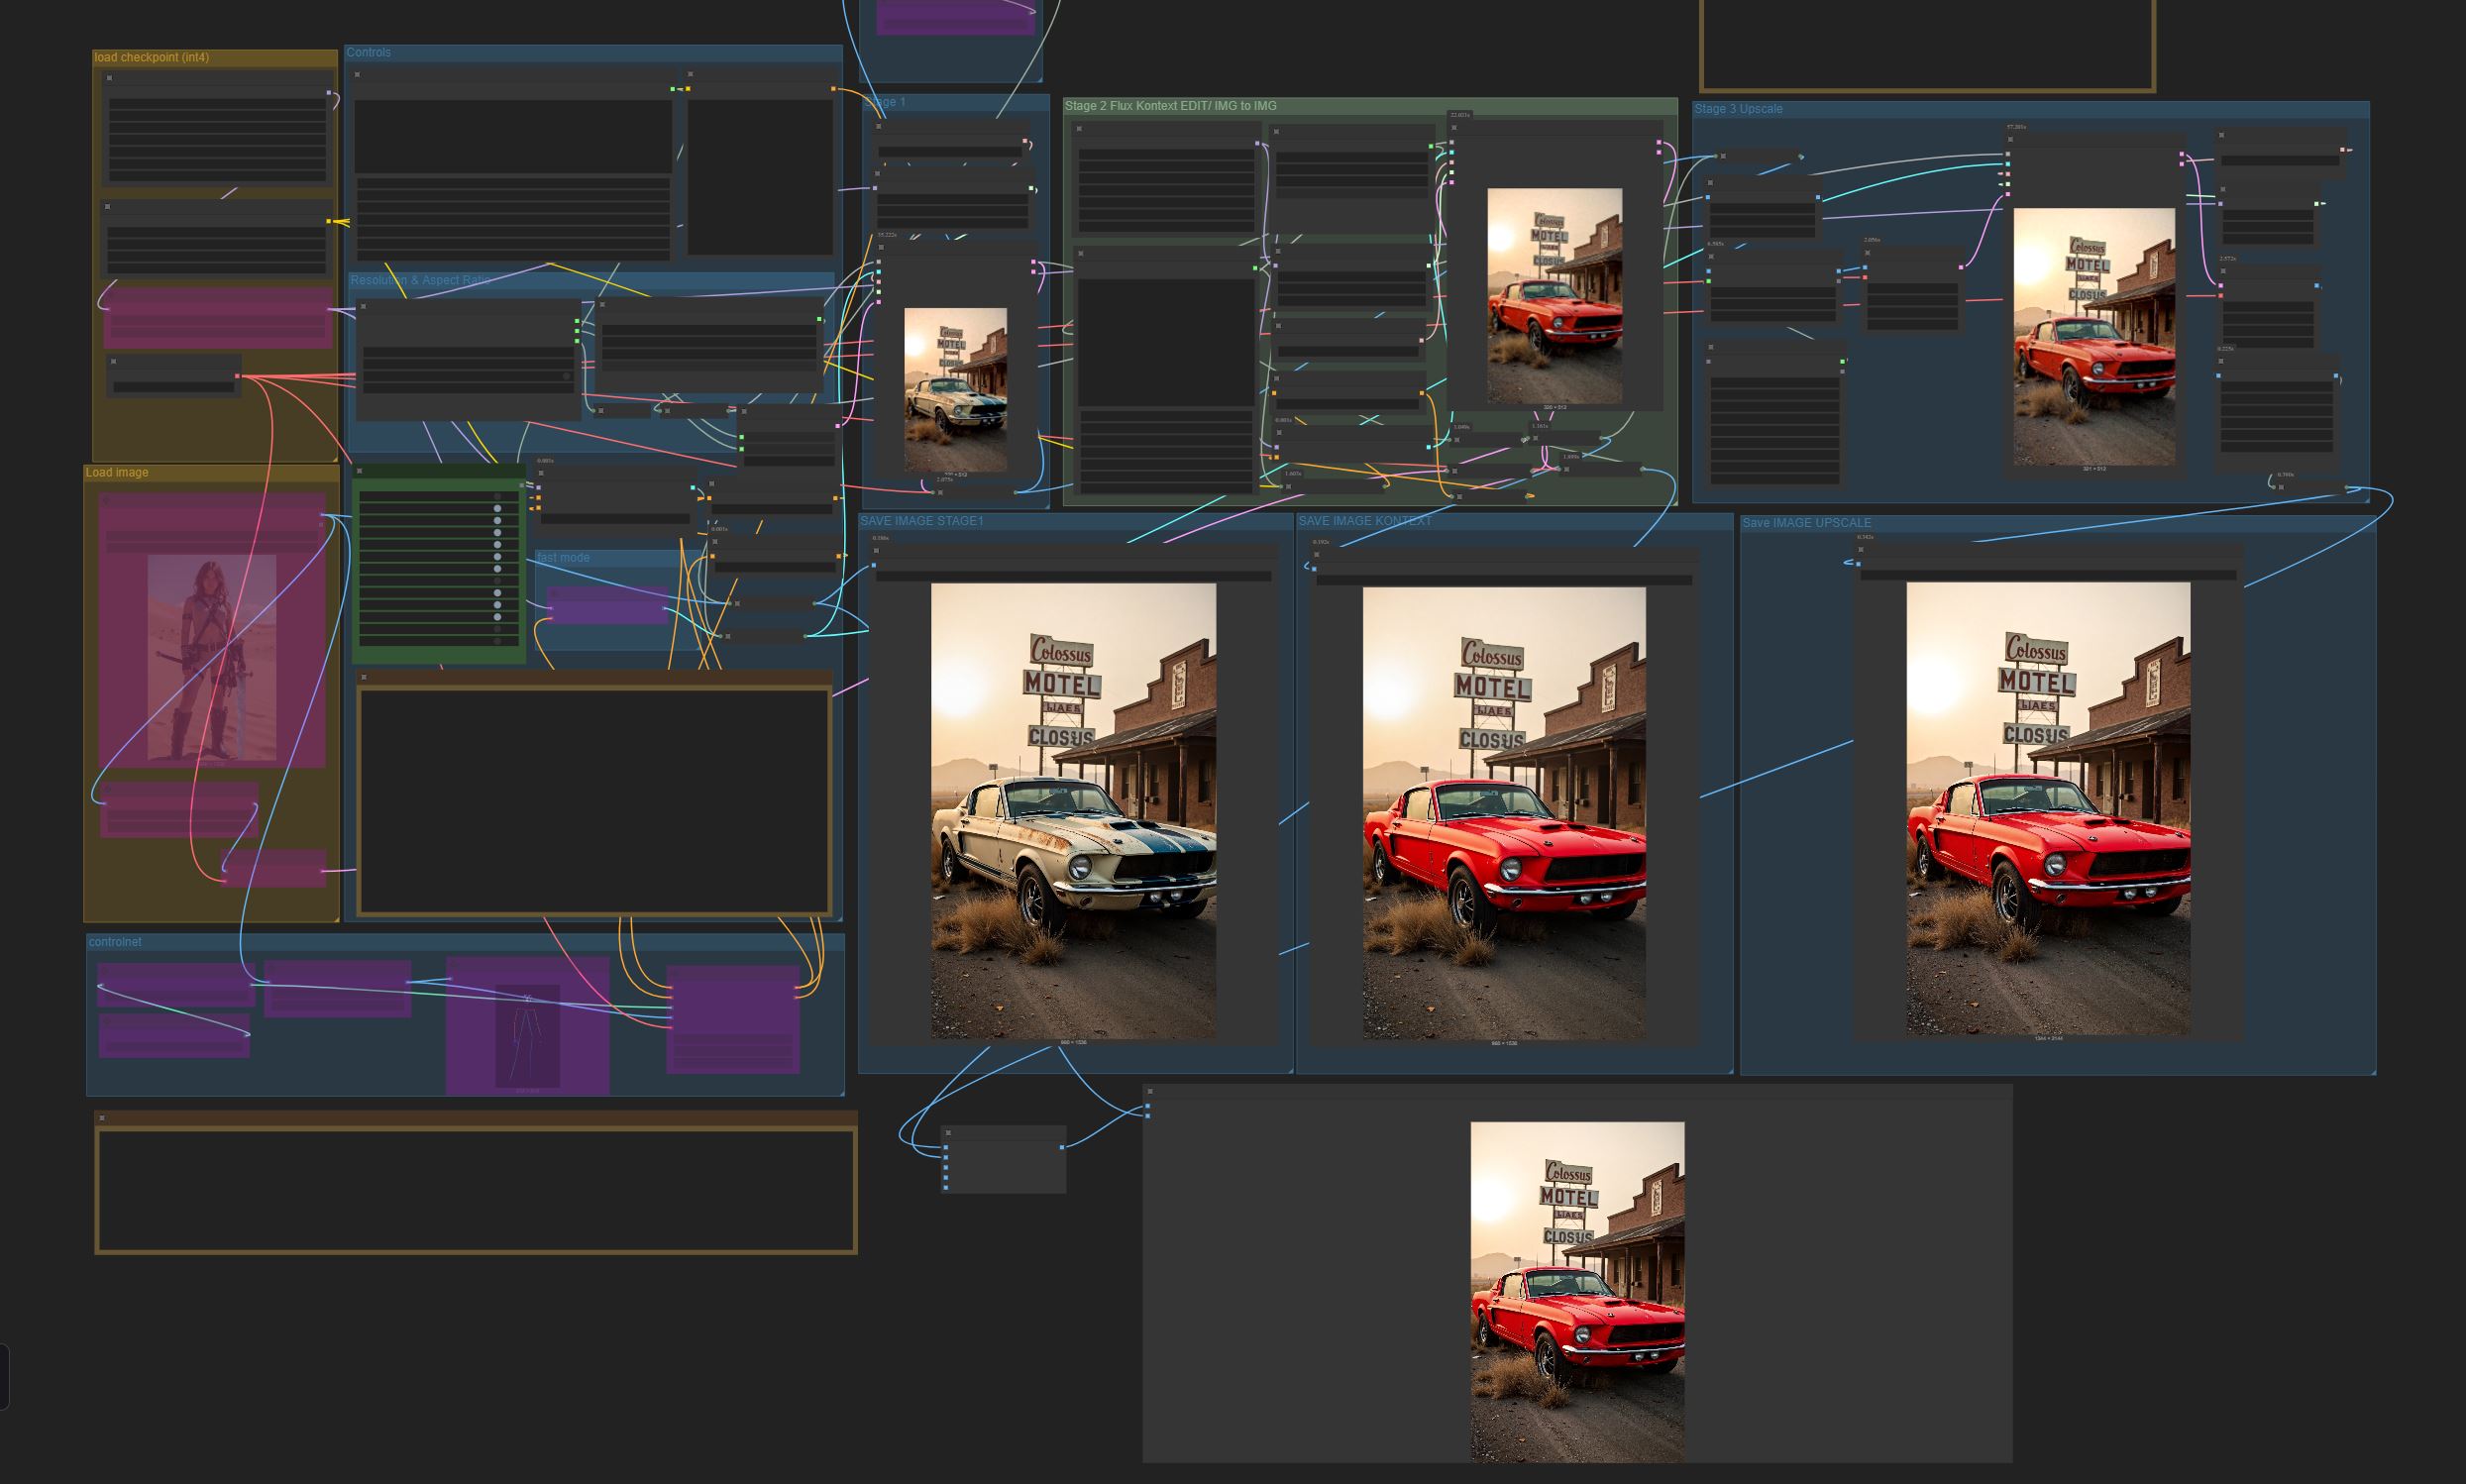
This workflow uses the quantified versions of Colossus Project Flux V12 and Flux Kontext This allows the creation and editing of high quality images in a single workflow. Below is a overview image covering the whole thing. This is a guide for how to use the workflow. Note that this workflow is still WIP and can change from time to time..
If you like my work feel free to reacts and write comments.. if you want to support me and my work on AI in general I don't mind at all :-) https://ko-fi.com/afroman4peace
What is Nunchaku?
Nunchaku is a ComfyUI-Node that uses 4bit SVD-quantification to boost the speed by around 3x times of a normal Flux checkpoint while keeping their quality. Only this allows even this kind of workflow. Here is the scientific paper for more details.. https://arxiv.org/abs/2411.05007
https://github.com/nunchaku-tech/deepcompressor
The installation of Nunchaku
This guide here mainly focus of the use of the workflow. Here is the link to my small Quick Install guide: https://civitai.com/articles/17313
Also you can check out the github page of Nunchaku here: https://github.com/nunchaku-tech/ComfyUI-nunchaku?tab=readme-ov-file
Downloading the checkpoints
I have tested this workflow using my own Colossus Project Flux V12 models but first let me explain you which version you need download first.. In order to run this you need at least a NVIDIA 20xx graphics card
FP4 or INT4?
Well this question is very important here.. Or should I ask you which graphics card you have? To make it short:
INT4 = 20xx, 30xx, 40xx graphic cards
FP4 = 50xx graphic cards
Downloading Colossus Project V12
With that sorted out you can get my Colossus Project FLUX V12 checkpoints from here: https://civitai.com/models/833086
Clip_L https://civitai.com/models/833086?modelVersionId=1985466
Special Thanks goes to to Muyang Li from Nunchakutech who did the quantification of V12
Downloading Flux Kontext
https://huggingface.co/nunchaku-tech/nunchaku-flux.1-kontext-dev/tree/main
All checkpoints are going into: models/diffusion models
Install missing nodes
Go to your Comfy Manager then go to missing nodes.. install them and restart ComfyUI.
UPDATE COMFY
if you run into issues. may update COMFYUI
WORKFLOW GUIDE
With Nunchaku and models installed you can start using the workflow.
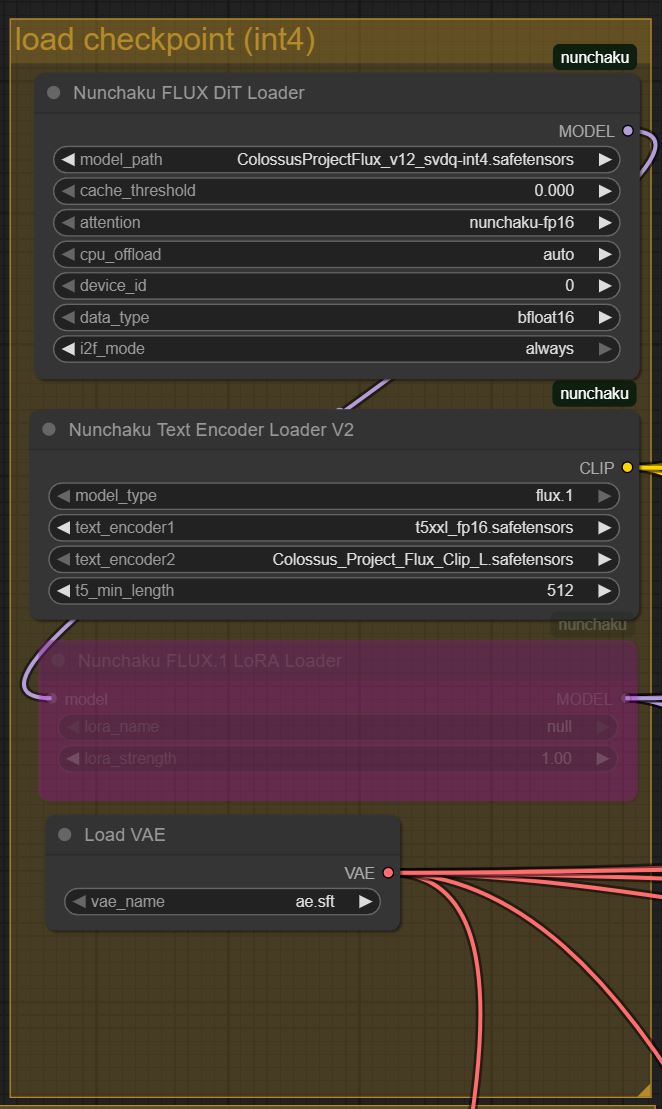
Load checkpoints
In this section of the workflow you will load up all the downloaded checkpoints and clips. You can also try to use FP8 clips but I recommend using FP16 ones. You can try to use FP16 on the data type instead of BF16. This also can give different and sometimes better outputs. For 20xx user set the i2f mode to enable.
Update: I changed the data type to "bfloat16" as default.. if you have a 20xx you need to set it to "float16"
CONTROLS of STAGE 1
In this section of the workflow you basically control the entire workflow..
Starting from above:
Prompt and negative prompt: I think you all know what that is, right?
Flux Resolution Calculation Node: Here you can select the aspect ratio and the resolution of the image.. default is 1.5MP but you can go higher or lower depending on your system. if you see something like devide by false.. set it to 64 or 32
Seed: select your seed.. you can press randomize each time to create more than one image..
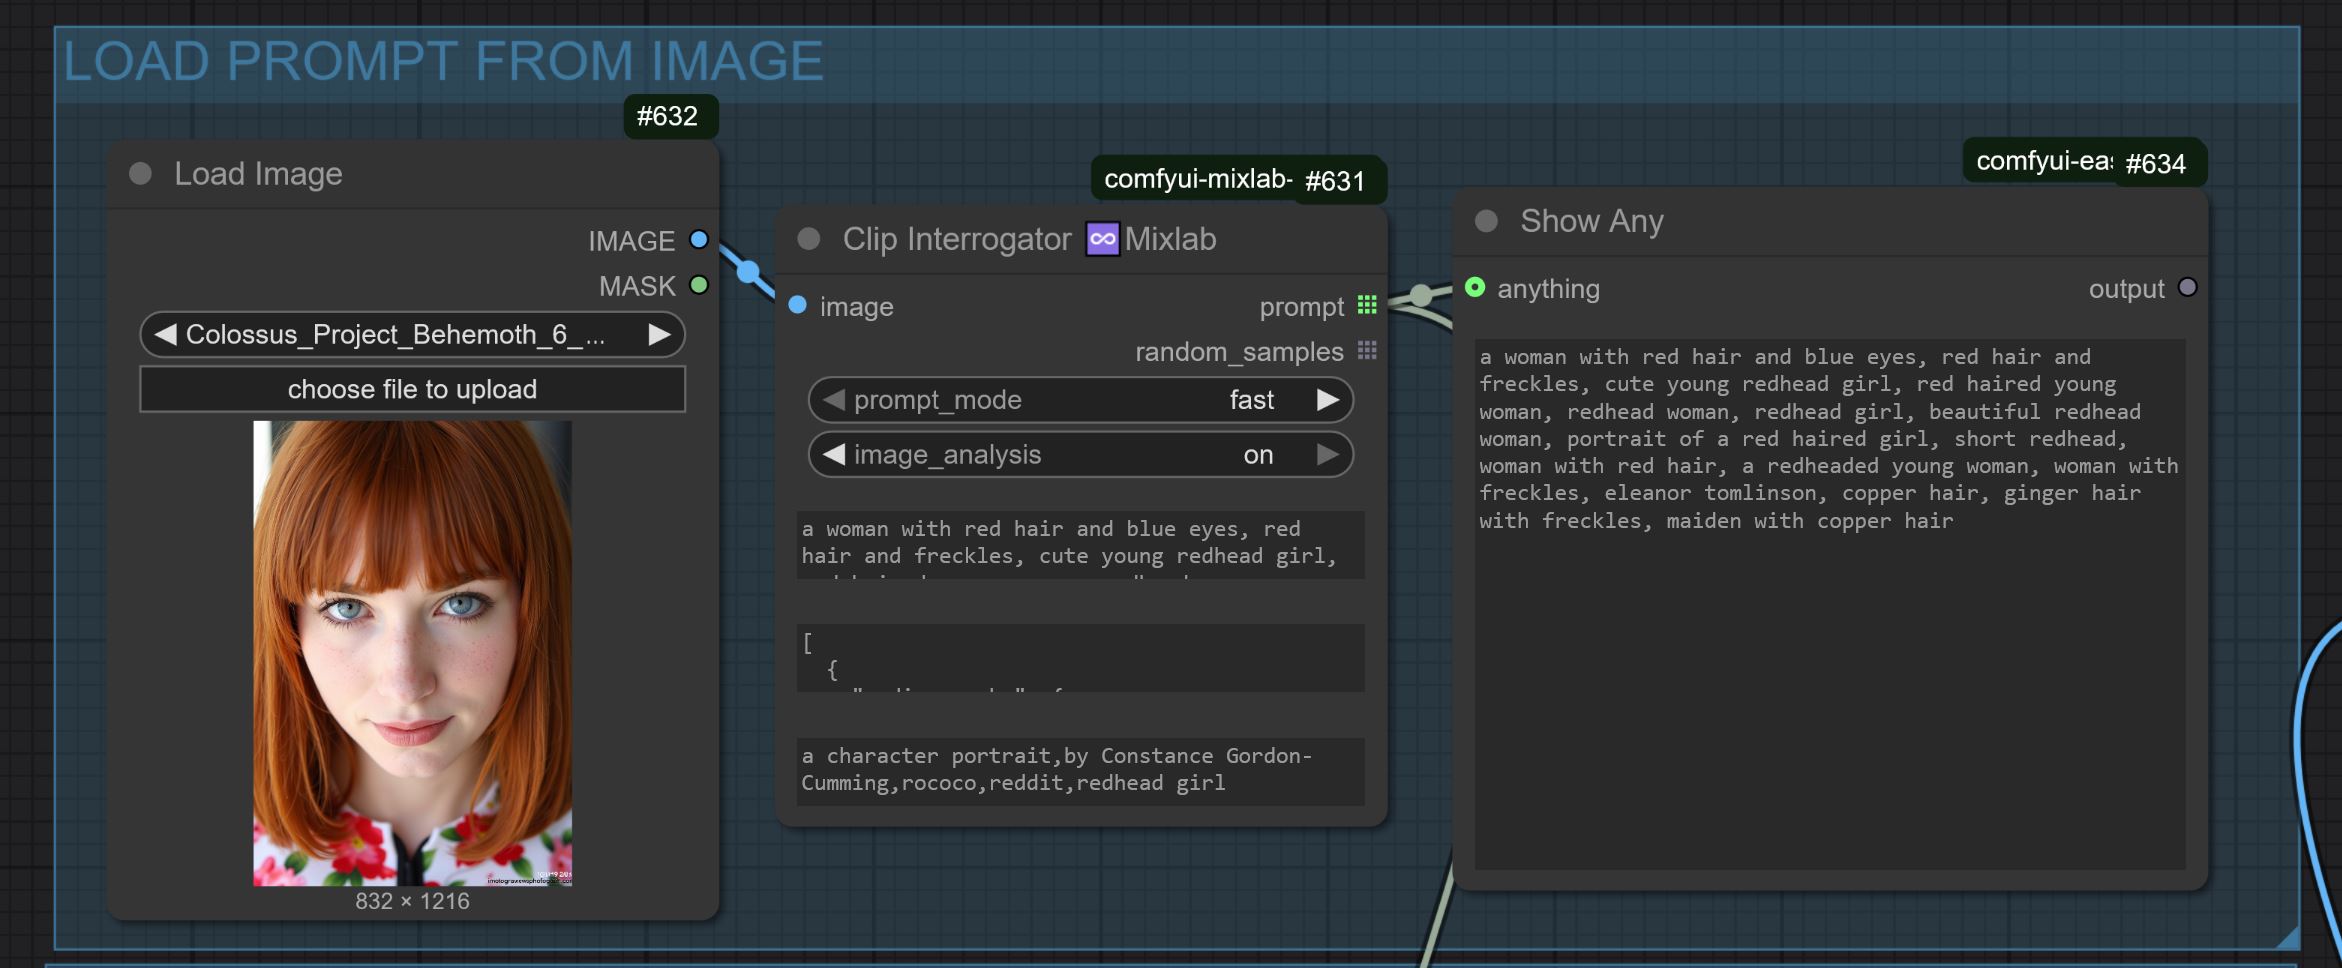
Update1: LOAD PROMPT FROM IMAGE: after V1.111
This part of the workflow lets you load an image to get a prompt from it. If this part of the workflow is enabled it will use the prompt from the loaded image instead of you manual prompt. Do you like this feature? let me know it :-)
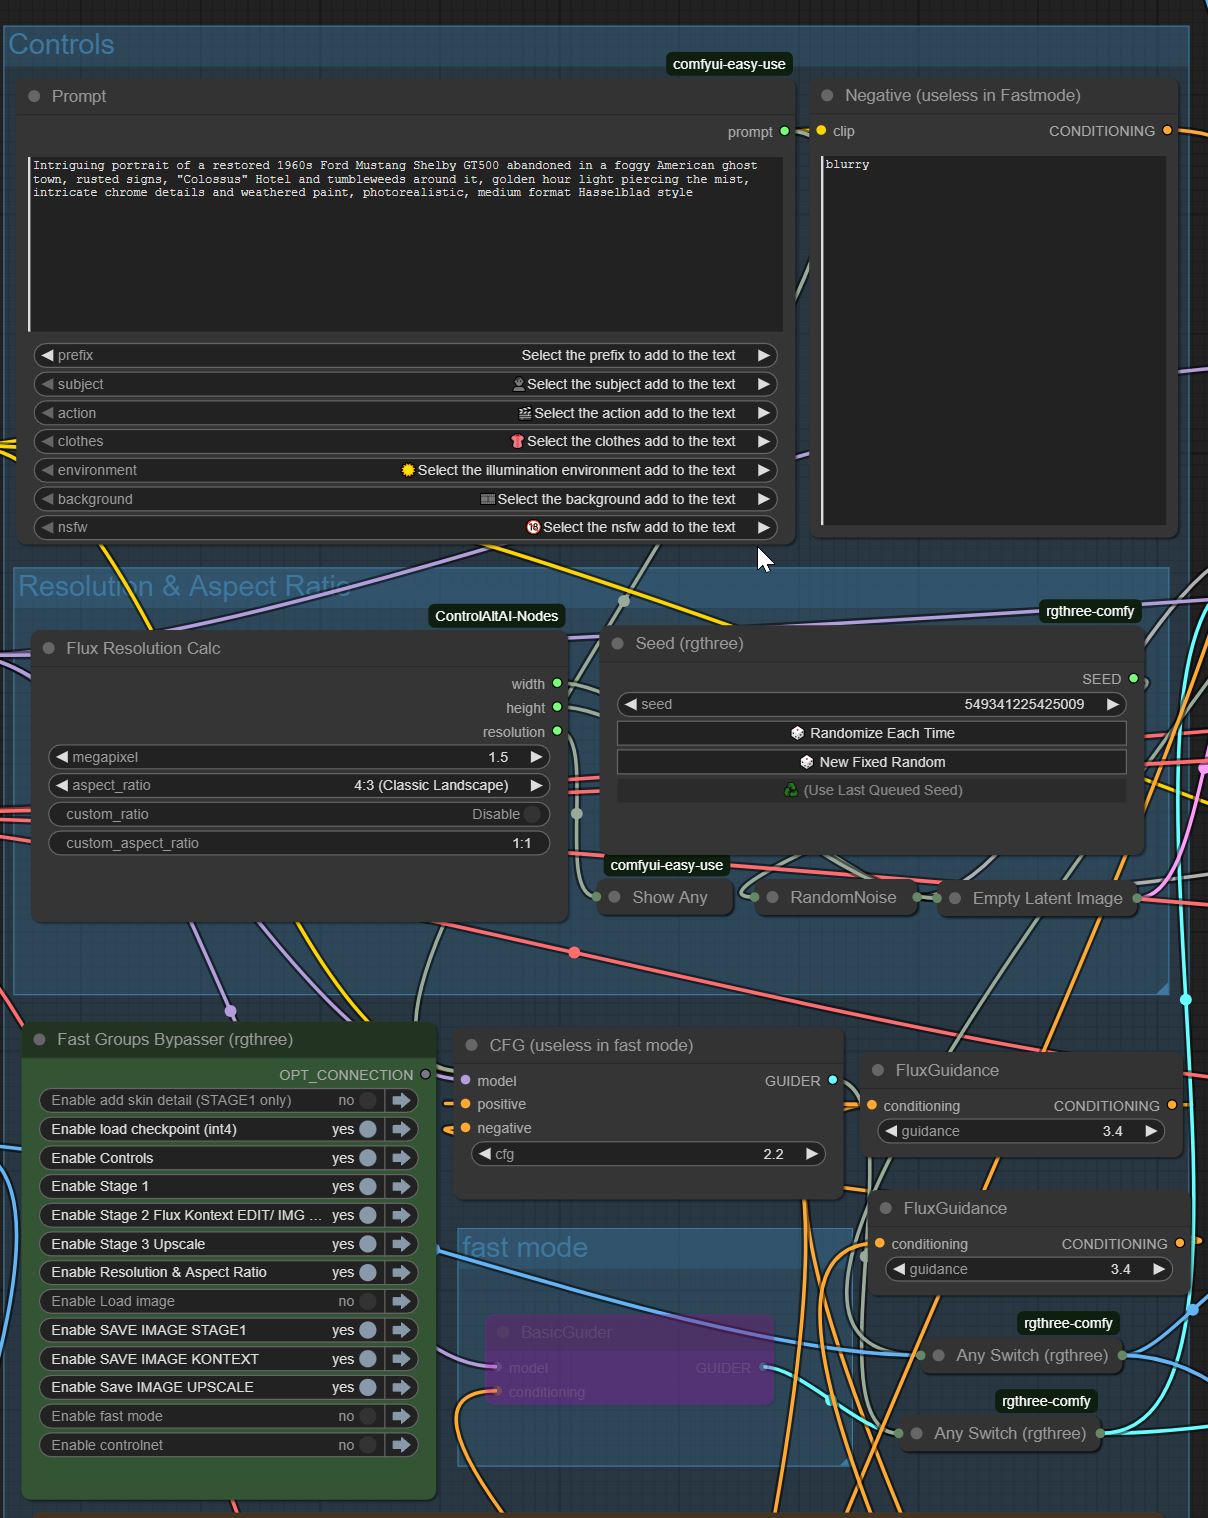
Down here you can set the cfg, and Flux Guidance: you can play with those a bit.. I got some good images using 3.6 Flux guidance for instance. Here is also the Fast Group Bypasser
Fast Group Bypasser:
This Node is one of the most important nodes of the entire workflow.. Here you can disable parts of the workflow. Note that some combinations strait out don't work-- Like disabling the CONTROLS. Here are some things you can do: Enable loading Image, Enable "fast mode", Enable controlnet.
Fast Mode:
This workflow has a built in "fast mode" What this does is basically disabling the control of cfg and it doesn't uses any negative at all.. This makes the already fast creation even faster... This can be useful but also you might run into problem when creating text.
Load images:
You can load images in here.. using them for controlnet or to IMGtoIMG (Using Flux Kontext)
if you run into issues you can scale the image down with the Upscale image by node.
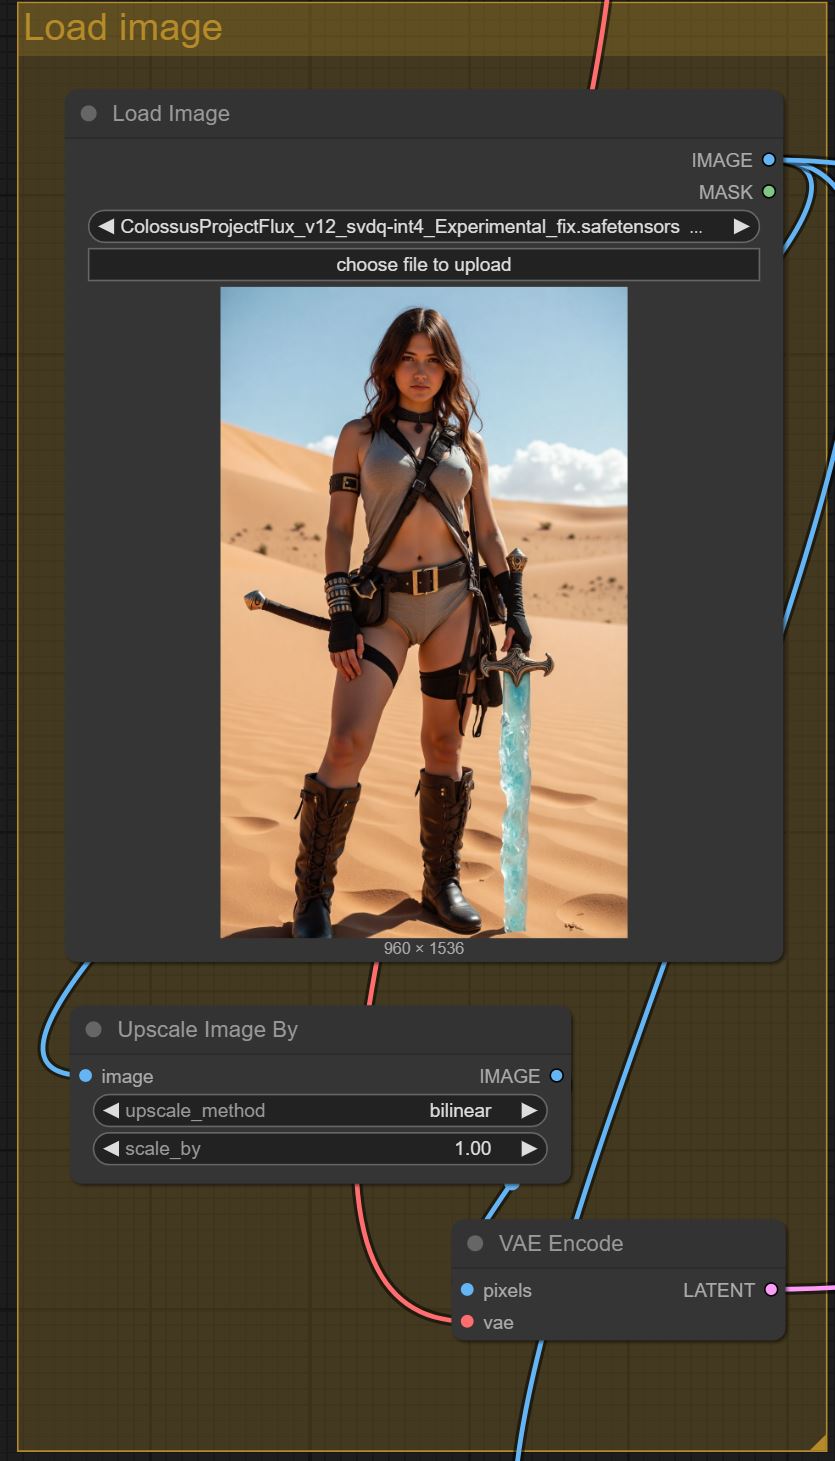
CONTROLNET (WIP)

You can use controlnet but its still WIP. I did run into issues using it with the normal mode. Enable "FAST MODE" here. Also make sure that Stage 1 is enabled.
STAGE 1
This is Stage 1; the main "image creation part" Here you can play with the sampler, sheduler steps and denoise. Feel free to experiment here :-)
![2025-07-25 22_28_52-[86%][55%] SamplerCustomAdvanced.jpg](https://image.civitai.com/xG1nkqKTMzGDvpLrqFT7WA/7949c224-0fda-4a7a-8d0f-10a9103df075/original=true/7949c224-0fda-4a7a-8d0f-10a9103df075.jpeg)
Stage 2: IMGtoIMG/ IMAGE EDIT with Flux Kontext
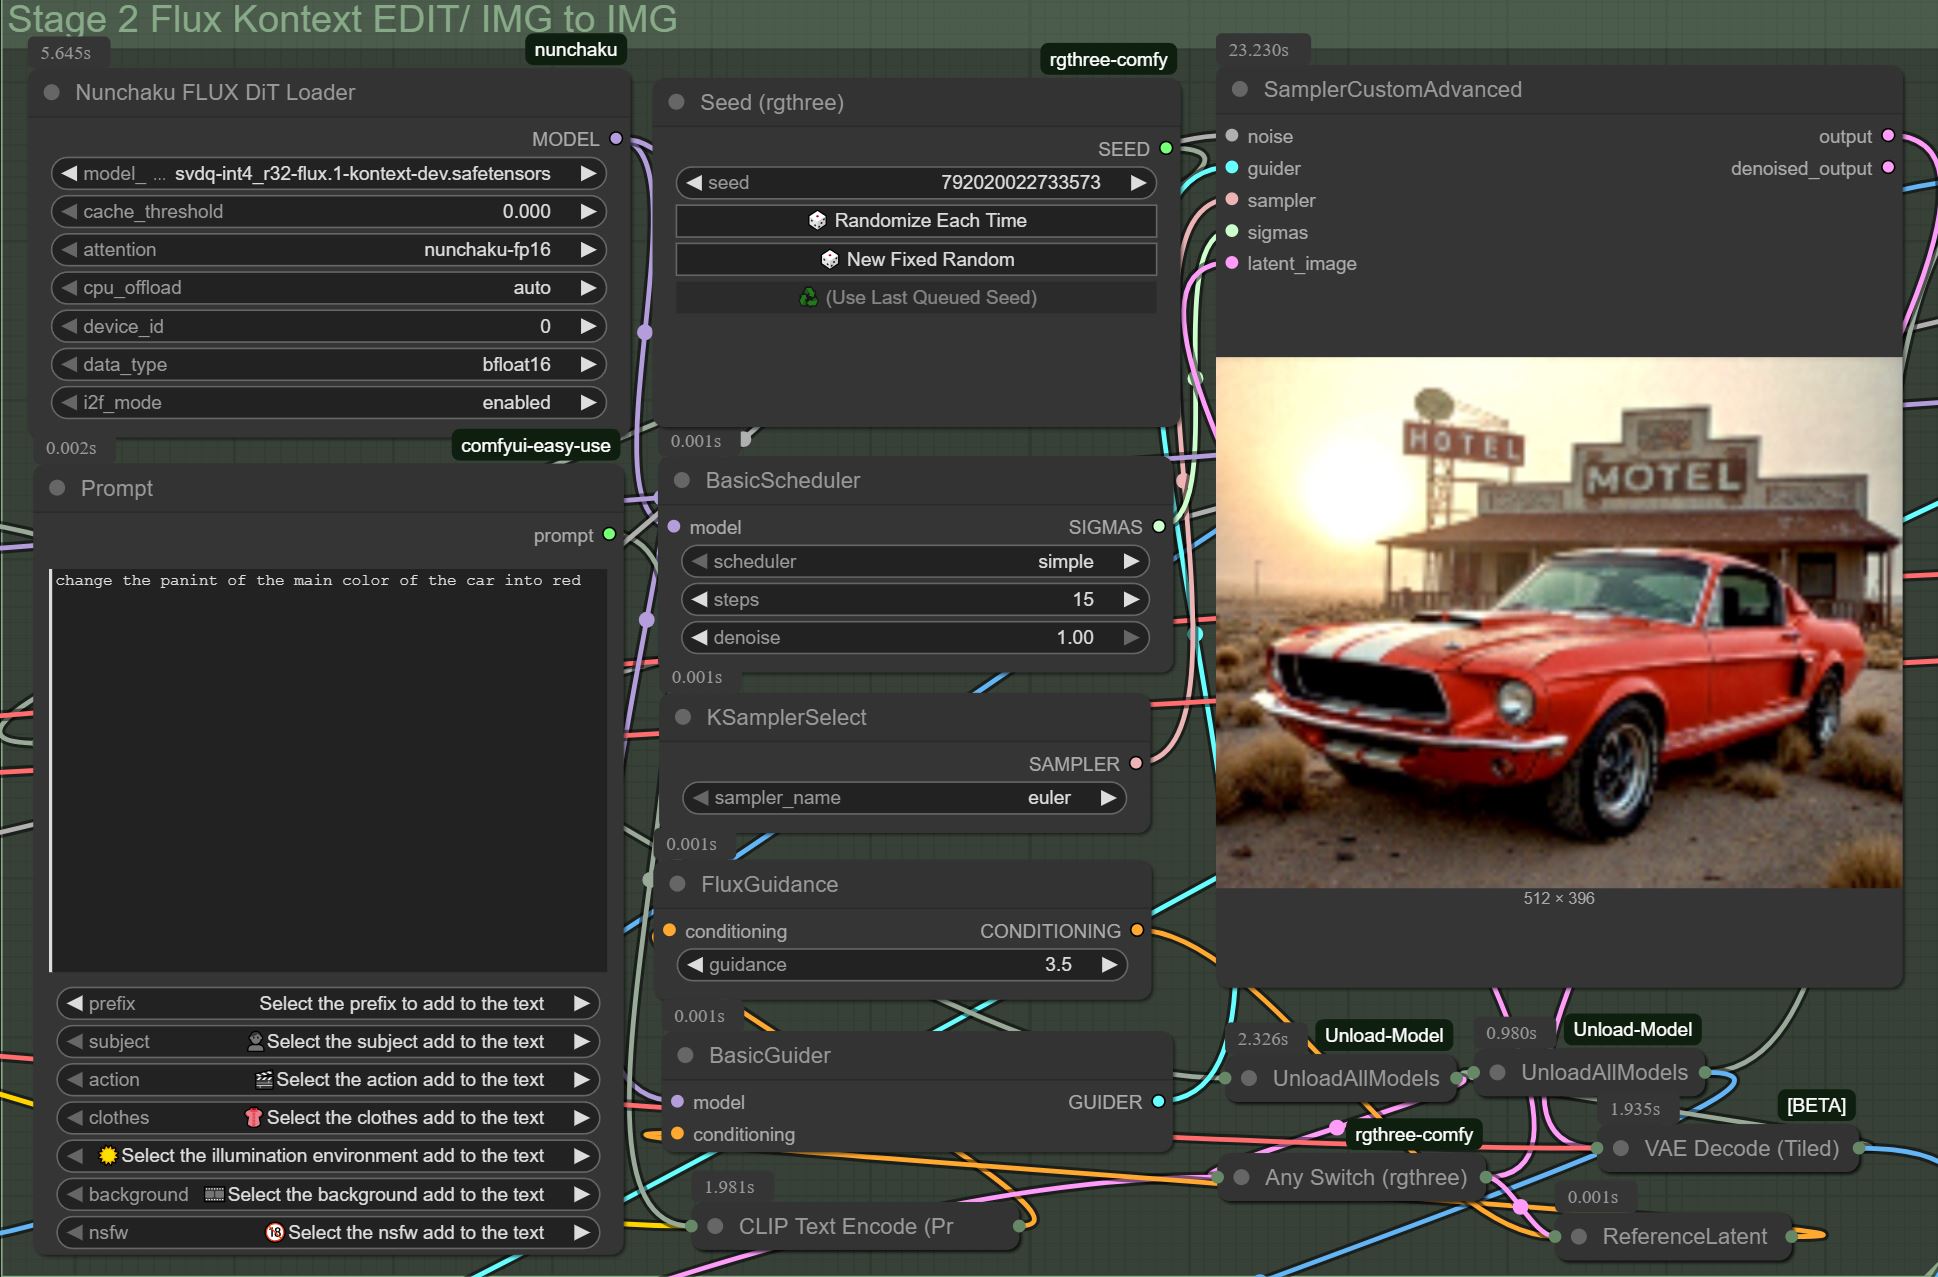
Image EDIT
This is part of the workflow uses Flux Kontext to change the image you have created with Stage 1.
For this showcase I changed the color of the car into red. You also can remove watermarks for change small details of the image here.. The possibilities are endless--
what I recommend is to run only STAGE 1 first to get a image you like and then Enable Stage 2. You also can disable STAGE 2 if you don't want to change the image at all. (here is a example)

IMGtoIMG (using a loaded image)
First Disable Stage 1..

The workflow the automatically changes to the IMG to IMG mode.. (IF you have a image loaded... same as above.. tell Flux Kontext what you want to change.
Examples:
Change car color into red


Change the hair color into blue


STAGE3 (UPSCALE) (WIP)
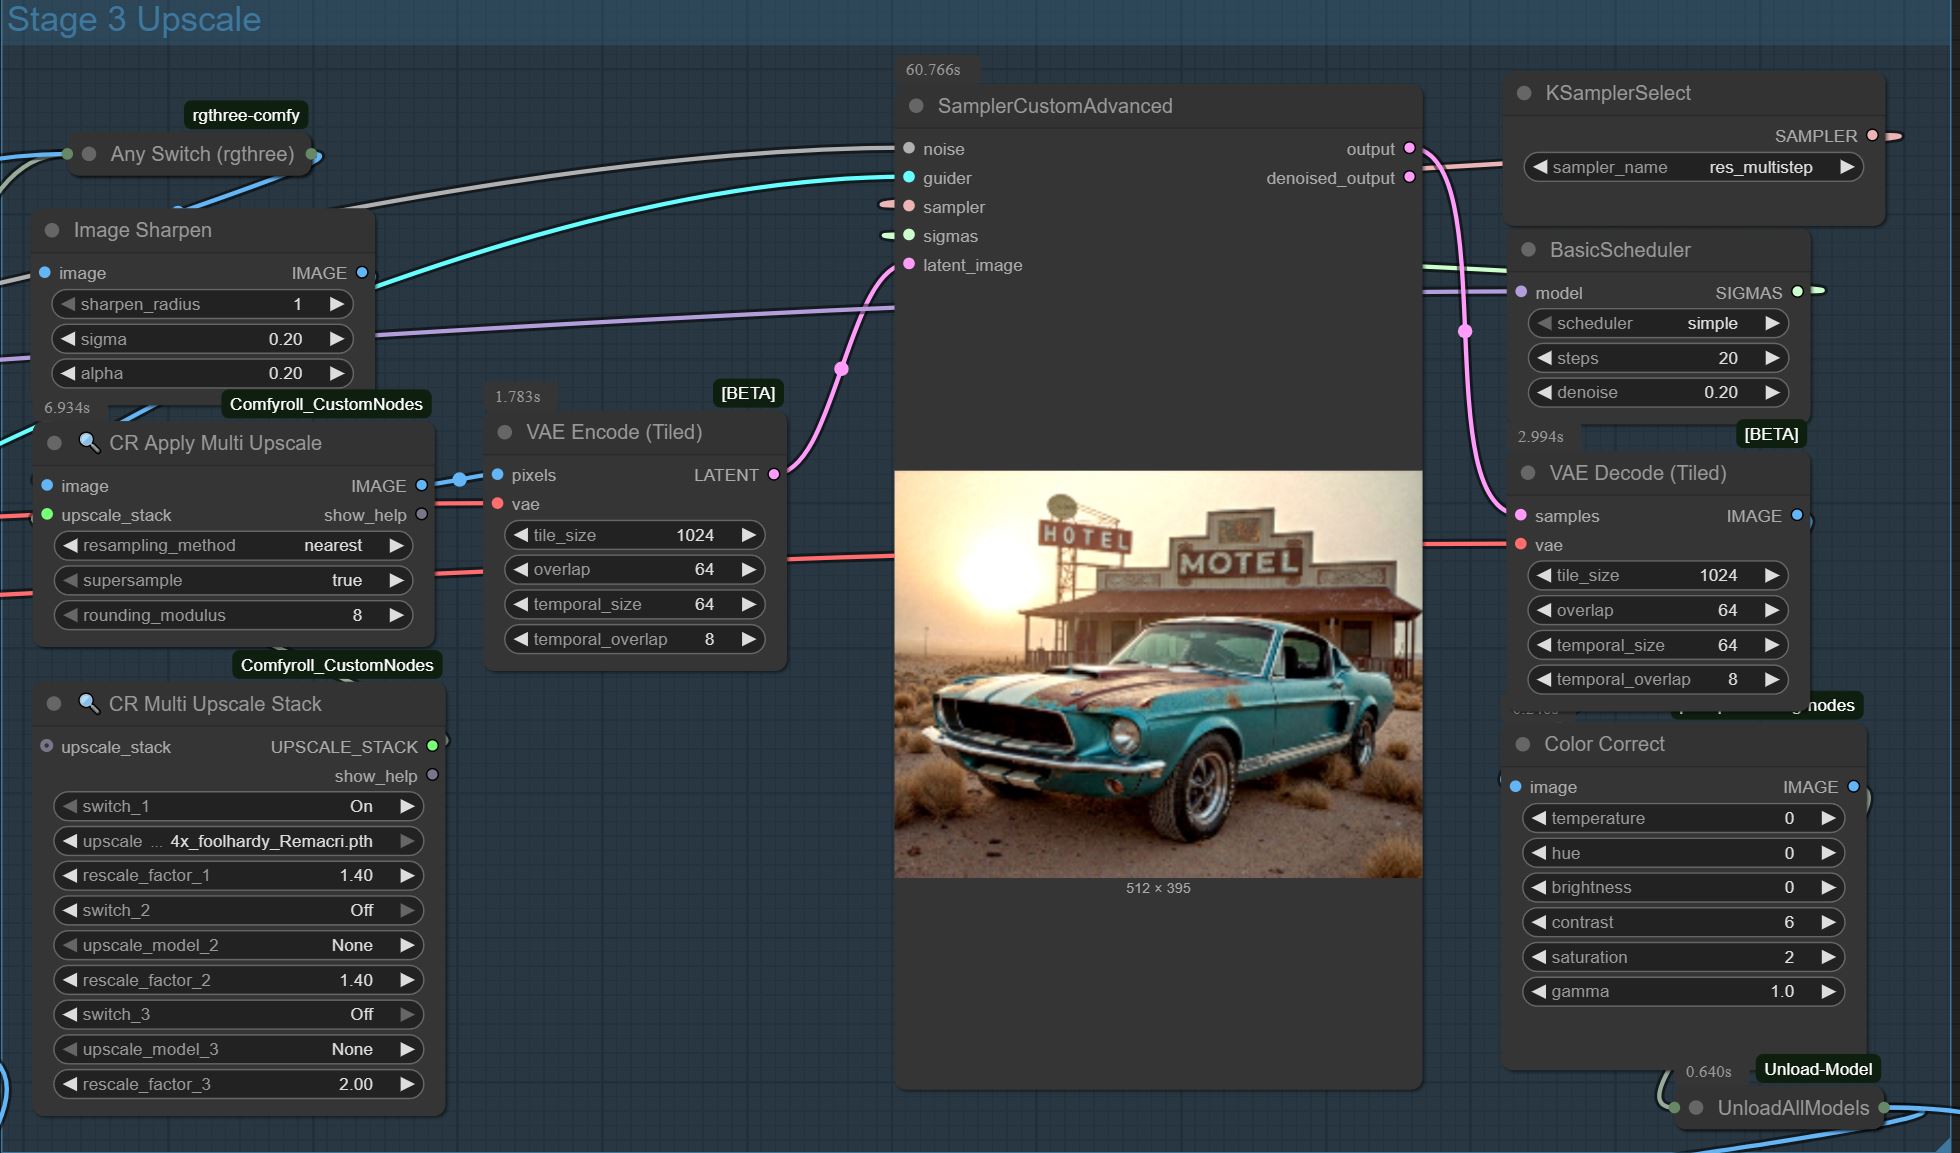
This part of the workflow is a simple upscale process. Feel free to play with the values.. its still a work in process. With the denoise on the basic scheduler you can set hob much the image can change.
EXAMPE IMAGES USING THIS WORKFLOW


