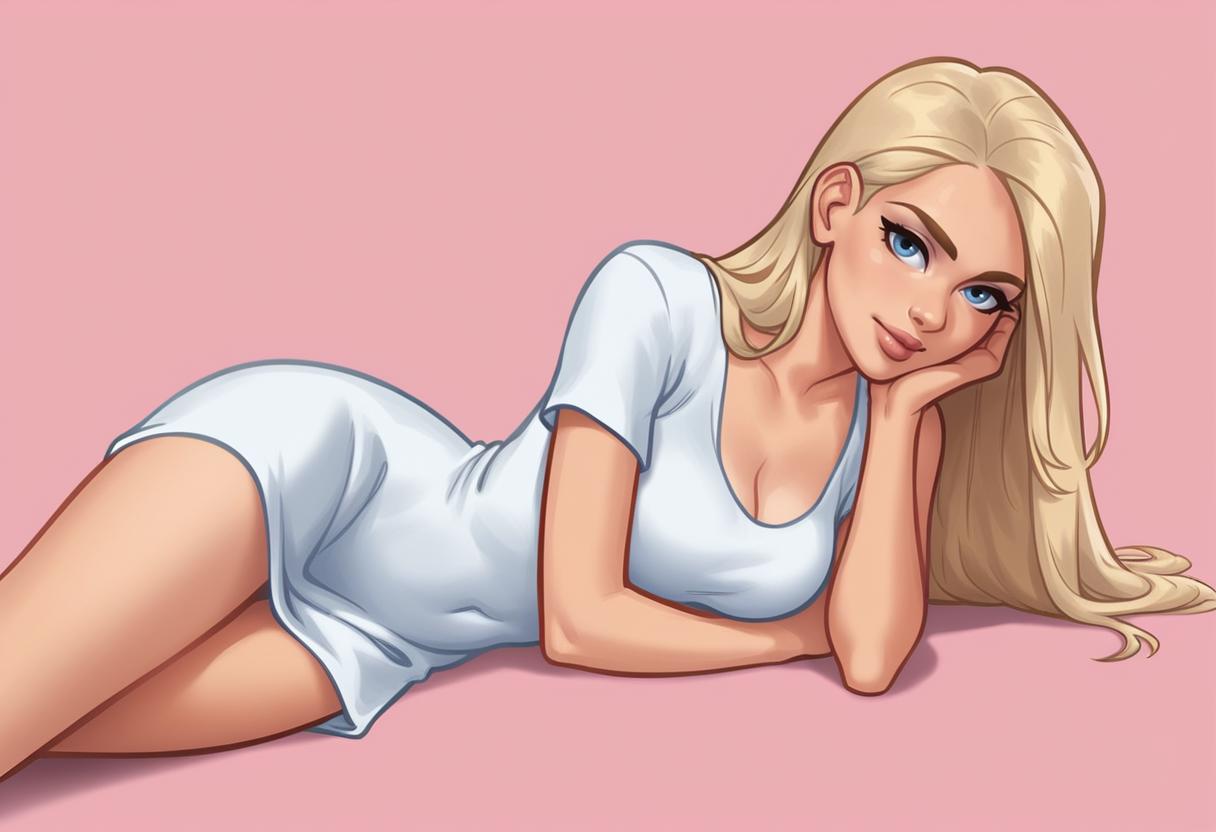
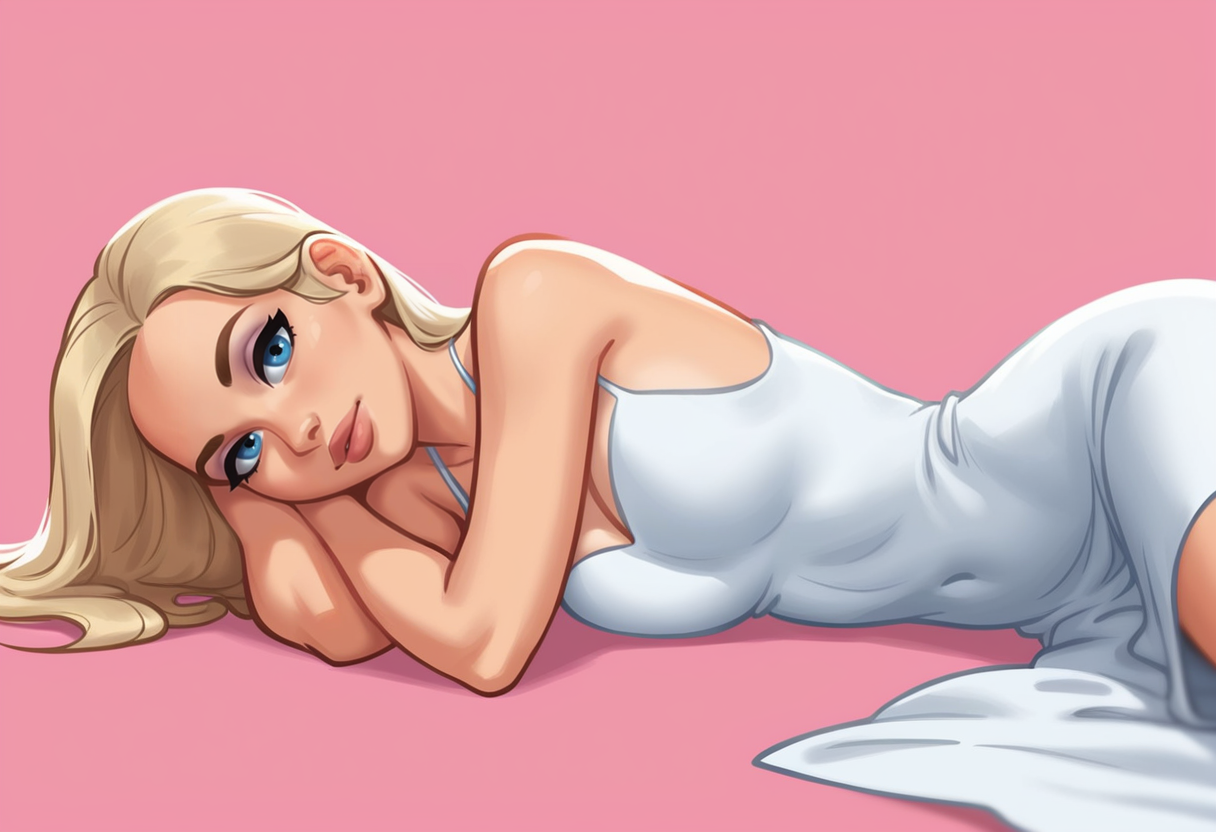
Welcome to my first Workflow Guide, where our goal is to generate an Image of the Girl in the above used Cover Image, as close as possible.
A completely free experience, thanks to offline image generating with A1111's StableWebUI.
Preface:
I want to say this is my way of doing things. There are other and arguably better tools out there.
Warning: Some Links link to 18+ Content.
You Need
Checkpoint: https://civitai.com/models/257749?modelVersionId=290640
Lora: https://civitai.com/models/365758/summertimesagaxl-reupload
Patience.
A PC with good performance. (Optional)
I won't cover the installation, there are tons of Videos and Guides for that.*
Checkpoint and Lora Folder's
After finished installation, Checkpoints you downloaded from Civitai go here:
C:\stable-diffusion-webui-master\models\Stable-diffusion
Lora's here:
C:\stable-diffusion-webui-master\models\Lora
Not every Lora goes along well with another. I always try to use as less Lora's as possible, they will get in each other's way and alter the image too much.
Settings
*The same goes for the "Settings" Tab.
I left the Settings mostly untouched, and much of it is self-explanatory or user preference.
Except this on under "User interface":

Extensions
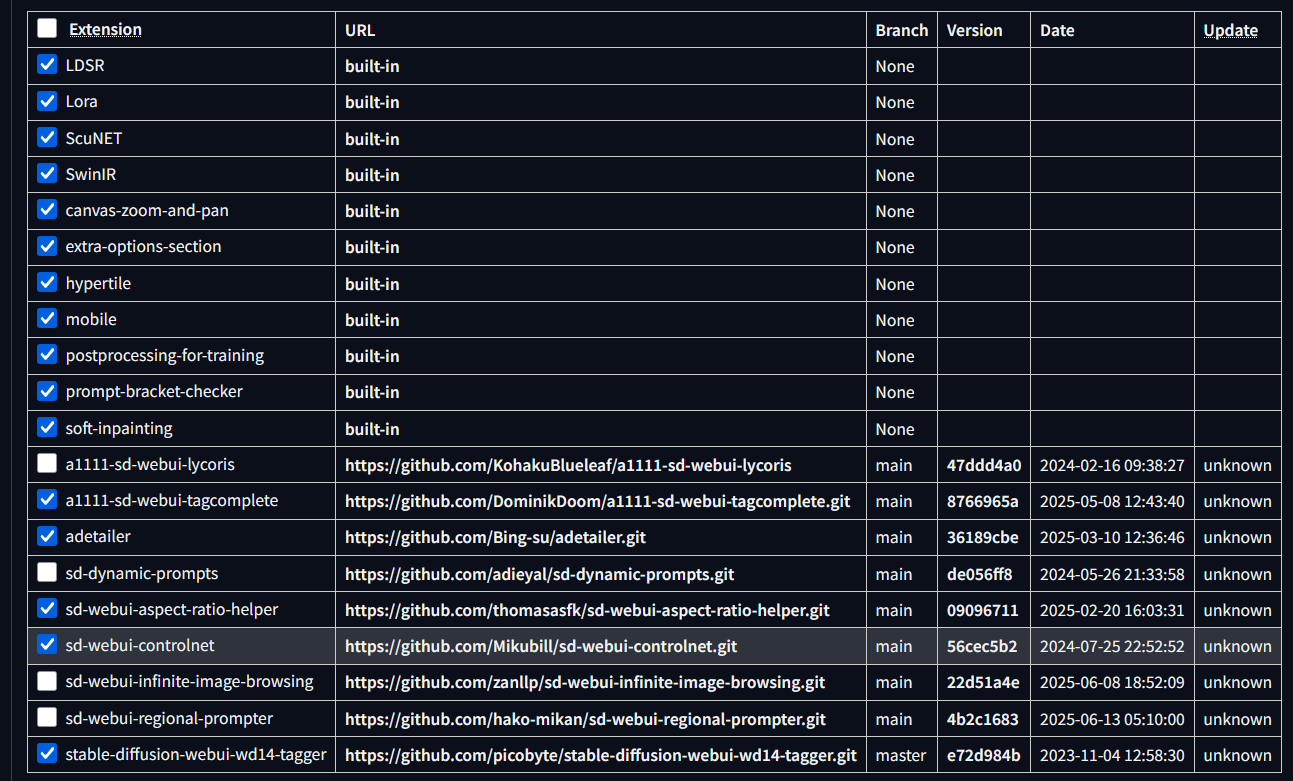
Extensions are a must-use, this is what I use:
ADetailer and ControlNet are the most useful. Others are Optional, but I can't live without them anymore. (only blue ticked Extensions)
Generating
For all "Pony" prompts, Danbooru tags are extremely helpful.
score_9, score_8_up, score_7_up, score_6_up, score_5_up, score_4_up explained
How to Structure Prompts:
There is no right or wrong order here, the thought behind this is: easy overview and easy swapping and/or adding prompts in their corresponding category.
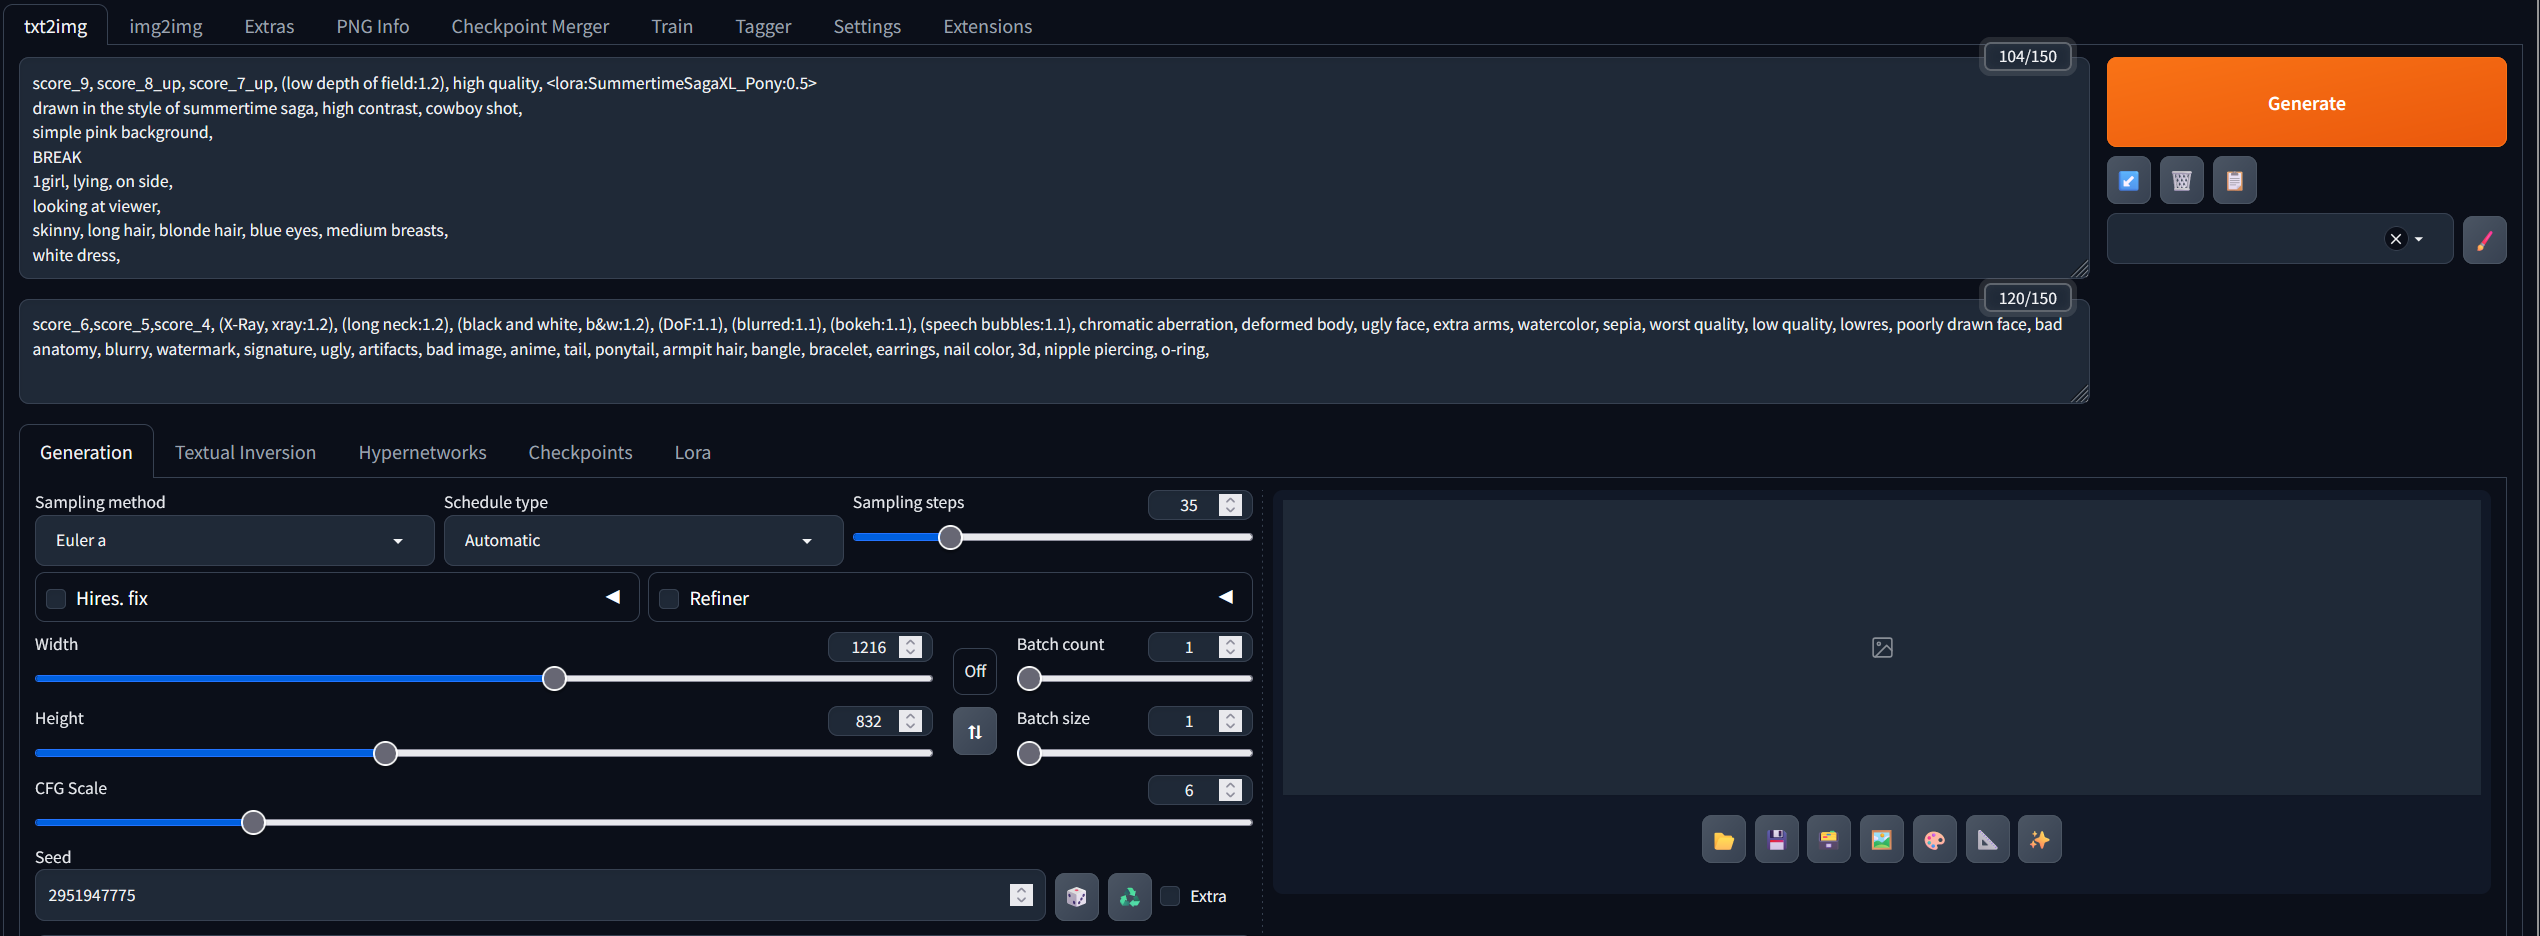
I always have the same structuring, something like this ↓
score_9, score_8_up, score_7_up, (low depth of field:1.2), high quality, <lora:SummertimeSagaXL_Pony:0.5>
drawn in the style of summertime saga, high contrast, cowboy shot, Image Basics
simple pink background, Background, Place
BREAK
1girl, lying, on side, What Girl/Boy does
looking at viewer, What Head/Face does
skinny, long hair, blonde hair, blue eyes, medium breasts, How Girl/Boy looks
white dress, What is Girl/Boy wearing
Negative Prompt:
Most of it is copied from Collyn, known for his Summertime Saga Lora's
I have one Prompt Text in use for every Picture:
score_6,score_5,score_4, (X-Ray, xray:1.2), (long neck:1.2), (black and white, b&w:1.2), (DoF:1.1), (blurred:1.1), (bokeh:1.1), (speech bubbles:1.1), chromatic aberration, deformed body, ugly face, extra arms, watercolor, sepia, worst quality, low quality, lowres, poorly drawn face, bad anatomy, blurry, watermark, signature, ugly, artifacts, bad image, anime, tail, ponytail, armpit hair, bangle, bracelet, earrings, nail color, 3d, nipple piercing,
Pro Tip: You can always drag and Drop an AI Image into the prombt text field, were all image settings will be copied to. Then just hit the Blue Arrow Icon under Generation.
Txt2Img
Now you have should have something like this:
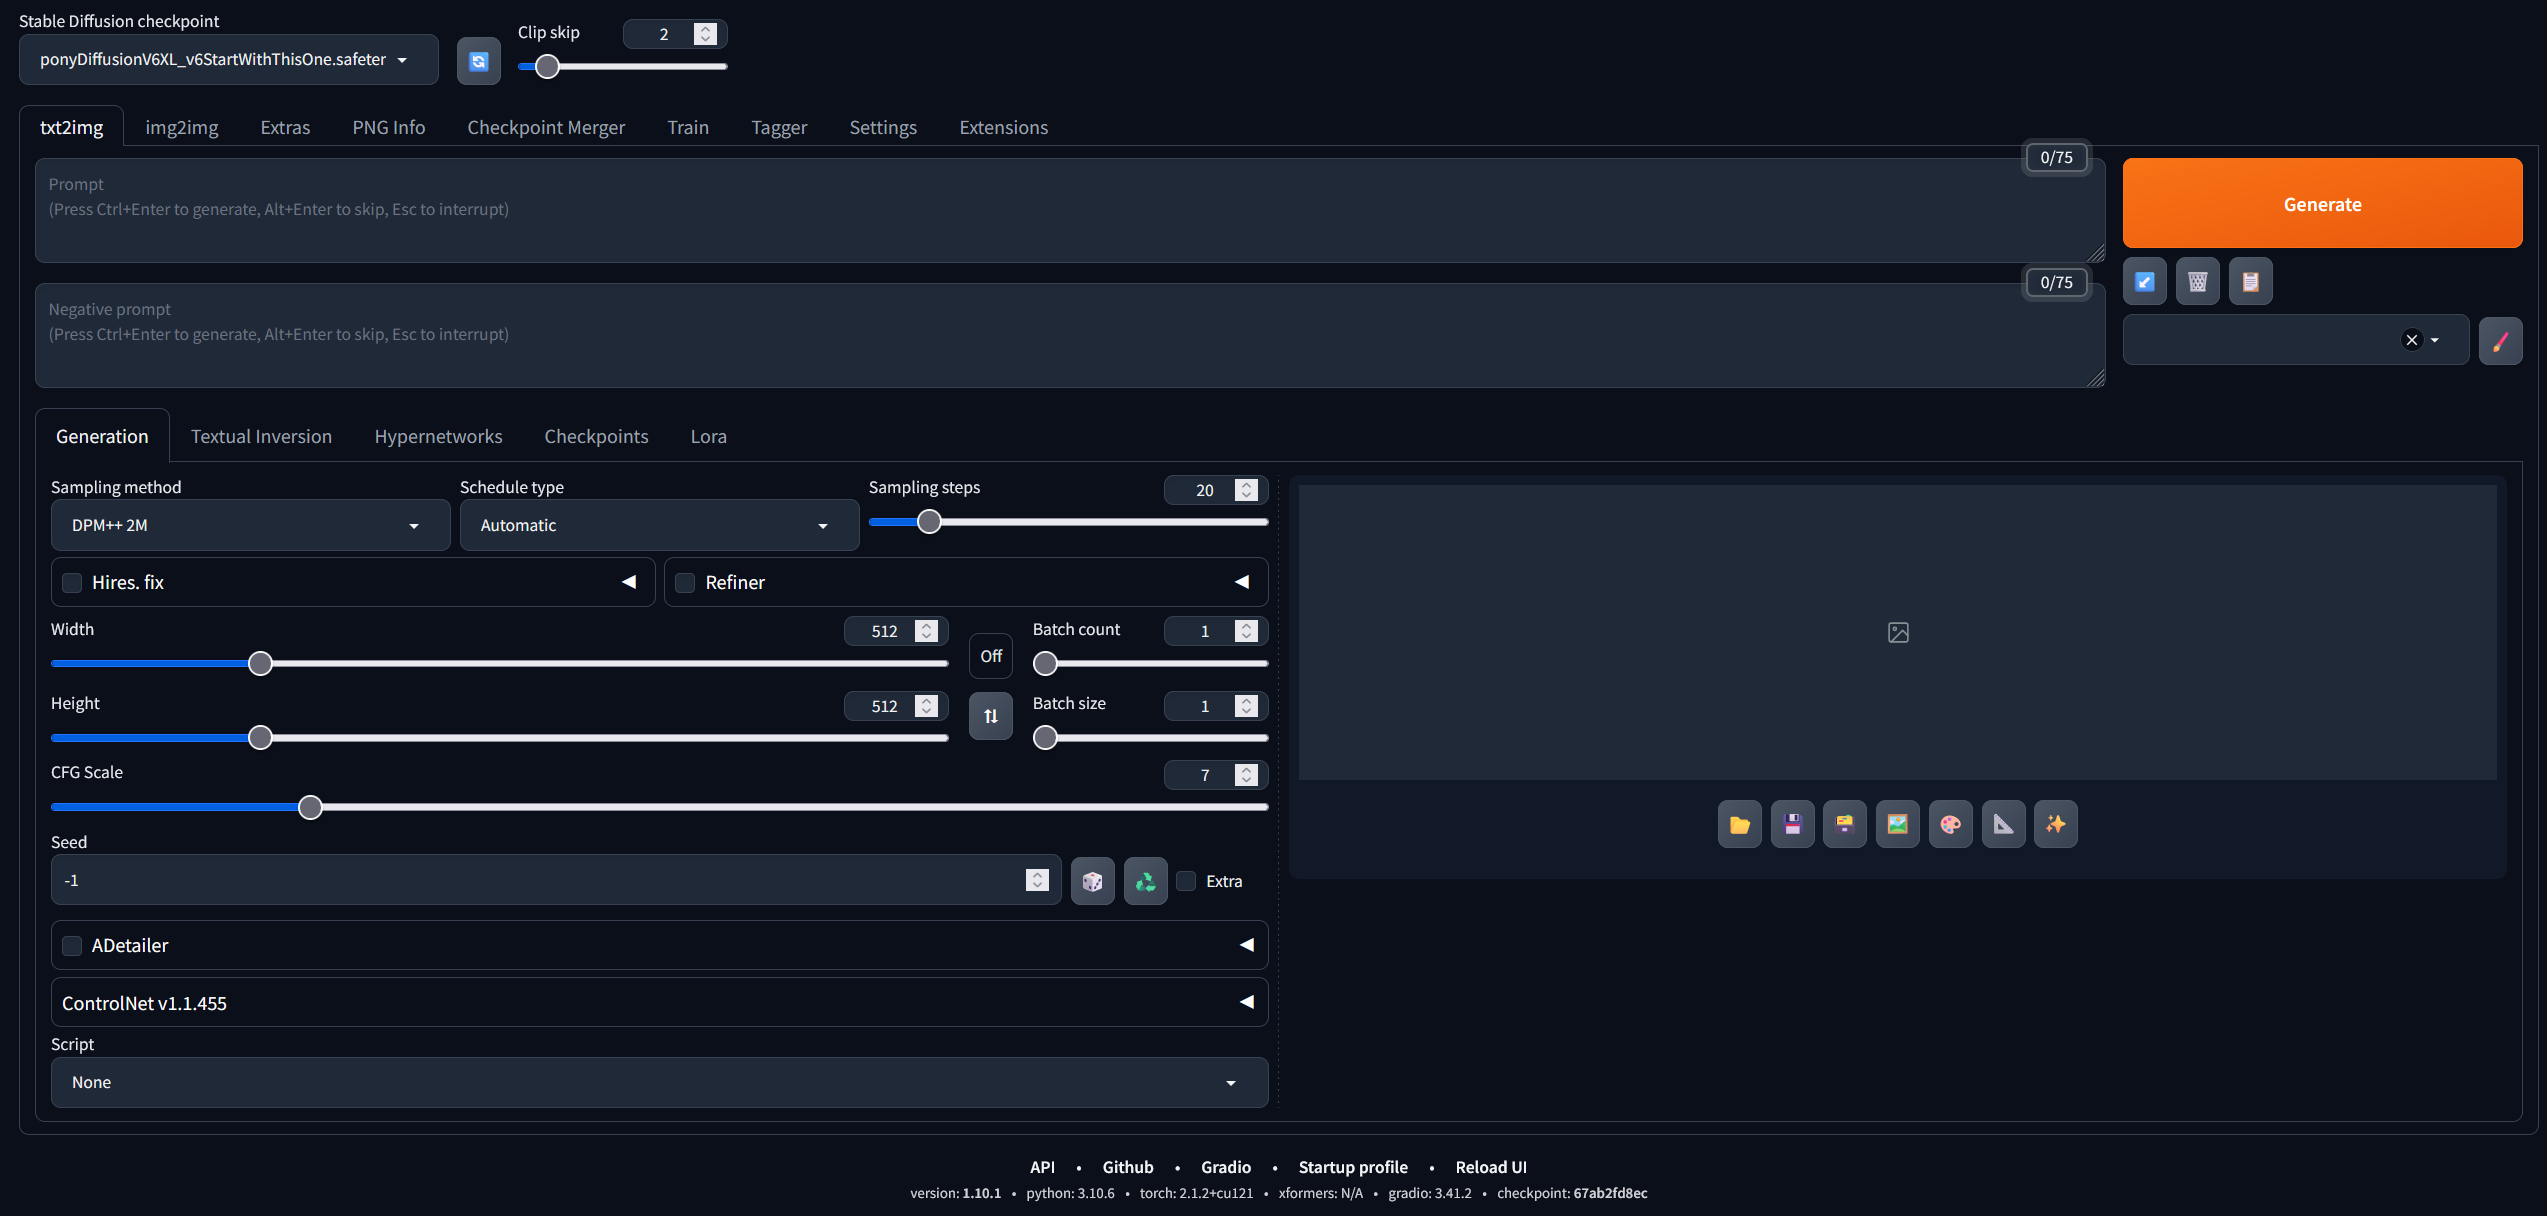
Select the Checkpoint in the top left corner.
Set Clip Skip to "2".
Use above said Prompts.
The Summertime Saga Lora I like to keep at 0.5 or 0.6Select "Euler A" under Sampling Method.
Set Sampling steps to 35 (in this case)
NEVER use Hires. fix. It just doesn't work (for me) and ruins the image.
You want to use 832x1216 or inverted 1216x832 Image Resolution.
CFG Scale around 6-7.
Seed is only important, when you want to exactly copy an Image.
Seed for used Cover Image: 2951947775
Also notice the symbols: Cube is for random Seed, and recycle for last generated image Seed.
Seed -1 is basically a random SeedGenerate.
Now we have something like this:
and this:
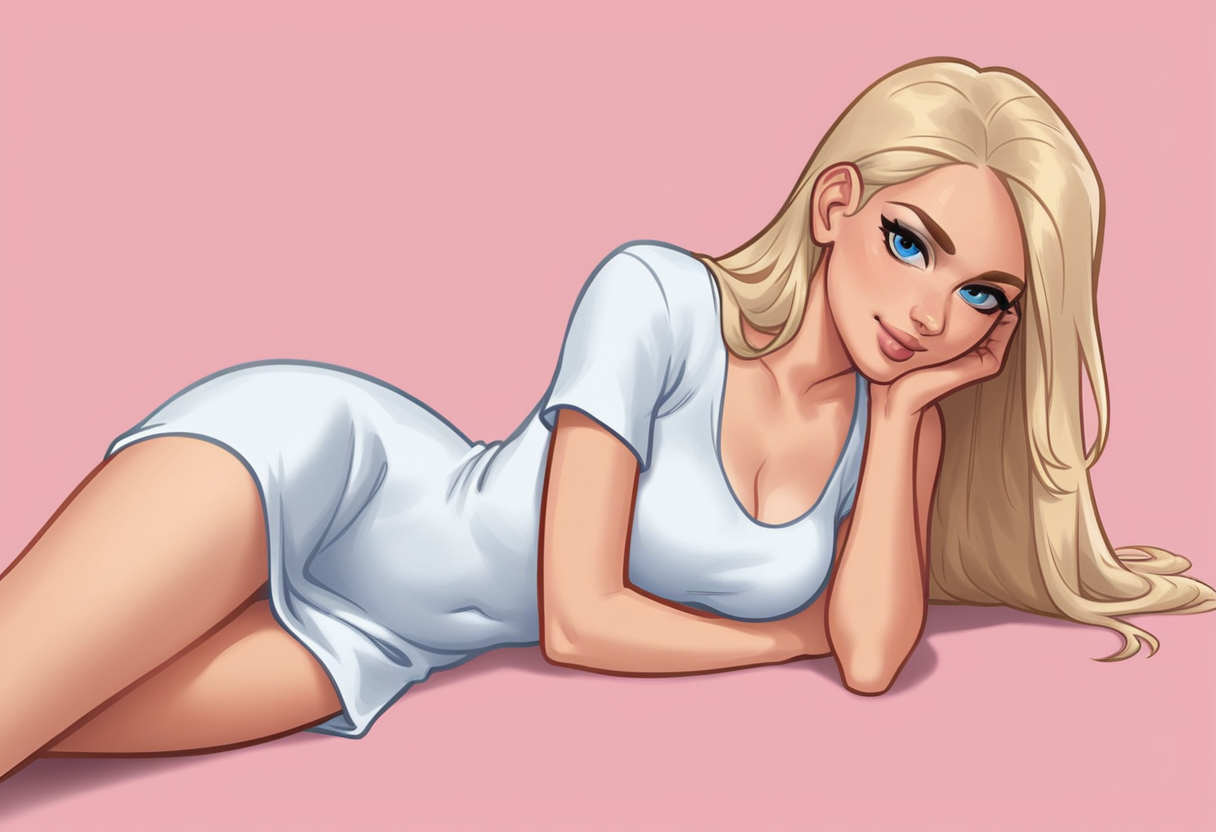
Notice how the eyes and the hand looks off. Not like in the Cover Image.
ADetailer
I get good results with marked model for the Face.
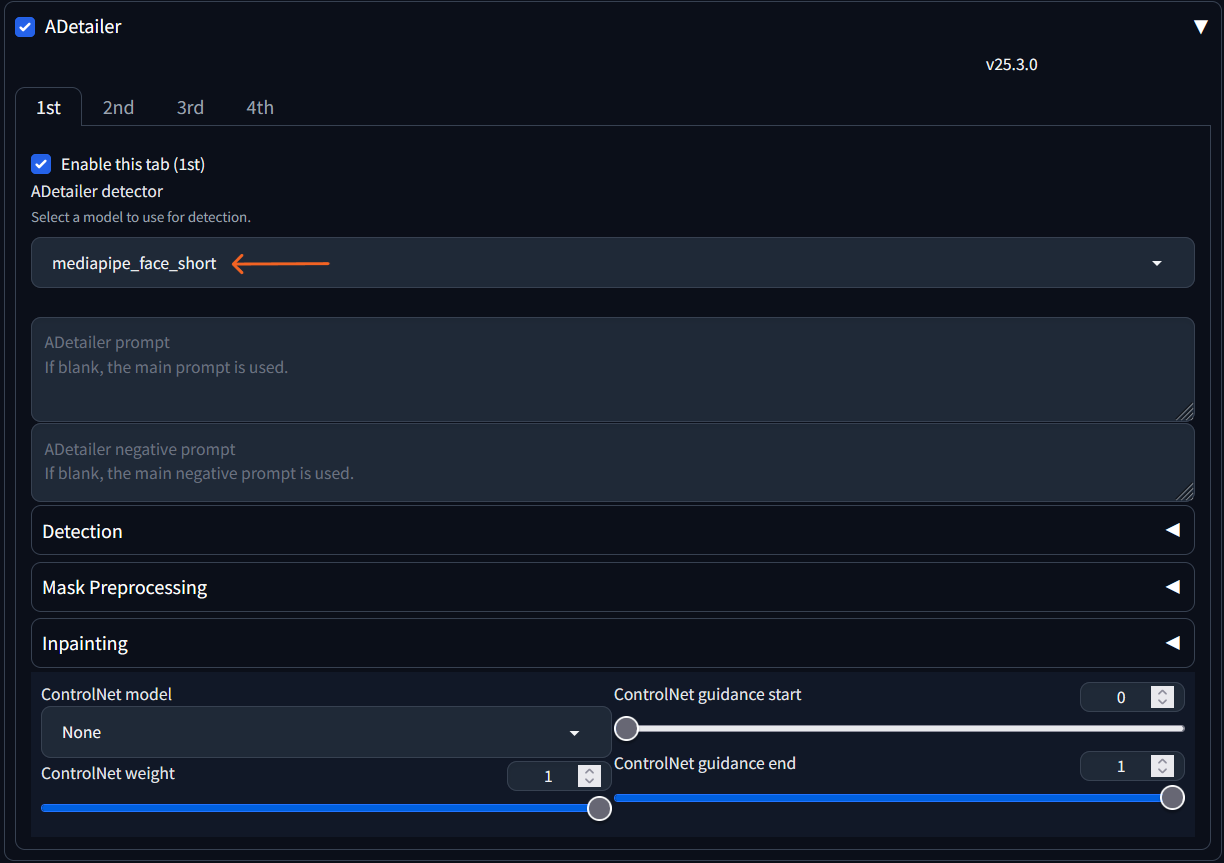
And for Hands:
Add: something like "hands" in the prompt text field. (sometimes messes up the hand detection and ruins the image, then you just delete "hands" and generate again)
Pro tip: Try to hide hands in the first place. If hands are hidden, disable the hand detector tab.
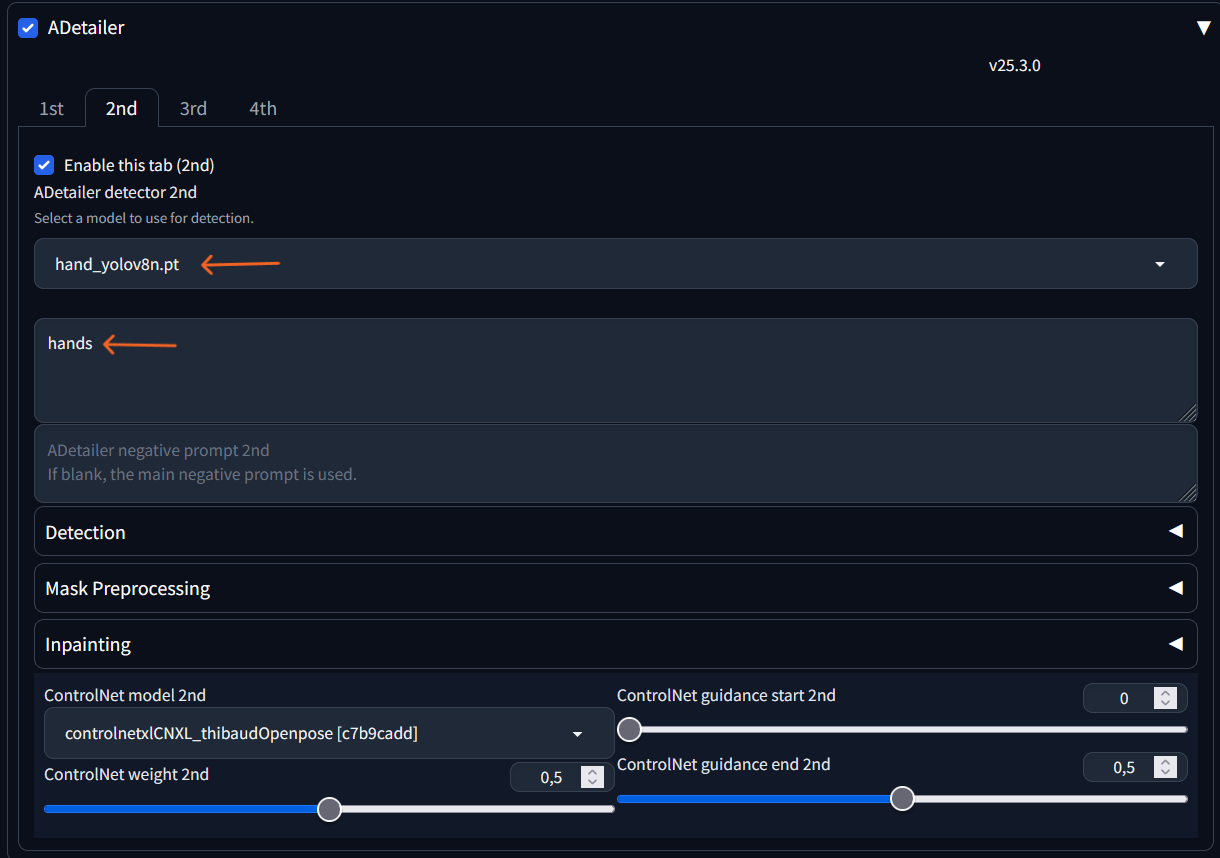
I don't change anything else.
Now we can repeat Step 10. Generate and watch the magic happen.
Hands are still tricky, and often need more than one try to look good. Heavily depends on hand position.
Important: Use the same Seed, otherwise you won't get the same image.
By now, we should have a nice looking finished Image. With these steps, you can copy and alternate an AI Image if you have the seed. But what if you don't have the seed, or want to copy a random Image from the Web? Img2Img can be your friend, but even better is ControlNET used with txt2img.
Img2Img is the same as txt2img, except you can additionally add an image to a text that describes the image. Also to be used with ControlNet.
ControlNET
The first thing that you need is a ControlNet model. I went with xinsir-cannyv2.
This model is basically all you need and works really well for me. Feel free to test others.
Download goes here:
C:\stable-diffusion-webui-master\extensions\sd-webui-controlnet\models
ControlNet better copies foreground from an Image, hardly the background. Depends on the depth of field from used image. That behavior can also be used as an advantage.
Now you should see this:
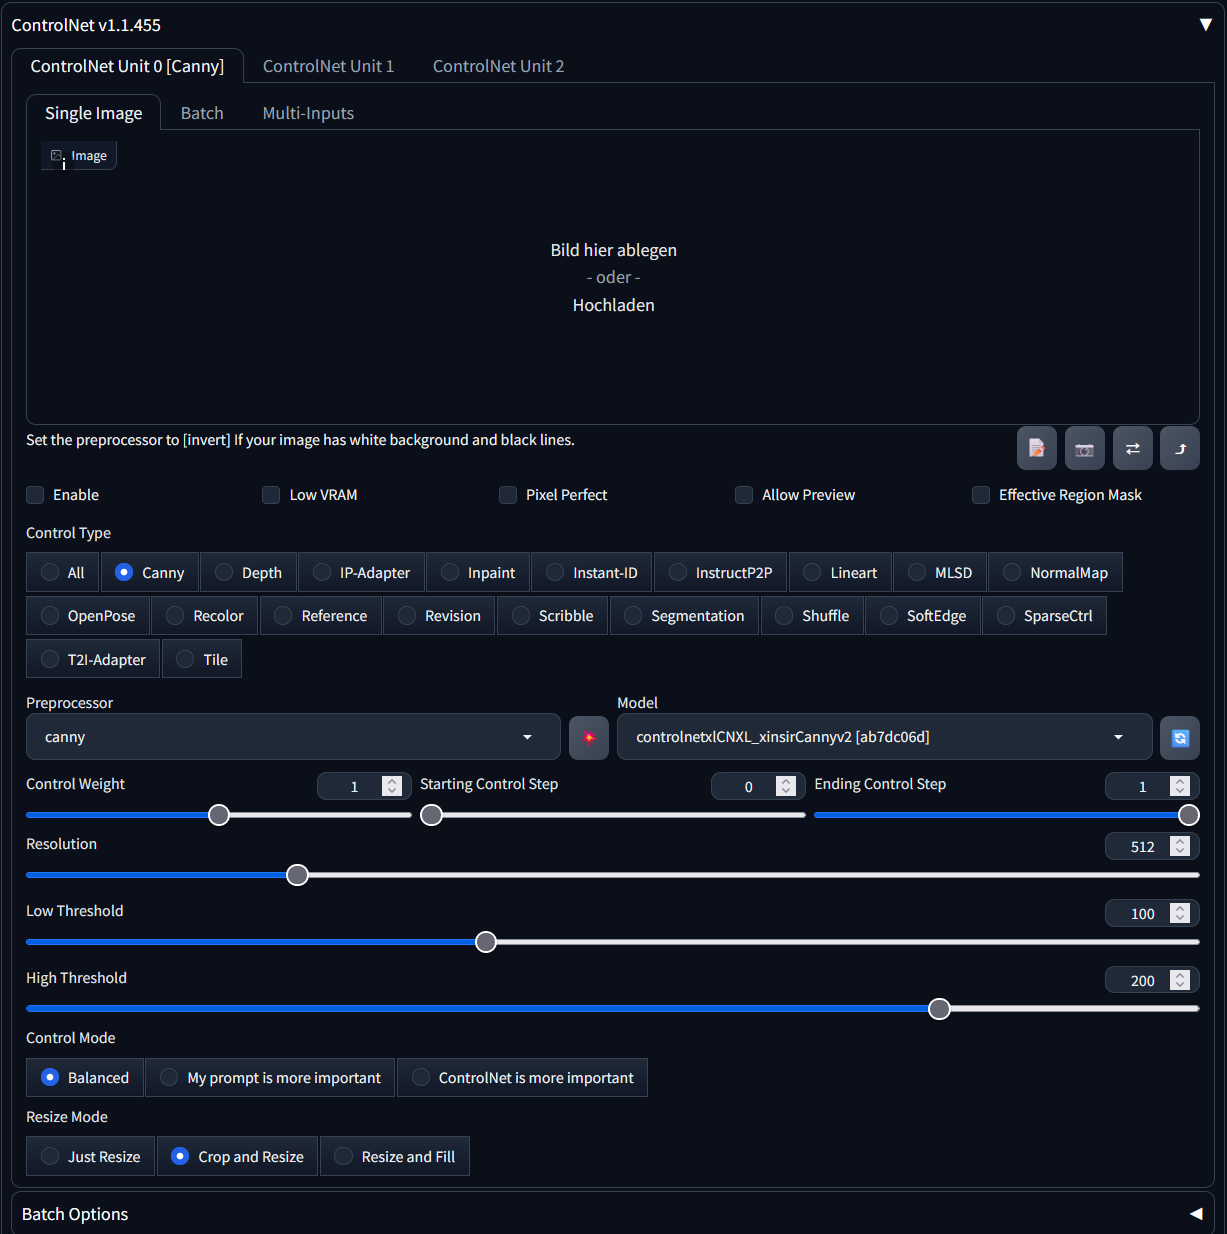
Take this image and drag it in the image drop off field.
Click "Enable", "Pixel Perfect" and "Allow Preview".
Select Canny
Click the explosion symbol for a preview.
Set Control Weight to 0.5 or below, Ending Control Step to 0.5 or below.
No need to select resolution if "Pixel Perfect" is selected.
Select "My prompt is more important".
Resize Mode to what you need. Most of the time "Crop and Resize"
You have this now:
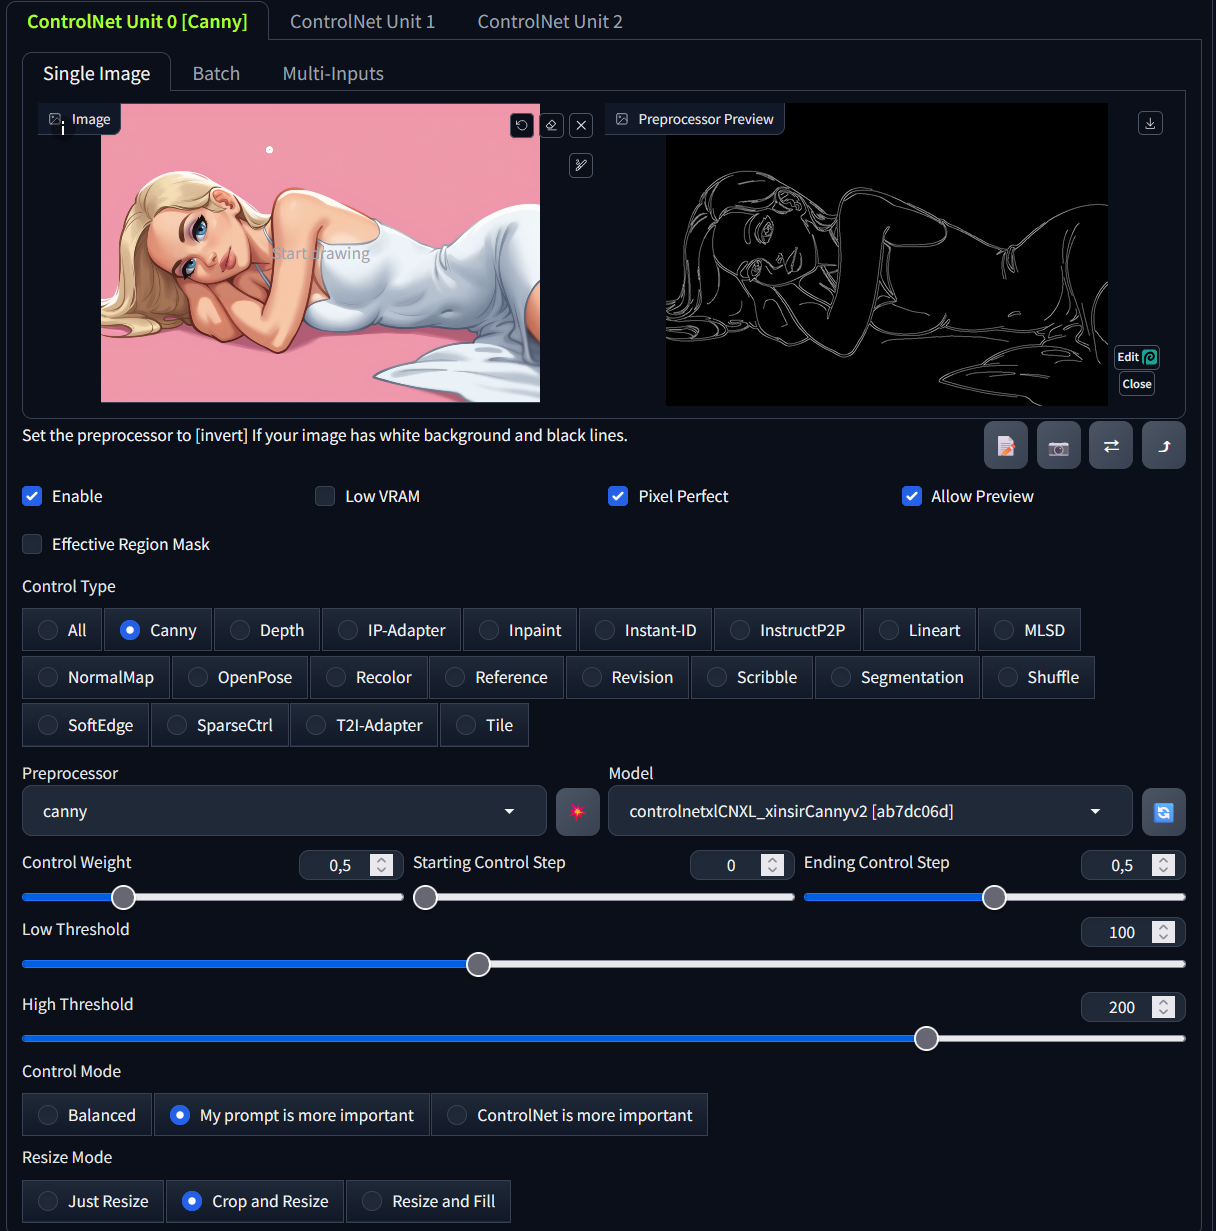
Feel free to play around with the settings, especially the weight sliders.
Hit Generate again (with Seed -1, stands for random seed). Now you should have an almost identical image as the source one.
Important: You still need to describe on what happens in the image, in the main prompt field, for an accurate result.
With this powerful tool, you can almost use any image, even self drawn doodles.
How I generate my images with an additional Lora, you can see the generation data on almost any of my images. I developed my workflow over time, so for the best examples refer to my newer images.
Summertime Saga Lora's
The following goes for every other Lora as well, of course.
You find your downloaded Lora's here:
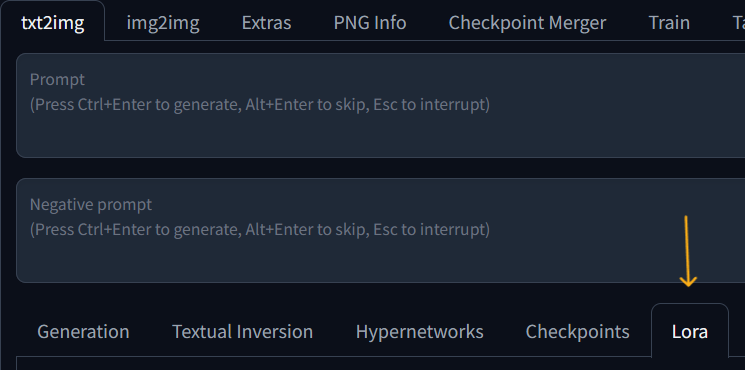
For this example, we have Jenny and Becca
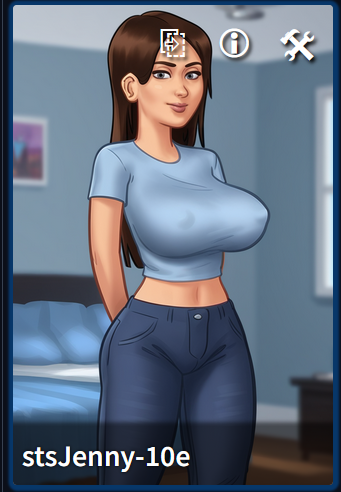
Click on the settings symbol, and where we have the settings for the Lora. Scroll down to this part
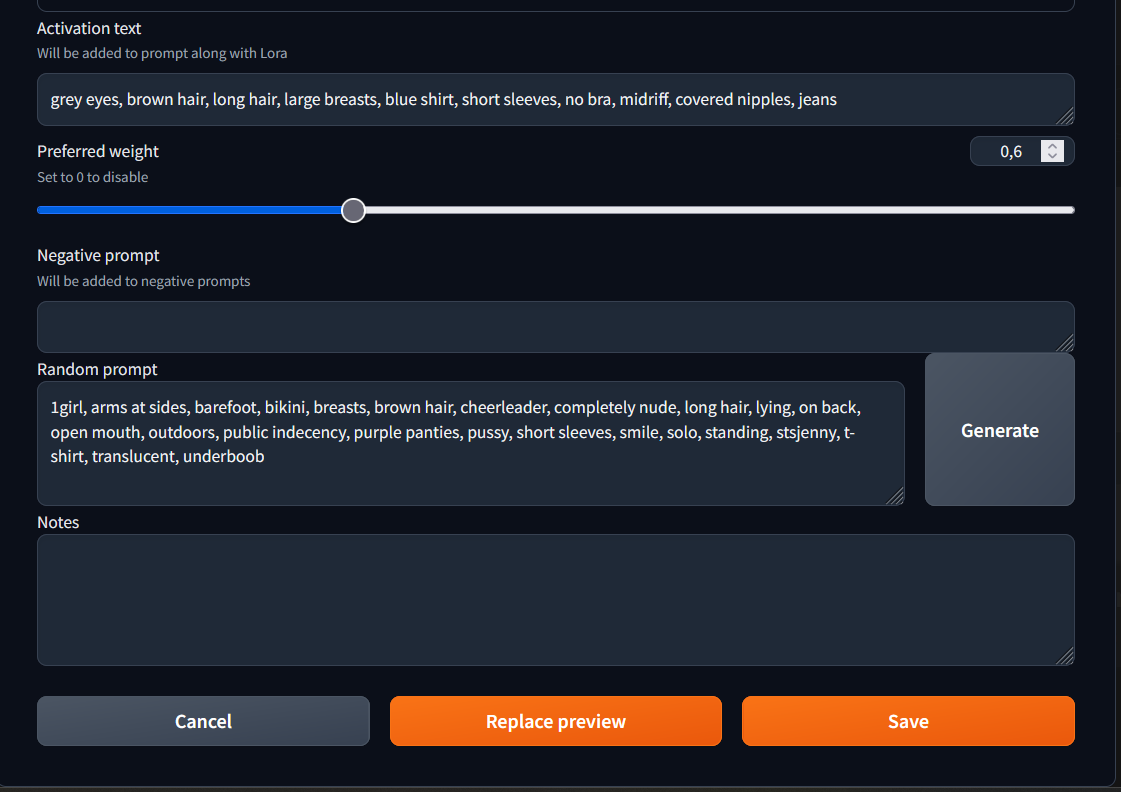
I advise adding an Activation text, provided by the Lora Creator. I like the weight setting around 0.6. Negative Prompt we leave empty. For a Review Image like above, you can add the current generated image with "Replace preview" and then "Save". Do this with every Lora you have.
Now adding the Lora to the prompt field is as easy as clicking on the Lora, it should fill in with the activation text. It will always be added in the last line. We restructure our prompt to look like this:

So for me, I have multiple Lora's and with this method I can "fast swap" Lora's out when I want to. I just need to delete the last line, and add another Lora. Together with the same Seed and ControlNet I get different girls in the same "Scenario", almost looking identical.
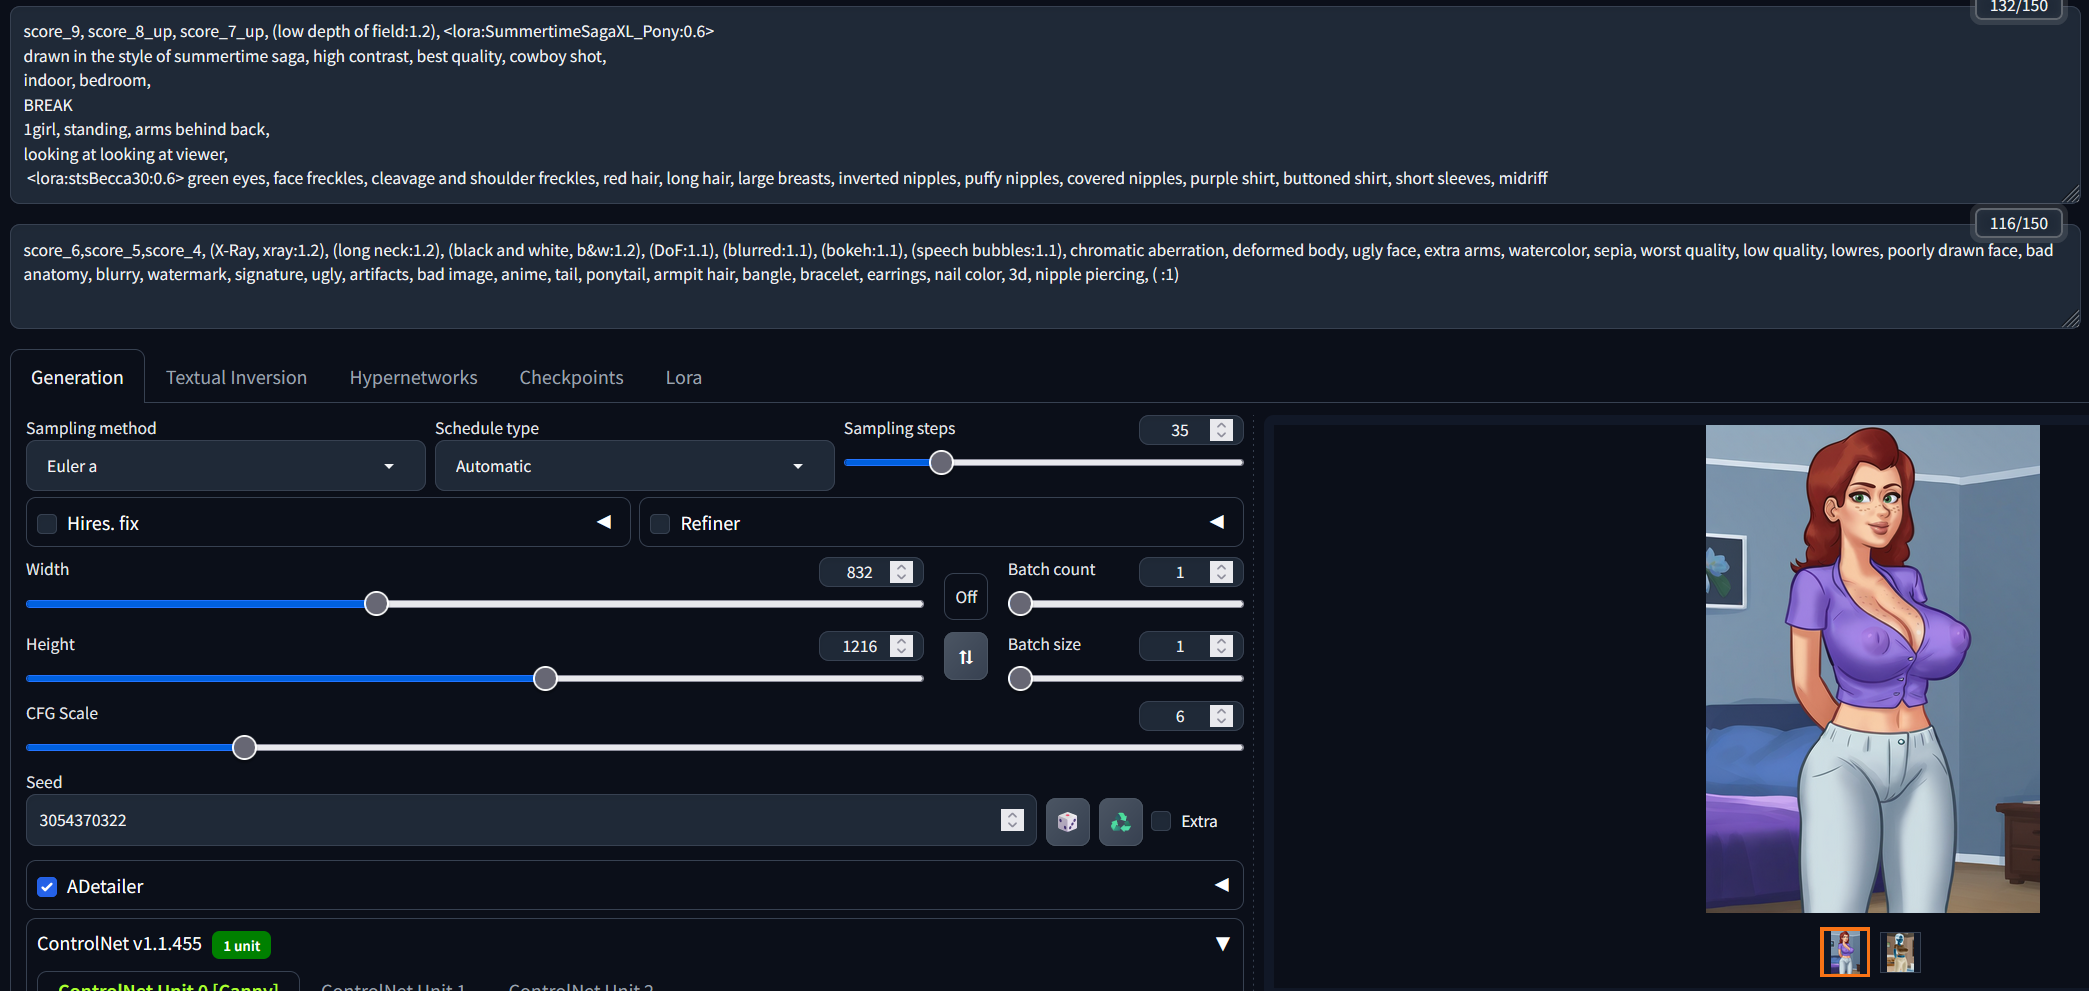
Notice how I set the Preprocessor to "inverted", to get a better matching Background
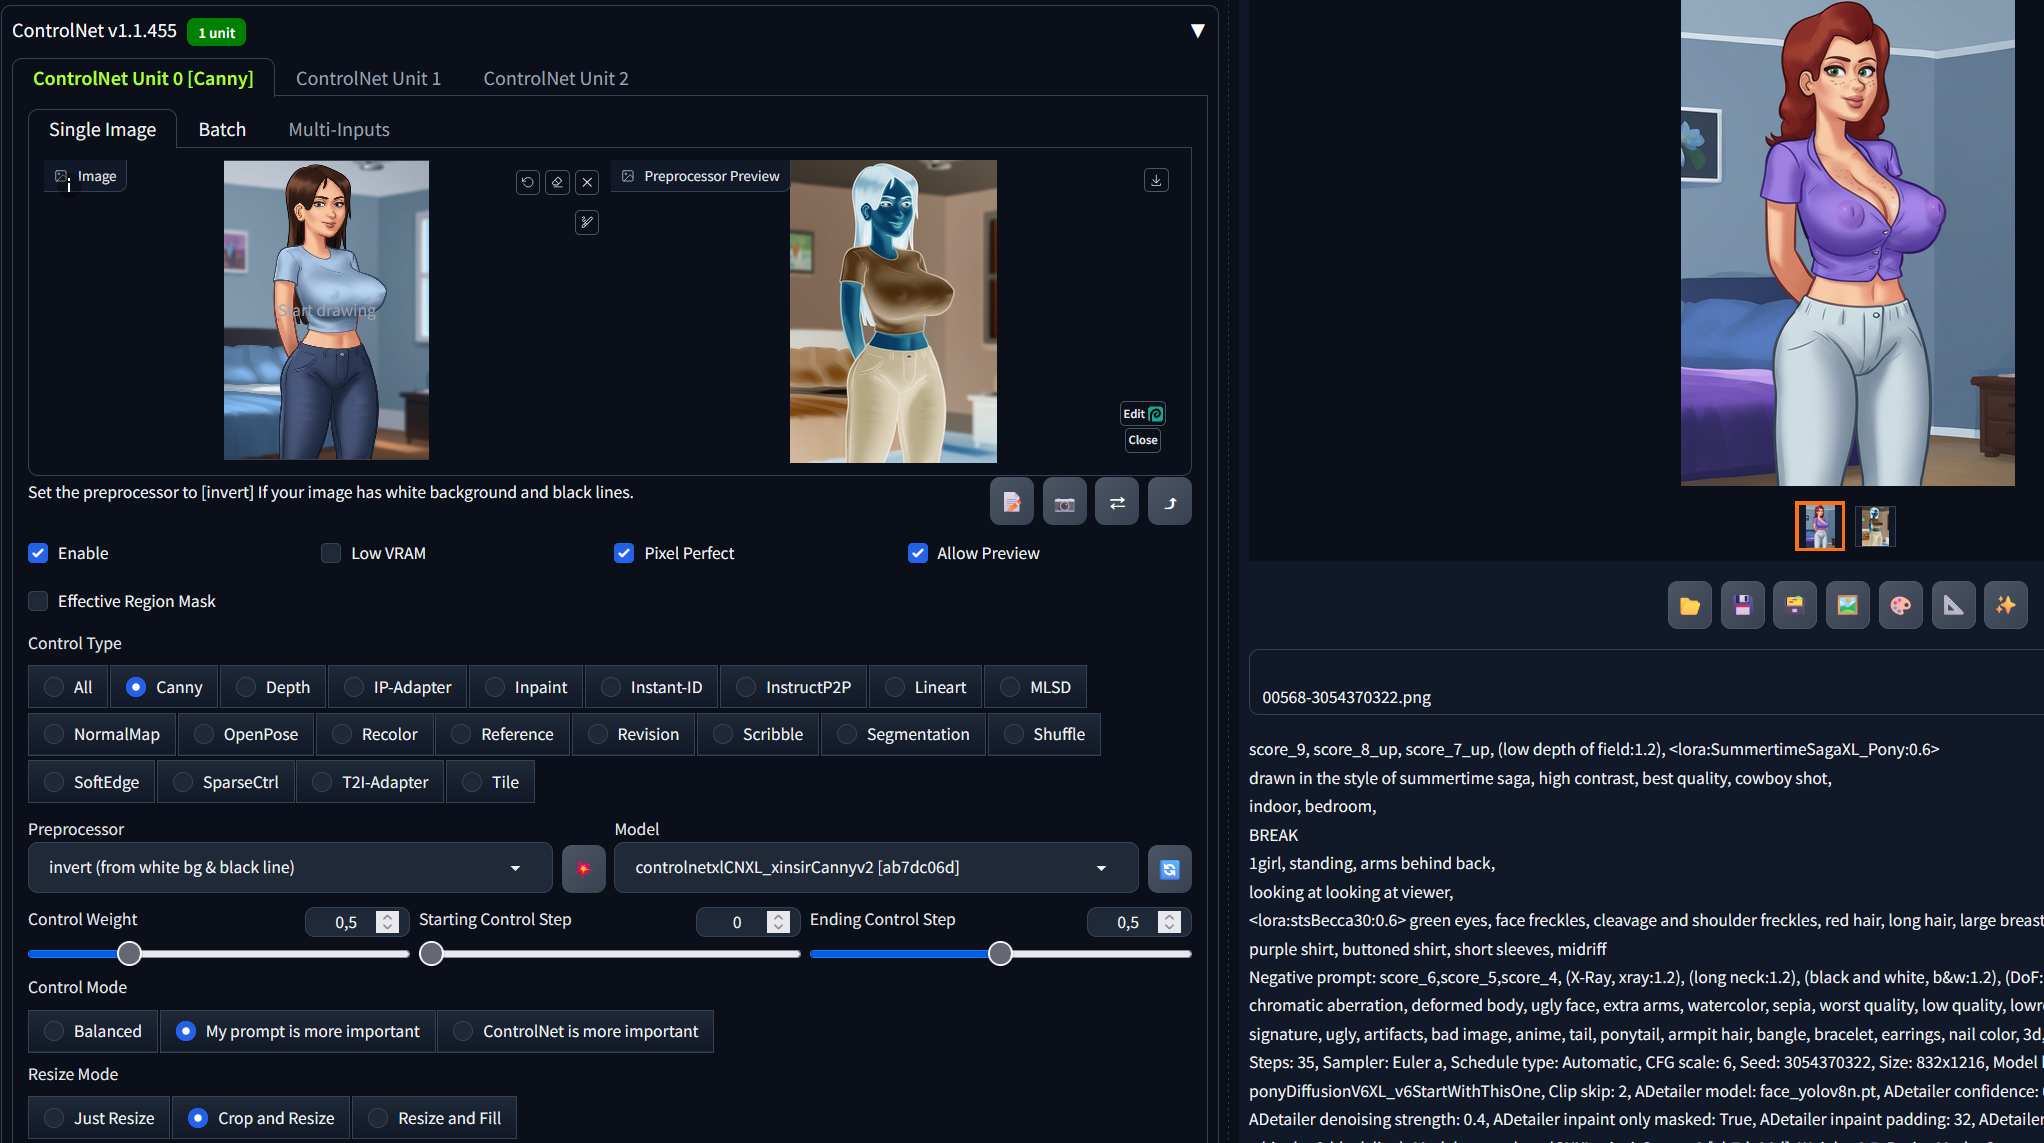
Like this, I used an Image of Jenny as reference and changed out the Lora to Becca. Once set up, generating like this is faster and way easier.
Inpainting
Inpainting is located under img2img → Generation → Inpaint. Used mostly for minor fixing of hands or face. For this use case, you don't need to change the uses prompt. If you want a bigger difference, you need to change the prompt accordingly.
Easiest way to copy an image to inpaint is:

Pro tip: Save the Image first, otherwise you might loose it.
Once there, just draw over what you want to change:
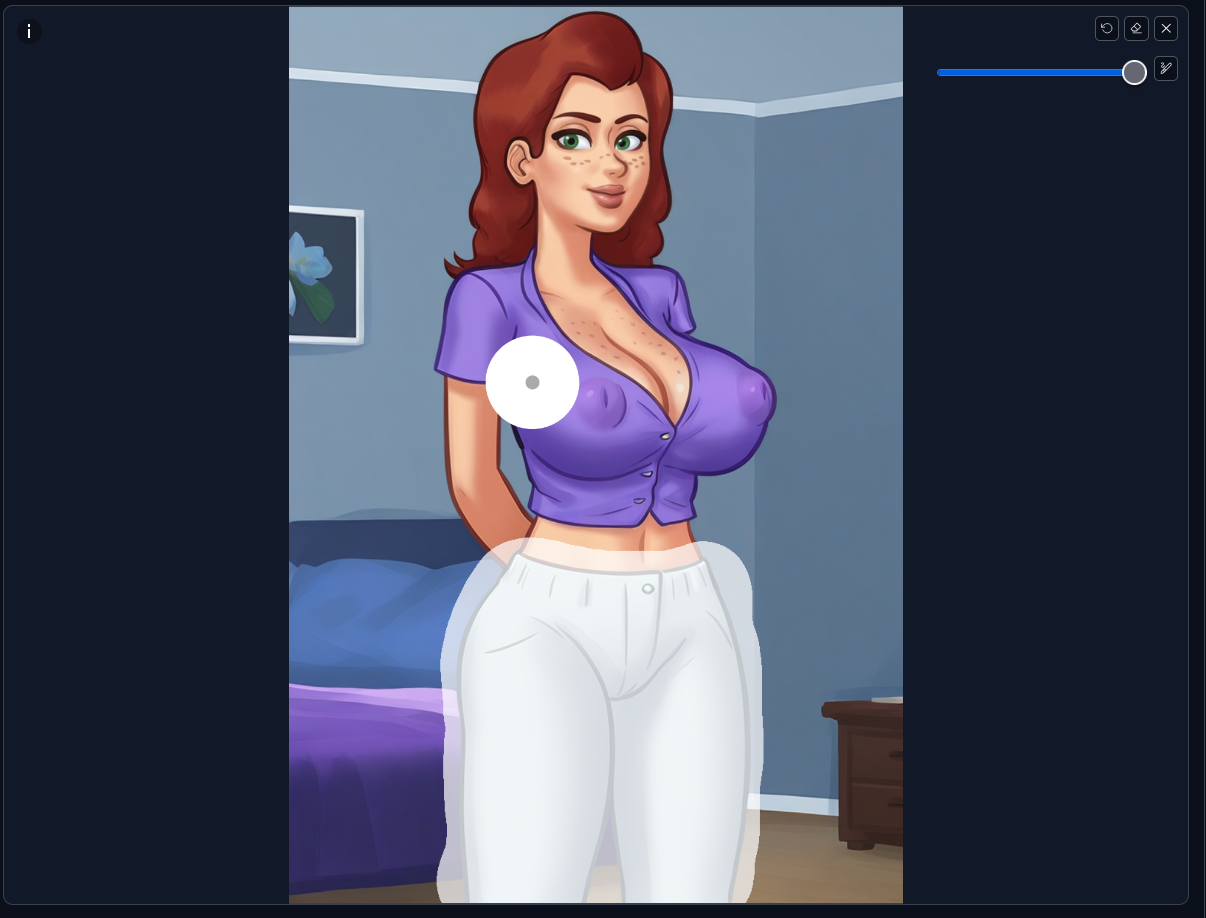
Edit the generation prompt, and go to the Inpaint settings:
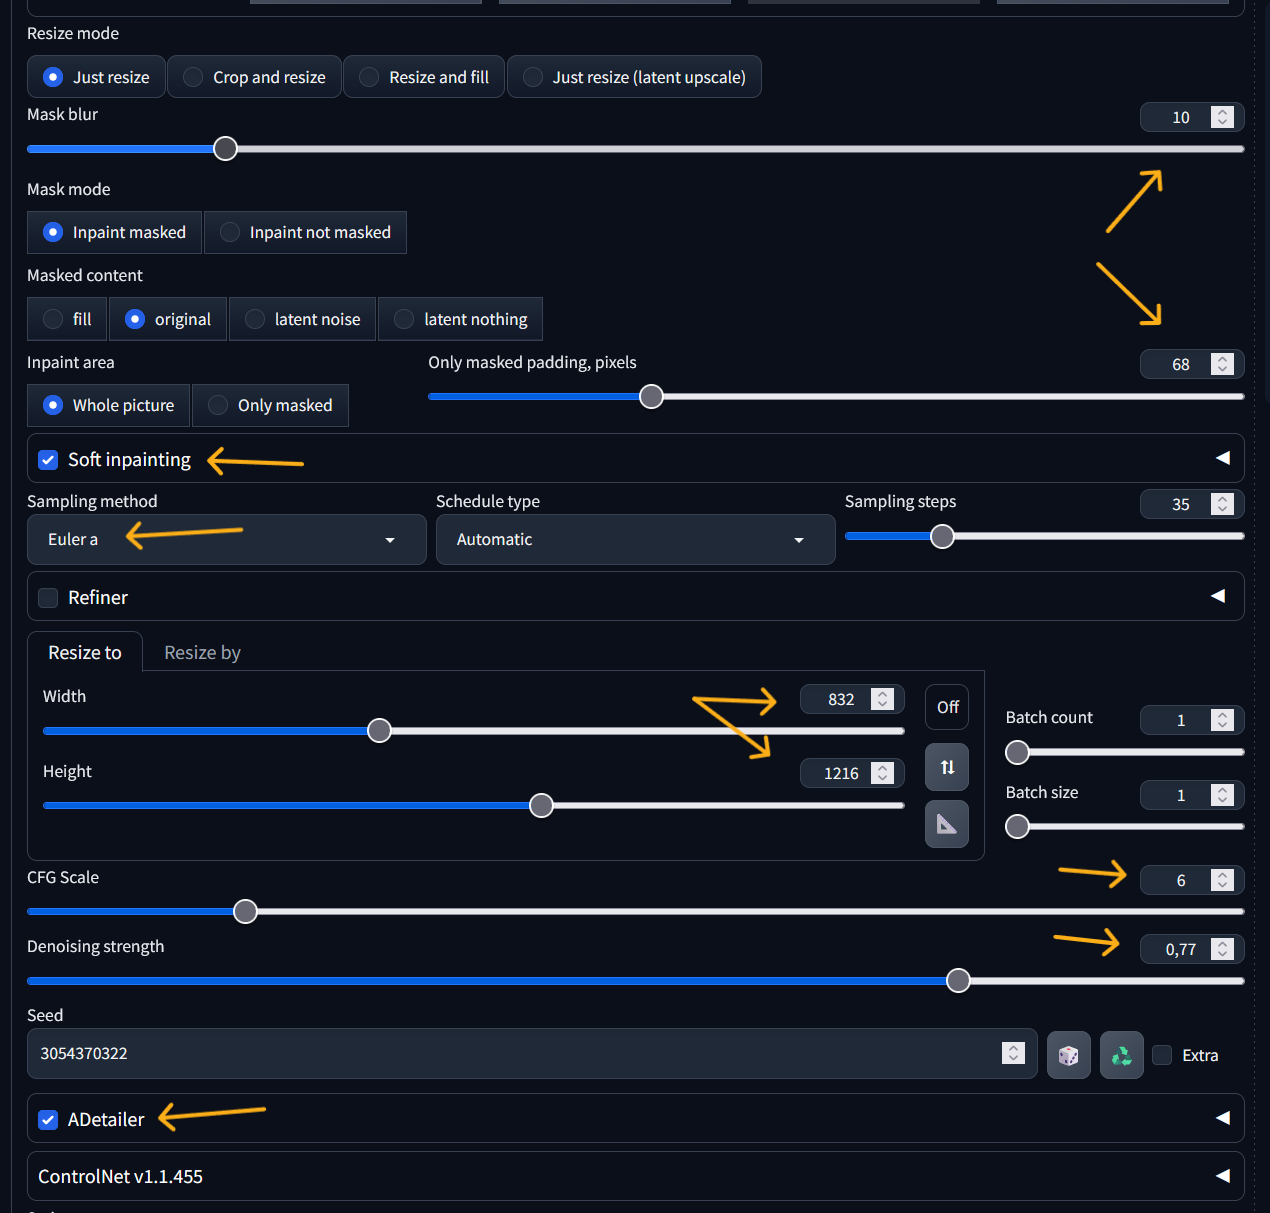
The settings are only a recommendation, except always use "soft inpainting", the same sampling method as the generated image, and keep the image size.
The more the "new" image differs from the original, the more you need to turn up the "Denoising strength" to like 0.80 or something, and maybe more "mask blur" helps as well sometimes.
I changed the white jeans in this case to a skirt, by also adding "skirt" to prompt:
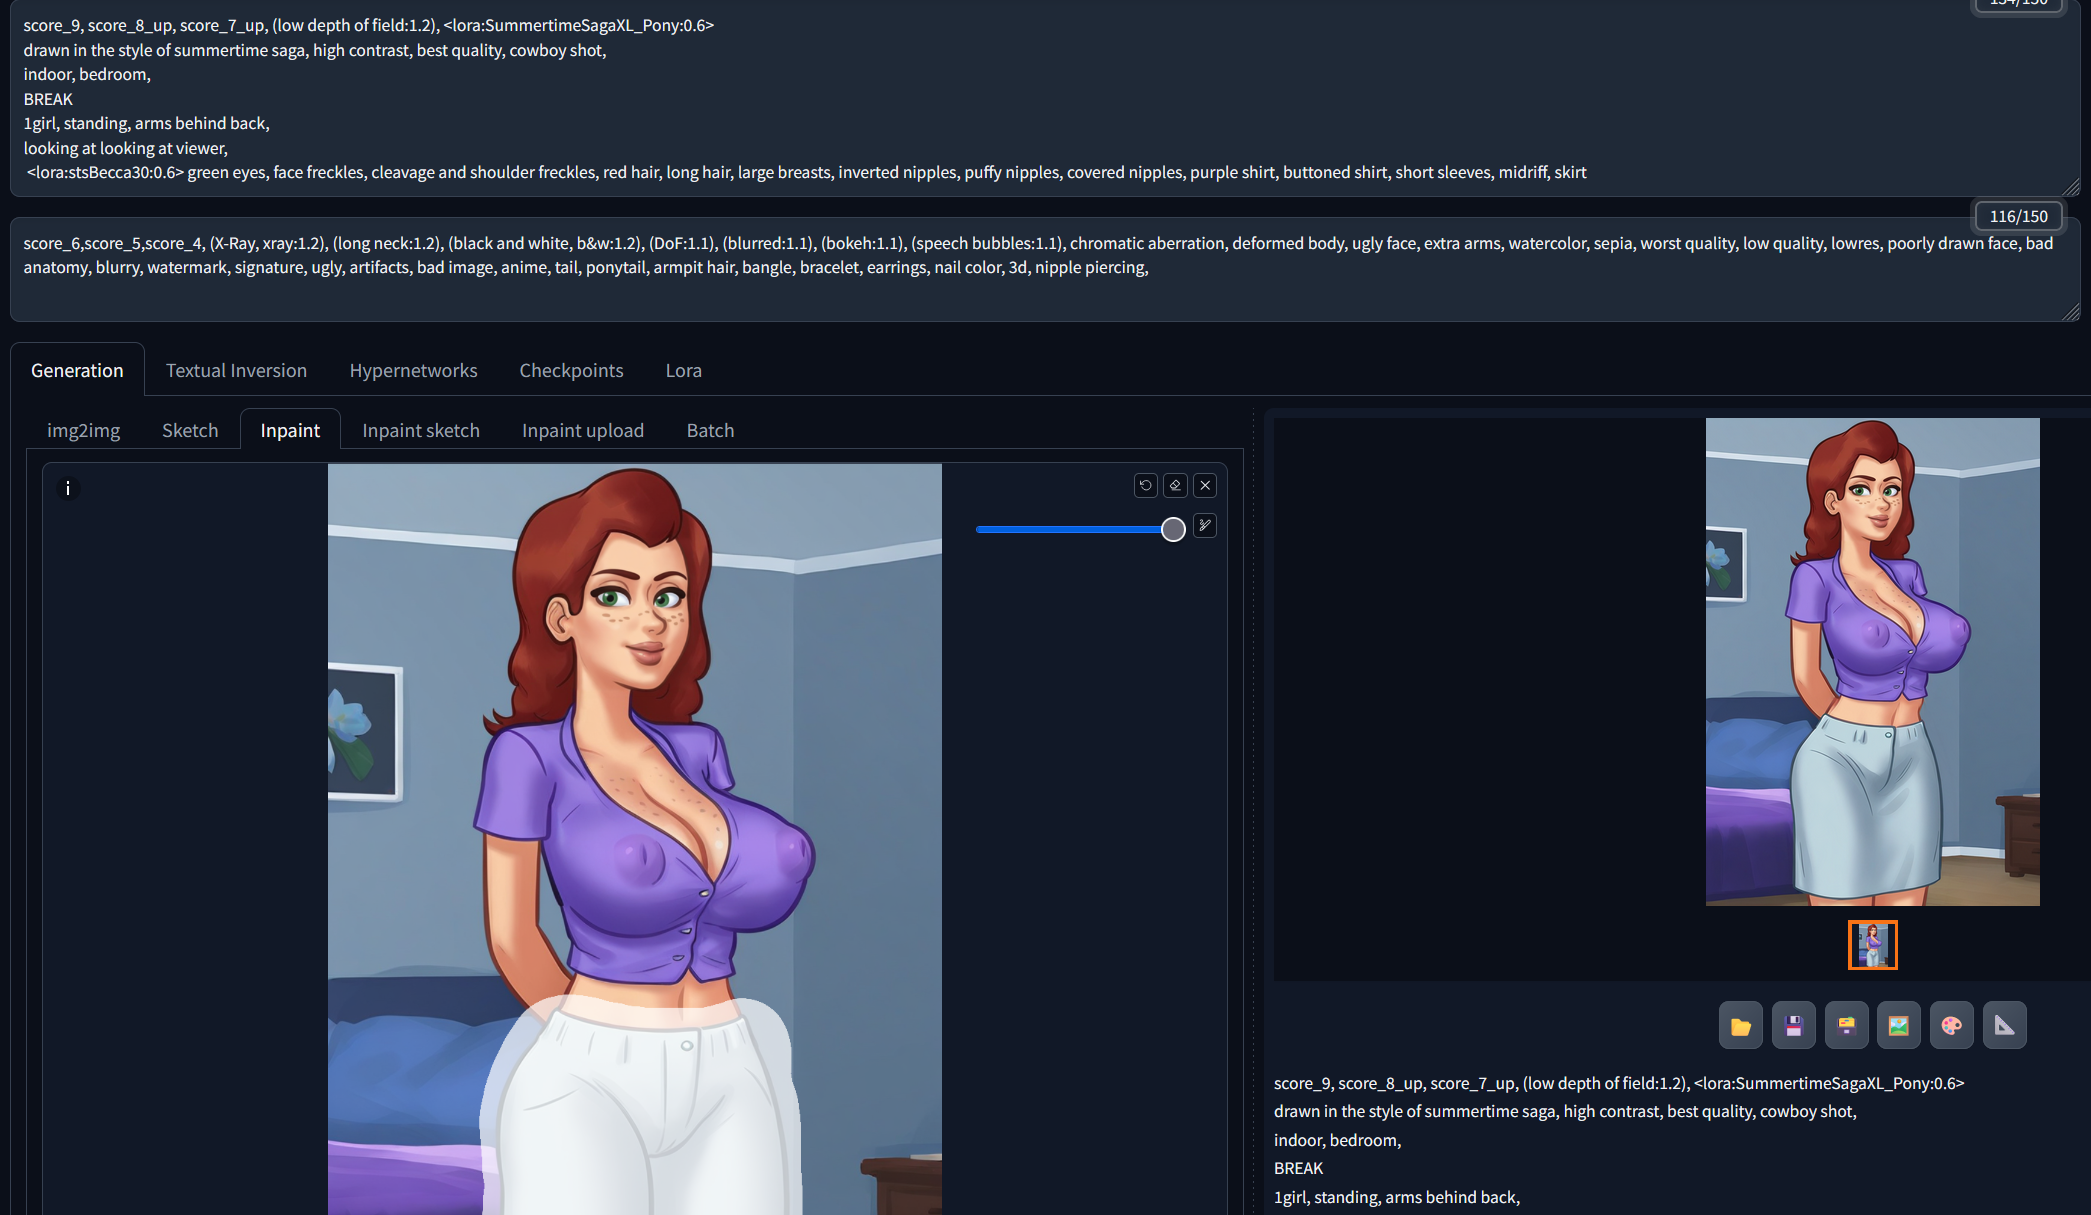
Another use case is to get two different characters in one image. Let's say you want Jenny and Becca together, but only with prompting, and adding both of theirs to Lora's won't get you anything near an expected result.
Instead, you get something like this:
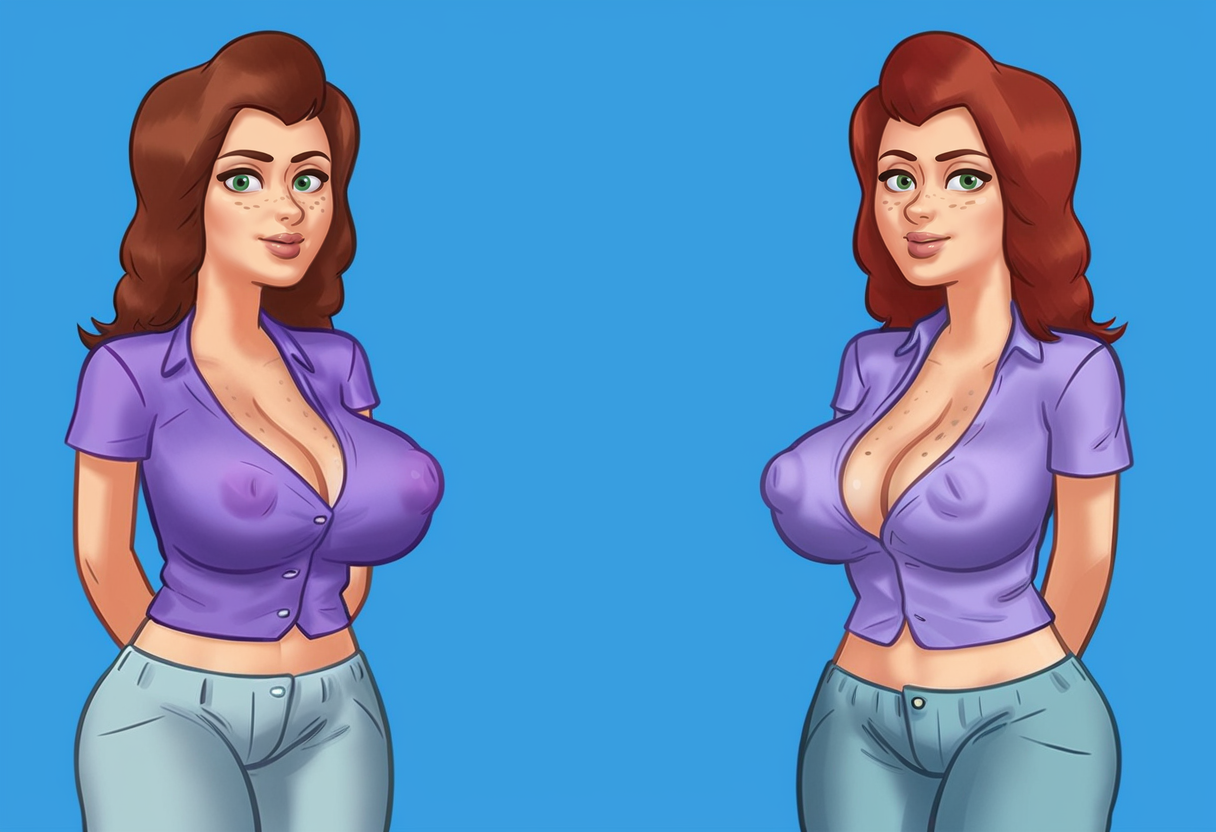
What we can do now is, inpaint one girl completely like this and change out Becca's Lora to Jenny's with the according prompts of course:
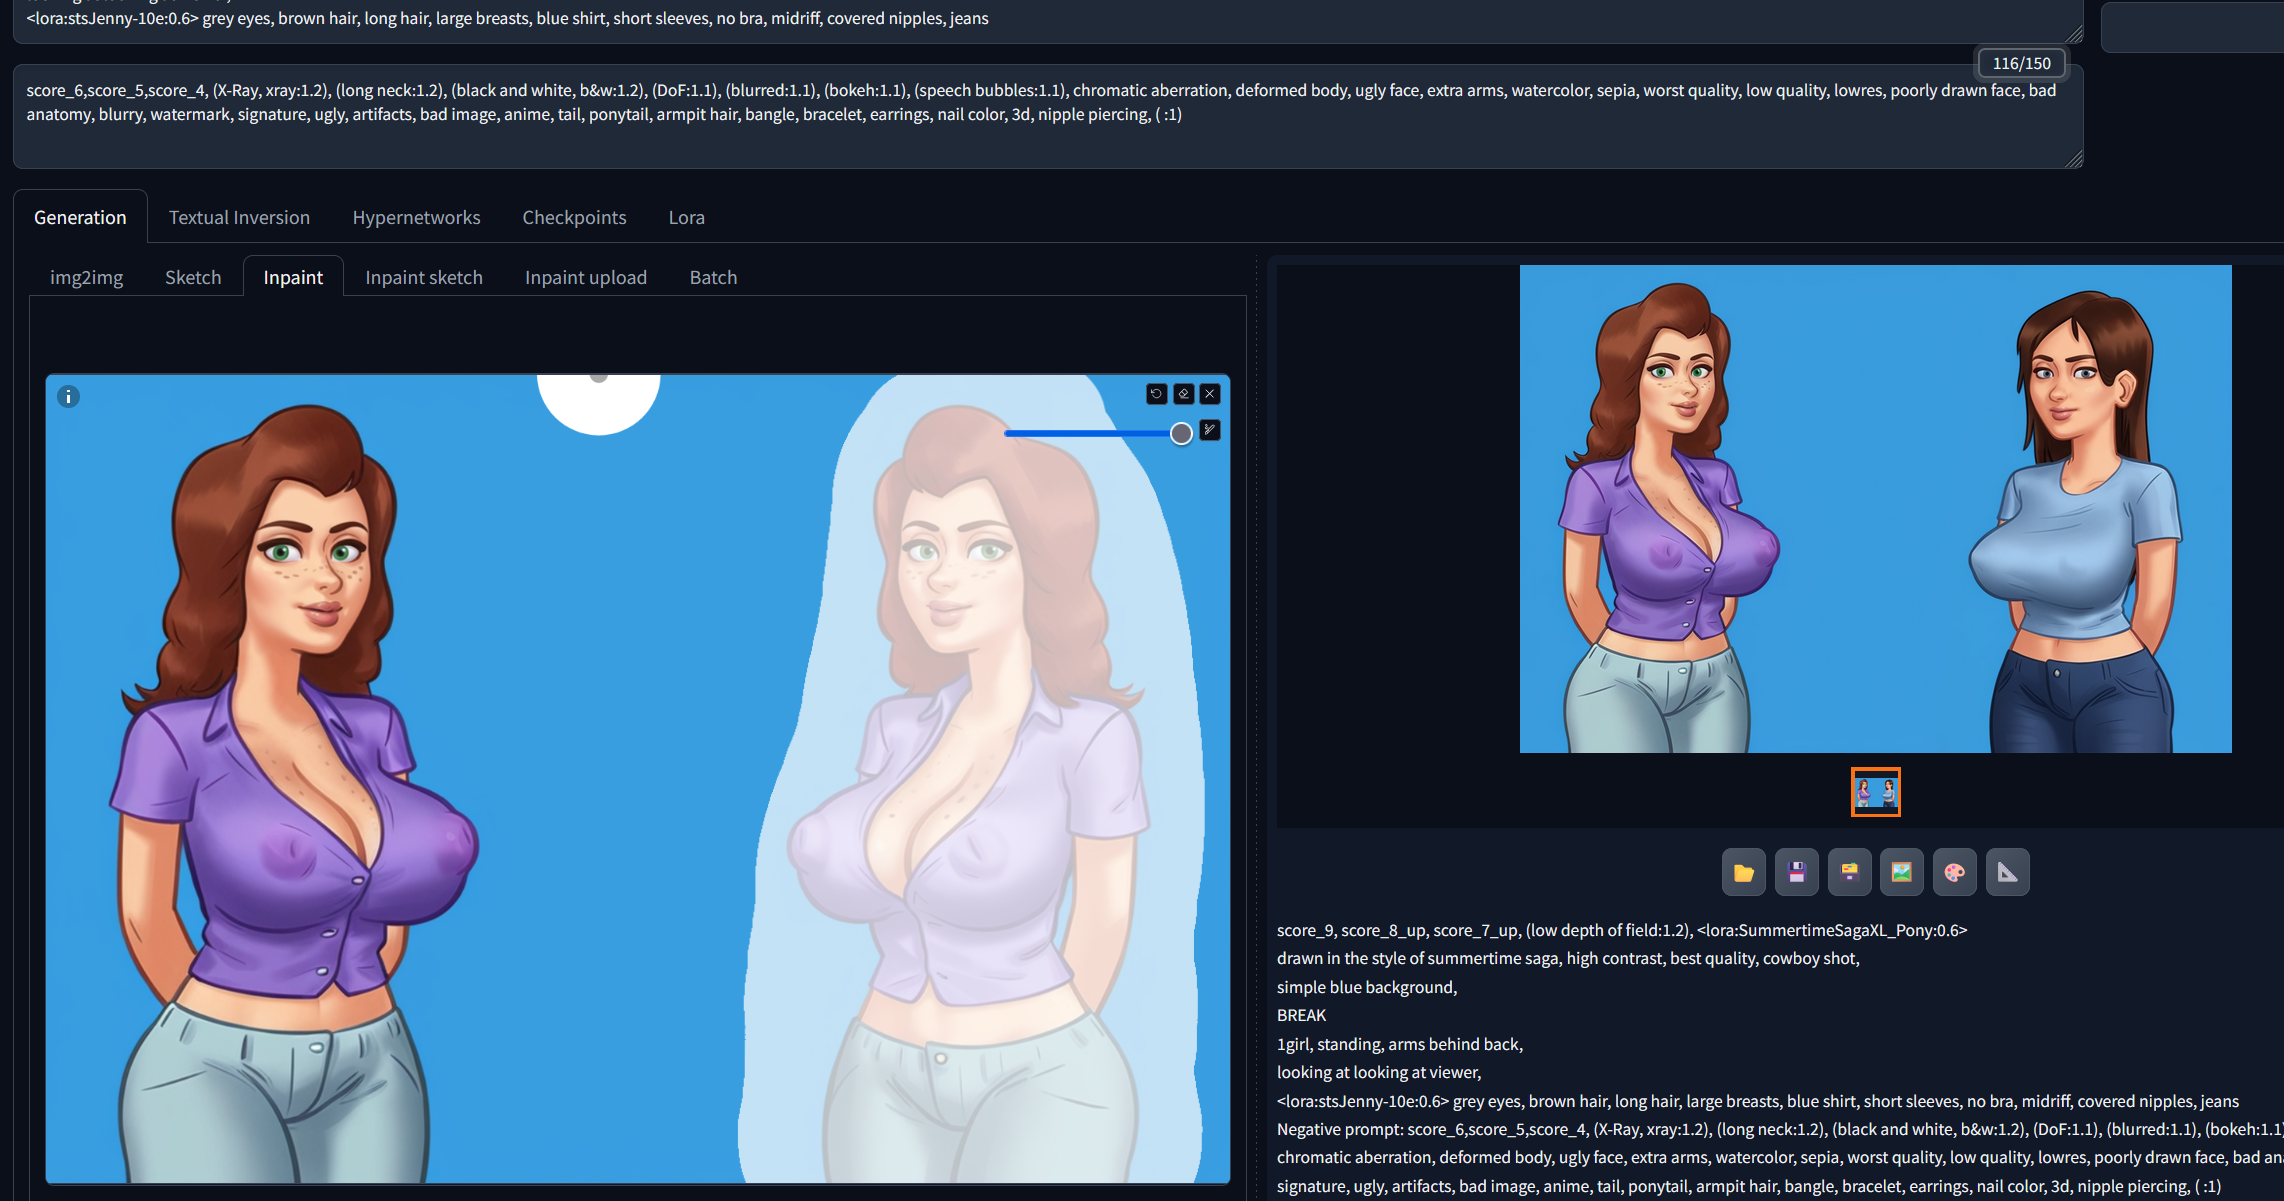
Works best if the girls share a similar body type.
But there's a drawback here, this only works good if the background isn't too complicated and the girls won't touch each other. If they touch, the inpainted area will change things on the other girl too. Keep in mind, the last used Lora will be listed in the image generated data.
Another useful Trick to get multiple girls is to generate only 1girl and edit the same image together like this (I do it in Word), then copy/paste it in ControlNet:
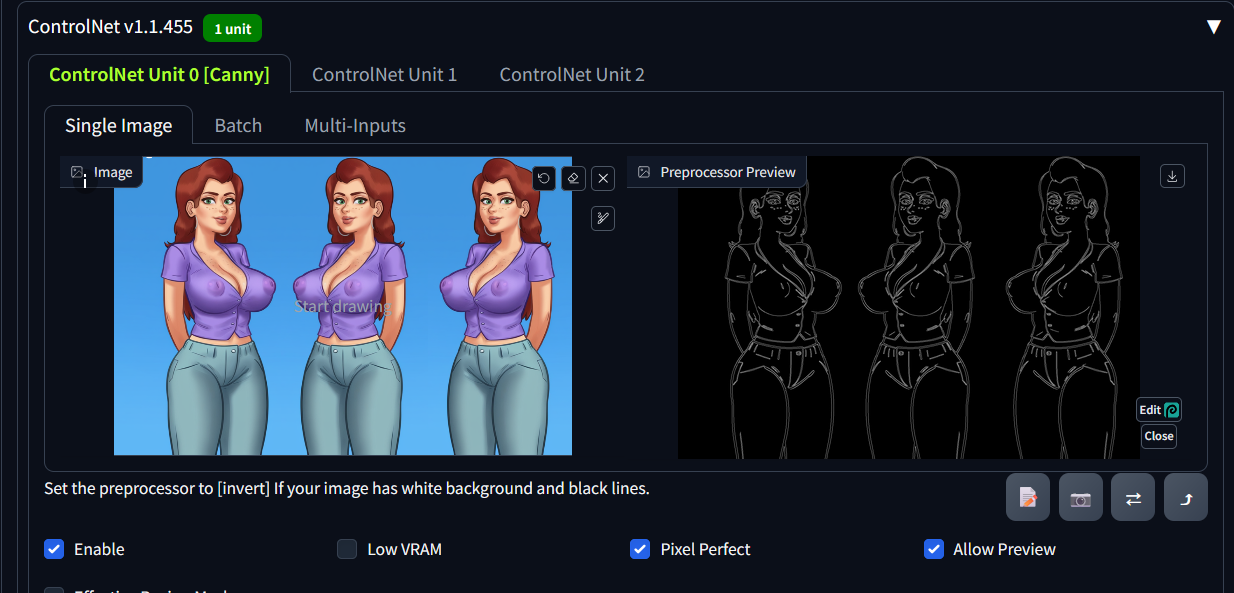
Now the generated Image looks like this and we then can inpaint it:
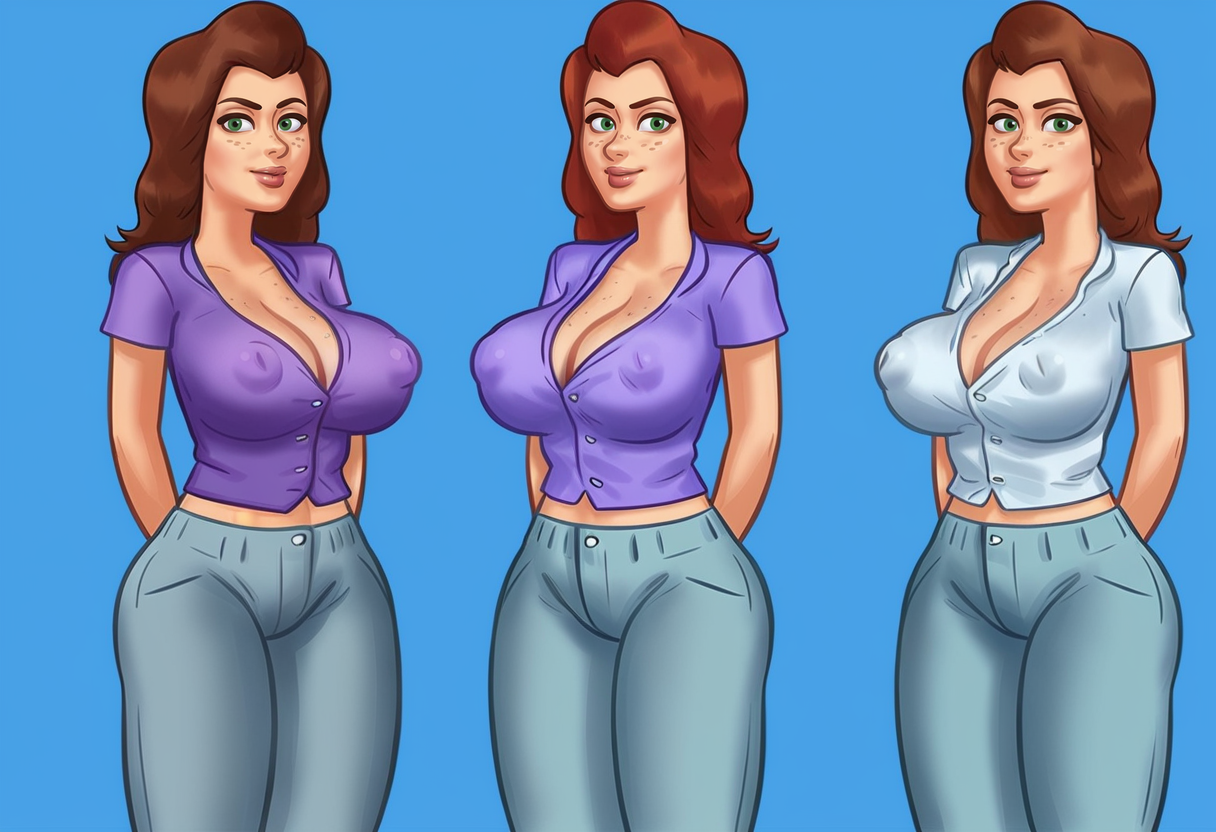
to look like this:
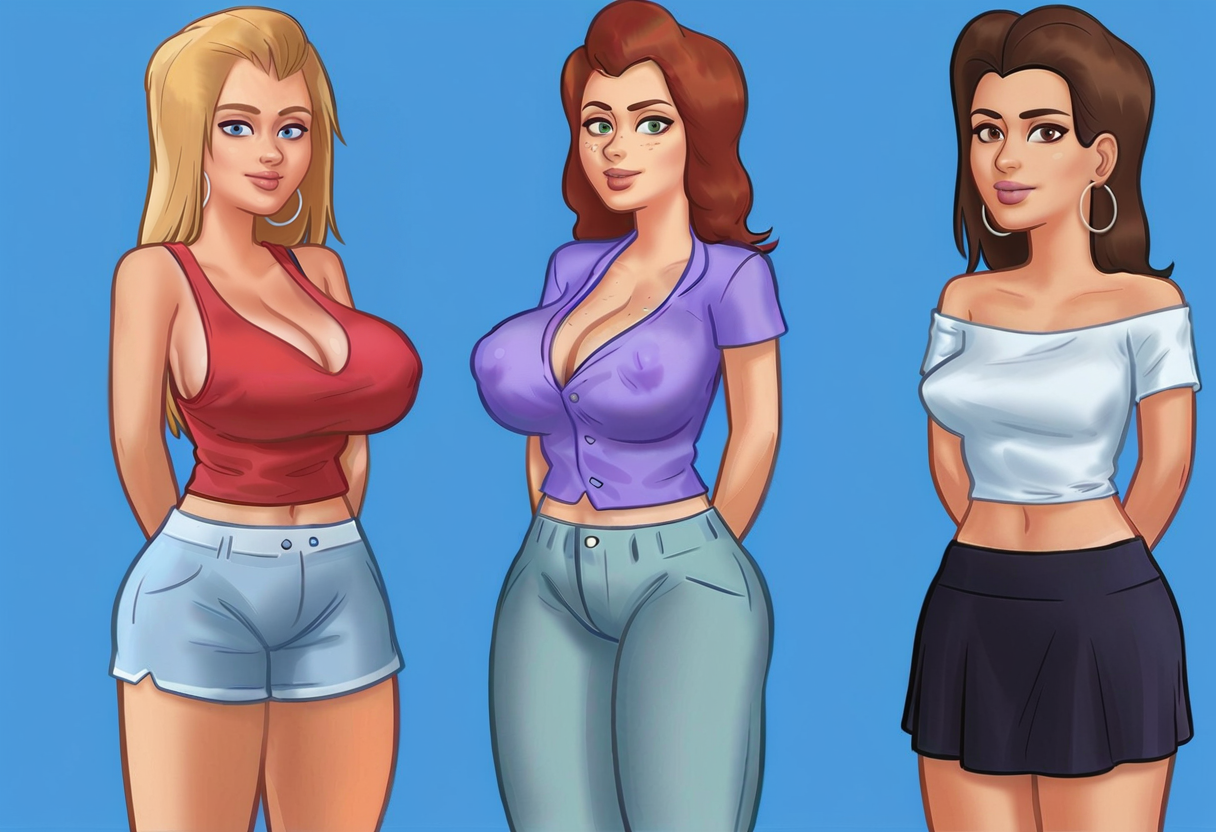
Saving and Extra's Tab
Saving
At this point i bet you figured out how to save images by yourself, if not click on "Save Icon" an then download the image. Only like this, you save the image with all the generating Data.

Extra's Tab
I use this Tab to Upscale my Images to 1.5x the resolution, or do other cool stuff.

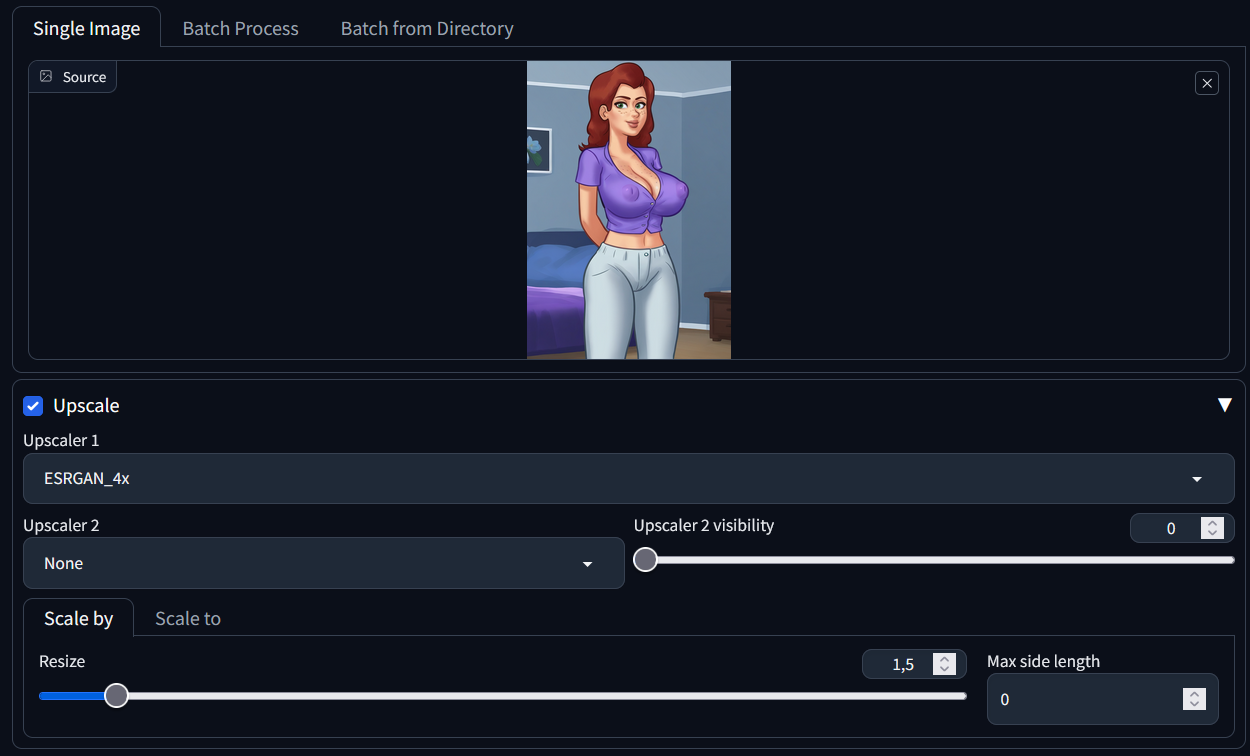
I use ESRGAN_4x, after testing every Upscaler, this one gives me the best results. I chose only 1.5x upscaling, because 1. the image is big enough after that and 2. higher numbers add more image noise. Then again you can save your image from here.
That's it for now. Thanks for reading this, and have a nice day.
If you have any improvement tips or questions, feel free to ask.

