hello everyone, this is a comfyui installation guide on google colab
as you all know the recent change sucks for both users and site activity.
past week i been searching for a way to generate image locally without needing a STRONG gpu (i have potato pc) or need to spend anything, in this Article im going to show how to use ComfyUi on Google Colab.
Requirment:
An empty Google Drive (optional but recommended)
Google Colab
Gmail Account
small bit of knowledge about how codes work (not required but helps)
you can do this without google drive , But in this tutorial i explained a installation with keeping google drive in mind.
Update 1 : just made an article about adding loras to your workflow check it out
Update 2 : made another article about Using Large Models like Flux to your workflow Heres the link
Step 1. Setup a Gmail
Pretty self explaintory, setup a google account anything that have access to google drive
Step 2. Log Google Drive
just open your google drive and stay there it should have 15 gb for free users
Step 3. Log into Google Colab
now you need to go into google colab using your account specifically this google colab page
ComfyUi on Google Colab

then Copy to your Drive (rename it to something else)
Step 4. Runtime Change
get back to your google drive and open the file you copied
then change your runtime from here top of the screen
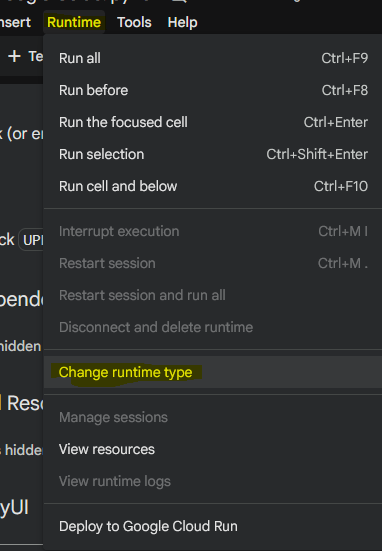
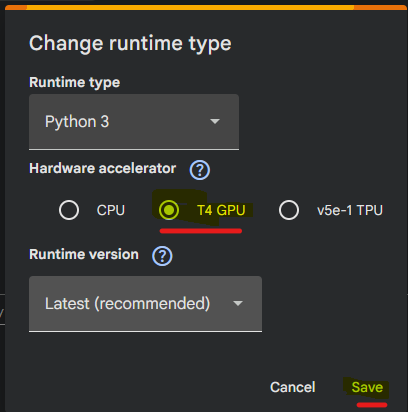
then change your runtime to use T4 Gpu so it let you use google colab gpu for generation (if its already selected leave it be)
Step 5. Basic View
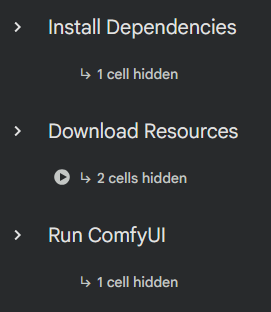
so now youre setup the space and everything lets get to installing the important parts, you should be able to see these 3 option (i minimize it for better view)
we go over them step by steps
Step 6. Install Dependencies
in first part we have to install comfyui i colored coded for explaination
we are keeping in mind this is your first installation, just hit run and this code will install comfyui on your google drive.
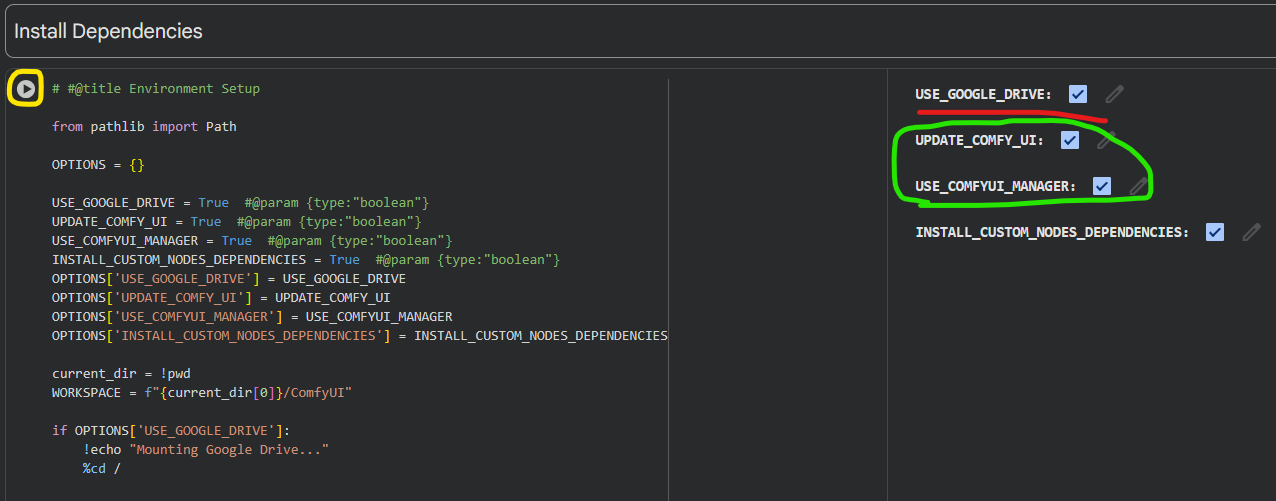
it will ask for permission to your google drive to install the Comfyui on it, after the installation you should have Comfyui folder in your google drive
now about the option i highlighted ,
USE_GOOGLE_DRIVE: this just use your google drive and get access to it so when you generate an image or download a checkpoint it saves it on your google drive
COMFY MANAGER/UPDATE: so after the first installation it recommended to turn them off (if youre using google drive)
NO GOOGLE DRIVE: you can use this colab page without using google drive the downside is if the session ends, nothing saves usually, just turn off the use google drive check mark
Step 7. Download Resources
next part is downloading your fav checkpoints for generating

pretty simple just in the first part you add your download link, second part is where it saves your file as we see it will go in models folder then save the file in loras as ghibli_v6.safetensors
theres few thing you have to know for saving the files,
it saves on your google drive (if you using google drive) in your comfyui, models folder and so have some space for it checkpoints are usually large files around 6-7 gb depending on what you downloading.
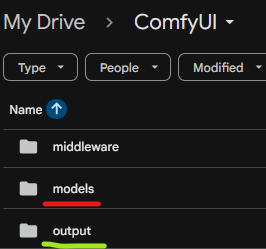
(your generated images will go in output and other downloaded stuff go in model btw)
since we installing checkpoints i recommend changing the loras to checkpoints or moving it after download in your google drive to you checkpoint folder so it dont get confusing for comfyui.
another thing is making a folder in your checkpoints and putting the checkpoints there like./models/checkpoints/2DCheckpoints/"yourfilenamehere.safetensors"
like here i created a folder called 2DCheckpoints
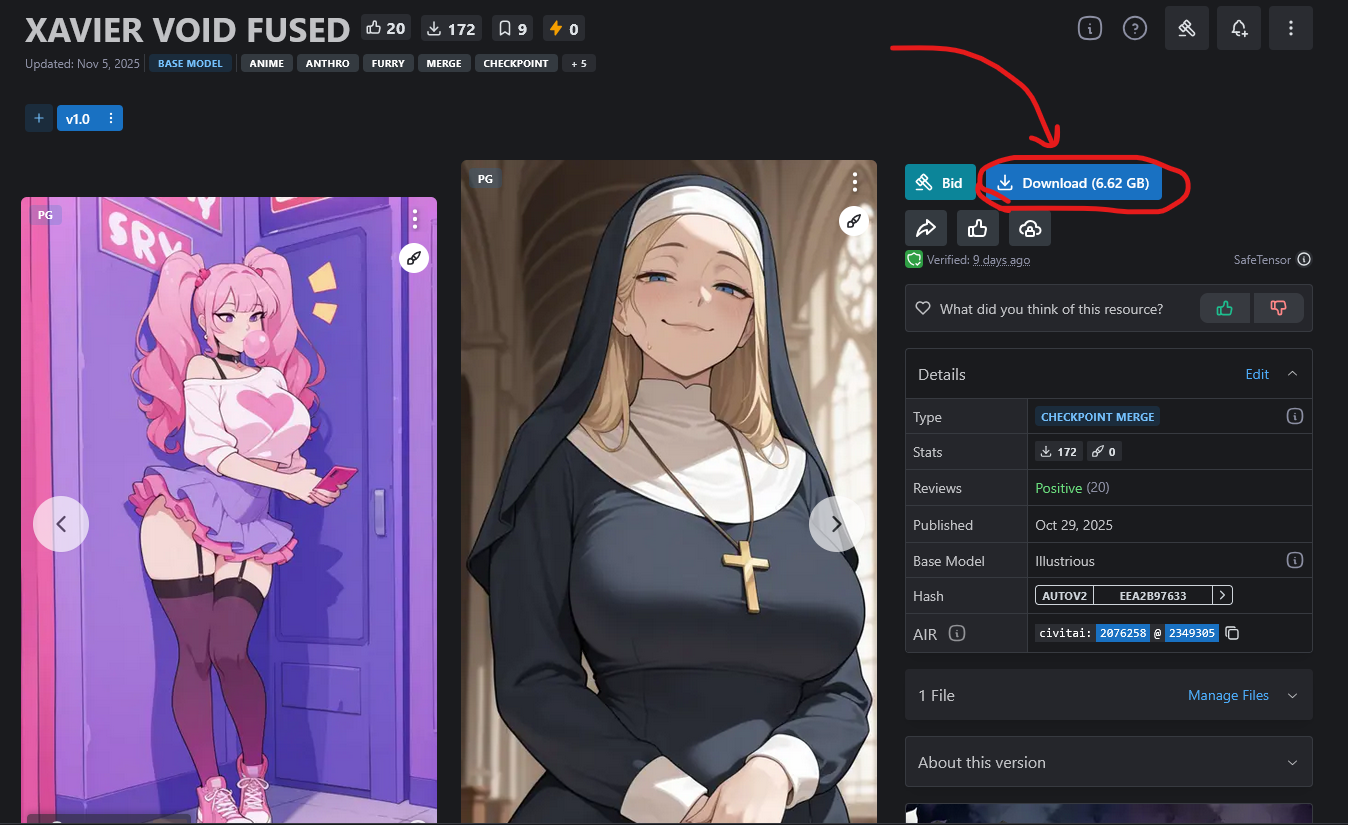
for getting the dowload link just visit your favorite checkpoint page and copy the link that download the files then place it between the "" in first part of code (After -c)
and select the path on second part, for example we save this file like (i added 2Dstyle folder in this example):./models/checkpoints/2Dstyle/XavoidFused10.safetensors
then hit run! thats it, it will download the checkpoint to your checkpoint folder in your google drive and you can use it later (Shameless Plug here lol check it out)
Step 8. Run ComfyUi
Bam! were on the last part of setting things up! just run the last code block and run comfyui codeblock and keep it running , it might take few minutes
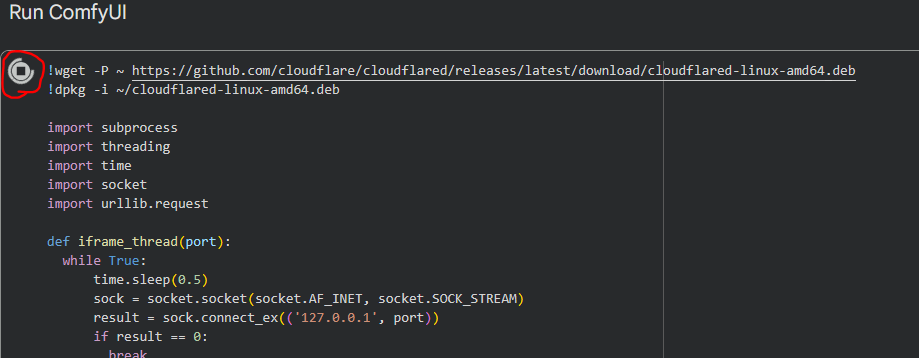
after code executed properly it will give you a link like bellow
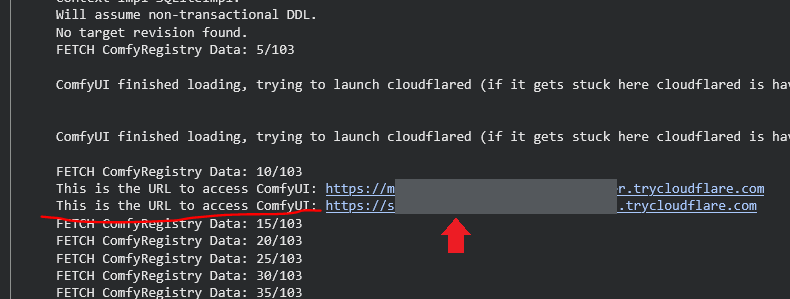
click the link and its done , it might take few minute to load the site too so dont get worried if it seems stuck , you should be able to see your comfyui space after a bit
Step 9. ComfyUi Elements
good job! you setup your own generating space on comfyui ! it seems theres alot of things here but dont worry ill explain them simply! (if the numbers too small open the image in new tab)
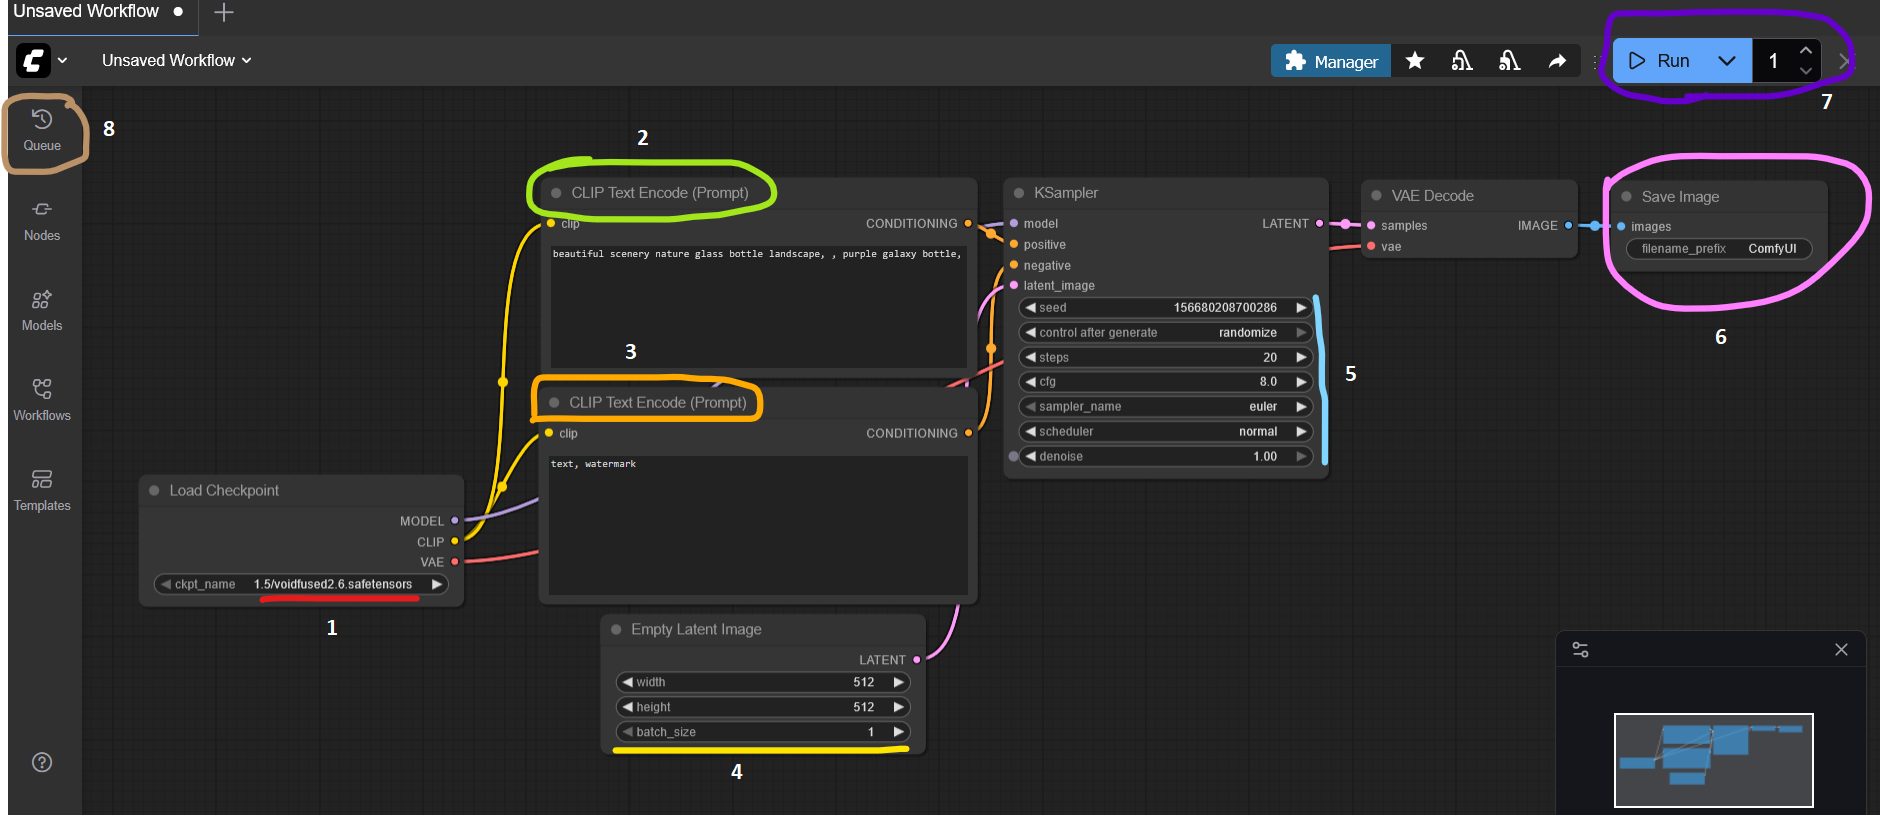
Red 1 . here you select the checkpoint you downloaded
Green 2 . your prompt what you want to generate write here
Orange 3 . your negative tags , what you dont want to see
yellow 4 . here you can adjust the size of your image height and width plus number of image you want to generate with each run
Light Blue 5 . you have your typical settings , steps , cfg , samplers , stuff like that (btw euler ancestral same as euler a , for my euler gang)
Pink 6 . with what name it saves your image and show you a preview of it usually
Purple 7 . run button plus how many time you want to run the whole setting
Brown 8 . this is where your images go and you can see the queue
Step 10. Pros and Cons
this was the setup that let me generate without needing this buzz shenanigans
but have its own cons and pros
Pros :
you are your own now! no more waiting for daily buzz and bs
really fast generation for something free
no limit on your generation at the time
your hands is super open for tweaking and changing setting for generation
so many option to fiddle with
No limits or filter on your prompt
Cons :
you can use google colab resources for 4 5 hour (read end of article)
access to loras and resources a bit rough since you have to stop the comfyui if you want to download via the code block unlesss you add them to your drive directly
honestly its more complicated compared to civitai
if youre using google drive you only have 15 gb (free version) so its around 2 checkpoints so youre kinda limited
initiating the whole setup a little time consuming , it takes between 10 to 15 min each time you want to set things up on each launch
does it worth setting up? in my opinion yes , as the look of things on civit ai it seems like this yellow buzz change going to stay for now.
plus i feel like it can generate solid images for local gen i was excpecting a really low quality images but they look nice
example here https://civitai.com/posts/23920790 (im still learning the settings btw)
it might be a bit annoying for creators who use ton of loras but if youre going for free i think this is the best option we have (with potato pc of course)
Others
im going to list some other stuff that i couldnt fit in the article here (ill update this section if i found anything interesting) ,
1 - i tested it on 8 images 30 steps 5 cfg (1024x1024) with euler a and it took around a 2 or 3 minute to generate them all wich i think is pretty decent for this heavy graphical work , and something free
2 - i couldnt find how much it take until the data and processing power you used recover but i read somewhere its between 4 hour to 24 hour until its go back to the 5 hour free use
3 - my workflow is pretty basic so im guessing theres many many more detailed workflows out there just find the thing that suits you
(New) 4 - i used to train loras on civit ai with 25 30 good quality picture (within the buzz limit) , but now i can easily generate up to 80 to 120 diffrent high quality images for my loras wich is huge upgrade (my recent egypt themed ones are trained on them , furry warning!)
(New Tips) 5 - i dont know if i mentioned it but for heavy checkpoints that goes beyond your google drive space(like 20 30 gb) you can use the google colab harddrive (it have around 110 gb total with 70 80 free space) you can download your large models and run the comfyui and generating with them , downside is you have to download the model each time your session ends (since it cant be saved to your google drive sadly) also so be sure to save the images you make to your pc so you dont lose them
(New) 6 - i still havent hit any Totall blockage for account usage that totally stop me from generating on one account(i been generating for a week now) , This is the Info colab posted about usage , ill update the post if theres a hard block for these stuff
if youre having problem heres a short video i found on youtube for setting things up
Video Tutorial
also about the time limit of google colab i wanted to say its REAALLY Bad if you had few other gmail accounts and REAALLY Bad if you used them thats not goood at all poor million dollar company gonna die of money loss (you know what to do with the info im clueless)
(another shameless plug) if you like the article you can support me by checking my checkpoint here or this new one
make some cool stuff (its a nice checkpoint i promise :)
i dont want it to sound intrusive but i humbly ask to share this article with anyone you think need to see this , so it wont be buried to new users or creators that dont want to pay , its not fair forcing a membership down people throat.
hope this article helped you beautiful creators to generate things for free without limits.
i wish you an amazing week and big good luck !


