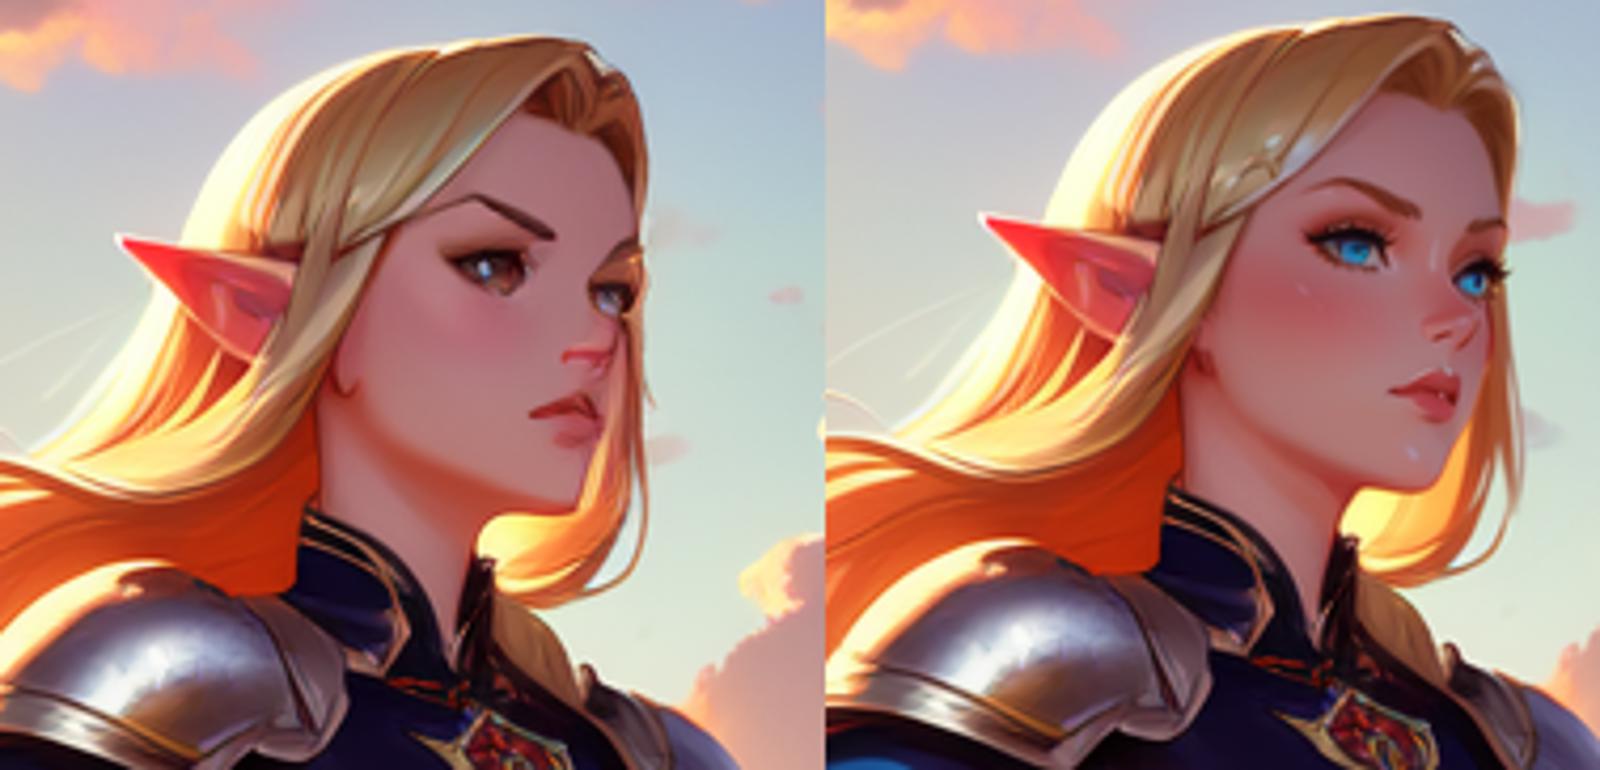
A Comprehensive Guide to Inpainting: Part 1
Introduction
Inpainting is an amazingly powerful tool in stablediffusion, but it’s one that can seem somewhat daunting when you’re first approaching it.
I’m hoping to demystify the big panel of options on the inpainting tab and help you get started. It’s impossible to make a complete guide. Inpainting often takes a lot of adjustment to get just the results you want, but by the end of this you’ll hopefully know where to start and what the things you’re adjusting actually do.
If you hate words and just want to check what setting to use to use to inpaint a face, you can skip to the first walkthrough section, but if you’re interested in doing more intensive inpaint, the following information is going to be very handy.
What is Inpainting?
At the most basic level, inpainting is selecting a portion of the image and feeding it back into the AI to redo. This allows you to preserve parts of the image you like while fixing parts you don’t.
It’s hard to overstate how much this changes what you are capable of with AI art. If you haven’t been inpainting, I’m sure you know how frustrating it is to get a beautiful image with deformed hands, a blurry face, or just a detail that doesn’t fit what you’re looking for. Instead of being at the mercy of what the AI decides to give you, inpainting puts you in control of the art and lets you sculpt it to fit your vision.
Or just fix that eight fingered hand.
Basics: The Inpainting Tab
First, let’s tackle the reason why inpainting seems so imposing, the Automatic1111 inpainting tab. There’s a lot of options here, and if you pick the wrong ones, nothing happens, or you get a crazy mess that’s nothing like what you wanted. So let’s go from the top:

At the very top, you have the prompt. This works identically to text2img prompts, and for the most part you can use the prompt you generated the image with. If you send the image over from the text2img tab, this will be filled in for you.
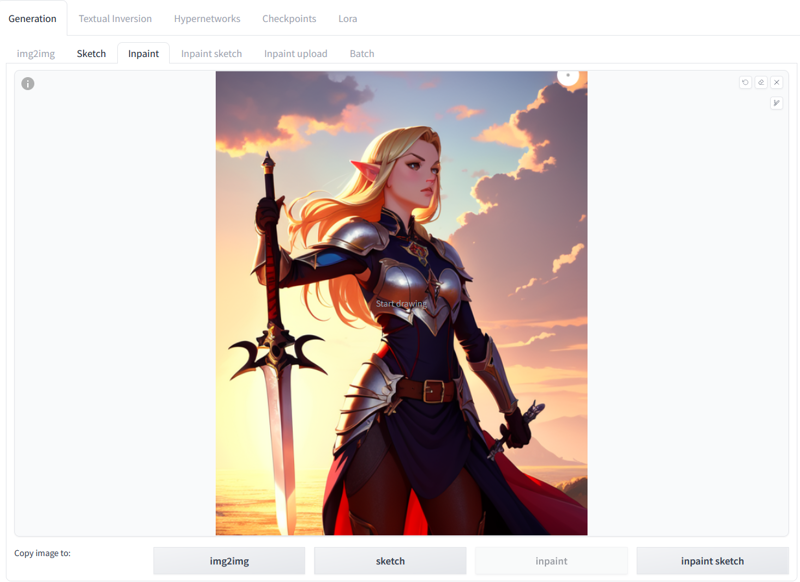
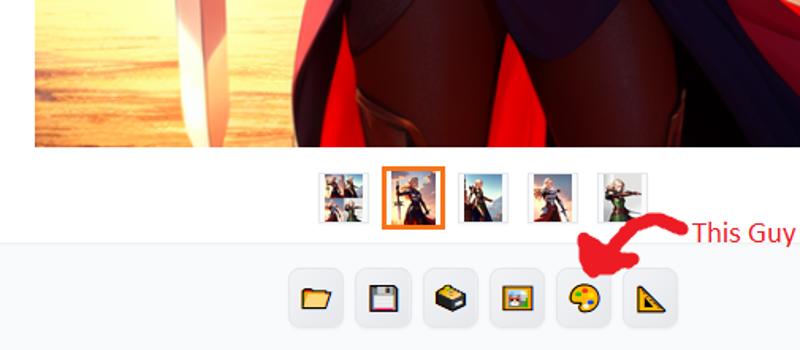
The first section is pretty self explanatory. You either drag an image onto the panel from a folder, or send an image there from the output elsewhere in Automatic1111 using the “Send to Inpaint” button.
For the inpainting section, you draw on the image in the areas you want to be redone by the AI. The three buttons in the top right control that. The first button undoes the last thing you painted, the second(eraser) erases all the inpaint areas, and the third removes the image as well as the inpainted sections.
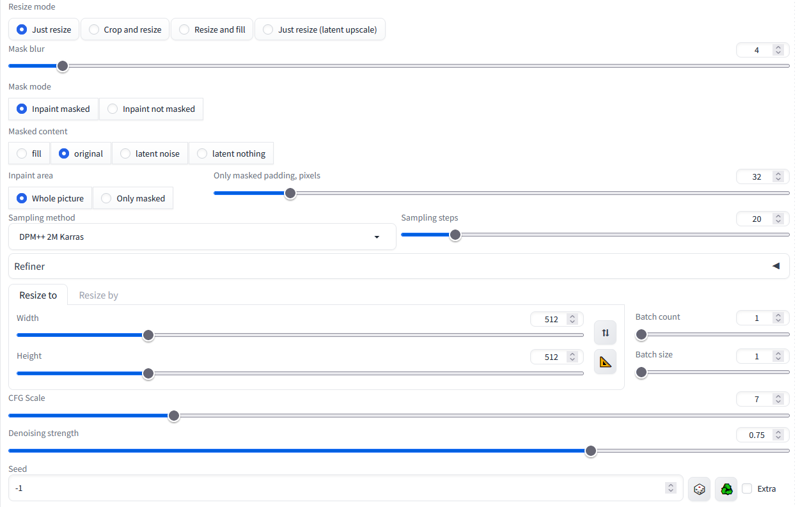
This part is very much NOT self explanatory, so let’s explain all the things, and I’ll include some tips on using them.
Resize mode: Just leave this on “Just resize” unless you have a good reason not to.
Mask Blur: Just leave it on 4 (the default).This controls how much the mask bleeds out from the exact area you’ve painted.
Mask mode: This changes whether the painted part, or the unpainted part is inpainted. If you’re just keeping a face or something and redoing the rest of the image you can switch it to “inpaint not masked” to save some time, but otherwise leave it on “Inpaint Masked”.
Masked Content: This is the first section you’re actually going to change. This controls where the image starts the inpainting. 99% of the time you will either use “Fill” or “Original”.
“Fill” randomly fills in the selected area with colors from the surroundings. This is useful for if you want to remove what’s there and replace it with either nothing, or something new.
“Original” is the method I use most. It starts from the source image, and is good for making adjustments, but bad for adding or removing things.
“Latent Noise” fills the area with random noise, the same thing that text2img starts with. This can be useful for adding something new in that area, but you’re basically starting from scratch with the raw stuff of image creation, so you have little control over what is added.
“Latent Nothing” I’m sure this is good for something, but I’ve never had any luck with it. You’ll probably be just fine without it too, but if anyone does know what it does, feel free to let me know in a comment.
Inpaint Area: Toggles between taking the entire image into consideration when inpainting, or just the area immediately around the masked area. If you’re making big structural changes, you can use “Entire Image”, but most of the time you’ll want to be on “Only Masked”
Only Masked Padding, Pixels: When in “Only Masked” mode (see above), how much around the masked area the AI will process and be able to see while inpainting. This is one of your most important controls over the inpainting process and you will be adjusting it often for more advanced inpainting.
Sampling Method & Sampling Steps (& CFG Scale): Just leave these on whatever you generated the image with in the first place. They function the same here as in txt2img.
Resize to: The size of the canvas for the inpainting. Generally the default of the normal image size is fine, but once you know what you’re doing, you can decrease the size when you don’t need extra pixels to speed up generation, or increase the size to add extra detail.
Denoising strength: This is your second main control for inpainting. Denoising Strength is essentially how much the image will change from the start point you set in “Masked Content”. When you’re using “Original”, you can imagine this as the image getting ‘blurred’ then reconstructed from that blurry image. On low denoising strength, only the small details will get lost and rebuilt, while on higher denoising strengths there can be major structural changes to the image. 0.3-0.4 is a good place to start for most adjustments. At this strength it can make a decent amount of changes, but still maintains vaguely what was there originally.
Tutorial Part 1: A Face (and learning about pixels)
Now that that’s all out of the way, let’s actually go through and inpaint something. For the purposes of this I’m using my own SD 1.5 model, but it goes the same for every model, and even for SDXL, though that takes a little longer.
With a quick prompt of:
(high quality, masterpiece), digital painting, 1girl, elf, pointy ears, blonde hair, armor, holding sword
Negative: FastNegativeEmbedding (embedding linked in recommended resources, but unimportant here)
We get the following image. Some good vibes, but it’s got some issues, perfect for our purposes.
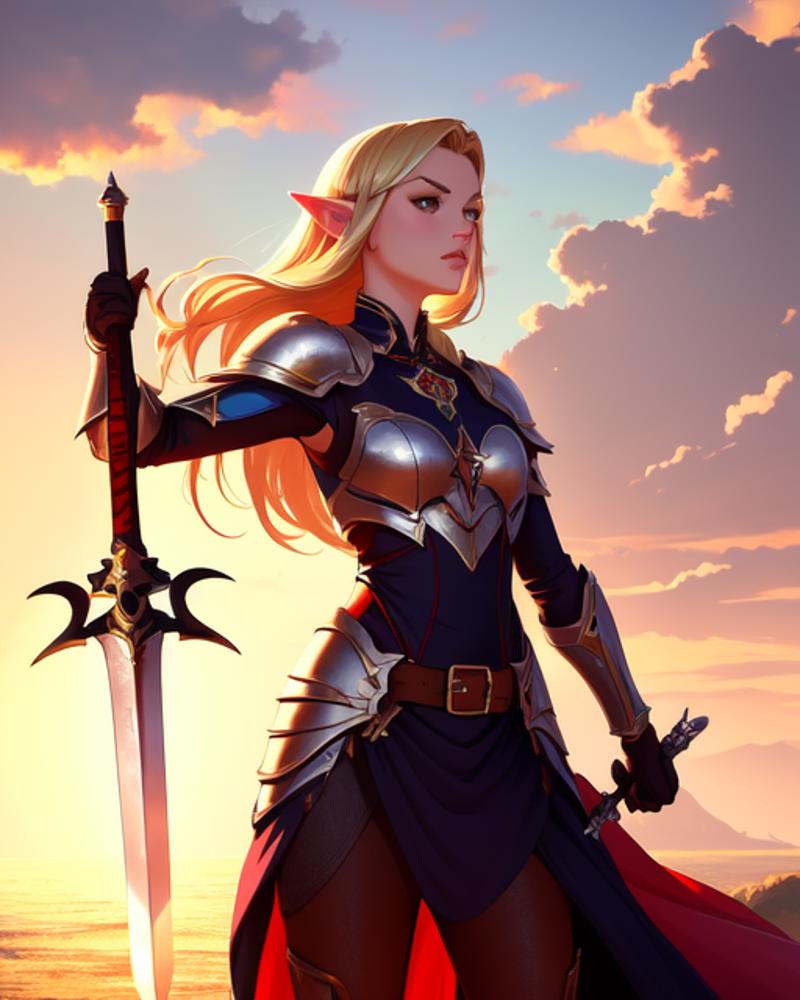
First we’re going to address the face. If you’ve done much with Stable Diffusion, you’ve probably noticed that when an image shows more of a character’s body, the face starts to lose detail and get weird. That’s because Stable Diffusion needs a certain amount of pixels to comprehend the face well enough to add details. Since we’ve generated the image at 512x640, there aren’t too many pixels to go around as the face makes up less and less of the image.
Luckily, inpainting can help you with that, and Pixels are the first thing you can control to get the AI to do what you want. There are two ways to get more pixels. First, you can increase the size of the entire image. If you use Hiresfix, that’s how it improves your images, increasing the size of the whole image so there are more pixels available to work with for detail. This is slow, especially if you’re generating a lot of options, because you’re enlarging the entire image, not just the areas that need more detail.
The second way to give the AI more pixels to work with is to zoom in on a small area of the image and only regenerate that. That’s where the “Only Masked” inpaint area comes in.
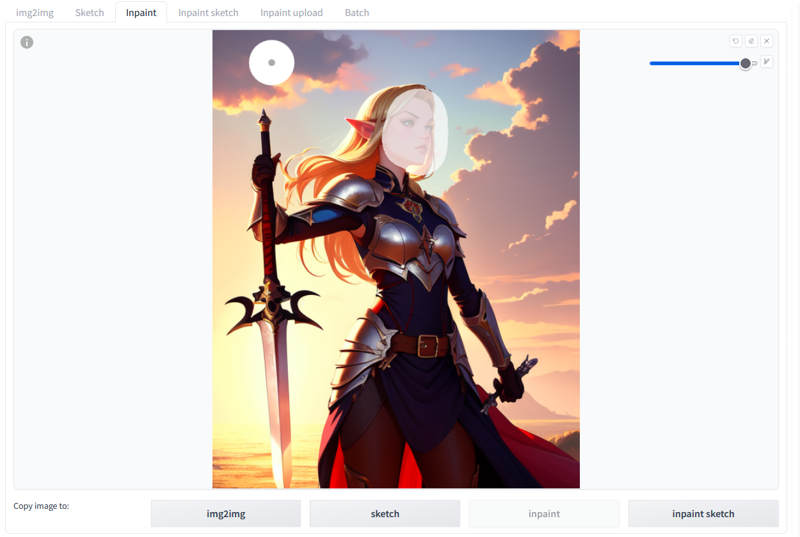
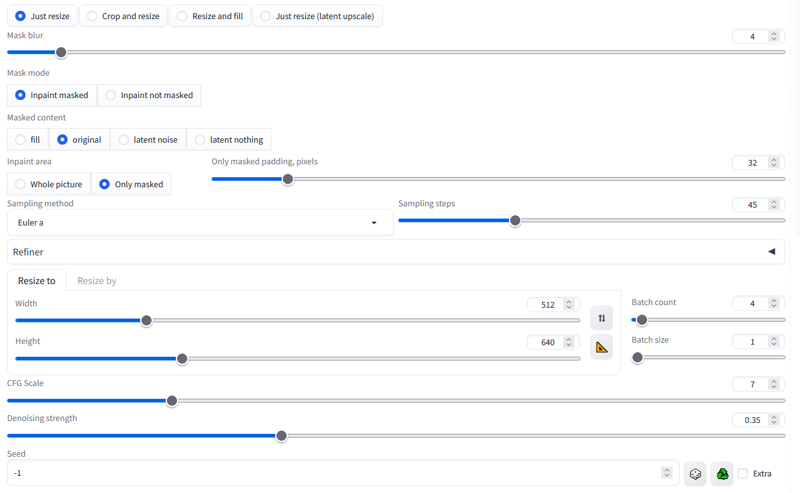
As you can see, we’ve painted over the face. That part is simple, but let’s go through our important settings:
Masked Content: “Original”. There’s already a face where we’re inpainting, it’s just not a good one. However, it works just fine as a base to work from.
Inpaint Area: “Only Masked”. For this operation, this is vital. Having this selected means that when we generate the inpainted image, it will zoom in on the masked area and generate it at a larger resolution.
Only Masked Padding: “32” For an image of this size, the default of 32 is a pretty good amount to pad out a face. It includes enough of the image that we’re not going to generate something that doesn’t fit in, but doesn’t expand our area so much that we aren’t zoomed in enough for good detail.
Batch Count: “4” As with all AI generation, you’re not going to get perfection every time. 4 images is enough to give you some options (or to tell you that your settings are the problem and you didn’t just get a bad roll of the dice)
Denoising Strength: “0.35” the face we have isn’t terrible, but we need to make enough changes to add detail, anywhere from 0.3-0.4 is good for this, or 0.5 if the face is really bad and you need to make major changes.
So, let’s hit generate:
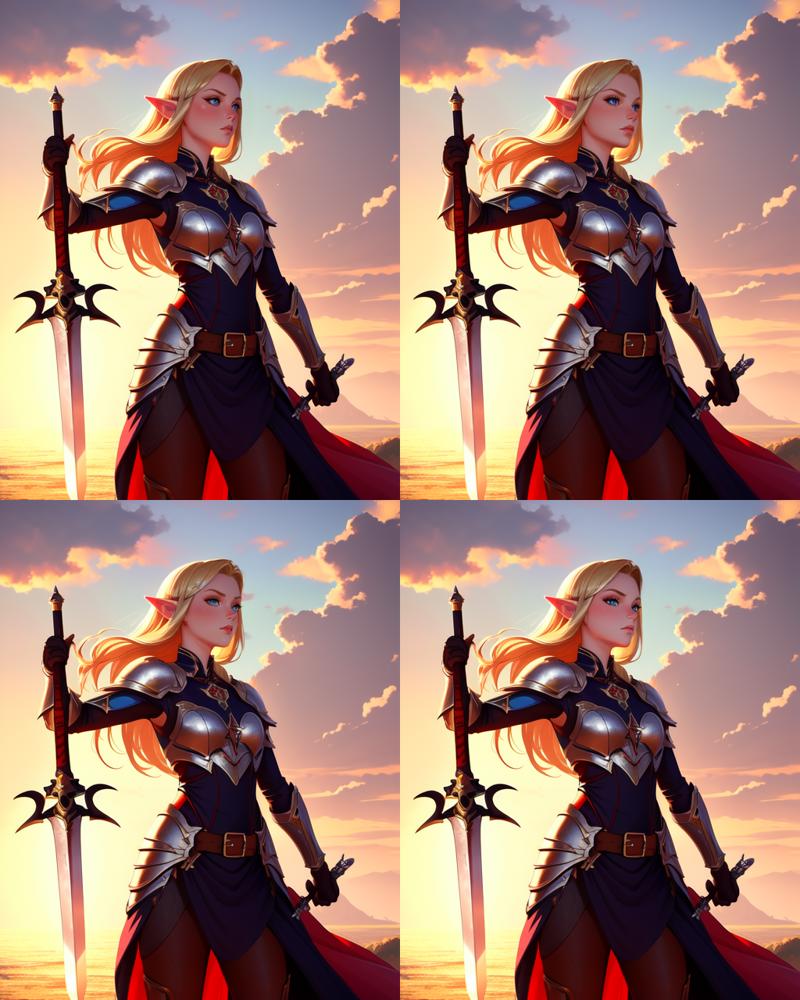
Some good options. This is where you can get artistic and really shape an image to your tastes. I picked the one that I like the most to move on with.
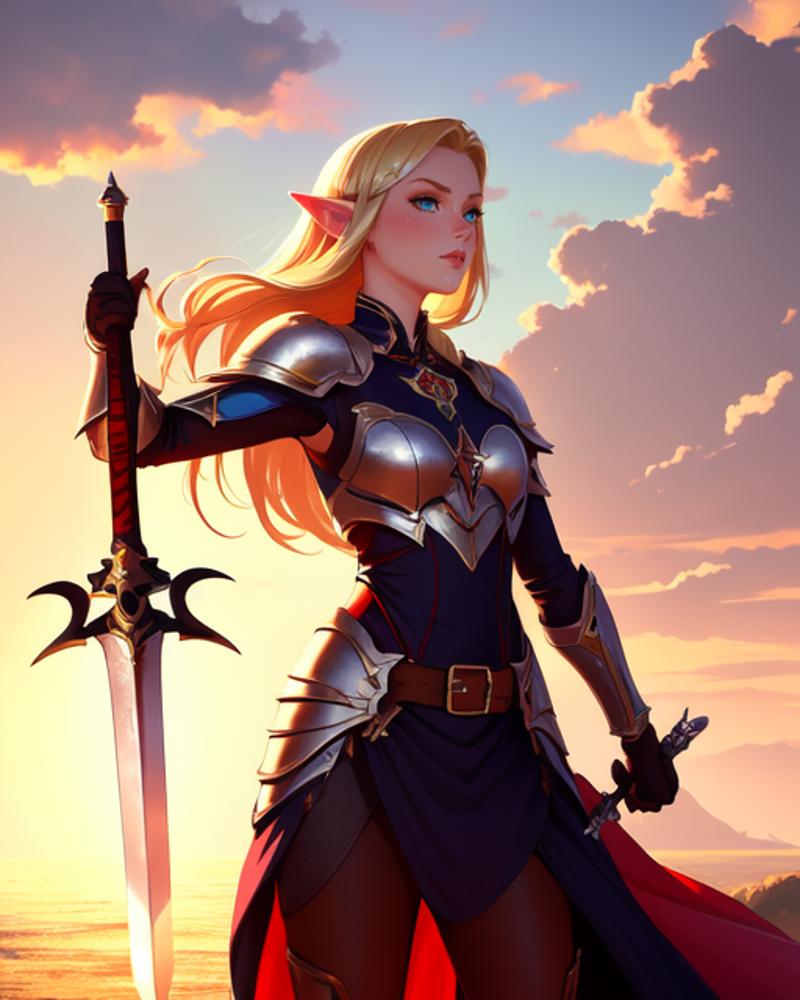
And you’ve now successfully inpainted something! Faces are fairly easy to inpaint and will work with a variety of settings. Stablediffusion knows what an image zoomed in on a face looks like, so when you zoom in on the face it knows exactly what to do. As we’ll see in the later lessons, this isn’t always the case with all body parts.
In the next installment of this tutorial, we tackle the most dreaded of AI art subjects, her hands.
Part 1: Basics and Faces (You Are Here)


