History:
16.04.2024
Updated link to non deprecated version of efficiency nodes.
1. Introduction
I saw article about upscaling in ComfyUi and though, i have not really seen much info about latent upscaling. Most of the workflows focus on upscaling with Ultimate SD Upscale or just plainly upscaling with model. I am not saying this is bad, but personally i prefer upscaling in latent.
When use Ultimate SD upscale? In my opinion it is good, when you run out of VRAM. Same applies for upscaling the final image with model. It does not require much VRAM.
On this article i will be solely focusing on latent upscaling. You might be asking "Why in the * would i use it?"
If you keep your image in latent you do not need to VAE decode/encode it between generates.
If you do it with upscale model, you have to:
Generate image -> VAE decode the latent to image -> upscale the image with model -> VAE encode the image back into latent -> hires
If you do all in latent:
Generate image -> upscale latent -> hires
You will save time doing everything in latent, and the end result is good too.
2. Getting started
This is solely for ComfyUi .I am going to use custom nodes. For custom nodes i recommend getting ComfyUi Manager .
I am not going to go through basic latent upscaling as the article i referred at the beginning goes through them.
Nodepacks i will be using:
Efficiency nodes : This nodepack has good quality of life features. It makes your workflow more compact. 16.04.2024, changed the link to non deprecated version of the efficiency nodes. You might need to change the nodes in the workflows.
Advanced controlnet : on the second and third workflow for more control over controlnet.
NNlatent upscale : Latent upscale on the second and third workflow.
3. Latent upscaling with model:
3.1 Efficiency nodes
First i am going to use the easiest method. This mainly uses efficiency nodes.
Using comfy cant be easy! You liar!
Let me show you how easy using comfy can be if you have the right nodes.
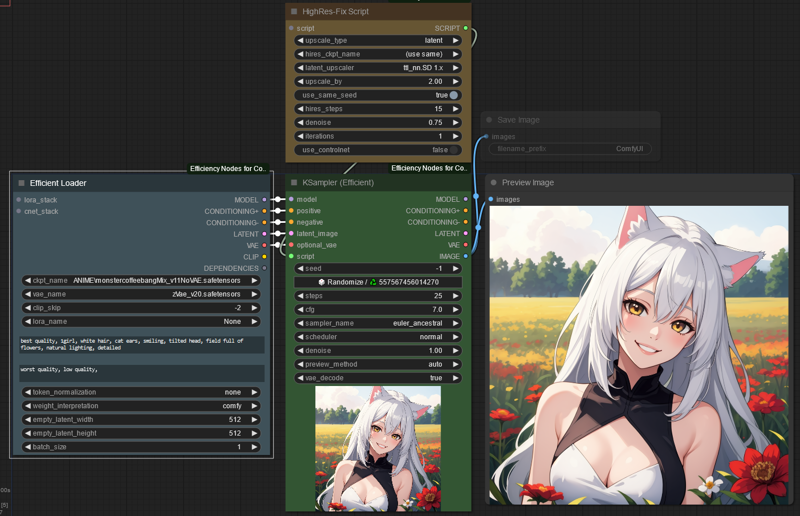
What this does is. Generates image -> 2x upscales in latent with latent upscaler -> hires it.
What comes to upscale settings:
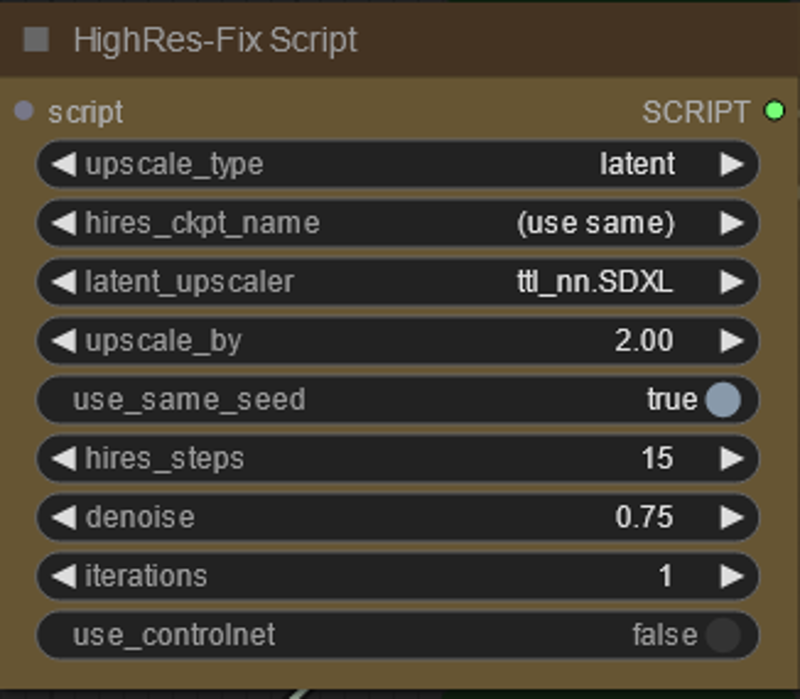
You can use this to do simple upscale with model too, but i am not going to touch that on this.
There are 2 different models you can use with Efficiency samplers HighRes node
ttl_nn model which has model for 1.5 and XL
city96 model which has mdoel for 1.5 and XL
I have not done testing which one is actually better, personally i prefer ttl_nn tho.
With latent upscale model you can do only 1.25, 1.5 or 2x upscale.
Iterations means how many loops you want to do. If you do 2 iterations with 1.25x uspcale, it will run it twice for 1.25 upscale.
Controlnet

With Efficiency nodes hires script you can use controlnet to further play around with the end image. Not gonna touch more about that in this, as there is enough tutorials on how simple controlnet works.
3.2 Latent upscale with advanced controlnet
This is the method i personally use for more control over the final output. This workflow uses advanced controlnet for more control over the weight of the controlnet model. Also if you want to have the image pretty much similar to the original, using tile model can help with that. With tile model you can use higher denoise and retain the composition of the original image.
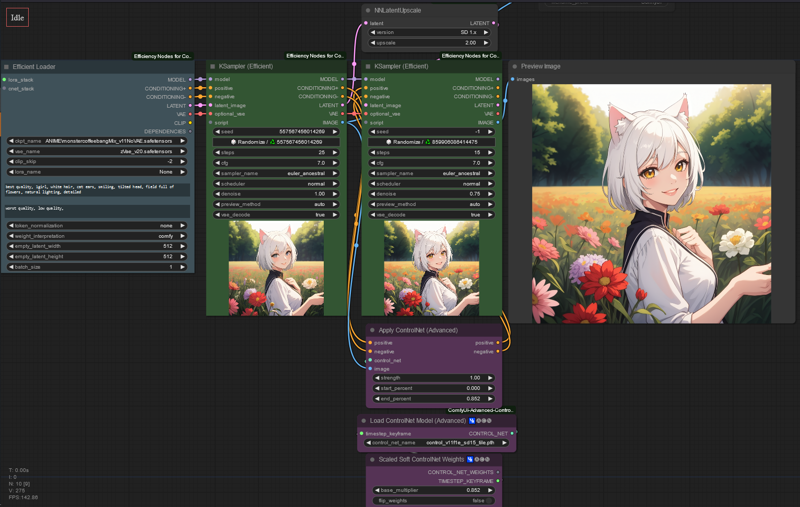
Settings of the advanced controlnet
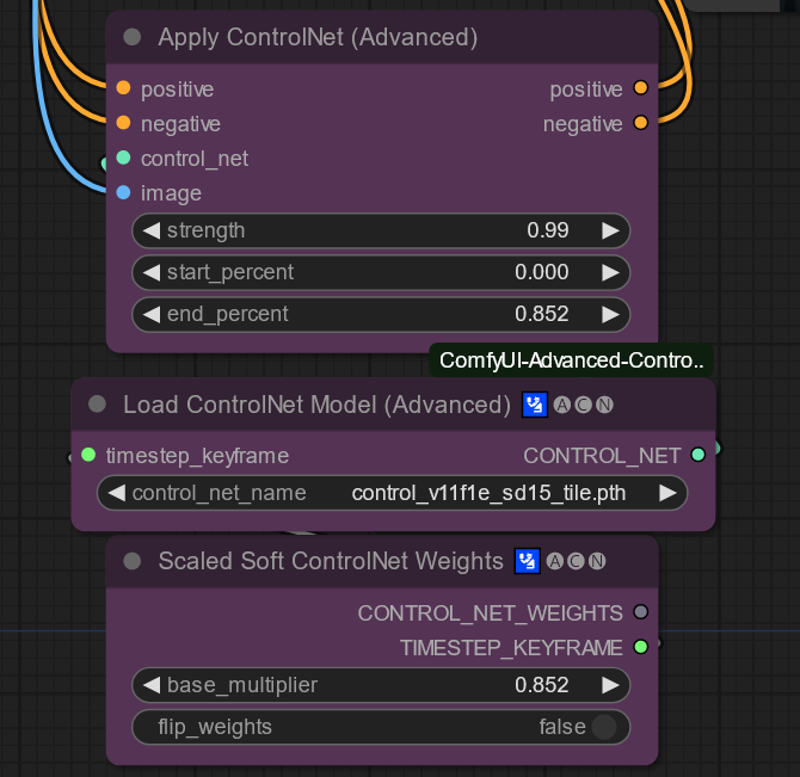
Looks complicated at first, but in reality it is simple.
Strength: strength of the controlnet model.
Start percent: When the controlnet starts to apply.
End percent: When the controlnet stops to apply.
Load controlnet model: Load the model.
As for the scaled soft controlnet weights. What it means basically is "My prompt is more important" mode from A1111. It gradually lowers the strength of the controlnet model along the generate. You can experiment with the base multiplier and see how it affects.
higher multiplier retains the original image more.
3.3 3 sampler wonder.
This is pretty close to what i have in my workflow. It has 3 samplers.
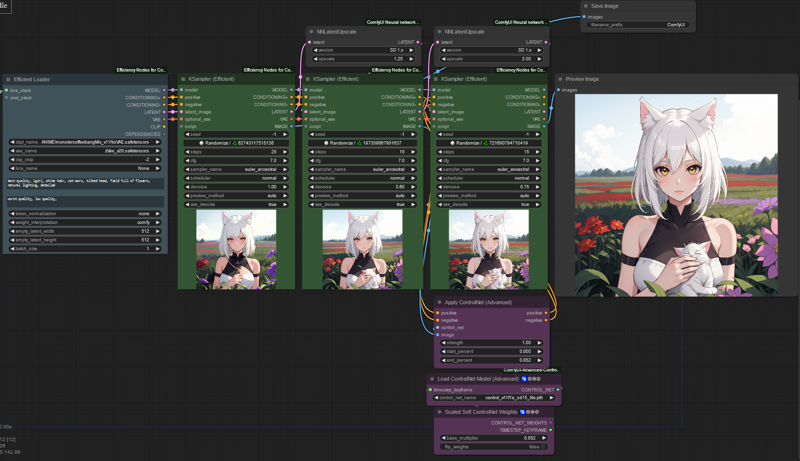
1st sampler samples the initial image
2nd sampler "refines" the image, this usually fixes hands, eyes,clothing etc. It can make image worse, usually i use different seed and find good image. It basically ads "fine" touches to the image. I usually use 1.25-1.5x uspcale on this one
Compare between first sampler -> second sampler

3rd sampler does the final upscale 2x upscale with the help of advanced controlnet model

Yes yes i know she has 1 more finger than she should have. She also has cat ears, that is not considered normal so who knows. Maybe it is normal to have 6 fingers where she lives. Damn i would like to have 1 more finger. Maybe i could write faster.
4. Advanced controlnet example
This was done with the 3rd workflow
Here is original image i am going to upscale with the 3rd sampler.

Here is example with soft controlnet weights as 1. It is really similar to the original image.

Here is image with soft controlnet weights as 0. It retains the original image somewhat but changes the composition of the image.

Conclusion
All of the methods i showcased uses latent upscale model which is better than not using latent upscale model.
If you want some compare between using and not using model, you can see some in the github page of NNLatent upscaler
https://github.com/Ttl/ComfyUi_NNLatentUpscale
All of the workflows can generate high quality images and the methods are ok. How good, comes down to settings. This was just fast showcase and the settings in the workflows are not perfect
All of the workflows can be downloaded from the attachments from right ->
If you have any questions about comfy, i usually hang around in @novowels discord, there is comfyui channel where you can drop them (~ ̄▽ ̄)~


