Welcome to the exciting world of txt2vid & vid2vid content creation! If this guide helps you craft extraordinary videos or learn something new, your appreciation is warmly welcomed. Let’s embark on this creative journey together!
In this tutorial we will create a 2 second animation, you will learn the basics of Txt2Vid animation along with the basics of Vid2Vid. It is important that you learn these fundamentals before we move on to more complicated / longer animations.
READ ME BEFORE STARTING:
This tutorial is specifically designed for intermediate to advanced enthusiasts using Automatic 1111 with NVIDIA RTX3080 or higher graphics cards. If you do not have A1111 installed, search "A1111 Install" on Google or YouTube for comprehensive installation guides and tutorials, there are several available. Also, If you don't have a RTX3080 graphics card, be prepared for longer rendering times or potential compatibility issues. However, I'll try to offer strategies to enhance generation speeds, though it may affect the quality of your overall animation. Weigh these options before moving forward.
Preparations for RTX3080/A1111 Users:
Our adventure begins with the DreamShaper 8 checkpoint. Access it here: DreamShaper 8 Checkpoint. You can use any SD Checkpoint you like but I have found that DreamShaper 8 produces some really nice results.
Once downloaded, put the checkpoint in the webui/models/stable diffusion folder.
This process WILL NOT work with SDXL Checkpoints.
Before diving in, equip yourself with the following Automatic 1111 extensions:
AnimateDiff Extension: For installation, search "A1111 AnimateDiff Install" on Google or YouTube for comprehensive installation guides, there are several available. Advanced users can go to the AnimateDiff Github page for download and installation. You only need this extension for txt2vid, if you are just interested in vid2vid please skip to step 3 (ControlNet Extension)
IMPORTANT: After successful installation, be sure to download the following Motion Modules:
mm_sd_v14.ckptmm_sd_v15.ckptmm_sd_v15_v2.ckptFrom the AnimateDiff Motion Modules page and place them in yourwebui\extensions\sd-webui-animatediff\modelfolder.Prompt Travel Extension: For installation, search "A1111 Prompt Travel Install" on Google or YouTube for comprehensive installation guides, there are several available. Advanced users can go to the Prompt Travel Github page for download and installation. You only need this extension for txt2vid, if you are just interested in vid2vid please skip to step 3 (ControlNet Extension)
Note: There are a few guides that walk you trough installing both AnimateDiff and Prompt Travel in the same tutorial. Any tutorial that covers both extensions is recommended.
ControlNet Extension with Tile/Blur, Temporal Diff & Open Pose Models:
ControlNet Extension: For installation search "A1111 ControlNet Install" on Google or YouTube for comprehensive installation guides, there are several available. Advanced users can find go to the ControlNet Github for download and installation.
Tile/Blur Model: Download:
control_v11f1e_sd15_tile.pthandcontrol_v11f1e_sd15_tile.yamlfrom ControlNet Models and place them both in your
webui/models/controlnet/modelsfolder.OpenPose Model: Download:
control_v11p_sd15_openpose.pthandcontrol_v11p_sd15_openpose.yamlfrom ControlNet Models, and place them both in your
webui/models/controlnet/modelsfolder.DW OpenPose Preprocessor: For installation, search "A1111 DW Openpose Install" on Google or YouTube for comprehensive installation guides, there are several available. Advanced users can go to the DWPose Github page for download and installation.
I have found that the DW OpenPose preprocessor works very well on faces. Please use this preprocessor for this tutorial.
TemporalDiff Model: Download:
diff_control_sd15_temporalnet_fp16.safetensorsandcldm_v15.yamlfrom TemporalNet Models and place them both in your
webui/models/controlnet/modelsfolder.IMPORTANT: Be sure to rename
cldm_v15.yamltodiff_control_sd15_temporalnet_fp16.yamlNote: you may get the following error when loading your TemporalDiff model into ControlNet:
ControlNet - ERROR - Unable to infer control type from module none and model diff_control_sd15_temporalnet_fp16 [adc6bd97].This is normal and the process will still work if this error appears, so please, do not be alarmed if you see it.
ADetailer Extension: For installation, search "A1111 After detailer Install" on Google or YouTube for comprehensive installation guides, there are several available. Advanced users can go to the ADetailer Github page for download and installation.
I strongly recommend exploring each extension (AnimateDiff, ControlNet, ADetailer, Prompt Travel) through tutorials, articles and videos. It’s a valuable investment of your time and it will aide you in mastering Stable Diffusion.
Now, with tools in hand and knowledge at your fingertips, are you ready to shine in the world of AI Animation? Let the magic begin!
I am going to break this up into two sections. In the first section we will go over creating a txt2vid animation, next, we will go over creating a vid2vid animation. Please skip to the vid2vid section if you have a video already and you are only interested in learning about the vid2vid process.
SECTION 1 - Txt2Vid Tutorial:
Start in the txt2img tab of your A1111 Stable Diffusion Web UI.
Checkpoint Selection:
Select the
DreamShaper_8_pruned.safetensorscheckpoint from the Stable Diffusion Checkpoint drop down in the upper left of your user interface. If you cannot see the DreamShaper 8 checkpoint in your dropdown list, press the light blue reload button to the right of the dropdown and look for it again it should be there. (If it is still not there, you may have not downloaded it or you may have put it in the wrong folder. Please go back to the above steps and make sure you follow them as closely as possible.
Generation Tab Settings:
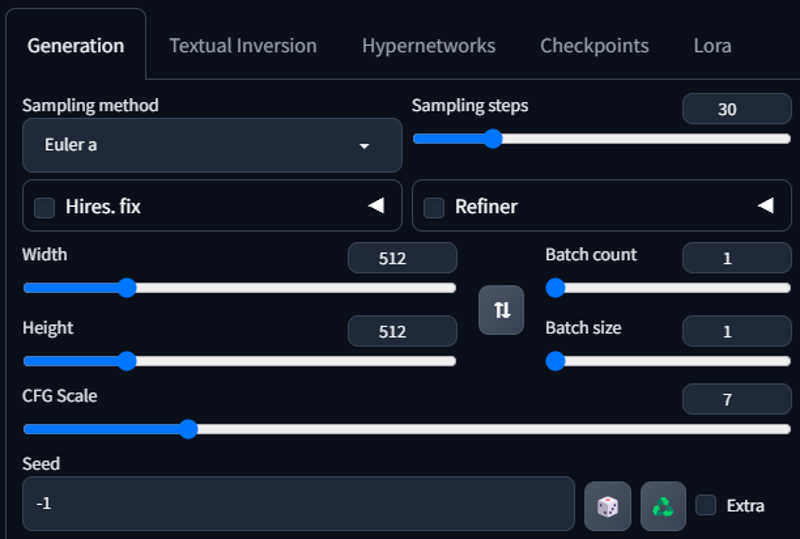
We are going to keep this very simple because this is just going to be our rough draft. First, from the sampling method dropdown menu, choose Euler A. Next, increase the Sampling Steps to 30. The rest of the settings will stay the same for now. Once you get the hang of this you can go back and play with these settings to find the perfect balance for your project but for now lets go with the defaults.
Your Generation tab settings should look like this:
Prompt for your animation:
The prompt for your initial animation should be no more than 50 tokens. You can use more than 50 tokens but for the sake of this tutorial, lets keep it simple at first. (Your token number is located in the upper right hand corner of your positive prompt text box. The default value is 0/75. Once you have mastered this process you can play around with the prompt a bit and see what works best for you. Let's start off with something simple. Enter this into your positive prompt:
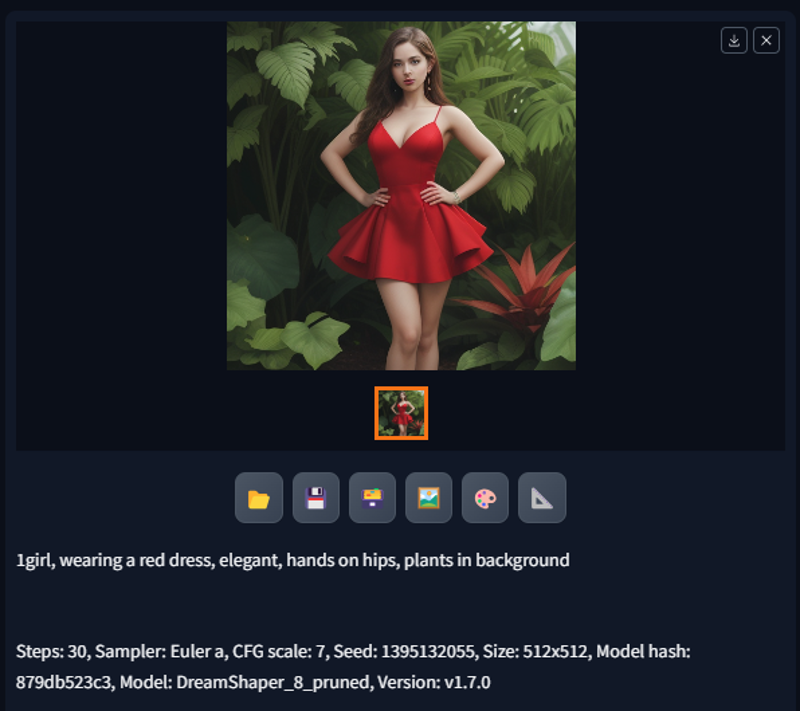
1girl, wearing a red dress, elegant, hands on hips, plants in backgroundClick the orange Generate button. (When creating your own prompts keep generating and making adjustments until you get an image that is very close to what you are trying to create in your animation)
If done correctly your generated image should look something like this:
AnimateDIFF Settings:
Under your Generation tab settings you will find all of your freshly installed extensions, let's scroll down to AnimateDiff and open the tab by clicking on the white arrow.

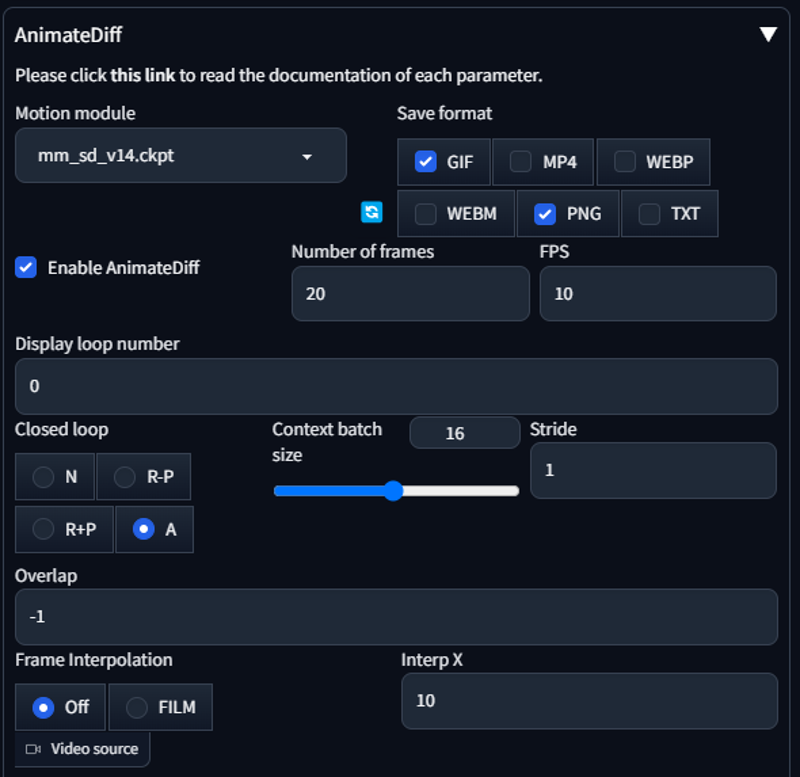
Once you open the tab, Select the
mm_sd_v14.ckptmotion module from the dropdown menu.Ensure GIF & PNG are selected as your Save Formats.
Click the Enable AnimateDiff check box.
Your Number of Frames should be 20 to start and your FPS should be 10.
This will create a 2 second video with 10 FPS.
Number of frames / FPS = video length in seconds(This can give you errors if your math is off, so I suggest you keep it simple,
3 second video = 30 Frames at 10 FPSor3 second video = 24 frames and 8 FPSand so on).The higher the frames the faster the action will look so try to use lower FPS for slower paced animations and higher FPS for faster paced animations. I usually just stick to 10 FPS because the math is easier to figure out and it works pretty well for both slow and fast animations.
Lastly, let's select
A(Automatic) bubble in the Closed Loop section. This will let AnimateDiff decide whether or not to loop your animation. I have found that this setting leads to to good results but you can play with the different options and find out what works best for you. The Closed Loop settings are as follows:N: Close loop is not used.
R-P: Reduce the number of closed-loop contexts. The prompt travel will NOT be interpolated to be a closed loop.
R+P: Reduce the number of closed-loop contexts. The prompt travel WILL BE interpolated to be a closed loop.
A: (Automatic) AnimateDiff will decide whether or not to close-loop based on the prompt.
Do not change any other AnimateDiff settings.
Your settings should look like this:
Prompt Travel settings:
Now that you have everything setup, lets go back up to the positive prompt and add your Prompt Travel instructions underneath your existing prompt:
0: moving hips10: smilingYour prompt should look like this:

0 and 10 indicate frame numbers. Prompt Travel will tell AnimateDiff to adjust the animation based on your prompt at the frames you specify.
(For longer animations you can use more Prompt Travel instructions, for example, lets say you have 30 frame animation, you could do something like this:
0: Moving hips 10: Smiling 20: Frowning, you can break it down however you like but I have found that AnimateDiff has trouble with complex instructions from Prompt Travel and will make your subject morph every 16 frames. This is due to the context frames, we will go over that in the advanced tutorial. For now, try to keep it as simple as possible if you are looking for consistency)Generate your first animation:
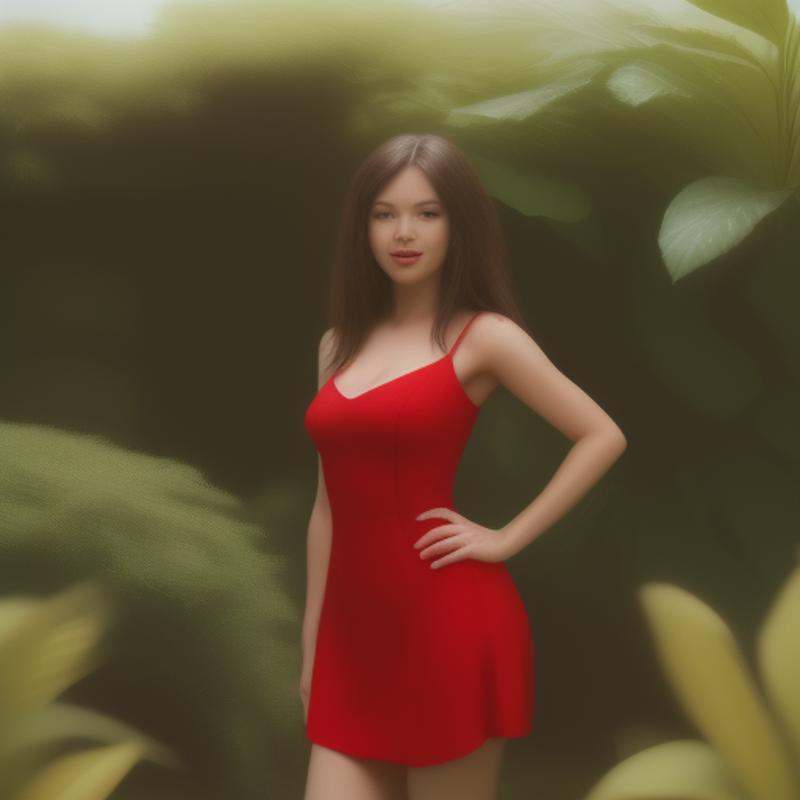
Click the orange Generate button in the upper left of your UI. The animation will take a few minutes to generate but when it completes it should look something like this:
Frame 0:
Frame 10:
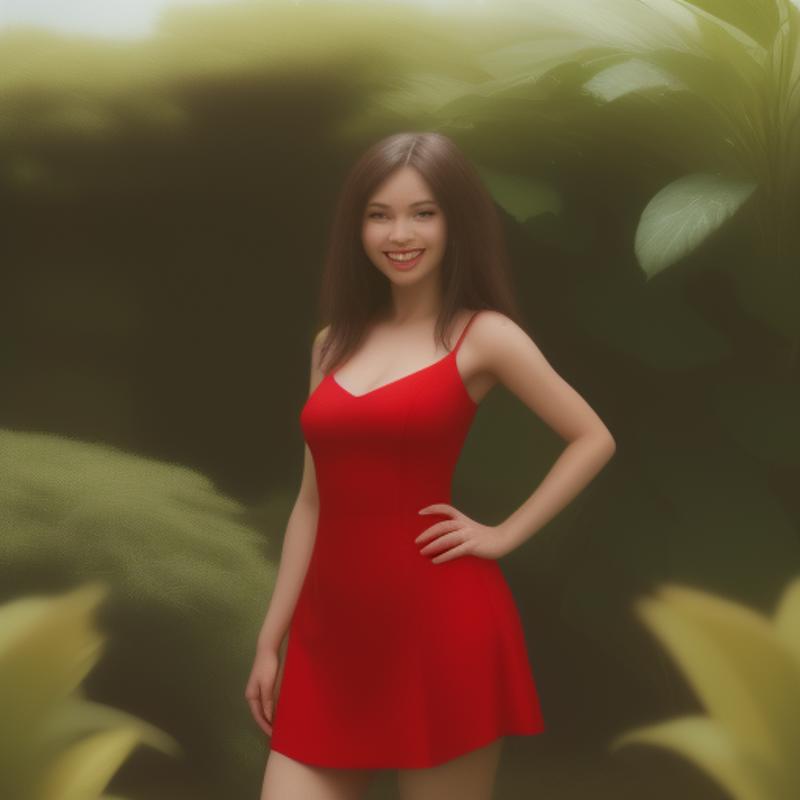
Congratulations you have created your first Animation!! Great work! Don't worry about the quality of your animation because next we are going to take it and run it through the vid2vid process to make it look amazing!
We are just scratching the surface of what AnimateDiff and Prompt Travel can do. In my next article I will go much more in depth on how to create longer, more complicated animations. For now, get used to using these extensions and feel free to experiment.
SECTION 2 - Vid2Vid Tutorial:
If you just completed the txt2vid tutorial: navigate to your
webui\outputs\txt2img-imagesand click into the folder that has todays date. In there you should find the output frames for the animation we just created. Highlight and copy the animation output frames, create a new folder on your desktop calledinputand place the copied output frames into input folder you just created.Note: You will see a folder called AnimateDiff in your txt2img output folder, do not copy anything from there. That is where the GIF file from your animation is stored. Please navigate to the folder that has todays date, in there you will find the output frames from your animation.
Create another folder on your desktop called
outputas well. You can leave the output folder empty for now.Continue to the ControlNet Settings step.
If you already have a video and you are here for the vid2vid tutorial: Please be sure that the video clip you have is no longer that 5 or 10 seconds. Longer video clips = Longer generation times, so keep that in mind when choosing/creating your clip.
Navigate to any free mp4 to jpg conversion site and convert your MP4 clip to jpeg images. I use ONLINE-CONVERT because it is free, easy and fast with minimal ads. Ensure that the Quality slider is maxed out to Best Quality and that your image output size is as follows:
[16:9 video settings] Width: 512 / Height: 288and for[1:1 video settings] Width: 512 / Height: 512and so on. These settings ensure that your images do not come out too large. Larger images = Longer generation times so ensure you use these settings. Once your video is processed, ONLINE-CONVERT will give you an option to download all of your images as a .zip file. Download the .zip file and and create a folder called
inputon your desktop and extract the images from the .zip file into your newly created input folder.Create another folder on your desktop called
outputas well. You can leave the output folder empty for now.Continue to the ControlNet Settings step.

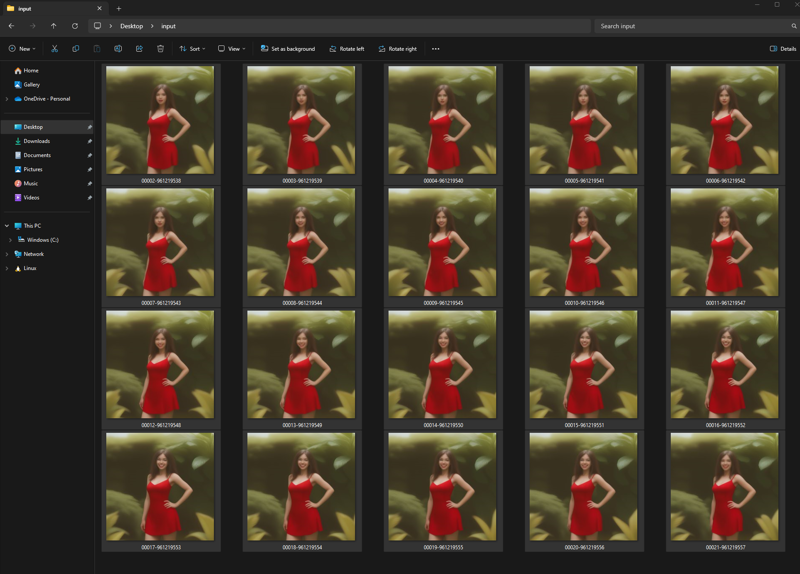
ControlNet Settings:
Make sure you are in the img2img tab of your Stable Diffusion Web UI. Once in the img2img tab you are going to head down the extension list until you find ControlNet. Open the tab by clicking on the white arrow:

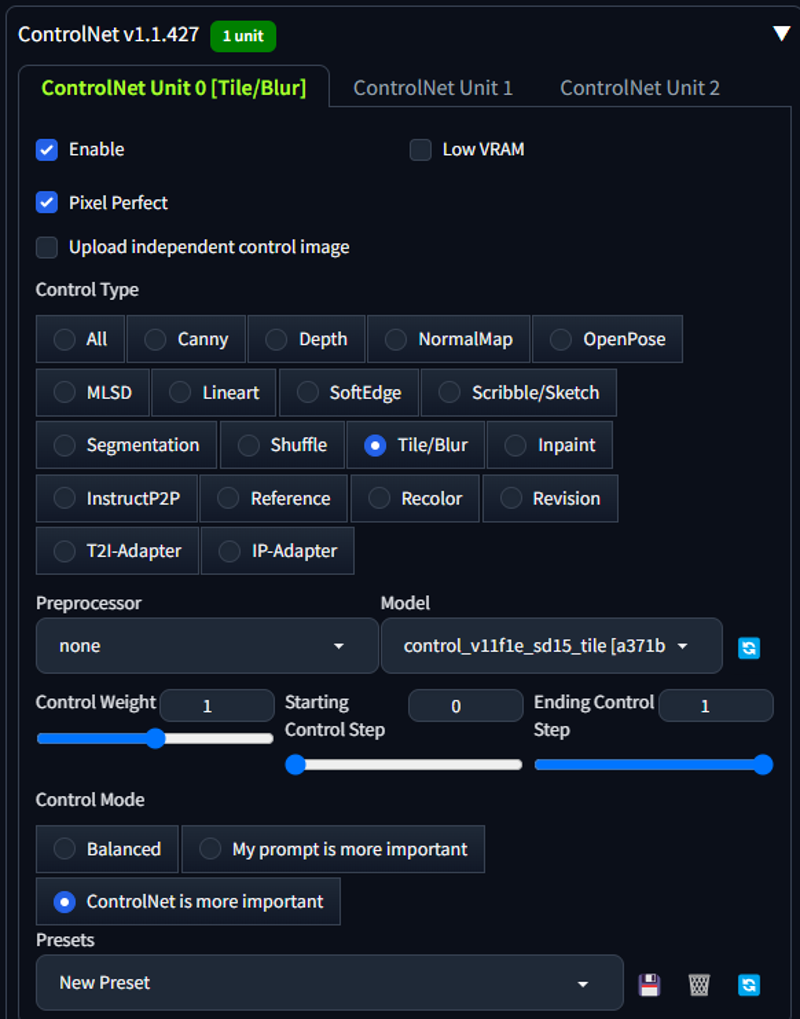
ControlNet Unit 0:
Check
EnableandPixel Perfect, Under Control Type selectTile/Blur, In the Preprocessor dropdown selectnone, Your model should already be loaded. Verify you are using this model:control_v11f1e_sd15_tile [a371b31b]Control Weight: 1
Starting Control Step: 0
Ending Control Step: 1
Control Mode: ControlNet is more important
Your ControlNet Unit 0 setting should look like this:
Presets:
To save time in the future, make sure the Presets box says
New Preset, click the disk icon to the right of the Presets dropdown. Name this presetT BLUR V2Vand click the disk icon again. The next time you set up a video you can just open ControlNet and select the preset from the presets dropdown and it will auto populate these settings for you.
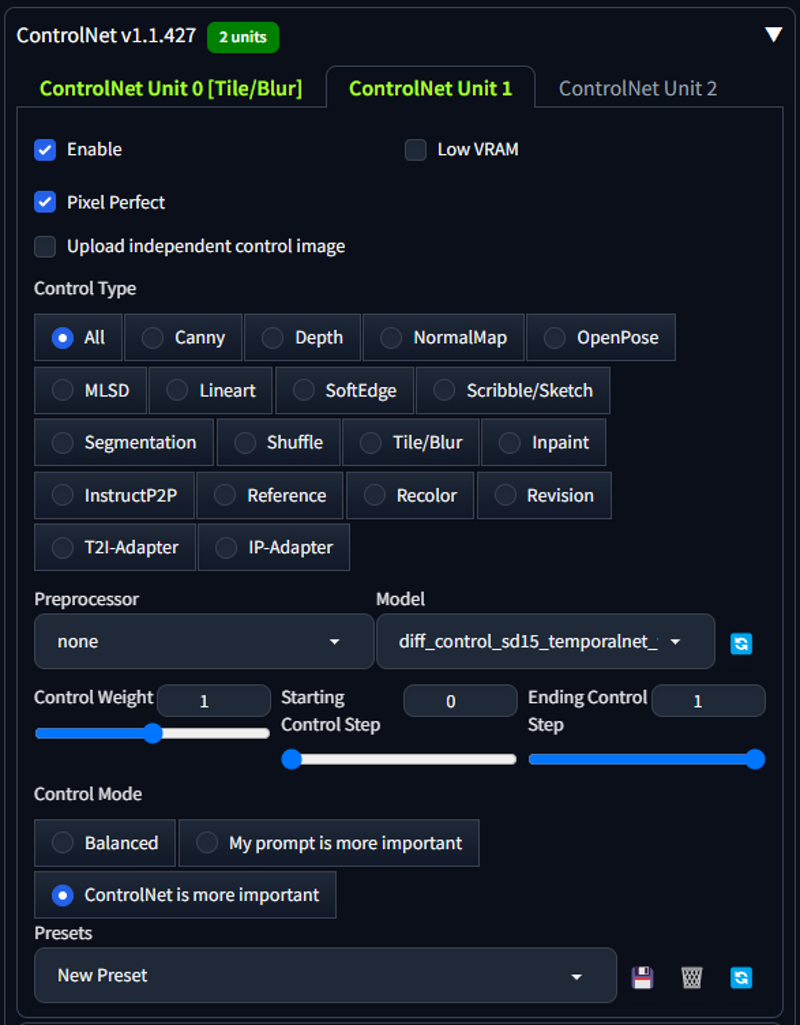
ControlNet Unit 1:
Check
EnableandPixel Perfect, Under Control Type selectAll, In the Preprocessor dropdown selectnone, From the Model dropdown menu select this model:diff_control_sd15_temporalnet_fp16 [adc6bd97]Control Weight: 1
Starting Control Step: 0
Ending Control Step: 1
Control Mode: ControlNet is more important
Your ControlNet Unit 1 settings should look like this:
Presets: Save this preset as
T DIFF V2Vusing the same process as above.
ADetailer:
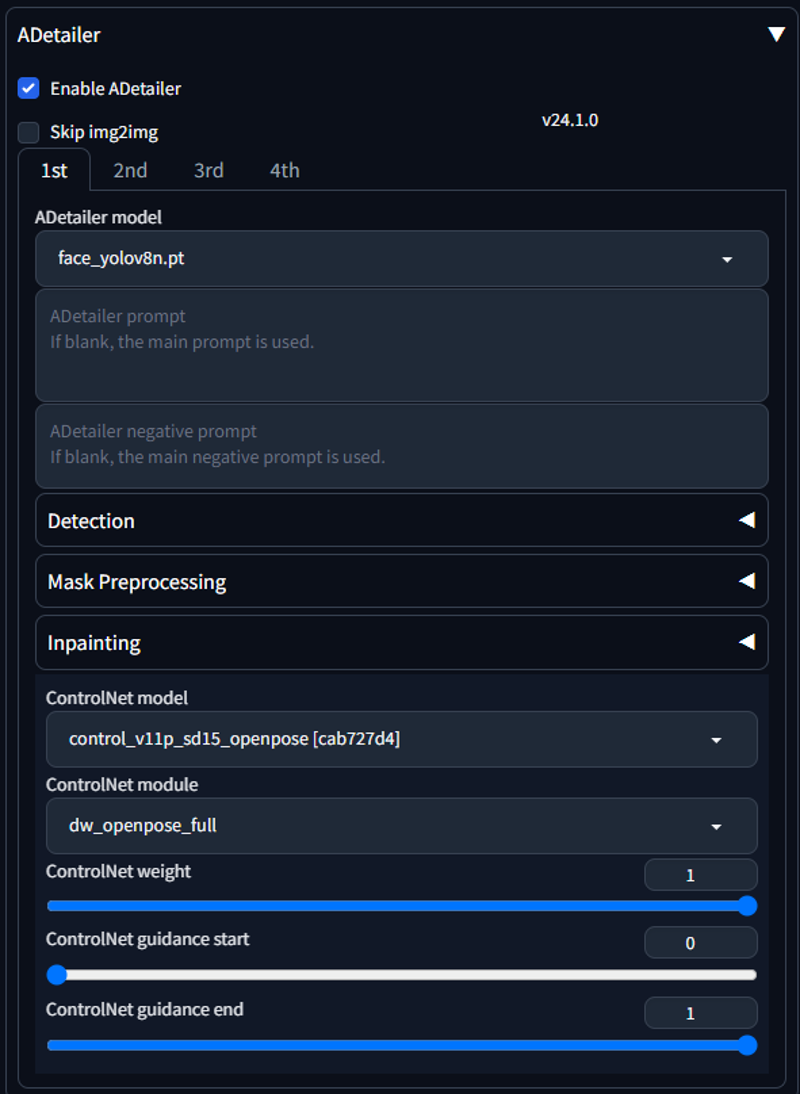
Ensure you are still in the img2img tab of your Stable Diffusion Web UI. Find the ADetailer extension tab and open it by clicking on the white arrow to the right of the tab.

Click on
Enable ADetailerYour ADetailer model should prepopulate, if not, choose
face_yolov8n.ptWhile still inside the ADetailer tab select:
control_v11p_sd15_openpose [cab727d4]from ADetailer's ControlNet Model dropdown menu.
Select
dw_openpose_fullfrom ADetailer's ControlNet Module dropdown menu. Enabling OpenPose in ADetailer will map the face of your target and inpaint expressions.Do not adjust any of the other settings.
Your ADetailer settings should look like this:
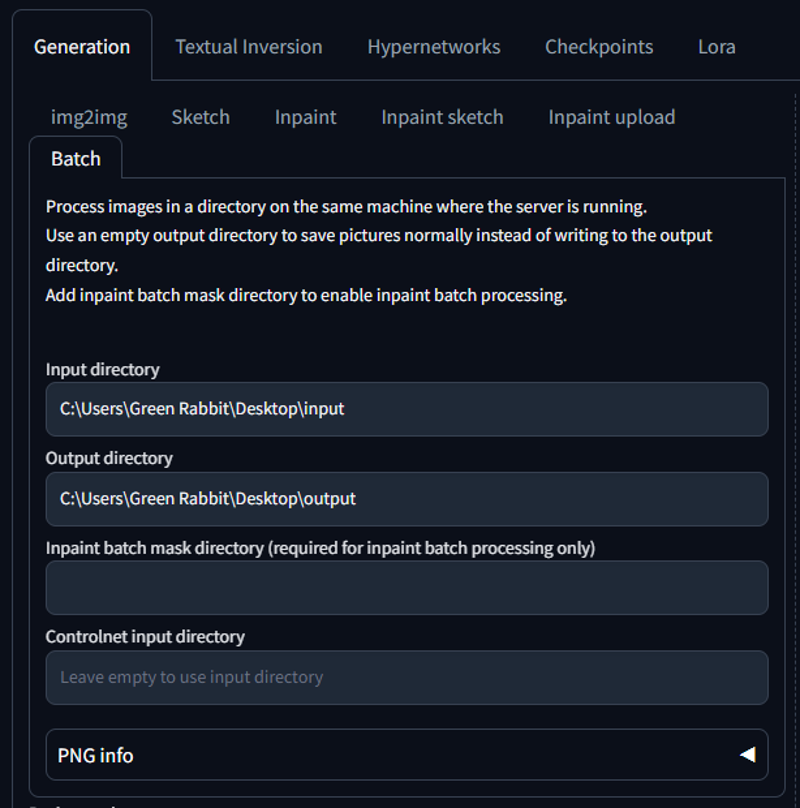
Generation Tab / Batch Sub Tab:
Under the Generation Tab in img2img choose the batch sub tab and enter the location of your desktop/input folder we created at the beginning of the vd2vid tutorial into the Input directory, then enter the location of your desktop/output folder into the Output Directory. Be sure that your input directory is not empty, this will cause an error.
Your Batch Sub Tab should look like this:
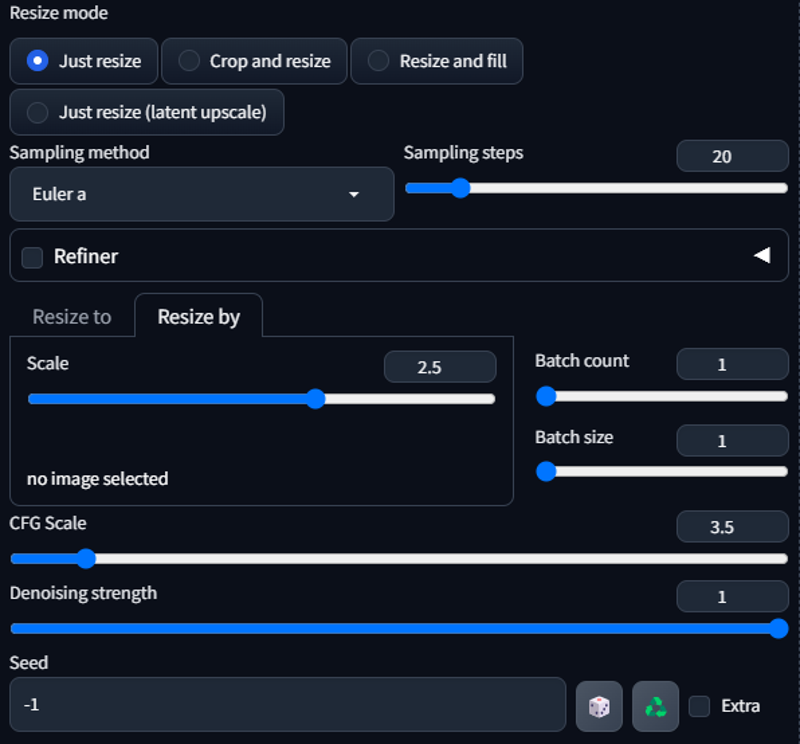
Now move down to Sampling Method and choose Euler A just like before, this time leave the sampling steps at 20. Do not use the "Resize to" tab instead use the "Resize by" tab and slide the scale up to 2.5
(If you are using a slower GPU try starting off at 1 for the Resize by Scale. This will dramatically effect your generation speeds but your image/final animation quality will suffer).
Set your CFG Scale to 3.5
Set your Denoising Strength to 1
Do not adjust any of the other settings.
After everything is said and done your settings should look like this:
Final Prompt:
Ok we are almost ready to generate our vid2vid animation but first we need to craft a prompt that give you the desired results you are looking for. I usually start off with something like:
((masterpiece)), ((best quality)), 8k, high detailed, ultra-detailed,and then I examine the video frames and look for things I want to highlight.
In the case of our txt2vid animation you can just add our old prompt from the txt2img tab onto the above prompt, like this:
((masterpiece)), ((best quality)), 8k, high detailed, ultra-detailed, 1girl, wearing a red dress, elegant, hands on hips, plants in background,For my negative prompt, I usually do something like this:
(worst quality, low quality:2), lowres, blur, bad anatomy, normal quality, monochrome, grayscale, text, logo, signature, username, error, cropped, watermark, blurry, ((ugly hands, ugly fingers, deformed fingers, missing fingers, extra digit, fewer digits,)) Nudity, NSFWYour prompt should look something like this:

Animation Generation:
Ok Now you are ready to generate your vid2vid animation! Great Job for making it this far, it has undoubtably been a journey. Let's get generating! Click the big orange Generate button in the upper right of your Stable Diffusion Web UI. Generation should not take longer than 10 or 15 mins.
FOR ADVANCED USERS ONLY:
If your generations are taking longer than 20 mins, try adding this line of code to your
set COMMANDLINE_ARGS=in your webui-user.bat file in your webui folder:set COMMANDLINE_ARGS=--autolaunch --update-check --xformers --skip-torch-cuda-testsave the file and reload your webui. This will install xformers and it will speed up your generation across the board. DO NOT TRY THIS IF YOU ARE NOT AN ADVANCED USER!
Here are my txt2vid / vid2vid results:
Frame 0:
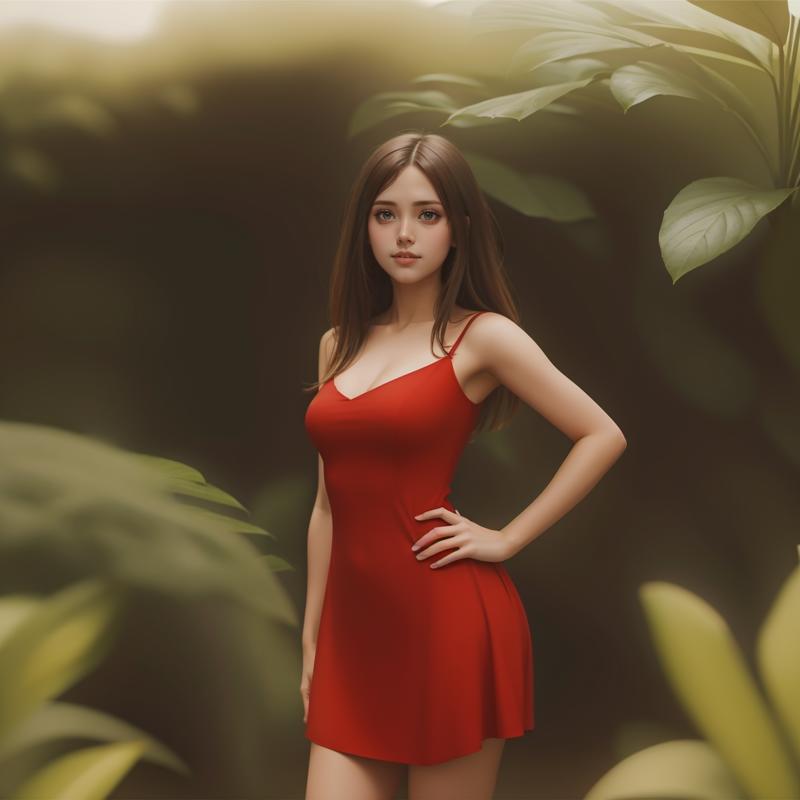
Frame 10:
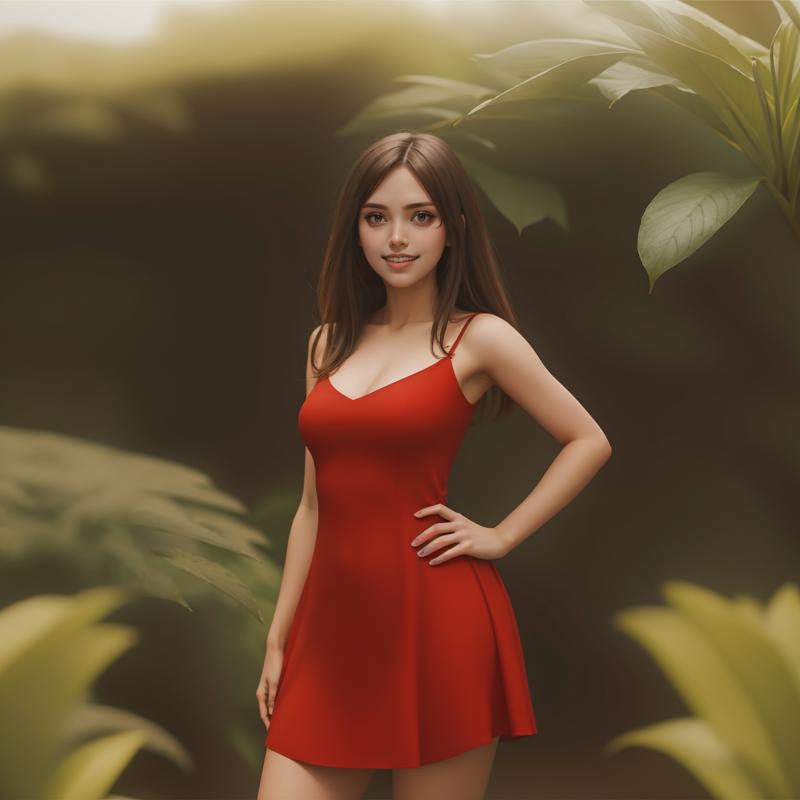
As you can see the final output is very nice compared to your rough draft input.
Interpolation:
Now that your have your high quality output frames we need a way to bring them all back together again (Interpolation). I personally use Flowframes, it can be found at the Flowframes Download Site.
Once you have downloaded and installed Flowframes, open it and click on the Interpolation tab.
For the Input Video (Frames or Folder) choose the
desktop/outputfolder we created. Flowframes will automatically output your final video to the parent folder of the folder you choose, so in this case the video will appear on your desktop when you are done. You can change this manually if you'd like but for the sake of this tutorial we will just keep it as desktop.For your Output FPS & Speed you can choose what ever you like, I use
15 X 4 = 60 FPS with 2X Slowmo, This works well for me.Do not change any of the other settings.
Your settings should look like this:
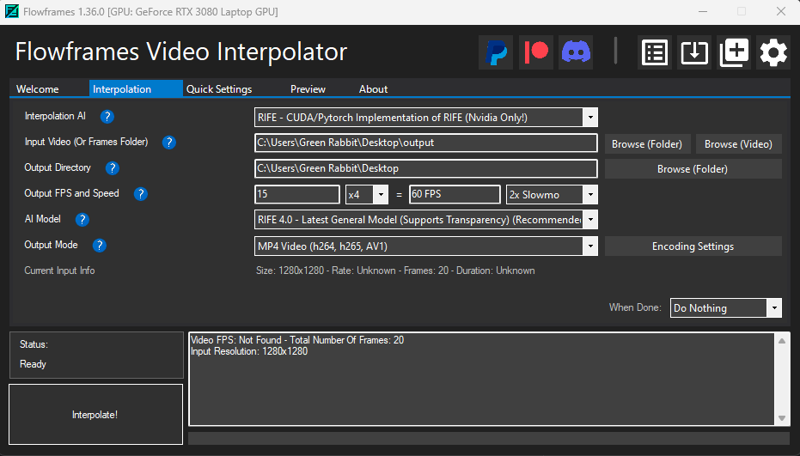
Now we are ready to Interpolate! Click the Interpolate! button in the bottom left of the Flowframes screen. This process should only take a couple of minutes.
You did it! Your animation video should be on your desktop, go check it out!
Lora's & Textual inversions:
I have found that Lora's & Textual Inversions work with both the txt2vid and vid2vid process. for vid2vid, I usually keep the weight very low, like below 0.3, anything higher and starts to effect the quality of the output frames. I suggest you play around with it and find what woks best for you.
Final thoughts & Credits:
I hope this tutorial was helpful! It is the result of many hours/days/weeks of cramming information and learning.
I cannot wait to see what you guys come up with now that you are armed with this knowledge. Please feel free to tag me in the comments of your animations so I can check them out!
The above guide is meant to give you a basic understanding of how these processes and extensions can be used together to create amazing content. I am still fascinated that we can create videos from text using AI, I honestly believe that it is the future of animation and I am glad we are all on the forefront of this technological revolution. If you are here reading this, right now, you are a pioneer! Let's continue to learn and build together! I am going to continue to push boundaries and innovate wherever and whenever possible. Feel free to join me! From here, you can use what you have learned to make longer and more complex animations.
I would like to give a big shout out to my friend @NerveoS for taking the time to help me get started on this journey. I am a student of his and all credit for my Vid2Vid knowledge goes to him. Please check out his page and drop him a like or a follow, his content is next level! If you are looking for the vid2vid tutorial that got me started, check out his article here: https://civitai.com/articles/3059/vid2vid-tutorial
I would also like to give a shout out to @Samael1976, he is arguably the best creator on civitai and on top of that he is my friend and I would like to thank him for everything! Be sure to like and follow him as well and show him some love on Ko-fi!
Last but not least, I would like to thank you, the civitai community, for showing me such a warm welcome! I am glad to be here and your support gives me motivation to keep learning and building! I will be creating more tutorials soon. I have even been kicking around the idea of starting a YouTube channel to share what I have learned with you all. I will keep you guys posted. Keep an eye out for my Advanced Animation Tutorial.
If you guys find any inconsistencies, typos or problems in this tutorial, please let me know and I will fix and update asap.
Thank you again & Cheers,
GREEN_RABBIT
