
Introduction
In this article, I will show you how you can run Stable Diffusion using the same backend as Automatic 1111 — the most popular Stable Diffusion tool — using Auto 1111 SDK. This tutorial will be very useful to you if you are trying to set up some sort of Stable Diffusion API for your backend, and in a future tutorial, I will specifically show you how you can deploy this model onto a serverless cloud GPU provider: Modal.
I have chosen to use Auto 1111 SDK over Huggingface Diffusers for this project because it has some more features that are necessary (Upscaling Pipelines, Outpainting, Inpainting with safetensors files, Civit Download, etc). You can view the full list of differences between Auto 1111 SDK and Diffusers here.
Running the Models
The first step of being able to deploy Stable Diffusion is figuring out how to run the models. We will be using Auto 1111 SDK to run these models because it allows developers to properly replicate generations made on Automatic 1111 — the most popular tool in the open-source Stable Diffusion community. Furthermore, Auto1111SDK also has things like upscaling and directly downloading models from Civit AI, the largest model repository for finetuned Stable Diffusion models. Here’s how we’re gonna do this:
Install the library
pip3 install auto1111sdkDownload a Civit model of your choice. You must input the Url to the civit model and the local file path you want to save the weights to. For this example, I will choose one of the most popular Civit models: Dreamshaper.
from auto1111sdk import civit_download
civit_download("https://civitai.com/models/4384?modelVersionId=109123", "dreamshaper.safetensors")
This process will take a few seconds. If you want to download a specific version of a model, you must specify this in the download url. Otherwise, it will download the latest version of the model.
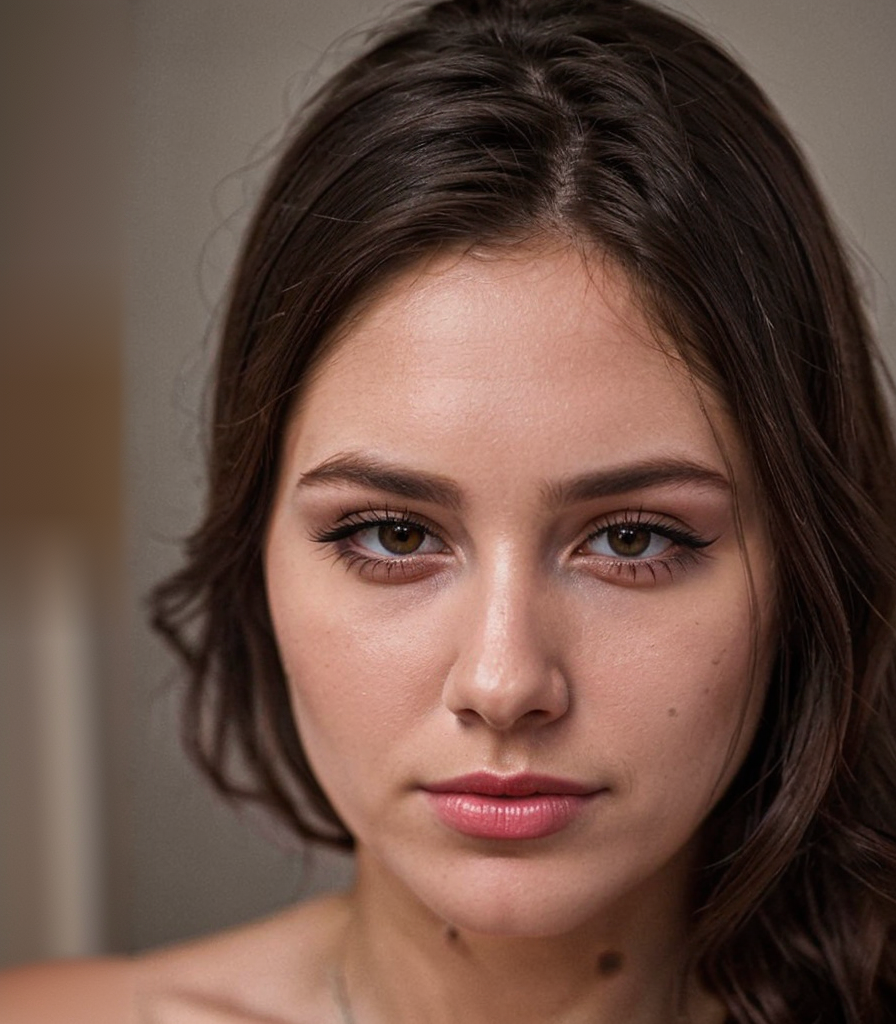
Finally, we can generate images with auto1111sdk. The text-to-image generation has several parameters — identical to the ones Automatic 1111 has — that you can view more in detail here. Let us start off by trying to generate an image of a woman using dreamshaper.
from auto1111sdk import StableDiffusionPipeline
pipe = StableDiffusionPipeline("dreamshaper.safetensors")

prompt = "closeup portrait photo of beautiful woman, 8k uhd, high quality, cinematic"
negative_prompt = "(deformed iris, deformed pupils, semi-realistic, cgi, 3d, render, sketch, cartoon, drawing, anime), text, cropped, out of frame, worst quality, low quality, jpeg artifacts, ugly, duplicate, morbid, mutilated, extra fingers, mutated hands, poorly drawn hands, poorly drawn face, mutation, deformed, blurry, dehydrated, bad anatomy, bad proportions, extra limbs, cloned face, disfigured, gross proportions, malformed limbs, missing arms, missing legs, extra arms, extra legs, fused fingers, too many fingers, long neck"

output = pipe.generate_img2img(init_image=image, prompt=prompt, negative_prompt = negative_prompt, steps = 20, height = 768, width = 512)[0]
This outputs:

Auto 1111 SDK automatically detects the device to run the model on and will also automatically unload the model once it is done being used, though to completely erase it from the CUDA memory, I recommend you to delete the object if you are finished using it.
The best part of Auto 1111 SDK is that it only requires a single pipeline object to run all of Text-to-Image, Image-to-Image, Inpainting, Outpainting, and Stable Diffusion Upscale. This greatly reduces the amount of VRAM used since a new Stable Diffusion object is not being created each time.
Image-to-Image
Image to Image generation refers to the task of generating an Image based on another Image for example. Using this reference image:

And the following prompt/negative prompt:
prompt = "closeup portrait photo of beautiful american woman, 8k uhd, high quality, cinematic"
negative_prompt = "(deformed iris, deformed pupils, semi-realistic, cgi, 3d, render, sketch, cartoon, drawing, anime), text, cropped, out of frame, worst quality, low quality, jpeg artifacts, ugly, duplicate, morbid, mutilated, extra fingers, mutated hands, poorly drawn hands, poorly drawn face, mutation, deformed, blurry, dehydrated, bad anatomy, bad proportions, extra limbs, cloned face, disfigured, gross proportions, malformed limbs, missing arms, missing legs, extra arms, extra legs, fused fingers, too many fingers, long neck"
I can generate the following picture of an Indian woman, just by slightly tweaking the prompt.

The only difference that I made to the original prompt was I “beautiful american woman” to “beautiful indian woman”. The reason why the result is so closely correlated to the 1st image is because of Image-to-Image generation (even if I used the same seed and changed the prompt, the generation would probably be different. Here’s how you can do the same with Auto1111 SDK:
from auto1111sdk import StableDiffusionPipeline
pipe = StableDiffusionPipeline("dreamshaper.safetensors")
prompt = "closeup portrait photo of beautiful indian woman, 8k uhd, high quality, cinematic"
negative_prompt = "(deformed iris, deformed pupils, semi-realistic, cgi, 3d, render, sketch, cartoon, drawing, anime), text, cropped, out of frame, worst quality, low quality, jpeg artifacts, ugly, duplicate, morbid, mutilated, extra fingers, mutated hands, poorly drawn hands, poorly drawn face, mutation, deformed, blurry, dehydrated, bad anatomy, bad proportions, extra limbs, cloned face, disfigured, gross proportions, malformed limbs, missing arms, missing legs, extra arms, extra legs, fused fingers, too many fingers, long neck"
image = Image.open("original.png")
output = pipe.generate_img2img(init_image=image, prompt=prompt, negative_prompt = negative_prompt, steps = 20, height = 768, width = 512)[0]
output.save("img2img.png")
Inpainting
Inpainting refers to the task of using Stable Diffusion to specifically manipulate parts of an image. Inpainting tends to yield better results when you use specific inpainting models, but it can still work with the original dreamshaper model decently well. In this example, I am going to use the dreamshaper inpainting model here. You can download this model using the civit_downloader we used earlier.
For this example, I will use the following reference/mask images:

Reference image generated with realistic vision

Mask Image
from auto1111sdk import StableDiffusionPipeline
from PIL import Image


inpainting_pipe = StableDiffusionPipeline("dreamshaper_v8Inpainting.safetensors")
image = Image.open("photo.png")
mask = Image.open("mask.png")


prompt = "closeup portrait photo of beautiful 26 y.o woman, makeup, 8k uhd, high quality, dramatic, cinematic, ((green hair))"
negative_prompt = "(deformed iris, deformed pupils, semi-realistic, cgi, 3d, render, sketch, cartoon, drawing, anime), text, cropped, out of frame, worst quality, low quality, jpeg artifacts, ugly, duplicate, morbid, mutilated, extra fingers, mutated hands, poorly drawn hands, poorly drawn face, mutation, deformed, blurry, dehydrated, bad anatomy, bad proportions, extra limbs, cloned face, disfigured, gross proportions, malformed limbs, missing arms, missing legs, extra arms, extra legs, fused fingers, too many fingers, long neck"
output = pipe.inpainting_img2img(num_images = 1, inpaint_full_res_padding=32, initial_noise_multiplier=1, inpainting_fill=1, mask = mask, init_images = image, prompt = prompt, negative_prompt = negative_prompt)
The resulting generation will depend heavily on your original prompt/negative prompt. I generated the reference image with the same prompt in the code block above, but without the ((green hair)). I also generated the original image with the Realistic Vision model, but I used the dreamshaper inpainting model to inpaint. The reason why there are 2 brackets around the ‘green hair’ is to emphasize that part of the generation. This is yet another difference between Auto 1111 SDK and Huggingface Diffusers: Auto 1111 SDK has prompt attention.
You can see there are several more parameters that we have to pass into the generation. You can view more details about the list of all parameters here.
This inpainting generation yields the following image:

Outpainting
Outpainting is the opposite of Inpainting: it allows you to extend parts of an image in any direction for any pixel amount. Currently, there is no other script/library that allows you to outpaint (and on top of that, with the same pipeline object) in a single line of code. In the following example, I used the same reference image as I did in inpainting:
And outpainted 128 pixels to the left to receive the following generation:
You can see that the Outpainted Image looks decently realistic too! I didn’t even change the prompt/any parameters from the original generation; I just used the outpainting script provided by Auto 1111 SDK to outpaint the image. You can outpaint in any of the 4 cardinal directions by specifying it in the parameters. As you can see below, there are more parameters to this outpainting generation, so you can view more details here on the parameters here.
from auto1111sdk import StableDiffusionPipeline
inpainting_pipe = StableDiffusionPipeline("dreamshaper_v8Inpainting.safetensors")

prompt = "closeup portrait photo of beautiful woman, 8k uhd, high quality, cinematic"
negative_prompt = "(deformed iris, deformed pupils, semi-realistic, cgi, 3d, render, sketch, cartoon, drawing, anime), text, cropped, out of frame, worst quality, low quality, jpeg artifacts, ugly, duplicate, morbid, mutilated, extra fingers, mutated hands, poorly drawn hands, poorly drawn face, mutation, deformed, blurry, dehydrated, bad anatomy, bad proportions, extra limbs, cloned face, disfigured, gross proportions, malformed limbs, missing arms, missing legs, extra arms, extra legs, fused fingers, too many fingers, long neck"

from PIL import Image
image = Image.open("photo.png")

output = pipe.poor_mans_outpainting_img2img(steps=10, prompt = prompt, direction=["left"], negative_prompt=negative_prompt, init_images = image)
I hope you found this content easy to understand. If you think I need to elaborate further or clarify anything, drop a comment below.