THE GUIDE WILL BE UPDATED WHENEVER THROUGH HERE
This CivitAI guide is now deprecated.
The Illustrious Update (11/24/2024):
Updated the cover image. Be nice to her.
Added the Illustrious XL v0.1 base model to the list of training models.
Added Jelosus1's fork of LoRA Easy Training Scripts because of its support for training GLoRAs, a flavor of LyCORIS I use to train styles here and there. It isn't covered much here, but a TOML in the attachments can get you started.
Added my fork of Dataset Processor All-in-One Tools, check it out here!
Edited the Dataset Helper section a bit. I don't prune tags like hair length, hair color, and eye color anymore post-PDXL.
Edited the Preparing the Oven section to include NAI 1.5, PDXL, and Illustrious XL settings. It's a lot to take in, but again, the settings are included within the attachments.
Edited the Concepts, Styles, and Outfits section to remove the part about poses as the basic methodology falls under concepts.
Preface
If you want to dedicate only 30-40 minutes of your time to making a simple character LoRA, I highly recommend checking out Holostrawberry's guide. It is very straightforward, but if you're interested in looking into almost everything that I do and you're willing to set aside more time, continue reading. This guide piggybacks a bit off of his guide and Colab Notebooks, but you should still be able to get the gist about everything else I am about to cover.
Introduction
Here's what this article currently covers:
Pre-requisites
Basic Character LoRA
Concepts, Styles, and Outfits
Multiple Concepts
Training Models Using AI Generated Images
Prodigy Optimizer
What is a DoRA?
Use chapters to the right of the page to navigate.
Baby Steps: Your First Character
We won't start off too ambitious here, so let's start out simple: baking your first character.
Here's a list of things that I use (or have used or recommend checking out).
A Stable Diffusion webui of your choice (Automatic1111, SD.Next, ComfyUI, Forge, ReForge etc...)
Base Models
LoRA Trainers
Derrian's LoRA Easy Training Scripts (for training locally; queue system support)
Use dev branch:
git clone -b dev https://github.com/derrian-distro/LoRA_Easy_Training_Scripts.gitFor training style GLoRAs, you can clone Jelosus1's fork:
git clone https://github.com/Jelosus2/LoRA_Easy_Training_Scripts
Jelosus1's LoRA Easy Training Colab (uses local settings; trained with Google's hardware)
Tag/Caption Editors
"Woah, that's a lot of bullet points don't you think?"
Don't worry about those, install the following first: the Grabber, dupeGuru, Dataset Processor by Particle1904, and Derrian's LoRA Easy Training Scripts if you're training locally. You'll be using an easy-to-use tool to download images off of sites like Gelbooru and Rule34. Then you'll be using dupeGuru to remove any duplicate images that may negatively impact your training, and finally send the remainder of your images straight to the dataset tag editor.
Grabber
I use Gelbooru to download the images. You're familiar with booru tags, right? Hope your knowledge of completely nude and arms behind head carries you into this next section.
Got a character in mind? Great! Let's say I'll be training on a completely new character this website has never seen before, Kafka from Honkai: Star Rail!
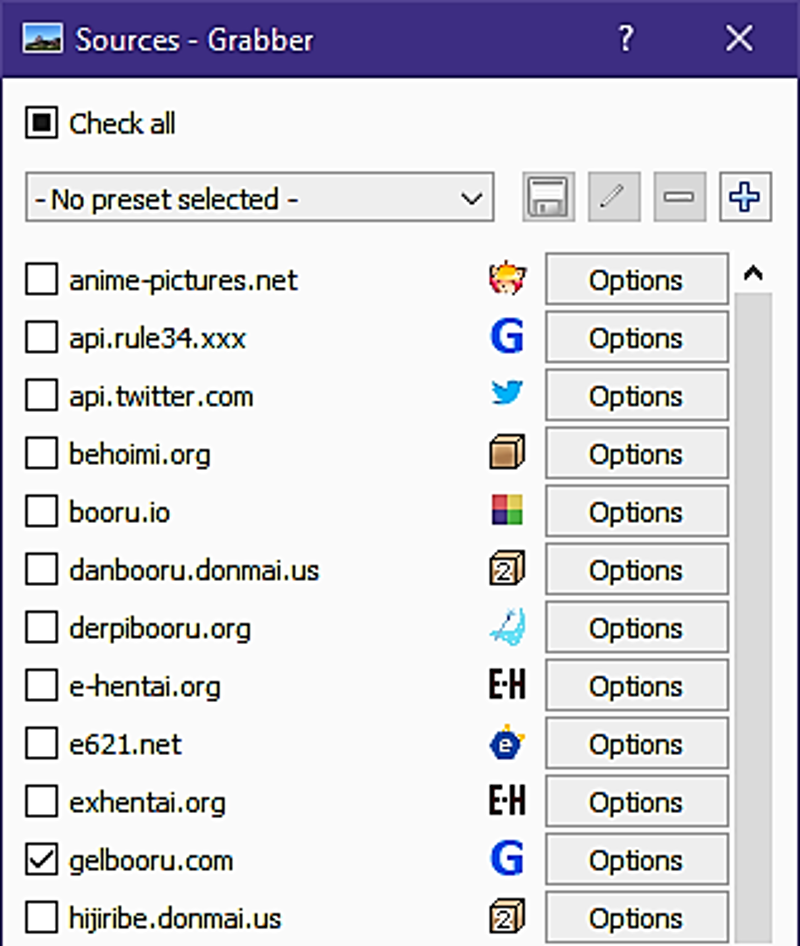
If you want to use a different site other than Gelbooru, click on the Sources button located at the bottom of the window. It's best that you leave one site checked.
So what should you put that in search bar at the top? For me, I'll type solo -rating:explicit -rating:questionable kafka_(honkai:_star_rail). You don't have to add -rating:questionable, but for me, I want the characters to wear some damn clothes. You may also choose to remove solo if you don't mind setting aside extra time to crop things out. This then leaves -rating:explicit, should you remove it? Well, it depends entirely on you, but for me, I'll leave it. And just because, I'll throw in a shirt tag.
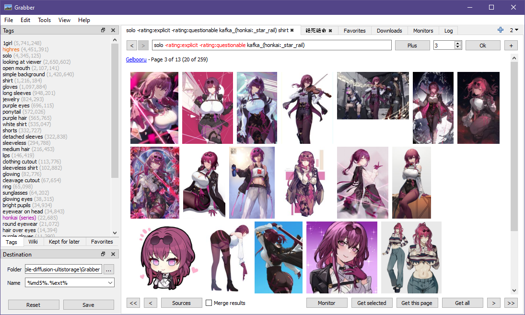
Well this looks promising: 259 results. Hit that Get all button. Switch over to your Downloads tab.
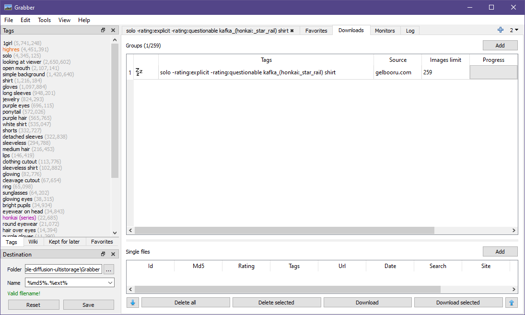
This tab is where you can keep track on what you're planning to download. Before we download, you see the bottom left? Choose a folder where you want your downloaded images to go. Then right click an item on the Downloads list and hit Download.
dupeGuru
All done? Great, let's switch over to dupeGuru.
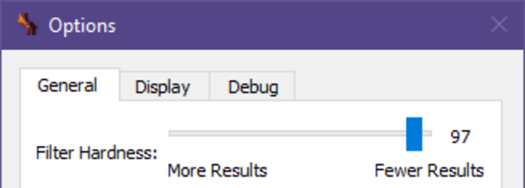
Once it's opened, you're going to add a folder location for it scan through your images. Click the + symbol at the bottom left and click Add Folder. Choose the folder where your images reside in and then click Select Folder. If you want to determine the hardness at which dupeGuru detects duplicate images, then go to View > Options or hit Ctrl + P. Set your filter hardness there at the top of the Options window then hit OK. Once you're done with that, select the Application mode at the top to Picture. Hit Scan. When it's finished going through your images, I usually Mark all then delete (Ctrl+A and Ctrl+D if you wanna speedrun).
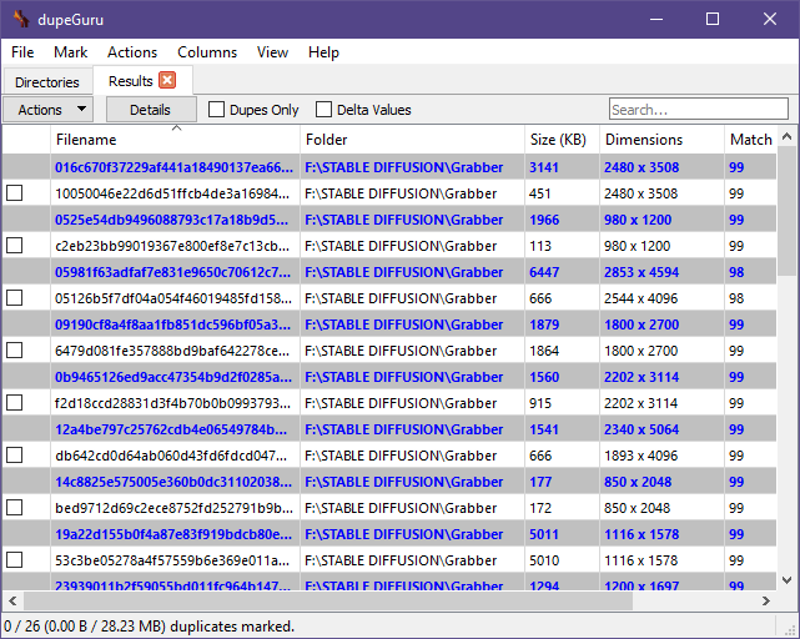
Note that this is not guaranteed to catch every duplicate image, so you'll still have to look through your dataset.
Curating
Inspect the rest of your images and see if there might have been any duplicate images dupeGuru might've missed and get rid of any bad quality images that might degrade the output of your training. Fortunately for me, Kafka is filled with plenty of good quality images, so I'll be selecting at most 100! Try going for other angles like from side and from behind, so that Stable Diffusion doesn't have to guess what they look like at those angles.
If you have images you really want to use, but found yourself in these cases:
Multiple Views of One Character
Unrelated Character(s)
Cropped Torso/Legs/etc.
Then you'll have to do a bit of image manipulation. Use any image editing application of your choice.
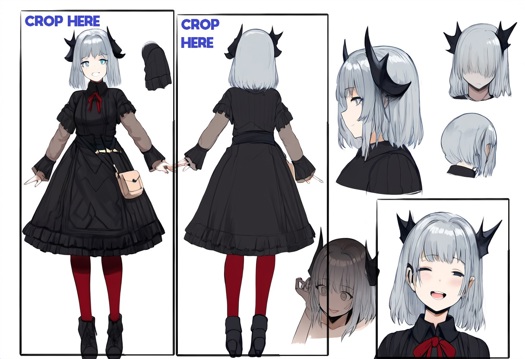
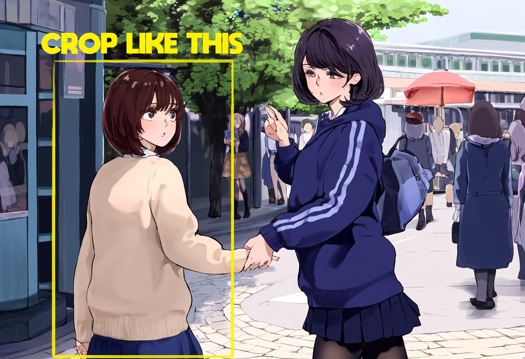
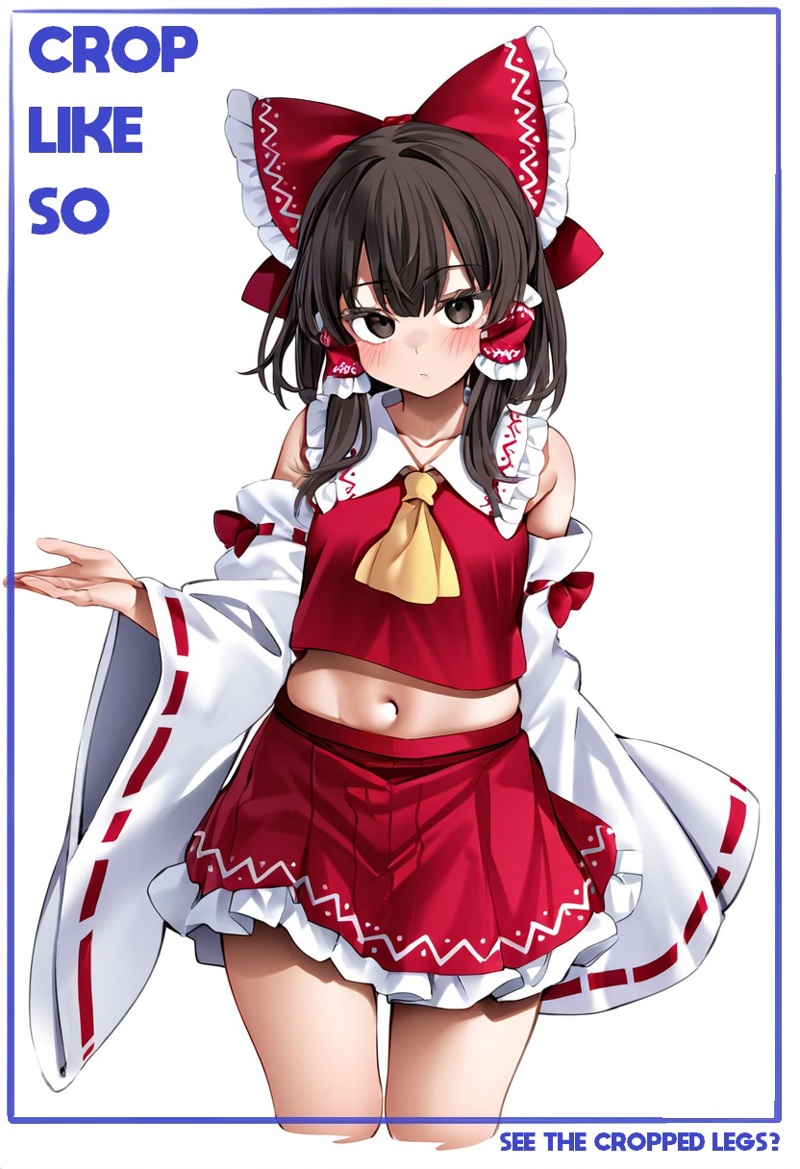
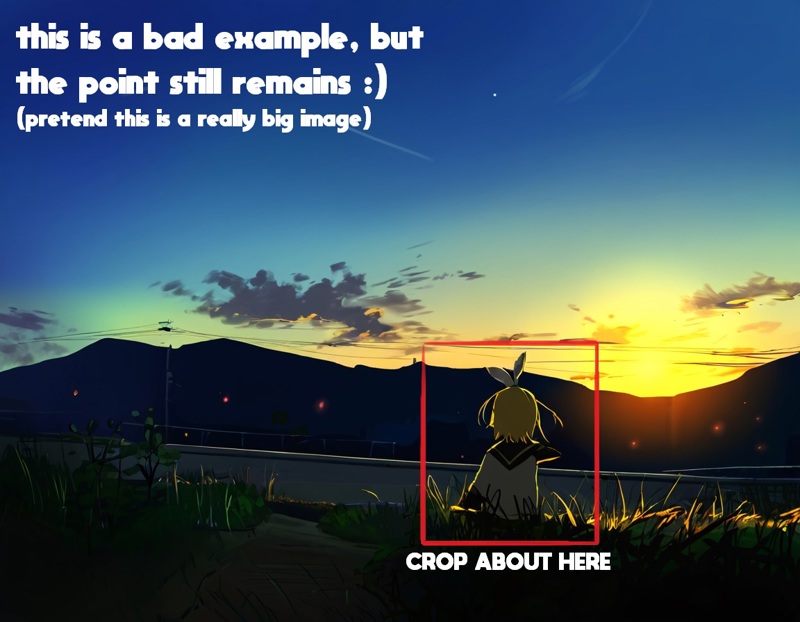
As new settings and technology start to pick up more detail, it's best that you try to get rid of signatures and watermarks in your dataset as well.
Improving the Quality of Your Output Model
If you think your dataset is good enough and you're not planning on training at a resolution greater than 512, then skip this step.
There is an article made by @PotatCat that upscales and changes the contrast of images (useful for anime screencaps). I recommend reading it, it's easy.
(In a WebUI of your choice) If you're screencapping an old and blurry anime, you should download ReFocus Cleanly and place it into the ESRGAN folder. Make sure to set Resize to 1 when using it.
Dataset Helper
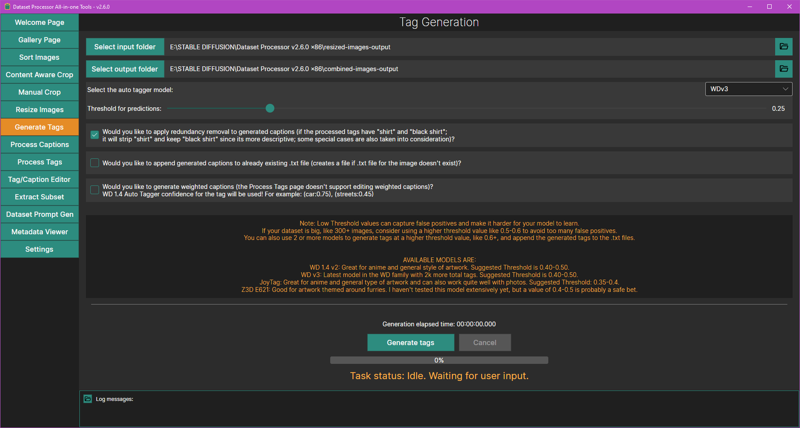
Let's start auto-tagging your dataset. In the Dataset Helper, go to Generate Tags. Point the input and output folder to your dataset folder. Set the auto tagger model to WDv3Large (wd-eva02-large-tagger-v3) and threshold for predictions to 0.3. Make sure the first option is checked. Click the Generate tags button at the bottom.
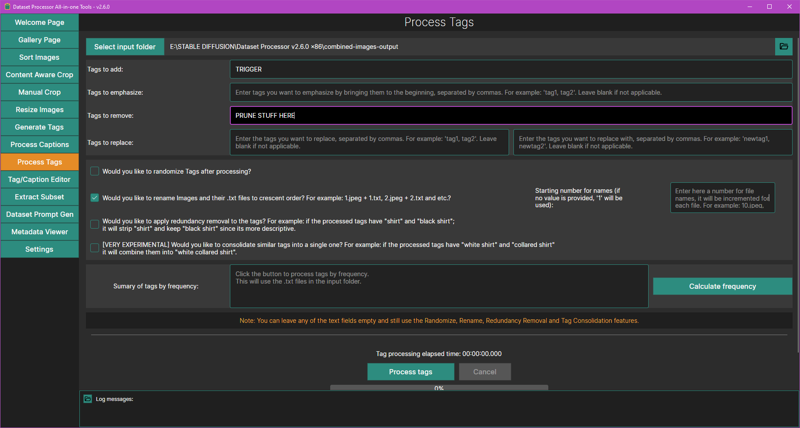
When it's done, head on over to the Process Tags screen.
In the "Tags to add" field, type a trigger word here.
In the "Tags to remove" field, this is where you can remove any tags you specify across all caption files.
I recommend checking Would you like to rename images and their .txt files to crescent order? Hit the Process tags button at the bottom when you're done.
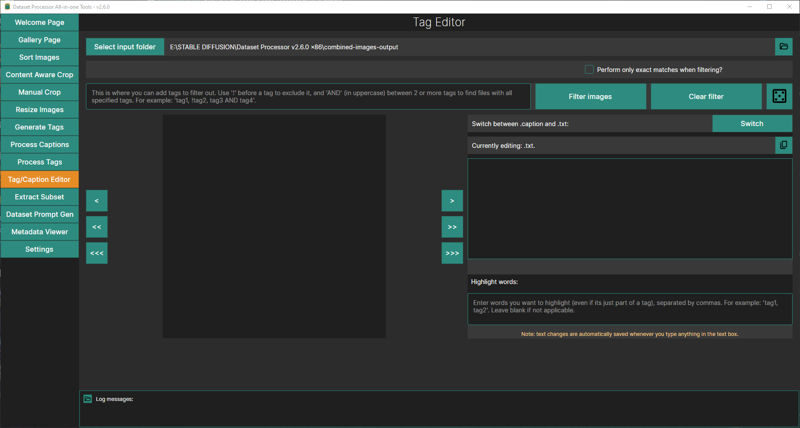
I strongly suggest manually editing your captions, so head on over to Tag/Caption Editor. This is where you'll be adding or removing tags. The application will tell you how this page works, so check it out. Use the danbooru wiki to read up on some tags, you might learn a thing or two.
Be descriptive and unique with your tags to minimize bleeding in your model!
Preparing the Oven
Settings for NAI 1.5, PDXL, and Illustrious XL are included in the attachments.
Here are my settings with 12GB of VRAM:
General Args
Model
Base Model: depends on what you want to train on
External VAE: SDXL VAE if training on PDXL / Illustrious
Training on PDXL / Illustrious? Enable these: SDXL Based, No Half VAE, and Full BF16.
Resolution: 1024
If you were training on NAI 1.5, you'd either train at 768 or 512.
Gradient Checkpointing: True
Set it to False if you got enough VRAM to train the model faster.
Gradient Accumulation: 1
Clip Skip: 2
This is only applicable to NAI 1.5.
Batch Size: 2
Set it to 1 to save on VRAM.
Training Precision: bf16
Set it to fp16 if your hardware doesn't support bf16.
Max Token Length: 225
Memory Optimization: SDPA
Cache Latents: True, To Disk: True
Network Args
LoRA Type: LoRA
Network Dim/Alpha:
NAI 1.5: 16/8
PDXL / Illustrious XL: 8/4
IP Noise Gamma:
PDXL / Illustrious XL: 0.05
Optimizer Args
Main Args
Optimizer Type:
NAI 1.5: AdamW8bit. Set it to AdamW if you have an old graphics card that doesn't support AdamW8bit.
PDXL / Illustrious XL: CAME.
LR Scheduler:
NAI 1.5: cosine with restarts
PDXL / Illustrious XL: REX or Rex Annealing Warm Restarts
Loss Type: L2
Unet Learning Rate:
NAI 1.5: 5e-4 or 0.0005
PDXL: 1e-4 or 0.0001
Illustrious XL: 6e-5 or 0.00006
TE Learning Rate:
NAI 1.5: 1e-4 or 0.0001
PDXL: 1e-6 or 0.000001
Illustrious XL: 6e-6 or 0.000006
Min SNR Gamma:
NAI 1.5: 5
Warmup Ratio: 0.05
This is used if your LR scheduler is set to constant with warmup.
Optional Args:
NAI 1.5: weight_decay=0.1, betas=[0.9,0.99]
PDXL / Illustrious XL: weight_decay=0.08
Bucket Args
Enable it
Maximum Bucket Resolution: (NAI 1.5) 1024 / (SDXL 1.0) 2048
Bucket Resolution Steps: 64
If you have a trigger word, make sure that Keep Tokens is set to at least 1. Enabling Shuffle Captions will supposedly make your LoRA less rigid.
Now while it's uploading, let's go over how many repeats and epochs you should use. First, how many images do you have? For NAI 1.5, this is Holostrawberry's reference table.
20 images × 10 repeats × 10 epochs ÷ 2 batch size = 1000 steps
100 images × 3 repeats × 10 epochs ÷ 2 batch size = 1500 steps
400 images × 1 repeat × 10 epochs ÷ 2 batch size = 2000 steps
1000 images × 1 repeat × 10 epochs ÷ 3 batch size = 3300 steps
For PDXL and Illustrious, this is mine.
20 images × 2 repeats × 10 epochs ÷ 2 batch size = 200 steps
40 images × 2 repeats × 7 epochs ÷ 2 batch size = 280 steps
60 images × 2 repeats × 5 epochs ÷ 2 batch size = 300 steps
100 images × 2 repeats × 4 epochs ÷ 2 batch size = 400 steps
200 images × 2 repeats × 3 epochs ÷ 2 batch size = 600 steps
600 images × 2 repeats × 2 epochs ÷ 2 batch size = 1200 steps
Great, I think that settles it, let's run it and let the trainer handle the rest.
Is it Ready?
Is your LoRA finished baking? You can choose to either download a few of your latest epochs or all of them. Either way, you'll be testing to see if your LoRA works.
Head back to Stable Diffusion and start typing your prompt out. For example,
<lora:hsr_kafka-10:1.0>, solo, 1girl, kafka, sunglasses, eyewear on head, jacket, white shirt, pantyhose
Then enable the script, "X/Y/Z plot." Your X type will be Prompt S/R, which will basically search for the first thing in your prompt and replace it with whatever you tell it to replace. In X values, you'll type something like -10, -09, -08, -07. What this will do is find the first -10in your prompt and replace it with -09, -08, -07. Then hit Generate and find out which epoch works best for you.
Once you're done choosing your best epoch, you'll be testing which weight works, so for your X values, type something like 1.0>, 0.9>, 0.8>, 0.7>, 0.6>, 0.5>. Hit Generate again.
Your LoRA should ideally work at weight 1.0, but it's okay if it works best around 0.8 since this is your first time after all. Training a LoRA is an experimental game, so you'll be messing around with tagging and changing settings most of the time.
Concepts, Styles, and Outfits
Now that you know the basics of training a character LoRA, what if you want to train a concept, a style, a pose, and/or an outfit? Look for consistency and provide proper tagging.
For concepts: Add an activation tag. Use the top tags as guidance by the autotagger. Here's an example. Not only does it include an activation tag, but it also includes a helper tag since the subject does in fact have their arm up.
For styles: I prefer not adding an activation tag, so that all the user needs to do is call the model and prompt away. If you're lazy like me, just let the autotagger do its work then immediately save & exit. Here's an example. Make sure there's style consistency across all images. You'll want to raise up the epochs and test each one. Lower unet LR if necessary. You may lower tenc LR or set it to zero. Set Keep Tokens to 0 if you're not using an activation token.
For outfits: Add an activation tag. Try your best to describe the outfit with all the booru tags you can think of. Here's an example.
Multiple Concepts
Sorting
This part will cover how to train a singular character who wears multiple outfits. You can apply the general idea of this method to multiple characters and concepts.
So you have an assortment of images. You're going to want to organize those images into separate folders that each represent a unique outfit.
Now let's say you're left with 4 folders with the following number of images:
Outfit #1: 23 images
Outfit #2: 49 images
Outfit #3: 100 images
Outfit #4: 79 images
Let's make things easier. Delete 3 images in the folder for outfit #1, 16 images in #2, and 29 images in #4. I'll elaborate on this later.
Tagging
Now you'll associate each outfit with their own activation tag. Use Zeta from Granblue Fantasy as a guide. These are my triggers for each outfit:
zetadef
zetasummer
zetadark
zetahalloween
Training Settings
Remember when I told you to delete a specific number of images in that hypothetical dataset of yours? What you'll be doing is trying to train each outfit equally, despite the differences in their image count. Here are the updated folders:
Outfit #1: 20 images
Outfit #2: 33 images
Outfit #3: 100 images
Outfit #4: 50 images
Use the following repeats for each folder:
Outfit #1: 5 repeats
Outfit #2: 3 repeats
Outfit #3: 1 repeat
Outfit #4: 2 repeats
Let's do some math: (20 × 5) + (33 × 3) + (100 × 1) + (50 × 2) = 399
We'll label this number as T. Now let's determine how many epochs we should get. Here's a reference table for NAI 1.5:
200 T × 17 epochs ÷ 2 batch size = 1700 steps
300 T × 12 epochs ÷ 2 batch size = 1800 steps
400 T × 10 epochs ÷ 2 batch size = 2000 steps
Our T is closest to the last row, so we'd run with 10 epochs if I was training on NAI. I train on Illustrious though, so here's a new table:
100 T × 8 epochs ÷ 2 batch size = 400 steps
200 T × 7 epochs ÷ 2 batch size = 700 steps
300 T × 5 epochs ÷ 2 batch size = 750 steps
600 T × 5 epochs ÷ 2 batch size = 1500 steps
Here, I'd run with 5 epochs, but feel free to add another epoch.
If you're using Derrian's LoRA Easy Training Scripts, you should see something like this:
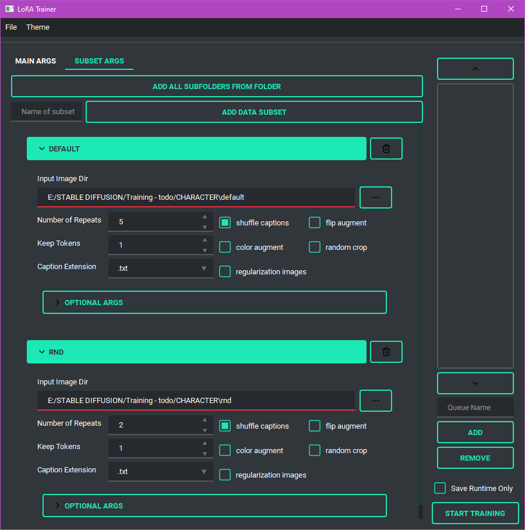
This is how you'll control the repeats for each folder. You can prepend a number to each folder's name to automatically input the number of repeats.
With that out of the way, start the trainer!
Using AI Generated Images for Training
Can it be done? Yes, absolutely, for sure. We even created an anime mascot for this website!
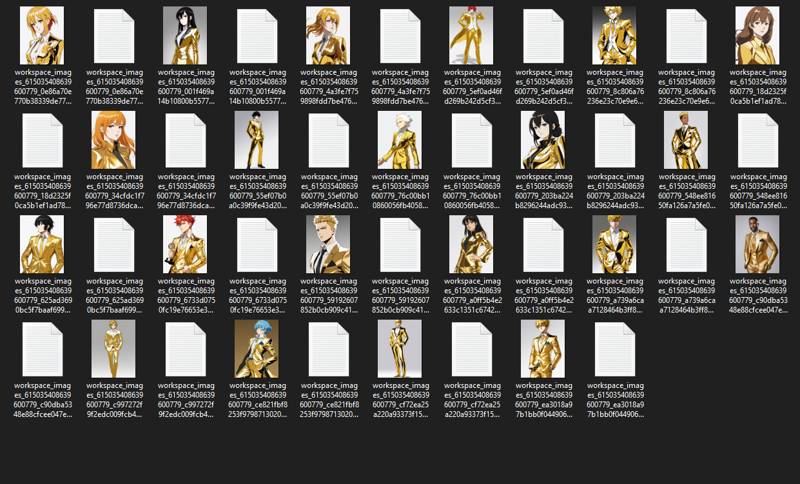
If you're working to better your models, you should choose your best generations (i.e., the most accurate representation of your model). Inspect your images carefully, Stable Diffusion alone is already bad enough with hands. Don't make your next generations worse if you're not taking care of your dataset.
Prodigy
The Prodigy optimizer is a supposed successor to the DAdaptation optimizers and it's been out for quite some time. Two of my early uses of this was Wendy (Herrscher of Wind) and Princess Bullet Bill. It is aggressive in the way it learns and it's recommended for small datasets (I'll typically throw around 20 to 30 images at it, give or take). The optimizer is great but not terribly amazing by any means since it seems to mess up some details like tattoos. If you want to mess around with it, here are the settings you would modify:
optimizer: Prodigy
learning_rate: 0.5 or 1 (unet lr and tenc lr are the same)
network_dim/network_alpha: 32/32 or 16/16
lr_scheduler: constant_with_warmup
lr_warmup_ratio: 0.05
optimizer_args:
"decouple=True, weight_decay=0.01, betas=[0.9,0.999], d_coef=2, use_bias_correction=True, safeguard_warmup=True"
For repeats, try shooting for 100 steps. For example, if I have 20 images, I would go with 5 repeats. For epochs, just set it to 20. While it's training, you'll see loss like here:

When it's nearly done training, look for the model with its loss at its lowest point. It'll typically be around 800 steps or so.
EDIT (May 14th, 2024): I've noticed some creators are using Prodigy with datasets over the recommended size at high repeats. The model will be burnt to a crisp. You don't have to do this.
What is a DoRA?
Known as Weight-Decomposed Low-Rank Adaptation, it's a type of LoRA with additional trainable parameters, direction, and magnitude, which makes them come close to native finetuning. Training a DoRA trades speed for greater detail and accuracy. This may be in your best interest if you're training a style or a concept.
You can check out their repo and paper here: https://github.com/catid/dora
Preparing the Oven
Take the above PDXL settings and make changes to the following:
Network Args
LoRA Type: LoCon (LyCORIS)
Conv Dim/Alpha: 8/4
DoRA: True
Optimizer Args
Main Args
Learning Rate: 5e-5 or 0.00005
Unet Learning Rate: 5e-5 or 0.00005
(Old) Final Thoughts
Hello, if you made it here, then thank you for taking the time to read the article. I did promise making this article to share you everything that I've done since that announcement. Though, I did rush some things up until the end, so this article is not completely final just yet. If there's any questions and criticisms you have, please let me know! If there's something that you think can be done more efficiently, please let me know! Treat this as a starting point to your way of training LoRAs. Not everything here is perfect and no method in training LoRAs is ever perfect.
And remember, making LoRAs is an experimentation game.


