

Managing VRAM to Optimize Performance for Flux Training: Part 1
TLDR: Skip to the bottom for settings and configurations.
Consider this an update to my previous guide, Training Flux: Optimal Settings for an RTX 3060. Since then, I’ve discovered new optimizations, and Kohya's script now includes parameters that significantly reduce VRAM requirements. These improvements have allowed me to more than double the performance of my RTX 3060 during Flux training. Plus, I’ve gathered new data about VRAM usage that isn’t just for the RTX 3060, but applies to any GPU. In this article, which is part one of two, I'll share tips to optimize your training. Part two will come later and dive into more data and analysis for those who want all the data goodness.
VRAM Requirements: My Experiment Process
First, let’s quickly discuss how I collected these VRAM requirements. You may have noticed a slow-down in my LoRA production recently—that’s because I’ve done over 150 test runs with various settings on my poor little RTX 3060 12GB card to gather this data. It's a secondary GPU with no monitors attached, meaning I can push it harder, but still, it’s not the best for local training. I used a dataset of 18 images and Kohya’s SD3/Flux branch, which uses block swapping instead of the older split mode for Flux training.
For each run, I recorded constant VRAM usage, shared VRAM (system memory), and average seconds per iteration (s/it). Most tests were stopped after the first epoch since VRAM use doesn’t usually spike significantly after that point—although there's a small initial spike of 0.3 to 0.5 GB. Keep in mind that system-reserved VRAM added about 0.2 GB and if you only have one GPU, your OS is likely using more. The numbers I’m sharing reflect the highest stable VRAM usage during training. If you want to know if your card can handle these settings, you need at least 0.5 GB of headroom beyond my recorded VRAM values. In all my tests, the highest VRAM requirement I saw for successful training was 11.5 GB. If usage exceeded that in the first 20 steps, it would always end with an Out of Memory (OOM) error before completing the first epoch.
Training Speed: Relative Measures
I also measured training speeds, but bear in mind that these are relative to my hardware. I’m using an RTX 3060, and while it’s decent, it’s far from top-tier. A more powerful card may yield better speeds—even with less VRAM. So, more VRAM doesn’t always mean faster training; it just dictates which quality settings you can use. Faster GPUs may process things quicker even if they have less memory.
Key Parameters Impacting VRAM Usage
Now, let’s get to the good stuff. There are four main parameters that I’ll discuss impact VRAM usage during Flux training:
Training Resolution
LoRA Network Dimension
Batch Size
Blocks-to-Swap
I also have some other parameters that you can tweak that affect quality, speed, and VRAM usage, which I'll touch on later. You might be asking, "How much VRAM do I need, and how do I optimize my performance?" Well, that depends on what “optimizing performance” means for you. Are you aiming for the best quality LoRAs? The fastest training time? The lowest VRAM requirement? I’ll give you the information to get the most out of your GPU—whether it’s a modest $250 card like mine or a high-end setup.
Training Resolution: The Biggest VRAM Factor
TLDR: To train at 1024x1024, you'll need a GPU with at least 10GB of VRAM. For 768x768 or 512x512, 8GB should suffice (but is not optimum). Training at 512 is about three times faster, making it a good starting point for experimentation.
Training resolution is the most impactful of the four parameters on VRAM usage. I’m not going to dive deep into the technical details here, but generally, 512x512 is the minimum you’ll use for LoRA training (to learn more, look under Training Settings Related to Datasets here). Depending on your goal, you might use 768x768 or even 1024x1024. Non-photorealistic styles are typically good to run at 512, but for more complex concepts or high-resolution realistic images, a higher resolution is ideal.
From my tests using settings to maximize free VRAM, I found the lowest amount of VRAM for each training resolution was:
512x512 uses around 4.0 GB VRAM.
768x768 uses about 6.0 GB.
1024x1024 uses around 7.5 GB.
Others have confirmed these numbers by training on GPUs with as little as 6 GB of VRAM. But remember: just because you can train at the bare minimum doesn't mean you should. Minimum settings usually mean reduced quality, and the training speed drops drastically. You don't want to tie up your GPU for 24 hours just to end up with a low-quality LoRA.
Even if you adjust all the other settings, that baseline VRAM difference of 1.5 to 2 GB to step up the resolution is hard to bypass. It can be even higher, depending on how other parameters interact with the training resolution. That is because training resolution impacts everything else—higher resolutions will increase the cost of other parameters like batch size or network dimension.
So, should you always train at the highest possible resolution? Not necessarily. Speed is a factor, too. A training resolution of 512x512 can run in as little as 6 s/it, while 768x768 takes around 10 s/it, and 1024x1024 takes roughly 18 s/it. To save time, I recommend starting with 512x512 to work out any kinks before moving to higher resolutions. You can even train with multiple resolutions for a balanced approach (read more about that here)
Network Dimension: Balancing Memory and Model Capacity
TLDR: Stick with a network dimension of 32. It keeps VRAM requirements manageable while ensuring quality.
Network dimension (also called network rank) is another important parameter. A higher network dimension increases VRAM requirements because of the exponential growth in model parameters. At a training resolution of 512, moving from a dimension of 8 to 16 only adds 0.1-0.2 GB, while moving from 16 to 32 costs around 0.3-0.4 GB. But the jump from 32 to 64 requires 0.3-0.6 GB more, and moving all the way to 128 can cost over 1 GB.
Training speed isn’t significantly impacted by increasing network dimension, but VRAM certainly is. Also, a larger network dimension means a larger LoRA file size, which may matter depending on your goals. I generally recommend starting with a dimension of 32—it's a good balance of capability and memory efficiency. If successful, you can always retrain at a lower dimension to reduce file size.
Batch Size: More Images, More VRAM
TLDR: If you have the VRAM, aim for a batch size of 4 to speed up training. Adjust learning rate and steps accordingly.
Batch size refers to the number of images that are processed in one step during training. One image is batch size 1, two images is batch size 2, and so on. To learn more, look under Training Settings Related to Datasets in the linked article.
Batch size directly impacts VRAM requirements and training speed. Most numbers I discuss here are based on a batch size of 1, which is best for keeping VRAM usage low. At a training resolution of 512, each increase in batch size adds 1.6-1.8 GB of VRAM usage. At 768, it adds around 2.7-3 GB, and at 1024, it's around 4 GB per increase in batch size.
Batch size also impacts speed. Training at 512 with a batch size of 1 takes about 6 s/it, but increasing to 2 can bump that to 9 s/it. Moving to 3 increases it to 14 s/it. The benefit is that increasing batch size improves training efficiency, reducing the total number of steps needed.
Note: When increasing batch size, you'll need to adjust the learning rate proportionally to maintain convergence.
Blocks-to-Swap: The Real Magic
TLDR: If you run into an out-of-memory error, increase your blocks-to-swap until it stops.
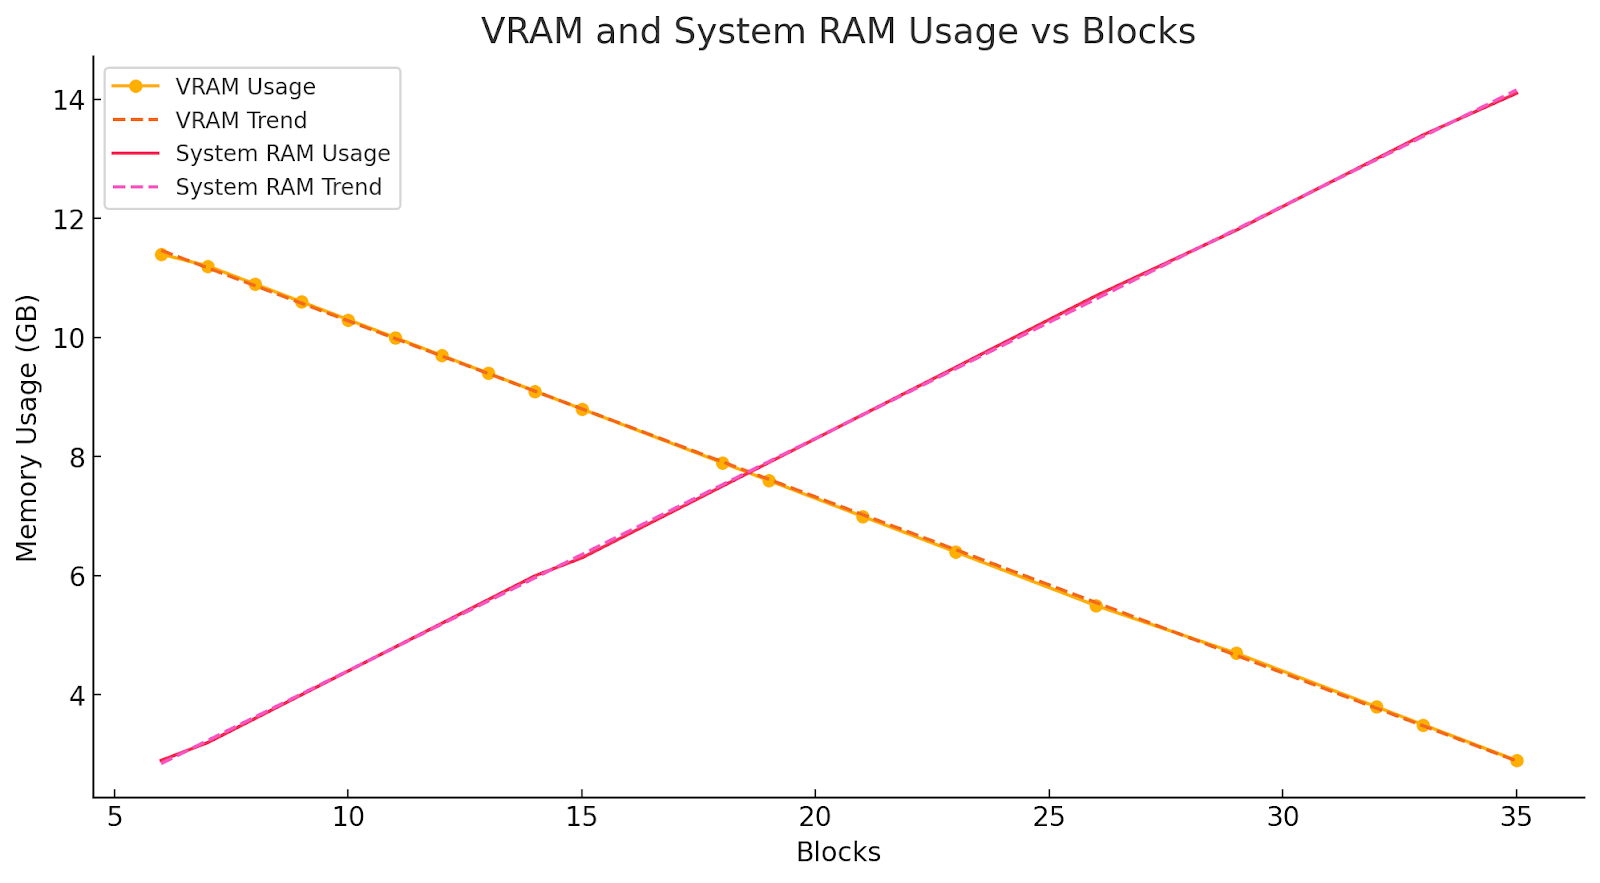
Blocks-to-Swap is where things get really interesting. Kohya’s script now allows block swapping, which lets you trade VRAM for system memory in predictable increments. Each additional block swapped out reduces VRAM requirements by about 0.3 GB, with a corresponding increase of 0.4 GB in system memory. This parameter allows you to optimize VRAM usage without compromising quality. I've saved most of my graphs for part two, but this one is great at showing how blocks-to-swap affect VRAM.
For example, at 512 resolution and a network dimension of 8, I need to swap at least 6 blocks. If I raise the dimension to 32, I swap 8 blocks. Adding a batch size of 2 means covering an additional 1.8 GB of VRAM, which translates to 6 more blocks swapped out, for a total of 14 blocks-to-swap.
There’s a small speed boost (~0.5 s/it) if you keep the number of swapped blocks low, so I recommend adjusting the blocks-to-swap until you’re just below the VRAM limit—usually between 11.1 and 11.3 GB for my card. Just note that attempting to swap more than 34 blocks has caused outliers to appear in my testing, so I suggest staying below 34.
Other Parameters to Tweak Related to VRAM
I've tested some of these settings extensively and others only briefly. While most had minimal impact or required more VRAM than I could typically spare, they might be beneficial depending on your setup.
T5 Attention Mask
Enabling the T5 Attention Mask can improve quality, as it masks the extra padding used on captions so the trainer doesn't pay attention to it. When you use it, extra information is passed on during processing with the mask details, so it uses more VRAM. I can say that it slightly increases VRAM usage, but not significantly—especially at lower resolutions.
At 512x512 resolution: Enabling it didn't make much difference in VRAM usage (maybe an extra 0.1 GB) or training speed.
At 768x768 resolution: I observed an increase of about 0.5 GB in VRAM usage and a small increase in seconds per iteration (s/it).
At 1024x1024 resolution: VRAM usage increased variably, usually between 0.5 and 2 GB, with an s/it increase of up to 1 second.
I usually turn it on, especially at lower training resolutions, because the quality improvements outweigh the minimal VRAM cost.
Memory Efficient Attention
This option offers a reduction in VRAM usage at the expense of slower training speeds. I've seen up to a 1 GB decrease in VRAM requirements when using it. However, the speed reduction isn't worth it unless you can't use xFormers for cross-attention (which reduces VRAM usage with almost no speed penalty). Now that block swapping is available, it's generally a better trade-off than using Memory Efficient Attention. I don't usually enable this setting unless necessary due to the system setup.
FP16 Precision
I debated including this in the main sections because it uses a significant amount of VRAM. Essentially, using the FP16 model doubles the VRAM required to load the model (and therefore to load each block), which can over-tax my GPU quickly. However, if you use a high blocks-to-swap value, you can train with FP16 at 1024 resolution and apply some other optimizations. I’ve just never seen conclusive results where I’ve noticed an overall difference in quality.
In my limited testing, I saw an increase of up to 1 s/it in training speed, but overall, it didn't significantly slow down training. The VRAM requirement for other parameters may also double (like loading the T5 text encoder). Due to the high VRAM cost and minimal benefits, I don't recommend enabling FP16 if you have VRAM to spare (on a 24 GB GPU, for example).
Text Encoders
I have tested the VRAM consumption related to the T5 Text Encoder. While the effectiveness of training the T5 text encoder for a LoRA is debatable, there are reasons you might want to use it during training—like utilizing caption manipulation parameters (caption dropout rate, wildcards, shuffling, etc.).
Loading the T5 Text Encoder into VRAM consumes at least 4.3 - 4.5 GB, which significantly limits what else you can do. If you decide to train the T5 Text Encoder, you'll need an additional almost 1 GB of VRAM on top of the 4.3 GB required just to load it.
Due to my limited VRAM, I couldn't extensively test training the encoder at different settings, as most attempts resulted in an OOM error. But I can tell you this:
At 512x512 resolution with minimal VRAM settings:
VRAM usage went from 3.5 GB to 8.0 GB when loading the T5 Text Encoder.
VRAM usage increased to 8.8 GB when training it.
At 768x768 resolution:
VRAM usage increased from 4.9 GB to 9.2 GB when loading.
VRAM usage went up to 10.0 GB when training it.
Unless someone provides conclusive proof that training the T5 Text Encoder significantly improves LoRA quality, I don't recommend using it—especially if you're training locally with limited VRAM. While I like some of the captioning options it enables, the VRAM cost is too high.
The CLIP-L text encoder is tiny by comparison and trains by default if you set the learning rate for text encoders to anything but zero. It only takes up about 0.3 GB of VRAM, which you can easily offset by swapping one block. I recommend enabling it (at a low learning rate like 5e-5) because for just 0.3 GB, it's worth it. In fact, it was enabled during all my data collection.
Training Only Selected Blocks
It's possible to train only selected blocks during LoRA training. Tools like maDcaDDie's LoRA Block Weight Testing for FLUX can help you identify which blocks to focus on. Initially, I thought this would work well with the block swapping parameter, but tests showed that Flux loads some blocks into VRAM regardless of what you’ve selected to swap and train.
However, I discovered that training fewer blocks does consume less VRAM. While I didn't run exhaustive tests, the data suggests that training only some blocks will save VRAM. Additionally, focusing on fewer blocks allows you to lower the network dimension, further reducing VRAM usage.
If you aim to train a very high-quality LoRA, I suggest running initial tests with settings optimized for training speed. You can retrain with the best quality settings once you've identified the blocks you need to train.
Final Recommendations for a RTX 3060: Good, Better, Best
Below are my configurations and recommendations for training on an RTX 3060. I have also included my Khoya JSON configuration files for each. If you use the file and get an out-of-memory error, increase the Blocks-to-Swap until the error goes away. Remember that your OS may use some of your VRAM, so you'll need to check on that first.
Good LoRAs, Fast Convergence: Fast training, good enough quality.
Training Resolution: Start at 512x512. It's less demanding on VRAM and faster to train.
Network Dimension: Use 32 for a balance between model capacity and VRAM usage.
Batch Size: Stick with a batch size of 4 to minimize VRAM requirements. Don’t forget to up the learning rate.
Blocks-to-Swap: Adjust as needed to fit within your VRAM limits. 23 gives me the best balance and speed.
Text Encoder: Enable the CLIP-L text encoder at a low learning rate (e.g., 5e-5).
T5 Attention Mask: Enable it for slight quality improvements with minimal VRAM cost.
Better LoRAs, Slower Convergence: Balancing training efficiency with quality.
Training Resolution: Move up to 768x768 if your LoRA would benefit from higher resolution.
Network Dimension: Keep it at 32.
Batch Size: Use 3. Remember to adjust the learning rate accordingly.
T5 Attention Mask: Enable it for slight quality improvements with minimal VRAM cost.
Text Encoder: Enable the CLIP-L text encoder at a low learning rate (e.g., 5e-5).
Blocks-to-Swap: Optimize the number of blocks swapped to manage VRAM while maintaining speed. I used 32.
Best LoRAs, Slowest Convergence: If maximizing quality is your priority...
Training Resolution: Use 1024x1024 for the highest image quality.
Network Dimension: Keep it at 32. Higher dimensions are costly at a 1024 training resolution.
Batch Size: You have a choice: you can set batch size to 1 or 2, but you'll have to make some concessions (see below). For the highest quality, use 1.
Blocks-to-Swap: To use batch size 2, you'll need to set Blocks-to-swap to 34. Otherwise, you can set it to 29.
T5 Attention Mask: If you use batch size 2, you'll likely need to disable it. Otherwise, it should be kept enabled for potential quality gains.
Text Encoder: Enable the CLIP-L text encoder at a low learning rate (e.g., 5e-5).
Fp8 base: If you use batch size 1, you'll save enough VRAM to disable the Fp8 base.