Download
1 variant available


Tencent Hunyuan is licensed under the Tencent Hunyuan Community License Agreement, Copyright © 2024 Tencent. All Rights Reserved. The trademark rights of “Tencent Hunyuan” are owned by Tencent or its affiliate.
Powered by Tencent Hunyuan
HUNYUAN | AllInOne
no need to buzz me. Feedbacks are much more appreciated. | last update: 06/03/2025
⬇️OFFICIAL Image To Video V2 Model is out!⬇️ COMFYUI UPDATE IS REQUIRED !
Get files here:
link 1 paste in: \models\clip_vision
link 2 or Link 3 paste in: \models\diffusion_models (pick the one that works best for you)
⚠️ I2V model got an update on 07/03/2025 ⚠️
This workflows have evolved over time through various tests and refinements,
thanks also to the huge contributions of this community.
Requirements, Special thanks and credits above.
Before commenting, please keep in mind:
The Advanced and Ultra workflows are intended for more experienced ComfyUI users.
If you choose to install unfamiliar nodes, you take full responsibility.I do this workflows for fun, randomly in my free time.
Most issues you might encounter are probably already been widely discussed and solved on Discord, Reddit, GitHub, and addressed in the description corresponding to the workflow you're using, so please..Read carefully..
and consider do some searches before comment.I started this alone, but now there's a small group of people who are contributing with their passion, experiments and cool findings. Credits below.
Thanks to their contributions this small project continues to grow and improve
for everyone's benefit.Fast Lora may works best when combined with other Loras, allowing you to reduce the number of steps.
- Wave Speed can significantly reduce inference time but may introduce artifacts.
- Achieving good results requires testing different settings. Default configurations may not always work, especially when using LORAs, so experiment to find settings that fits best.THERE'S NOT UNIVERSAL SETTINGS THAT WORKS FOR EVERY CASES.
- You can also try to switch to different sampler/scheduler and see wich works best for you case, try UniPC simple, LCM simple , DDPM, DDMPP_2M beta, Euler normal/simple/beta, or the new "Gradient_estimation"
(Samplers/schedulers need to be set for each stage and mode; they are not settings found in the console)
Legend to help you choose the right workflow:
✔️ Green check = UP TO DATE version for its category.
Include latest settings, tricks, updated nodes and samplers, working on latest ComfyUI.
🟩🟧🟪 Colors = Basic / Advanced / Ultra
❌ = Based on deprecated nodes, you'll have to fix it yourself if you really want to use
Quick Tips:
Low Vram? Try this:
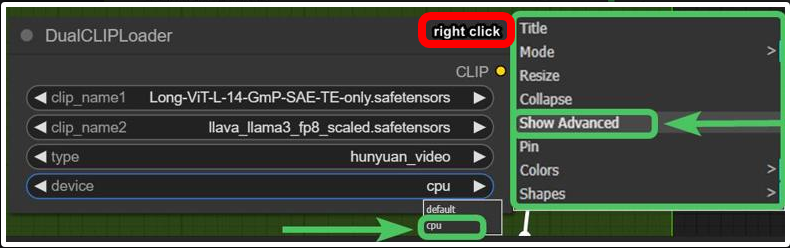 and/or try use GGUF models avaible here.
Rtx4000? use this: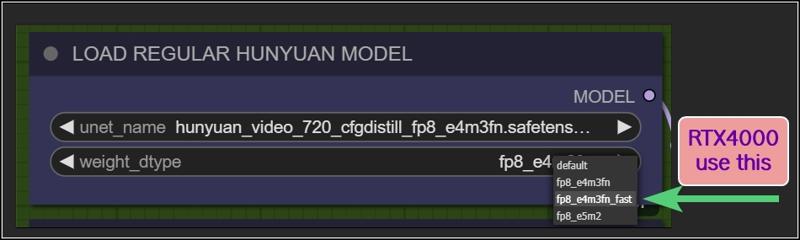
Want more tips?
Check my article: https://civitai.com/articles/9584
All workflows available on this page are designed to prioritize efficiency, delivering high-quality results as quickly as possible.
However, users can easily customize settings through intuitive, fast-access controls.
For those seeking ultra-high-quality videos and the best output this model can achieve, adjustments may be necessary, like Increasing steps, modifying resolutions, reducing TeaCache / WaveSpeed influences, or disabling Fast LoRA entirely to enhance results.
Personally, I aim for an optimal balance between quality and speed. All example videos I share follow this approach, utilizing the default settings provided in these workflows. While I may make minor adjustments to aspect ratio, resolution, or step count depending on the scene, these settings generally offer the best all-around performance.
WORKFLOWS DESCRIPTION:
🟩"I2V OFFICIAL"
require:
llava_llama3_vision: ➡️Link paste in: \models\clip_vision
Model: ➡️Link or ➡️Link (pick the one that works best for you)
paste in: \models\diffusion_modelshttps://github.com/pollockjj/ComfyUI-MultiGPU
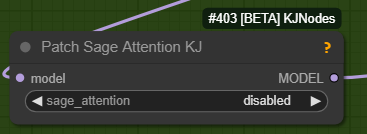
The following node is for SAGE ATTENTION, if you don't have it installed just bypass it:
🟩"BASIC All In One"
use native comfy nodes, it has 3 method to operate:
T2V
I2V (sort of, an image is multiplied *x frames and sent to latent, with a denoising level balanced to preserve the structure, composition, and colors of the original image. I find this approach highly useful as it saves both inference time and allows for better guidance toward the desired result). Obviously this comes at the expense of general motion, as lowering the denoise level too much causes the final result to become static and have minimal movement. The denoise threshold is up to you to decide based on your needs.
There are other methods to achieve a more accurate image-to-video process, but they are slow. I didn’t even included a negative prompt in the workflow because it doubles the waiting times.
V2V same concept as I2V above
require:
https://github.com/chengzeyi/Comfy-WaveSpeed
https://github.com/pollockjj/ComfyUI-MultiGPU
🟧 "ADVANCED All In One TEA ☕"
an improved version of the BASIC All In One TEA ☕, with additional methods to upscale faster, plus a lightweight captioning system for I2V and V2V, that consume only additional 100mb vram.
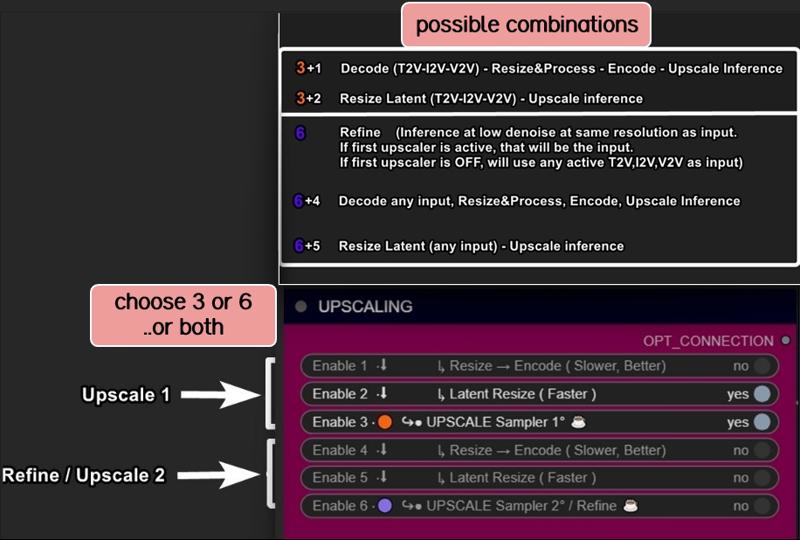
Upscaling can be done in three ways:
Upscaling using the model. Best Quality. Slower (Refine is optional)
Upscale Classic + Refine. It uses a special video upscaling model that I selected from a crazy amount of multiple video upscaling models and tests, it is one of the fastest and allows for results with good contrast and well-defined lines. While it’s certainly not the optimal choice when used alone but when combined with the REFINE step, it produces well-defined videos. This option is a middle ground in terms of timing between the first and third method.
Latent upscale + Refine. This is my favorite. fastest. decent.
This method is nothing more than the same as the first, wich is basically V2V, but at slightly lower steps and denoise.
Three different methods, more choices based on preferences.
Requirements:
-ClipVitLargePatch14
download model.safetensors
rename it as clip-vit-large-patch14_OPENAI.safetensors"
paste it in \models\clip
paste it in \models\ESRGAN\
-LongCLIP-SAE-ViT-L-14
-https://github.com/pollockjj/ComfyUI-MultiGPU
-https://github.com/chengzeyi/Comfy-WaveSpeed
Update Changelogs:
|1.1|
Faster upscaling
Better settings
|1.2|
removed redundancies, better logic
some error fixed
added extra box for the ability to load a video and directly upscale it
|1.3|
New prompting system.
Now you can copy and paste any prompt you find online and this will automatically modify the words you don't like and/or add additional random words.
Fixed some latent auto switches bugs (this gave me serious headhaces)
Fixed seed issue, now locking seed will lock sampling
Some Ui cleaning
|1.4|
Batch Video Processing – Huge Time Saver!
You can now generate videos at the bare minimum quality and later queue them all for upscaling, refining, or interpolating in a single step.
Just point it to the folder where the videos are saved, and the process will be done automatically.
Added Seed Picker for Each Stage (Upscale/Refine)
You can now, for example, lock the seed during the initial generation, then randomize the seed for the upscale or refine stage.
More Room for Video Previews
No more overlapping nodes when generating tall videos (don't exagerate with ratio obviously)
Expanded Space for Sampler Previews
Enable preview methods in the manager to watch the generation progress in real time.
This allows you to interrupt the process if you don't like where it's going.
(I usually keep previews off, as enabling them takes slightly longer, but they can be helpful in some cases.)
Improved UI
Cleaned up some connections (noodles), removed redundancies, and enhanced overall efficiency.
All essential nodes are highlighted in blue and emphasized right below each corresponding video node, while everything else (backend) like switches, logic, mathematics, and things you shouldn't touch have been moved further down. You can now change settings or replace nodes with those you prefer way more easily.
Notifications
All nodes related to the browser notifications sent when each step is completed, which some people find annoying, have been moved to the very bottom and highlighted in gray. So, if they bother you, you can quickly find them, select them, and delete them
|1.5|
general improvements, some bugs fixes
NB:
This two errors in console are completly fine. Just don't mind at those.
WARNING: DreamBigImageSwitch.IS_CHANGED() got an unexpected keyword argument 'select'
WARNING: SystemNotification.IS_CHANGED() missing 1 required positional argument: 'self'
🟪 "AIO | ULTRA "
Embrace This Beast of Mass Video Production!
This version is for the truly brave professionals and unlocks a lot of possibilities.
Plus, it includes settings for higher quality, sharper videos, and even faster speed, all while being nearly glitch-free.
All older workflows have also been updated to minimize glitches, as explained in my previous article.
From Concept to Creation in Record Time!
We are achieving world-record speed here, but at the cost of some complexity. These workflows are becoming increasingly intimidating despite efforts to keep them clean and hide all automations in the back-end as much as possible.
That's why I call this workflow ULTRA: a powerhouse for tenacious Hunyuan users who want to achieve the best results in the shortest time possible, with all tools at their fingertips
Key Features and Improvements:
Handy Console: Includes buttons to activate stages with no need to connect cables or navigate elsewhere. Everything is centralized in one place (Control Room), and functions can be accessed with ease.
T2V, I2V*,V2V, T2I, I2I Support: Seamless transitions between different workflows.
*I2V: an image is multiplied into *x frames and sent to latent. Official I2V model is not out yet. There's a temprorary trick to do I2V here wich require Kijai's nodes.
Wildcards + Custom Prompting Options: Switch between Classic prompting with wildcards or add random words in a dedicated box, with automatic customizable word swapping or censoring.
Video Loading: Load videos directly into upscalers/refiners and skip the initial inference stage.
Batch Video Processing: Upscale or Refine multiple videos in sequence by loading them from a custom folder.
Interpolation: Smooth frame transitions for enhanced video quality.
Random Character LoRA Picker: Includes 9 LoRA nodes in addition to fixed LoRA loaders.
Upscaling Options: Supports upscaling, double upscaling, and downscaling processes.
Notifications: Receive notifications for each completed stage, organized in a separate section for easy removal if necessary.
Lightweight Captioning: Enables captioning for I2V and V2V with minimal additional VRAM usage (only 100MB).
Virtual Vram support.
Use the GGUF model with Virtual VRAM to create longer videos or increase resolution.
Hunyuan/Skyreel (T2V) quick merges slider
Switch from Regular Model to Virtual Vram / GGUF with a slider
Latent preview to cut down upscaling process.
A dedicated LoRA line exclusively for upscalers, toggled via a dedicated button.
RF edit loom
Upscale using Multiplier or "set to longest size" target
a button to toggle Wave Speed and FastLoRA as needed for upscaling only.
Ui improvements based on users feedbacks
- Sequential Upscale Under 1x / Double Upscaling
You can now downscale using the upscale process and then re-upscale with the refiner, or customize upscaler multipliers to upscale 2 times.
New Functionality:
The upscale value range now includes values as low as 0.5.
Two sliders are available: one for the initial upscale and another for the refiner (essentially another sampler, always V2V).
Applications:
Upscale, Refine or combine the twoUpscale fast (latent resize + sampler) or accurate (resize + sampler)
Refine (works the same as upscale, can be used alone or as an auxiliary upscaler)
Double upscaling: Start small and upscale significantly in the final stage.
Downscale and re-upscale: Deconstruct at lower resolution and reconstruct at higher quality.
Combos: Upscale & Refine / Downscale & Upscale
- Skip Decoders/Encoders Option
Save significant time by skipping raw decoding for each desired stage and going directly to the final result.
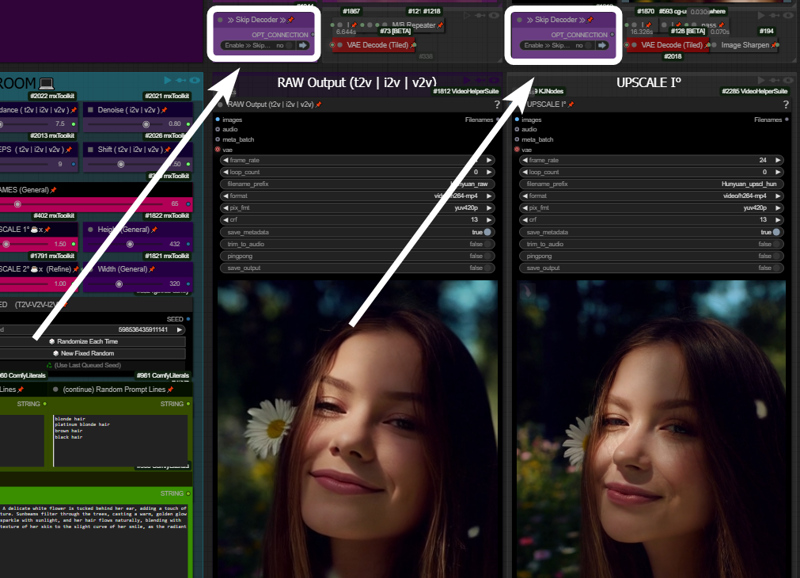
How It Works: If your prompt is likely to produce a good output and the preview method ("latent2RGB") is active in the manager, you can monitor the process in real-time. Skip encoding/decoding by working exclusively in the latent space, generating and sending latent data directly to the upscaler until the process completes.
Example:
A typical medium/high-quality generation might involve:Resolution: ~ 432x320
Frames: 65
One Upscale: 1.5x (to 640x480)
Total Time: 162 seconds
In this example case, by activating the preview in the manager and skipping the first decoder (the preview before upscaling), you can save ~30 seconds. The process now takes 133 seconds instead of 162.
Bypassing additional decoders (e.g., upscale further or refinement) can save even more time.
- Image Generation (T2I and I2I)
Explore HUN latent space with this image generation capabilities.
When the number of frames is set to 1, the image node activates automatically, allowing the image to be saved as a PNG.
Use the settings shown here for the best results: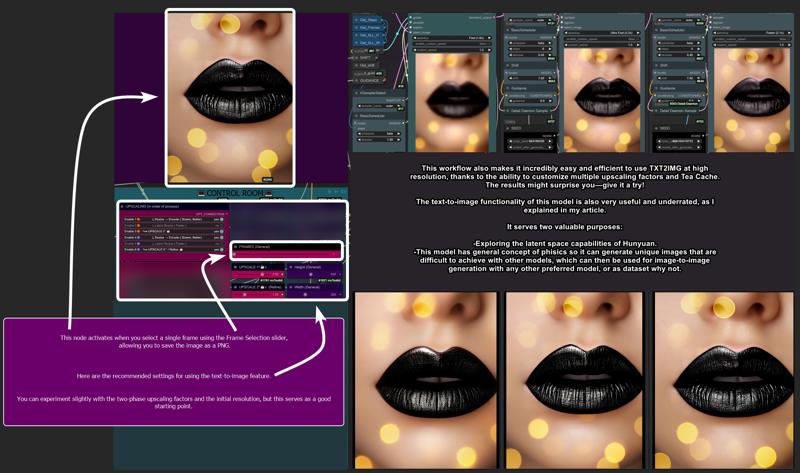
T2I Example Gallery: Hunyuan Showcase
- Structural Changes / Additional Features
Motion Guider for I2V
This feature enhances motion for image-to-video workflows, lowering chances to get a static video as result.
9 Random Character Loras Loader: Previously limited to 5, now expanded to 9.
Random Character Lora Lock On/Off:
By default, each seed is set to corresponds to a random Lora
(e.g., seed n° 667 = Lora n° 7).Now, you can unlock this "character Lora lock on seed" and regenerate the same video with a different random Lora while maintaining the main seed.
Clarifications:
Let’s call things by their real names:"Refine" and "Upscale" are both samplers here. Each optimized for specific stages:
Upscale: Higher steps/denoise, fast results, balanced quality.
Refine: Lower steps/denoise, focused on fixing issues and enhancing details.
Refine can work alone, without upscaling, to address small issues or improve fine details.
UI Simplification:
The "classic upscale" is now replaced by a faster and better-performing resize + sharpness operation and hidden in back-end to save space.Frame Limit Issue (101+ Frames):
Generating more than 101 frames with latent upscale can cause problems. To address this, I added an option to upscale videos before switching to latent processing.
- Bug Fixes
Latent Upscale Change:
Latent upscaling now uses bicubic interpolation instead of nearest-exact, which performs better based on testing.
"Cliption" Bug Fixed
201-Frame Fix:
Generating 201-frame perfect loops caused artifacts with latent upscale. Switching to "resize" via the pink console buttons now resolves this issue.
- Performance and other infos:
Once you master it, you won’t want to go back. This workflow is designed to meet every need and handle every case, minimizing the need to move around the board too much. Everything is controlled from a central "Control Room."
Traditionally, managing these functions would require connecting/disconnecting cables or loading various workflows. Here, however, everything is automated and executed with just a few button presses.
Default settings (e.g., denoise, steps, resolution) are optimized for simplicity, but advanced users can easily adjust them to suit their needs.
-Limitations:
No Audio Integration:
While I have an audio-capable workflow, it doesn’t make sense here. Audio should be processed separately for professional results.No Post-Production Effects:
Effects like color correction, filmic grain, and other post-production enhancements are left to dedicated editing software or workflows. This workflow focuses on delivering a pure video product.Interpolation Considerations:
Interpolation is included here. I set up the fastest i could find around, not necessary the best one. For best results, I typically use Topaz for both extra upscaling and interpolation after processing but is up to the user to choose whatever favourite interpolation method or final upscaling if needed.
Requirements:
ULTRA 1.2:
-Tea cache
ULTRA 1.3:
-UPDATE TO LATEST COMFY IS NEEDED!
-Wave Speed
-ClipVitLargePatch14
ULTRA 1.4 / 1.5:
-UPDATE TO LATEST COMFY IS NEEDED!
https://github.com/pollockjj/ComfyUI-MultiGPU
https://github.com/chengzeyi/Comfy-WaveSpeed
https://github.com/city96/ComfyUI-GGUF
https://github.com/logtd/ComfyUI-HunyuanLoom
https://github.com/kijai/ComfyUI-VideoNoiseWarp
NB:
The following warning in console is completly fine. Just don't mind at it:
WARNING: DreamBigImageSwitch.IS_CHANGED() got an unexpected keyword argument 'select'
WARNING: SystemNotification.IS_CHANGED() missing 1 required positional argument: 'self'
Update Changelogs:
|1.1|
Better color scheme to easily understand how upscaling stages works
Check images to understand
|1.2|
Wildcards.
You can now switch from Classic Prompting system (with wildcards allowed)
to the fancy one previously avaible
|1.3|
An extra wavespeed boost kicks in for upscalers.
Changed samplers to native Comfy—no more TTP, no more interrup error messg
Tea cache is now a separate node.
Fixed a notification timing error and text again.
Replaced a node that was causing errors for some users: "if any" now swaps with "eden_comfy_pipelines."
Added SPICE, an extra-fast LoRA toggle that activates only in upscalers to speed up inference at lower steps and reduce noise.
Added Block Cache and Sage to the setup. Users who have them working can enable them.
Changed the default sampler from Euler Beta to the new "gradient_estimation" sampler introduced in the latest Comfy update.
Added a video info box for each stage (size, duration).
Removed "random lines."
Adjusted default values for general use.
Upscale 1 can now function as a refiner as well.
When pressing "Latent Resize" or "Resize," it will automatically activate the correct sampler.
A single-frame image is now displayed in other stages as well (when active).
Thanks to all users that contributed on discord for this workflow improvements!
|1.4|
Virtual Vram support
Hunyuan/Skyreel quick merges slider
Toggle to switch from Regular Model to Virtual Vram / GGUF
Longer vids / Higher Res / extreme upscaling now possible
Default res changed to 480x320 wich looks like a balanced middle way for lowres quick vids and most users should be ok with that.
Latent preview for skip preview mode
Switch toggle to enable/disable Exclusive LoRA for upscalers
RF edit loom
V2V loading time improved
Upscale to longest size target
Fixed slider upscale mismatch
info node moved
clean up and fixes
better settings for general use
upscale one can now use "resize to longers size" optional slider
added extra wave speed toggle for upscalers
added exclusive loras line for upscalers
general fixes
Ui improvement based on users feedbacks
fixed fast lora string issue on bypass in upscalers
more cleaning
changed exlusive loras for upscalers again, main fast lora is NOT going to pass in that line, since it has already a separate toggle (upscale with extra fast lora) previously called SPICE FOR UPSCALING.
fixed output node size for videos
moved resize by "longest size" toggle in extra menu
added extra wave speed toggle
control room is finished.. for now. I dont want to stress Aidoctor further. He already did a great job
lower fast lora default value now to 0.4
fixed VIDEO BATCH LOADING
|1.5|
general improvements, Ui improvements, some bugs fixes
leap fusion support
Go With The Flow support
Bonus TIPS:
Here an article with all tips and trick i'm writing as i test this model:
https://civitai.com/articles/9584
if you struggle to use my workflows for any reasons at least you can relate to the article above. You will get a lot of precious quality of life tips to build and improving your hunyuan experience.
All the workflows labeled with an ❌are OLD and highly experimental, those rely on kijai nodes that were released at very early stage of development.
If you want to explore those you need to fix them by yourself, wich should be pretty easy.
CREDITS
Everything I do, I do in my free time for personal enjoyment.
But if you want to contribute,
there are people who deserve WAY more support than I do,
like Kijai.
I’ll leave his link,
if you’re feeling generous go support him.
Thanks!
Last but not least:
Thank this community, especially those who given me advices and experimented with my workflows, helping improve them for everyone.
Special thanks to:
https://civitai.com/user/galaxytimemachine
for its peculiar and precise method of operation in finding the best settings and for all the tests conducted.
https://civitai.com/user/TheAIDoctor
for his brilliance and for dedicating his time to create and modify special nodes for this workflow madness! such an incredible person.
and
https://github.com/pollockjj/ComfyUI-MultiGPU
Also special thanks to:
Tr1dae
for creating HunyClip, a handy tool for quick video trimming. If you work with heavy editing software like DaVinci Resolve or Premiere, you'll find this tool incredibly useful for fast operations without the need to open resource-intensive programs.
Check it out here: [link]
Have fun