Download
1 variant available

6.6K
61K

no need to buzz me, i'm fine. ty 💗 feedbacks are much more appreciated.
check older versions for more video examples.
Credits and acknowledgments at bottom below.
__________________________________________________________________________________________________
This ComfyUI workflow offer different ways to make I2V by using 6 Video models:
LTX
CogVideoX-5B-1.5-I2V
Pyramid Flow
CogVideoX-Fun-v1.1-InP (2B)
CogVideoX-Fun-v1.1-InP (5B)

⚠️⚠️⚠️⚠️⚠️⚠️⚠️⚠️⚠️⚠️⚠️⚠️⚠️⚠️⚠️⚠️⚠️⚠️⚠️⚠️⚠️
This is designed to be fast and accessible, featuring a Front-End UI (Console) that includes all the necessary settings to easily produce high-quality videos as fast as possible, without the need to constantly navigate through tons of different modules. It also incorporates various additional experimental methodologies I use, which require the installation of multiple custom nodes.
As a result, this workflow is not recommended for beginners.
For a simpler experience, try the MINI version included in the zip, a stripped-down variant of the full workflow.
The workflow incorporates settings based on my hands-on experience with various video models, settings that may differ from the standard configurations typically associated with each model.
__________________________________________________________________________________________________
- - - | IT'S ALIVE | - - -
This is the result of over a month of work, almost daily.
I still keep improving it, optimizing and adding useful settings I came across or that i find by experimenting.
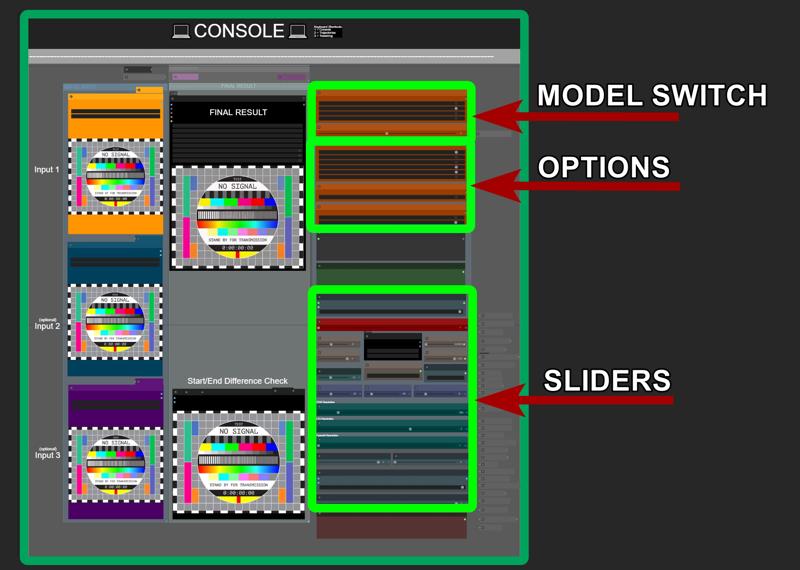
The workflow is designed so that you never have to leave the control room (console);
everything you need is right there at your fingertips.
Some extra tweaking commands are accessible via keyboard shortcuts (more info below).
__________________________________________________________________________________________________
Different methods are provided and can be selected with a slider:
Creative: In this mode, a single image is used as input, and the model generates a video with full creative freedom, determining its own ending.
*This method works with all Video models avaible in the menu.Sticky: In this mode, a single image is used as input, and the workflow automatically generates an ending frame that closely resembles the input image but with a slightly different perspective or altered facial expression if a person is detected. This new image, which resembles and references the input image, can be fine-tuned using convenient sliders available in the "Tweaking" section. This allows for maintaining the overall composition throughout the video.
*This method works only with COG models (for now), so make sure to activate it in the console.Zoom: In this mode, a single image is used as input, and the final frame of the video is a zoomed-in version of the input image. The zoom level can be adjusted in the "tweaking" menu. *This method works only with COG models (for now)
Img1→Img2 (Custom Start/End mode): This mode allows for the use of two or three images as inputs, enabling the model to create transitions between them. It is particularly useful for controlled animations and performs well with 5B COG models. *This method works only with COG models (for now)
Img1→Img1: This mode uses a single input image as start and end, so focuses more on maintaining the composition of the input image *This method works only with COG models (for now)
__________________________________________________________________________________________________
Shortcuts:
You can navigate through the only sections you need by using 3 keyboard keys:
1 = CONSOLE
Press the "1" key to access the console, where all the settings you need are available and easy to access.
2 = TRAJECTORIES (TORA - COG)
Press the "2" key to access Tora Trajectories
This method is exclusive to COG models.
The only compatible model avaible in this workflow that works with TORA is "5BInP"
and must be selected as showed below:

Four combinable trajectories are available .
You can activate only 1, 2, 3, or all four using a dedicated slider avaible in the console:
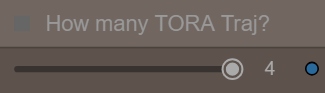
Be aware that each time you change the base resolution or input image you must redo all trajectories.

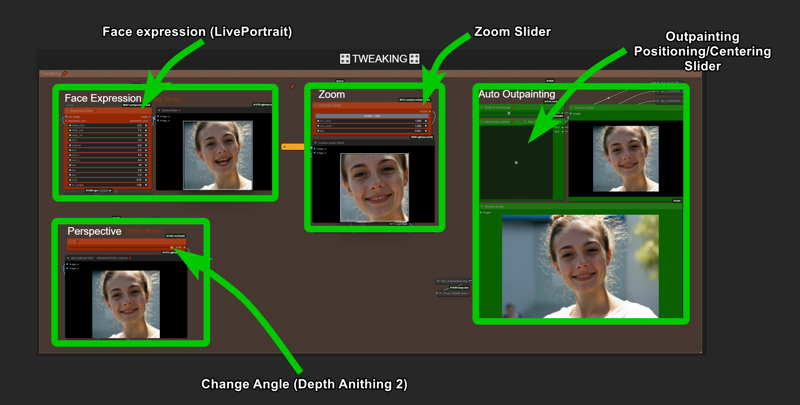
3 = TWEAKING
Press the "3" key to access Tweaking section.
Here you can adjust the ending frame for STICKY MODE to closely resembles the input image but from a slightly different perspective/angle or a different face expression/head position, ensuring the final frame remains similar or nearly identical to the initial image while incorporating subtle variations.
Auto Outpainting is avaible on the right, so you can copy the result and paste it back as input in case you need (Outpainting need to be activated in the console)
__________________________________________________________________________________________________
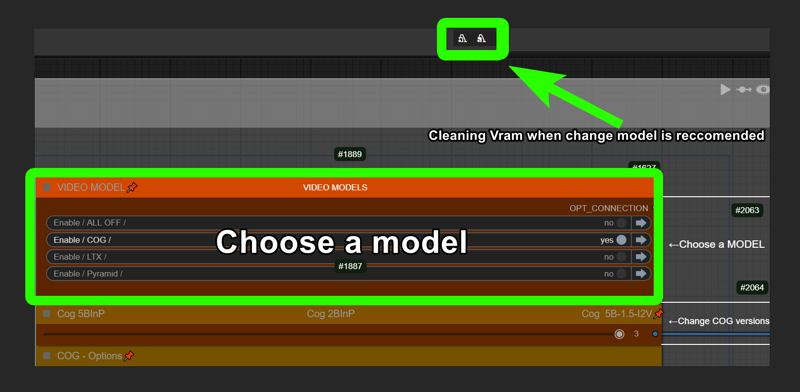
Cleaning VRAM when change model is reccomended:
__________________________________________________________________________________________________
__________________________________________________________________________________________________
__________________________________________________________________________________________________
### Troubleshooting:
This error message in console is completly normal:

### Minimum Hardware Requirements:
12GB VRAM for low resolution.
### Render Times:
On 3090 takes from 5 seconds to 2 minutes or more for each videos, depending on models/resolution/steps.
### Important COG Suggestions And Examples:
- To achieve a good, consistent result, then using "First/Last" mode, the two images need to be similar (same location, people, and very close positioning of everything) eg: You can choose to use any images, but you'll get the best results if you use two images that are fairly similar. For example, try pick two screenshots from a random internet video or two 3D characters posed in two different poses. or two similar AI-generated images 🙄
- Stay around 10-15 steps, go higher for better quality. (it's hit or miss below that, although I’ve gotten some nice ones at 5 steps).
- For quick tests, use a lower base resolution (like 320). At that resolution it takes around 10 seconds on my 3090.
- If the results are full of artifacts, switch to "custom prompt only" to avoid auto-prompting and get more stable, consistent animations, by simplify the prompt. Write something simple
(check manual written in the workflow)
Simple prompts like "a person posine, blink, camera shake" or words wiggle, earthquake, lens flares, blink, camera shake, handheld camera have already been tested here with great success. Please share your findings!
- If the video seems too fast for your settings, turn on interpolation in group and raise the "extra interpolation multiplier" or change the video length in the COG settings group according to user manual written right inside the workflow.
### Other Considerations:
I've tested Cog A LOT and changed the values from the standard settings to something I think works better/faster, at least based on my tests.
Feel free to make your own changes (and if you find better settings, please let us know)!
no need to buzz me, i'm fine. ty💗 feedbacks are much more appreciated.
__________________________________________________________________________________________________
*Please note:
do not confuse the different Cog models, as there are many, and they differ from one another.
I suggest taking a look around to understand what the other Cog models are capable of. There is a bit of confusion around,
here's a spredsheet by Kijay to clarify some misunderstanding
https://docs.google.com/spreadsheets/d/16eA6mSL8XkTcu9fSWkPSHfRIqyAKJbR1O99xnuGdCKY/edit?gid=0#gid=0
In general if you are looking for a way to produce videos quickly, with the most dynamic options, resolutions, ratios, first/last, trajectories then I recommend sticking to this workflow or at least using the models I use in this workflow.
SINCE TORA IS NOW COMPATIBLE WITH THIS XFUN VERSIONS OF COG I ADDED IT IN THE FLOW.
__________________________________________________________________________________________________
__________________________________________________________________________________________________
CHANGELOGS:
V8.0
changelog:
completly redone the entire workflow + cleanup and better logic.
added 3 video models
added auto outpainting
added liveportrait
Creative mode now works as it should, with no images selected as ending
holy s**t this took me a week to finish
__________________________________________________________________________________________________
V7.0
changelog:
Workflow clean, bug fixes.
__________________________________________________________________________________________________
V6.0
changelog:
added 4 Tora trajectories
More UI controls
Better settings, refinements and tips inlcuded
to use tora be sure you are using 5B model (there's a switch to change from 2B to 5B)
then:
1)deactivate "let's Cog" in groups
2)load an image, run
3) setup 4 trajectories (control+click to break the splines in multiple points)
4) activate "let's Cog" and run (the "extend video" will automatically turn on when you activate "let's cog", deactivate it for now untill i figure how to extend this tora mode)
__________________________________________________________________________________________________
V5.0
changelog:
Extra Extend ( ability to load a third image to create a video using 3 images)
More UI controls
Better settings, refinements and tips inlcuded
__________________________________________________________________________________________________
V4.0
changelog:
EXTEND now works for all modes (except first last mode)
improved UI
+ lora strenght slider
+ seeds management
+ prompt strenght
+ COG frames amount control
+ model selector 2B/5B
+ negative prompts
other changes:
efficiency improvements
completly revisited chain system
some minor fixes
__________________________________________________________________________________________________
V3.0
|changelog|:
improved UI:
added lora loader and strenght slider
model selector 2B/5B
negative prompts
some workflow efficiency improvements
other changes:
switched to a faster interpolation method
some minor fixes
updated user's manual
__________________________________________________________________________________________________
V2.0
|changelog|:
more refined workflow
more options
simple ui
added User's Manual
__________________________________________________________________________________________________
__________________________________________________________________________________________________
A special thanks to Kijai , Purz and the team at Rgthree , DreamProject and VideoHelperSuite, who dedicated their time for help me resolve some steps i thought were impossible to solve.
I encourage you all to visit their pages and support their projects
__________________________________________________________________________________________________
__________________________________________________________________________________________________