
Update (October 15th 2025)
All updates in the article are displayed in yellow.
I added more references at the end of the article, toward more solutions to generate multi-characters in a picture.
a few correction on the two tango dancers image generation (I forgot the hand of the dancer in the mask),

Update (August 30th 2025)
Following the publication of this article, I proposed a bounty whose purpose was to generate multiple characters in the same image.
Here are the bounty results, with all winners and the link to the bounty page displaying all submissions:
https://civitai.com/articles/17883/multiple-characters-bounty-results
Also, I updated the article with:
I added the Workflow 3e. This variant allow to manually edit the pictures to allow a better character isolation from their background,
I added several references at the end of the article, to go further.
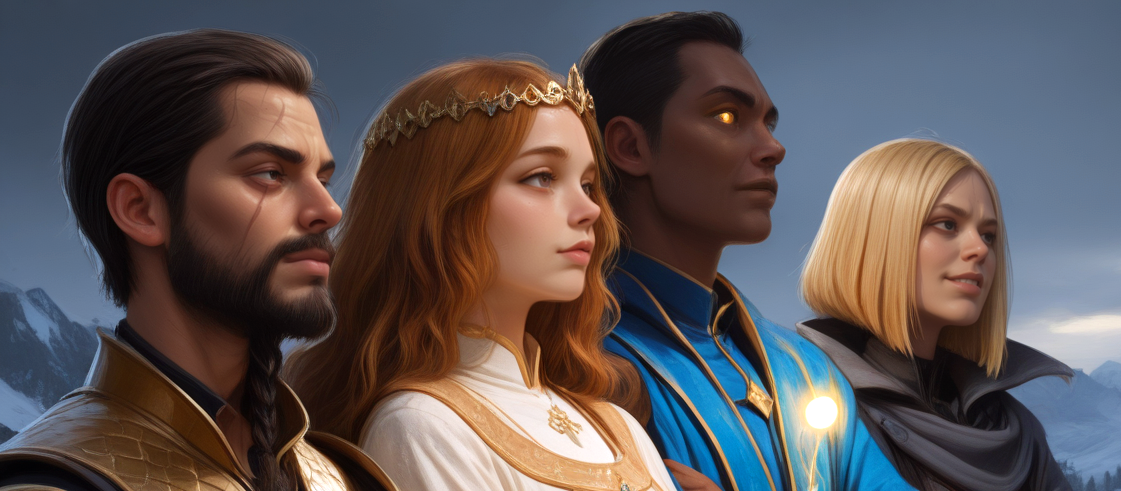
You certainly have noticed that most pictures generated on Civitai display (only) one character. And you certainly have noticed as well how difficult and frustrating it can be to generate several characters on the same picture.
I mean, several different specified characters, I mean, several different specific characters, especially if they have to be generated from dedicated LoRAs.
It is particularly difficult for Illustrious or Pony models.
In the article, I will try to explore a few techniques to help generate different specified characters in a picture, using Illustrious models. All of this should also work with Pony models and any other SDXL based models.
Method #1: prompt several characters
The most obvious method, the one we all have used already is to basically describe the different characters in the prompt.
This is where the frustration begins, because the good image can emerge only after a large multitude of bad and failed generations. If it ever does!
Is it good enough ?
The problem here is prompt bleeding, that is, when some prompt elements from one character bleed into the other character. For instance, if one character has eyeglasses, the probability is high to have all characters on the picture wearing eyeglasses!
Prompt bleeding is something that can't be avoided and the only basic way to limit it is to simplify the prompt, to make sure the bleeding elements are not part of the generation.
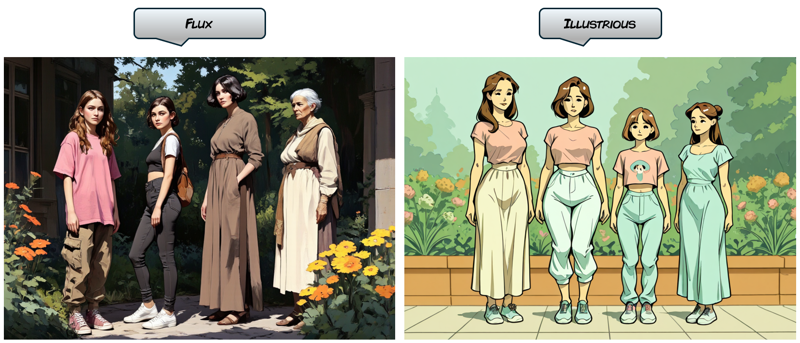
It is important to note here that the chosen model for the generation has a huge impact on the result. Flux can easliy prompt different characters where Illustrious and Pony models really struggle.
For instance, here is a comparison, with the same prompt:
4girls, multiple girls, 1girl, young teenager, baggy pants, sneakers, oversize pink t-shirt, long hair, 1girl, young woman, legging, crop top, angled bob cut, 1girl, mature woman, dress, shirt, short hair, 1girl, old woman, long dress, whool pull-over, bun, garden background
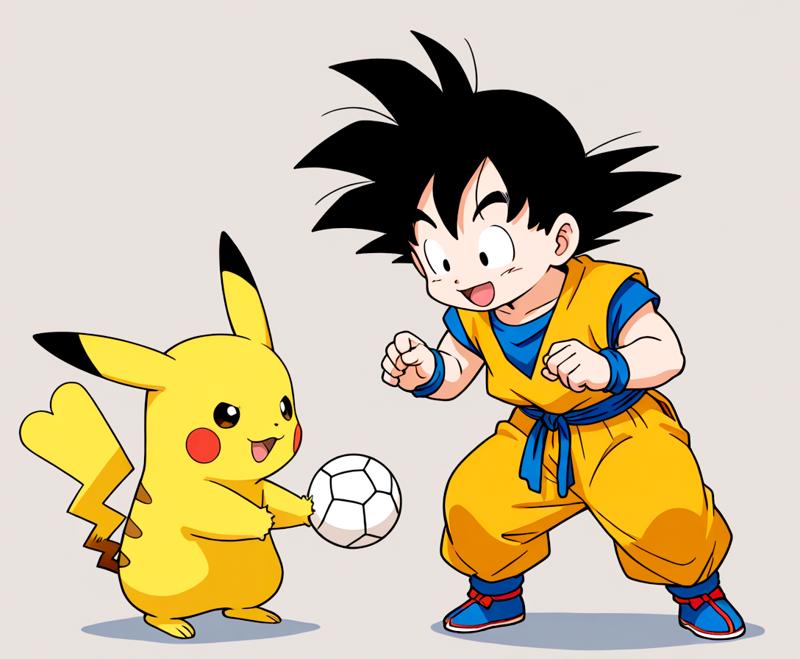
Some models may be more adapted than other. For instance, some models may already know many famous characters (especially anime) and therefore, they can generate several of those characters easily without too much prompt bleeding.
Example (model WAI-NSFW-Illustrious-SDXL): 2boys, duo, pikachu and goku, playing ball

Method #2: generating characters separately
While working on episode #5 of The Abduction of Clara Coleman (see the collection on my profile. Warning: XXX content inside), I was trying to generate a picture of Dahra and Mr Director discussing together. I was unable to generate a good picture of those two by using Method #1 and I rapidly got sick of trying again and again.
So, Method #2, I decided to generate instead the two characters separately and assemble them into a new picture.
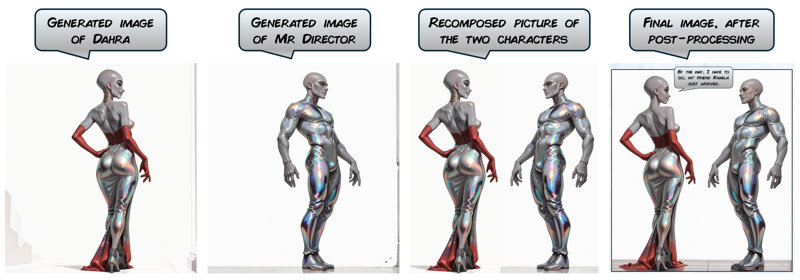
After generating Dahra, I simply switched the Dahra part of the prompt with one for Mr Director. So I generated a new picture with the same setting, size and style, of Mr Director, our second character.
Then comes the most useful tool of the whole Windows suit: Paint! With Paint, I copy/pasted the two pictures into one.
And finally, I used some inpainting workflow to rework the ground part of the picture. Some post-processing later (face detailers, details inpainting and upscaling), the final image is ready.
Is it good enough ?
The result is quite good but this method has some obvious limitations.
First, the background consistency is an issue. Here the background is plain white and only the ground had to be reprocessed (which was not too difficult). So we have dodged the problem.
If the background is detailed, it could be a real problem to inpaint a large area and this method will simply not be relevant.
Second issue: since the characters are generated separately, this method cannot be used if the characters are interacting together, like if they are fighting, dancing or having sex.

Method #3: generating characters separately - automated workflow
Now, we will keep that idea of generating the characters separately, but instead of doing it manually, let's build an automated workflow. For this, we will rely on a reference image and ControlNet to build our final picture.
Please, find the attached workflow:
Workflow 3 - separate characters generations & assembly.json
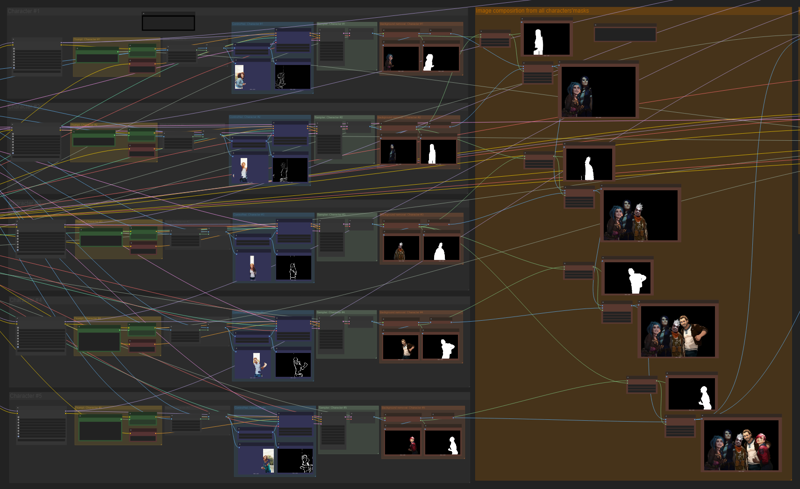
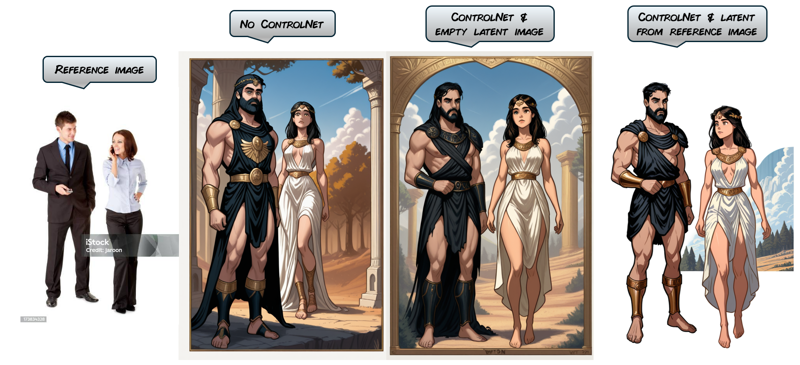
This is the complete workflow explained:
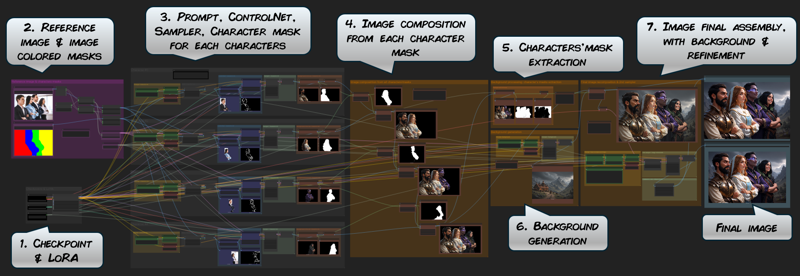
The workflow is based on separate generation lines, one for each character in the target image (steps 3.). Each generation line is made of basic image generation nodes : prompt, ControlNet and sampler and some mask/background processing.
Then, each character is added into the composition by using their mask (step 4.).
This step is a bit tricky as each character is added one after the other and it involves some masking operation to make sure that the character don't overlap themselves in an odd manner.
With the current setting, each character is placed behind the previous ones. To generate a picture with, for instance character #3 being in front of the others, some adjustements are required in the recomposition (see below).
The step 5. is a very important one as it allows to extract the characters from the composed image as a mask. This mask will be used in step 7. to compose the characters and the background.
The mask extraction used here is through the Image Remove Background node:
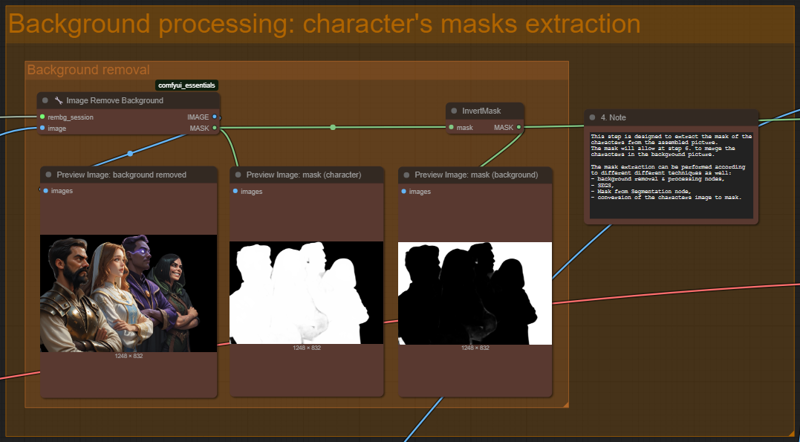
However, this technique don't always provide good results. I explore other different techniques to isolate the characters: see below for more information.
At step 6. the background is generated.
The final picture is then assembled at step 7. It is done by merging all the characters'mask into one.
This step also include a second global sampler. Its purpose is to slightly enhance the picture and clean any small artifacts resultings from the mask processing. To learn more about this refinement process, please check this article I wrote about it.
I find the result very impressive and very interesting. The result is very good.
This workflow is very powerful, because since all characters are generated independently, it is very easy to modify one element (character/background) without changing anything else in the composition:

Is it good enough ?
I find the result quite impressive actually. Depending on the reference image you use, it is possible to generate many characters in various positions.
The reference image can be anything you can think of. You can check this article I wrote which can provide some ideas on the matter: https://civitai.com/articles/11315/how-i-use-ai-to-produce-my-pictures.
However there are still some difficulties remaining, but more details in the next section below.
Method #3a: same method, but enhanced with LoRA
The previous workflow looks good so let's try to enhance it. What we want now are some LoRA, so we can generated pictures featuring very specific characters.
Please, find the attached enhanced workflows:
Workflow 3a - separate characters generations & assembly - extended.json
In this version, I have modified the following things:
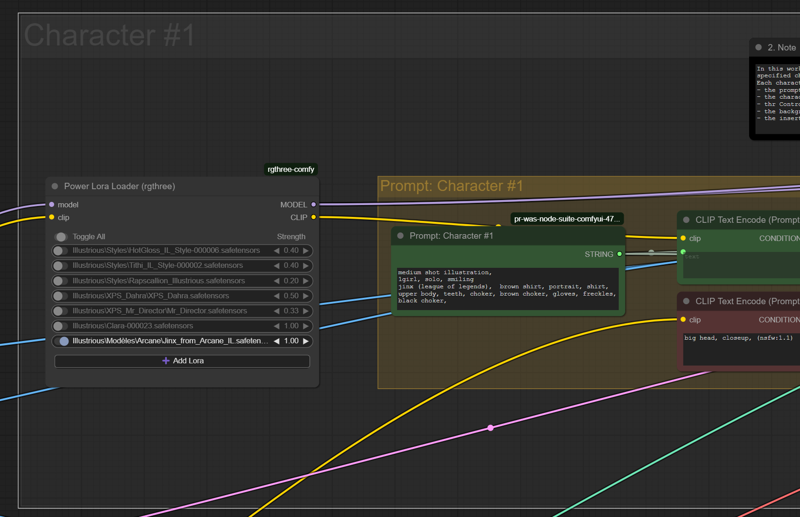
LoRA loaders
I added for each character generation line a LoRA loader. It is now possible to select specific LoRA for each character, and so, to generate specific LoRA based characters:
5th character generation line
I also added a fifth character generation line and I adjusted the image recomposition from masks accordingly. The workflow is scalable (almost) without limits, by adding new independant generation lines:
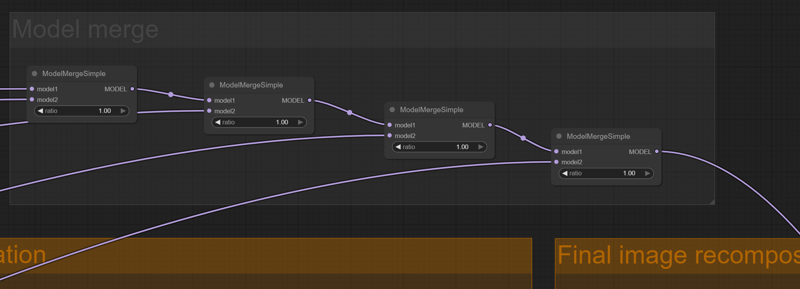
Final image refinement
The final image refinement step needs the LoRA inputs in the model. This is a bit tricky since the LoRA are processed independently. So I added a few ModelMergeSimple nodes to keep consistency in the final picture.
The final result is quite good actually: here is two family pictures from Arcane, featuring Jinx, Caitlin, Ekko, Vander and Vi, all characters generated from their respective LoRA:
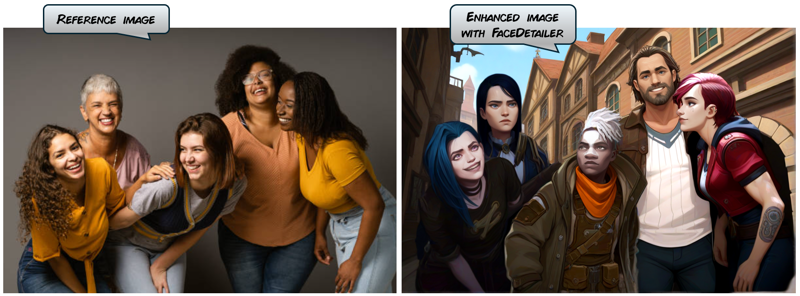
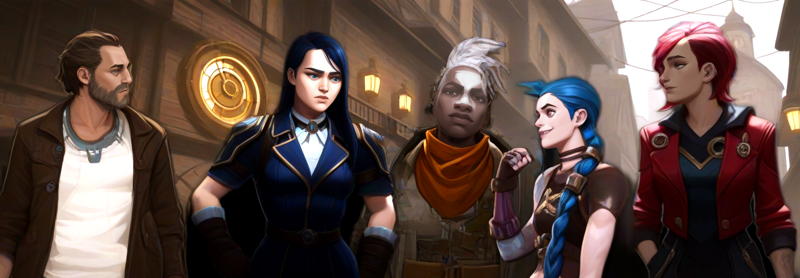
Note that on these two images, I changed the order of the characters. On the first one, Ekko and Vi are in front of the other characters. On the second image, Jinx is in front of Ekko.
Other way to extract the characters'masks
The key point in this workflow is in the characters'mask extraction, at step 5. The results are not always good, so I also give you three variants of the workflow, with different characters'masks extractions methods, because the extraction technique through the Image Remove Background node has some limits and we may want something more efficient.
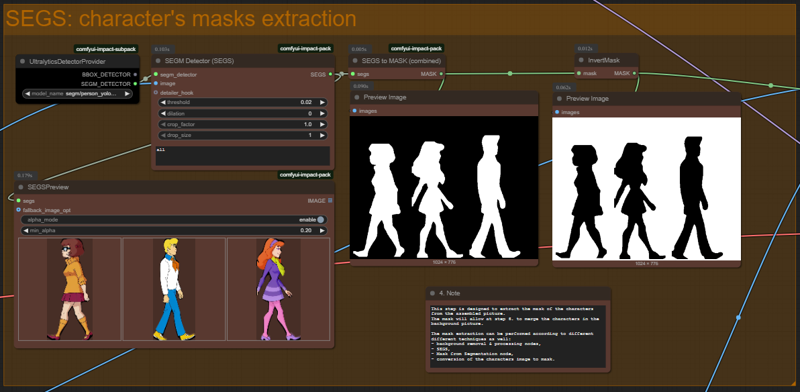
Workflow 3b - separate characters generations & assembly - extended with SEGS.json
Here the characters'masks are extracted through SEGS processing nodes. The result is interesting but not as good as I expected, at least on the tests I did. The extracted characters keep a thick black border coming from the black background of the picture and that kind of ruins the final image.
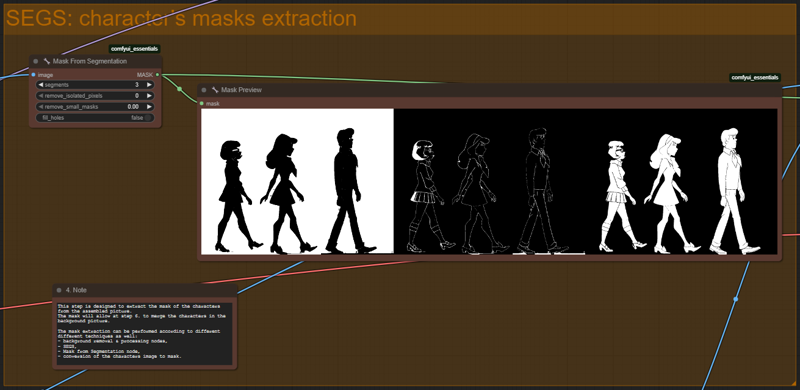
Workflow 3c - separate characters generations & assembly - extended mask from SEGS.json
I achieved the best results with the Mask from Segmentation node. Here this node extract different masks by using various techniques and combination of them provide the most precise mask for the characters. However, depending on the characters, and on the LoRA and models, the mask extraction sometime just don't work properly.
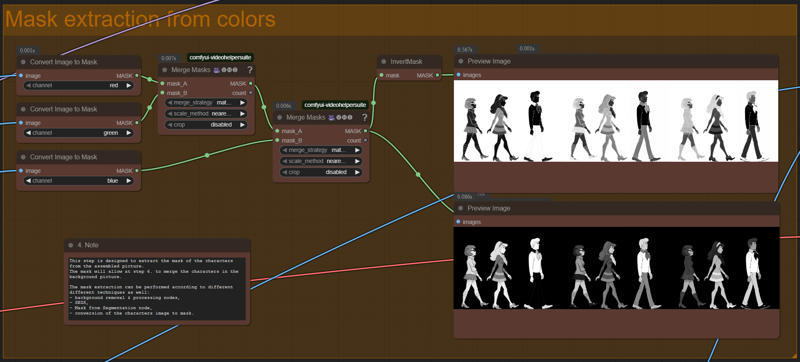
Workflow 3d - separate characters generations & assembly - mask from colors.json
In this one, the characters'masks is extracted from the Convert Mask to Image node. This node extract masks based on one color only, so it is necessary to combine the three RGB colors into one mask. However, the resulting combined mask can still be incomplete, which ruins the final image.
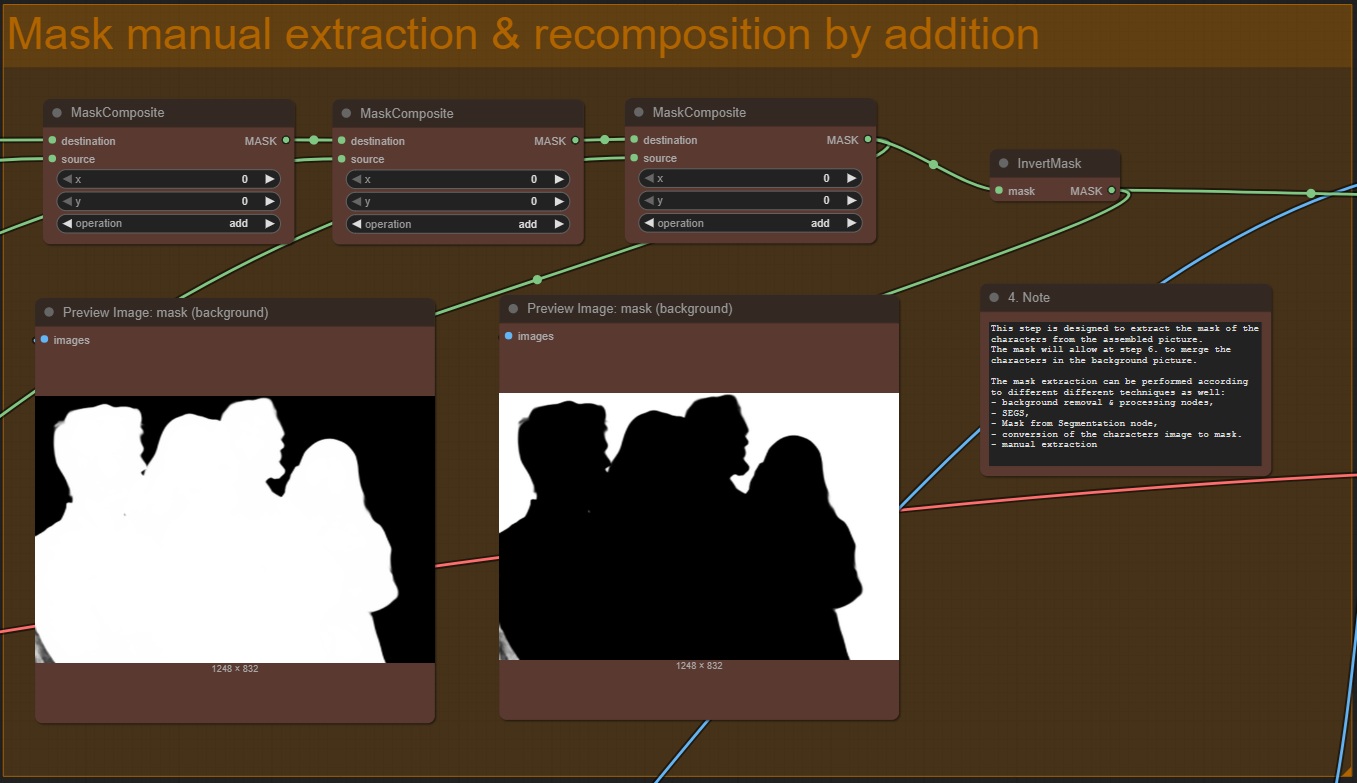
Workflow 3e - separate characters generations & assembly - mask manual edition.json
Although we like automated processes that run smoothly, sometimes the best results are achieved with some manual intervention. This last workflow is about that.
Here, once all characters are generated, their pictures are manually edited to get rid of the background. It is therefore recommended to add in the prompt a reference (plain black background).
This is done in two steps.
the generation of the characters in each generation line, up to the Save Image node.
There you can manually edit the characters images and get rid of any annoying background. Once this is done, you can load the cleaned image into the corresponding Load Image node:
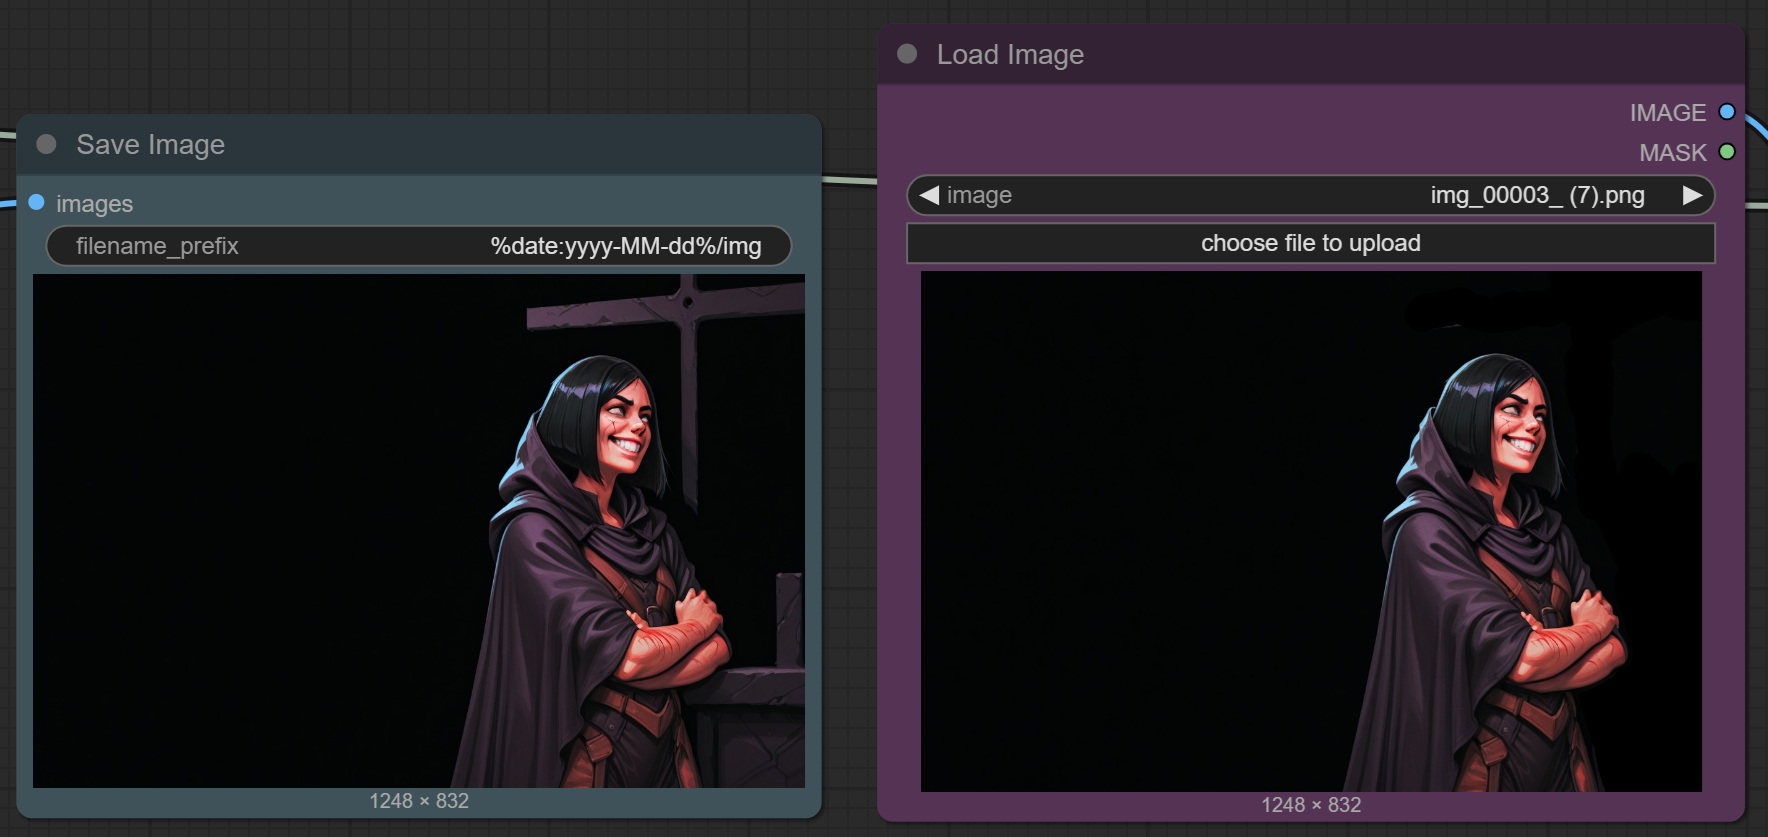
then, by relaunching the workflow, the process will go on and the mask for the composed characters is obtained by simply adding all their respective masks:
The best workflow to use will of course depends on the need, on the type of characters to generatedand on the model & LoRA. The key here is to test and customize them to see what we can get from them.
Is it good enough ?
The result is not as good as I expected but still very interesting. The workflow can easily generate multiple characters independently and with their own specific LoRA. That is our main objectif.
There are still some issues remaining.
Since the background is generated independently from the characters, the characters may sometimes look...out of place. This can be mitigated by reducing the background portion of the picture and increase the focus on the characters'portraits.
The characters are also generated independently from each other, and therefore, the final image may lack some consistency, just like on the pictures above, where the characters just seems to be thrown into the picture and their respective scale is a bit odd. On the pictures above, Ekko really look weird...
We still have difficulties with interacting characters, especially if the characters'parts are disjointed on the picture. The workflow work best with characters relatively apart from each others as complex interactions between them is not properly handled. On the sample below, the workflow can't process properly the man's arm around the girl's neck:

The workflow is easily scalable, but we quickly reach a limit. The more characters you have to generate, the more difficult it is to get and maintain good overall consistency across the image.
Method #4: prompt conditioning & ControlNet
The previous method is good but it has a feeling of...brute force hack. Let's try to see if we can generate characters more subtly and also address the issue of interacting characters.
For this, we will need prompt conditioning techniques and more ControlNet.
Please, find the attached workflow:
Workflow 4 - 2-characters generation - ControlNet.json
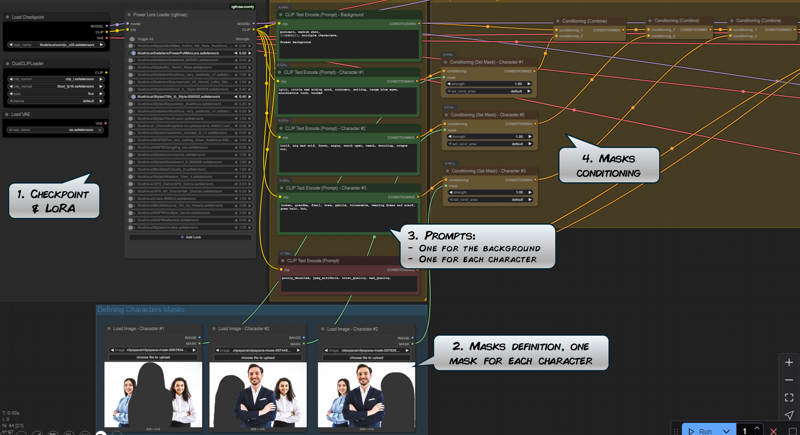
This is the complete workflow explained:
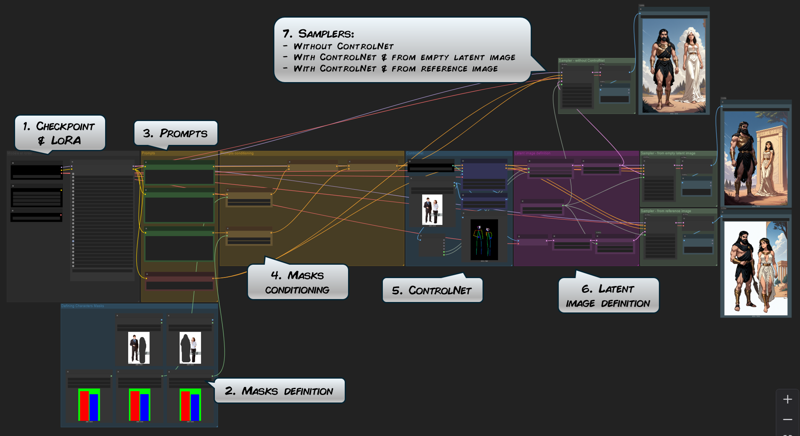
Steps 1. and 3. are universal to all picture generation. Note however that we have split the prompt generation with one distinct prompt for the background and for each characters.
Step 2. allow us to define the masks to apply to the generation, that is, which part of the picture will be dedicated to which character.
Step 4. is where the different prompts are conditioned according to their masks.
The basic idea here is to define different prompts for different areas of the final picture. Each prompt is conditioned separately, to be later combined together.
Prompt conditioning allow a more precise control of the prompts, especially by limiting the influence of one prompt (for instance, the prompt for character #1) to the other parts of the pictures (likely the character #2).
I write limiting the influence because as we will see, some prompt elements may still sometime bleed into others.
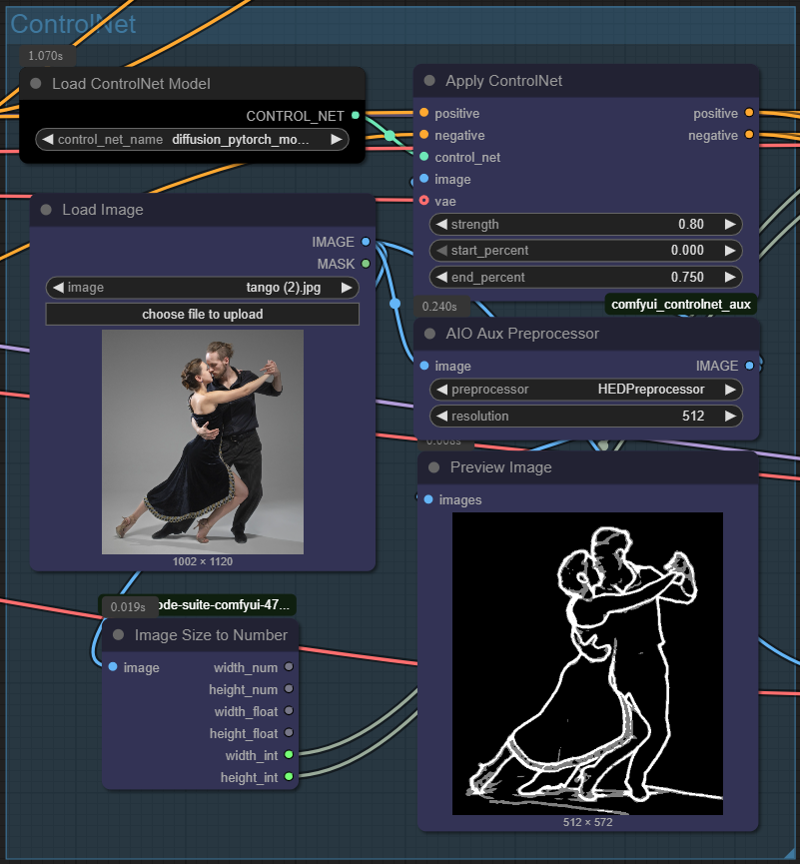
Step 5 is the ControlNet. To give more control over the final picture, we load a reference image to better describe the position we want on our characters.
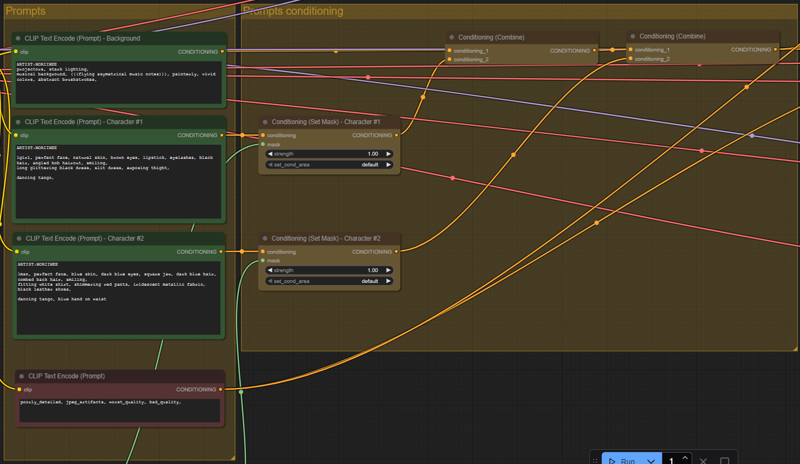
Steps 6 & 7 are the latent images definitions and the sampling steps. Here we generated three images, so we can compare different methods of generation:
First, without ControlNet: the conditioned prompts are directly provided as the input of the sampler.
Second, the input of the sampler comes from the ControlNet but the latent image is empty. The denoise value of the sampler is set to 1 so the model has total freedom on the generation.
Third, same as step 2, but the latent image comes from the provided reference image. The denoise value is lowered to force the generation to stay closer to the reference image.
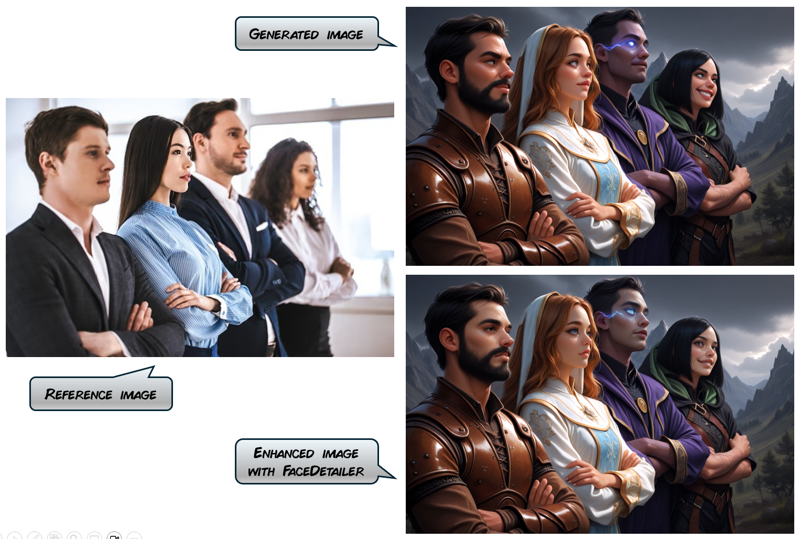
On the sample below, I googled those two cute corporate guys to be our reference image and tried to morph them into Theseus & Ariadne, from the famous greek mythology.
The result is good as all prompts elements are respected and contained on each character.
On the third picture, I struggled to get a background however. This is a consequence of the reference image having a blank background. Since this generation work with the reference image as the input latent, this is what we get in the final image.
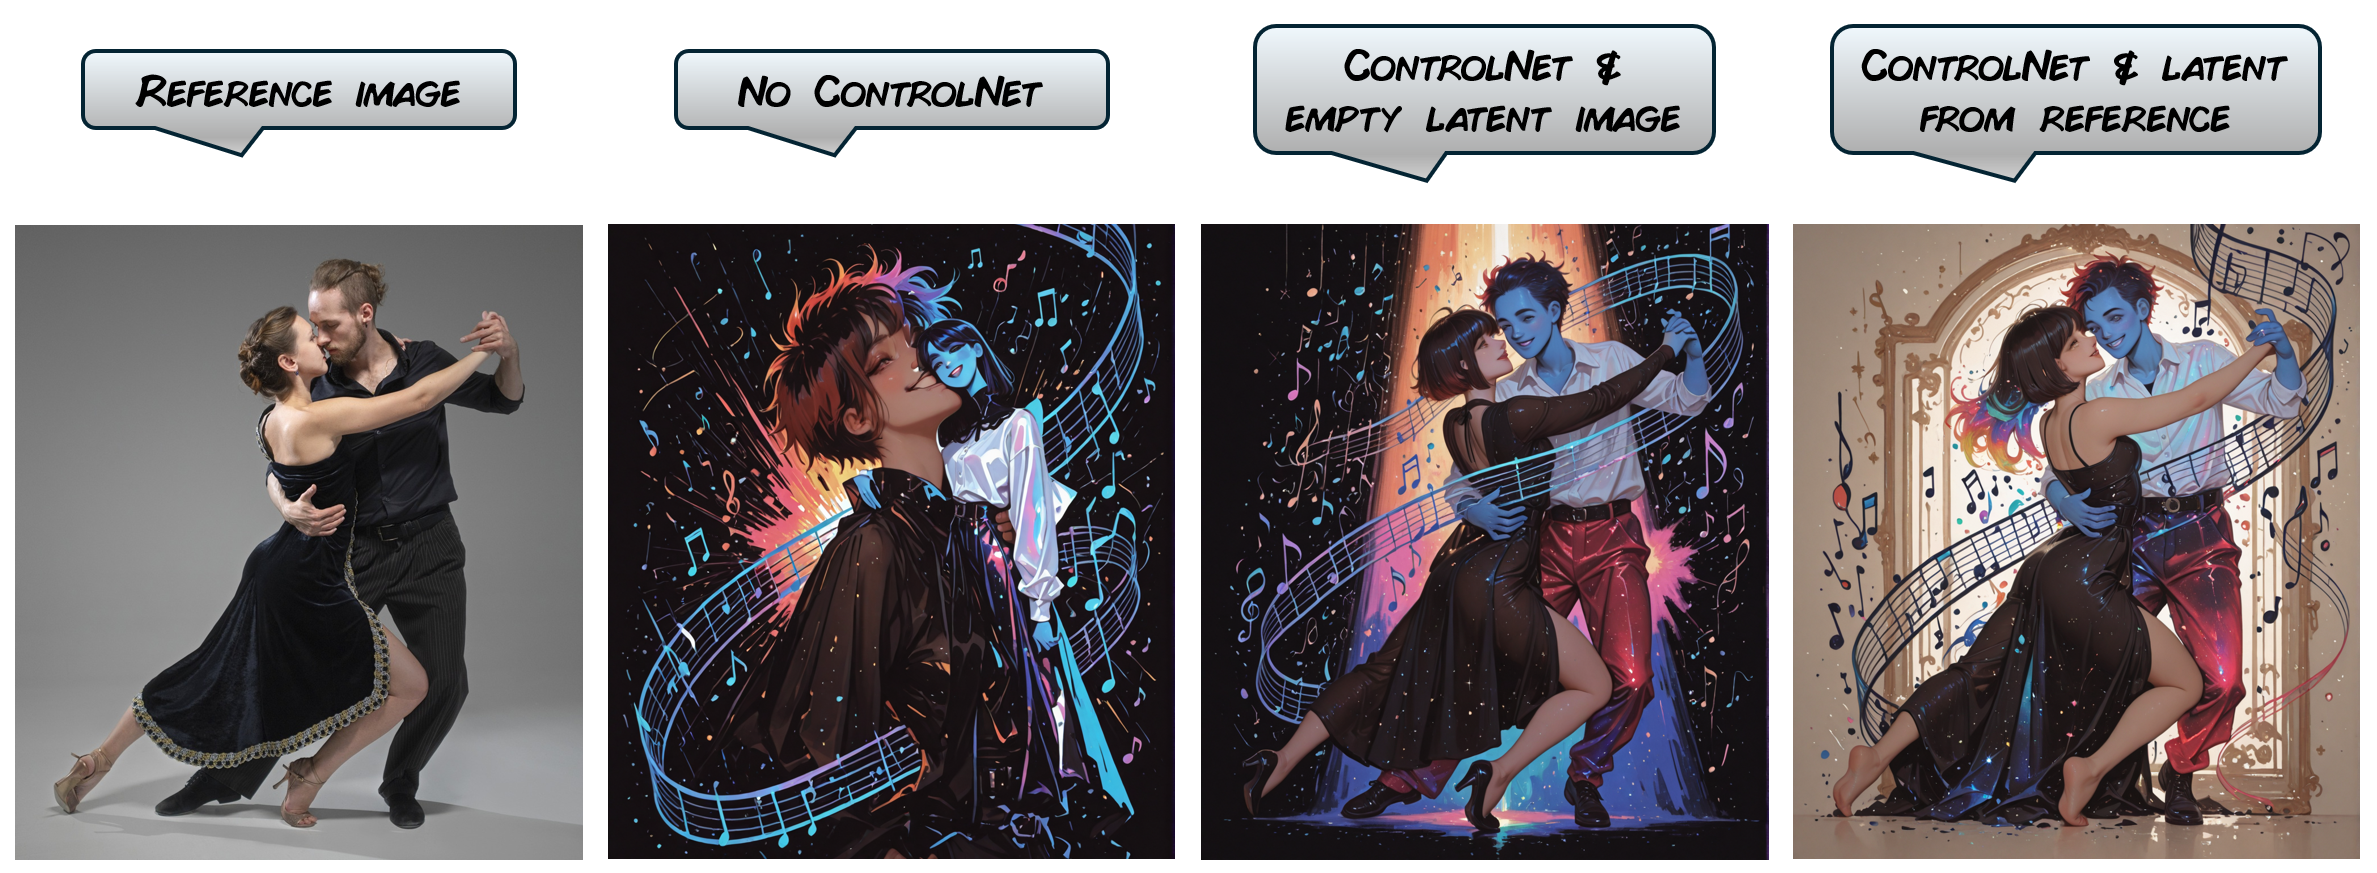
Now let's try something more dynamic, with a beautiful young couple dancing the tango. We want the boy to have a blue skin. This is an interesting challenge because some prompt elements for one character almost always bleed into the other characters of the picture, like the skin color, eye glasses etc.
The different prompts
Prompt for the background:
projectors, stark lighting,
musical background, (((flying asymetrical music notes))), painterly, vivid colors, abstract brushstrokes,
Prompt for the girl:
1girl, perfect face, natural skin, brown eyes, lipstick, eyelashes, black hair, angled bob haircut, smiling,
long glittering black dress, slit dress, exposing thight,
dancing tango,
Prompt for the boy:
1man, perfect face, blue skin, dark blue eyes, square jaw, dark blue hair, combed back hair, smiling,
fitting white shirt, shimmering red pants, iridescent metallic fabric, black leather shoes,
dancing tango, blue hand on waist
The characters' masks
I like to define tight masks for the characters but larger masks allow more freedom to the model for the picture generation:
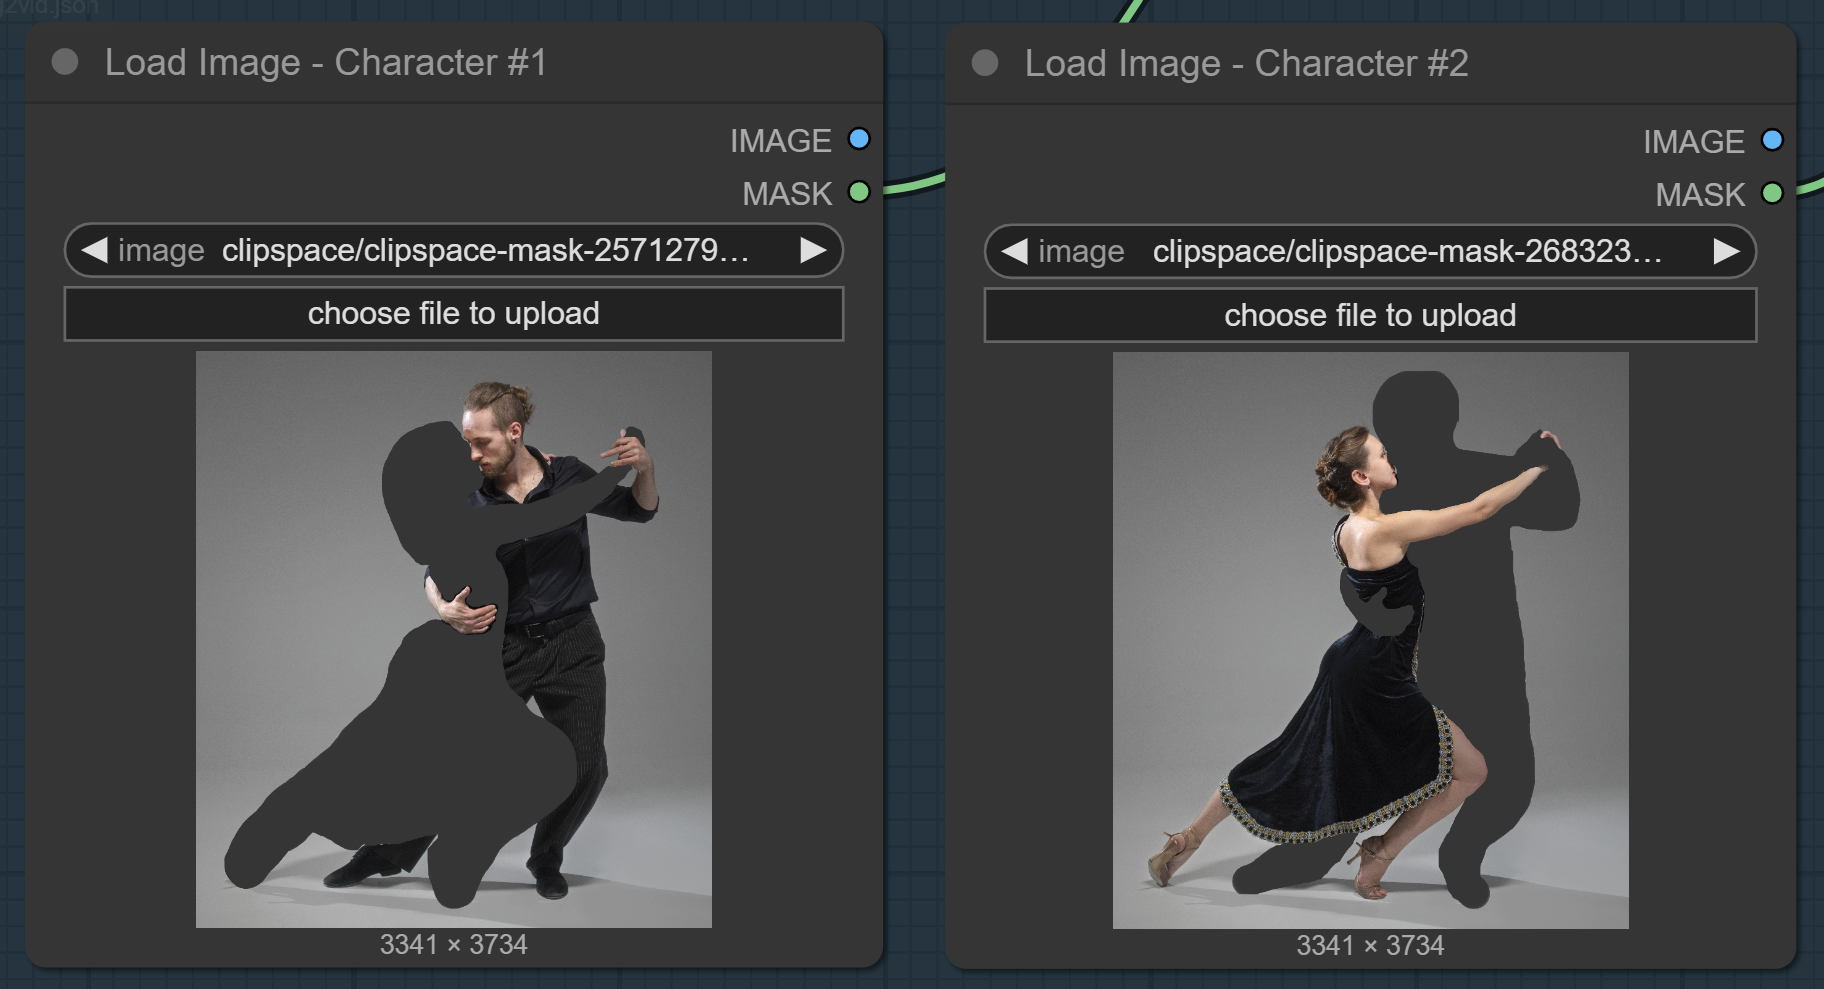
Note that the mask for the man is disjointed, with his right hand and right foot separated from the body. This was a big issue with the generation method #3 above.
The reference image and the choice of the ControlNet preprocessor
Here, the two characters are very close together, so the usual openpose preprocessor may not work properly.
Personally, I like HED because it detects the main features of the image well and ignores all the small features and smaller details in the image. But feel free to use different preprocessor. It is also possible to chain two ControlNet if the picture is not properly detected.
The final result is quite good, except for the generation without ControlNet. For thoses pictures, the prompts are completely mixed together for some weird random results in the end.
However, generations built with ControlNet respect the given prompts well and all specified elements are there, without prompt bleeding:
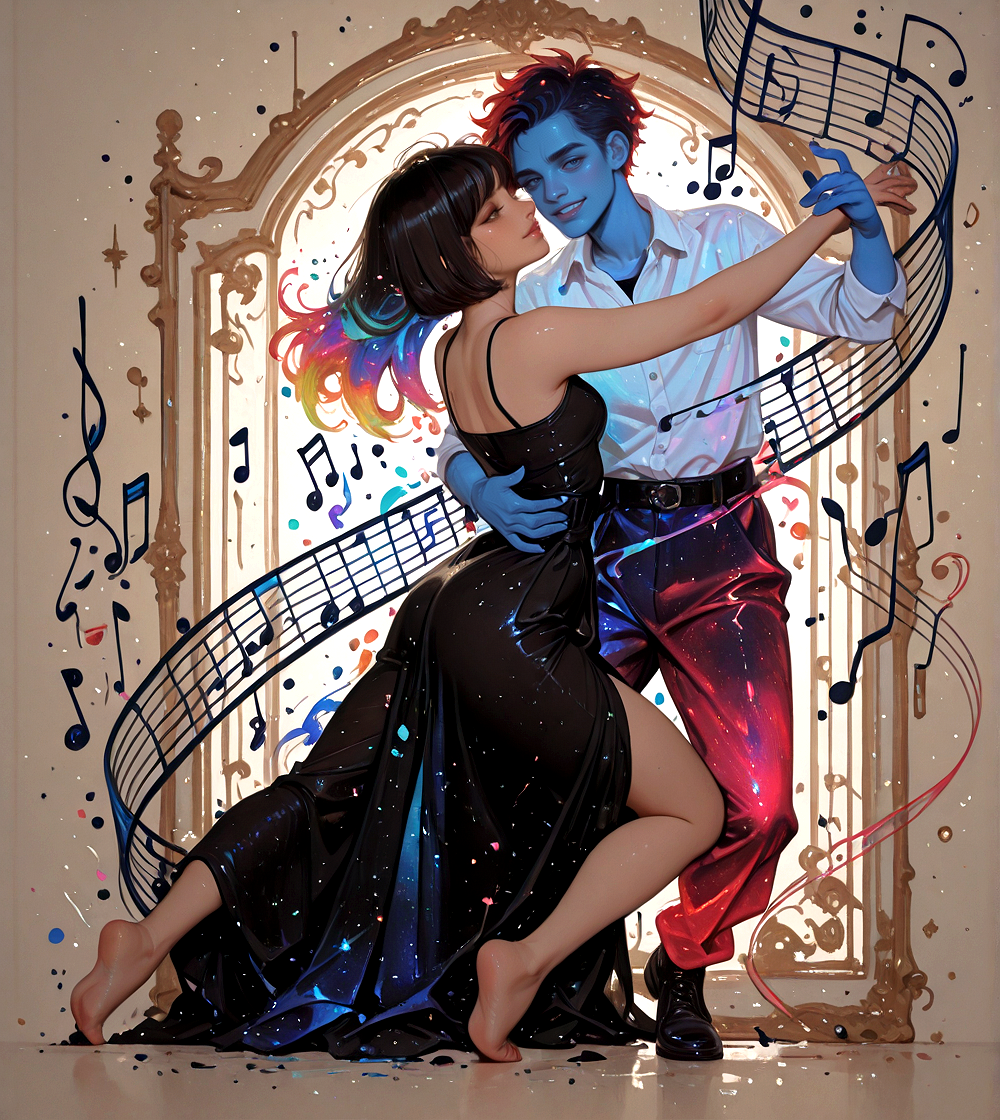
After some post-processing (inpainting, upscaling, face detailers and color enhancements), here is the final result we achieved:
Is it good enough ?
I find the result quite good and actually and very interesting. The workflow can produce good pictures which respect the prompts and the reference images.
Many issues from previous methods are correctly solved:
The characters can now be seamlessly integrated into a complex background,
The characters can also be generated interacting together in complex compositions.
The background and the characters are generated together, so the global image consistency is maintained.
However, it still produce weird results or just bad images and sometimes, some prompt elements from one character still bleed into the other.
Another example, just for fun:

Method #4a: same method, but enhanced with LoRA
Let's try to enhance our workflow by adding dedicated LoRA for each character.
Please, find the attached workflow:
Workflow 4a - 2-characters generation - ControlNet & LoRA.json
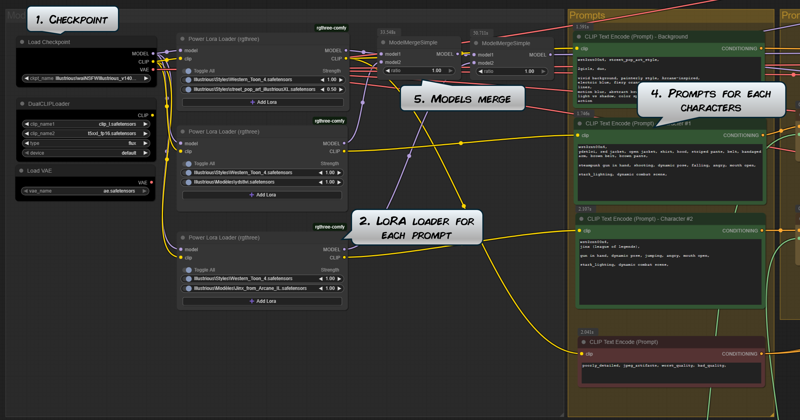
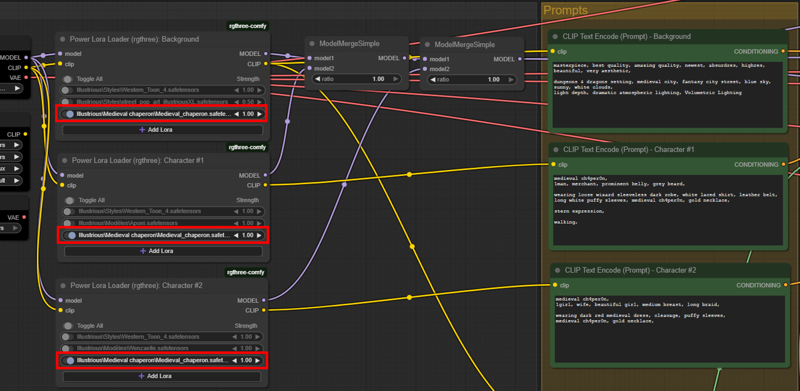
LoRA loaders & models merge
This workflow is the same as the previous one, but I added two LoRA loaders, one for each prompt (steps 2. and 4.).
We also need to merge all models output to be merge into the one input of the sampler. This is the purpose of the two ModelMergeSimple nodes (step 5.):
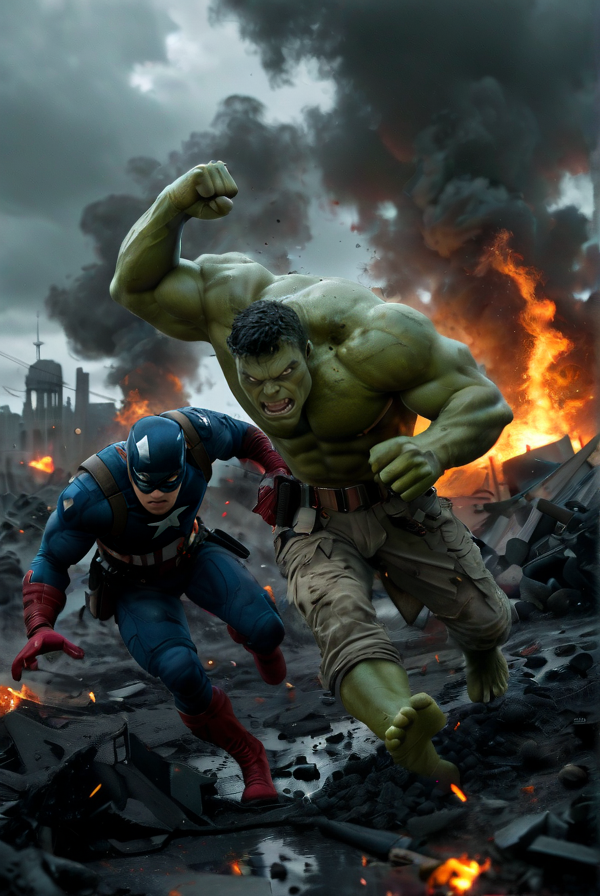
The results are pretty good actually. Example below, with Captain America trying to escape Hulk's wrath:
Another example, just for the fun to see Captain America getting molested by Hulk haha!
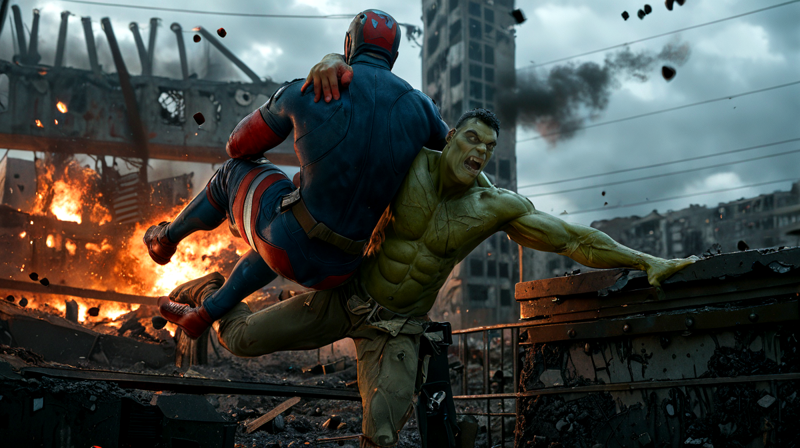
In the above pictures, I used one LoRA for each character, Captain America and Hulk. It is also possible to use style LoRA, for some specific outfit for example. In that case, it may be necessary that the style LoRA is defined for the characters and also for the background.
On the following image, the two characters are wearing a medieval chaperon.
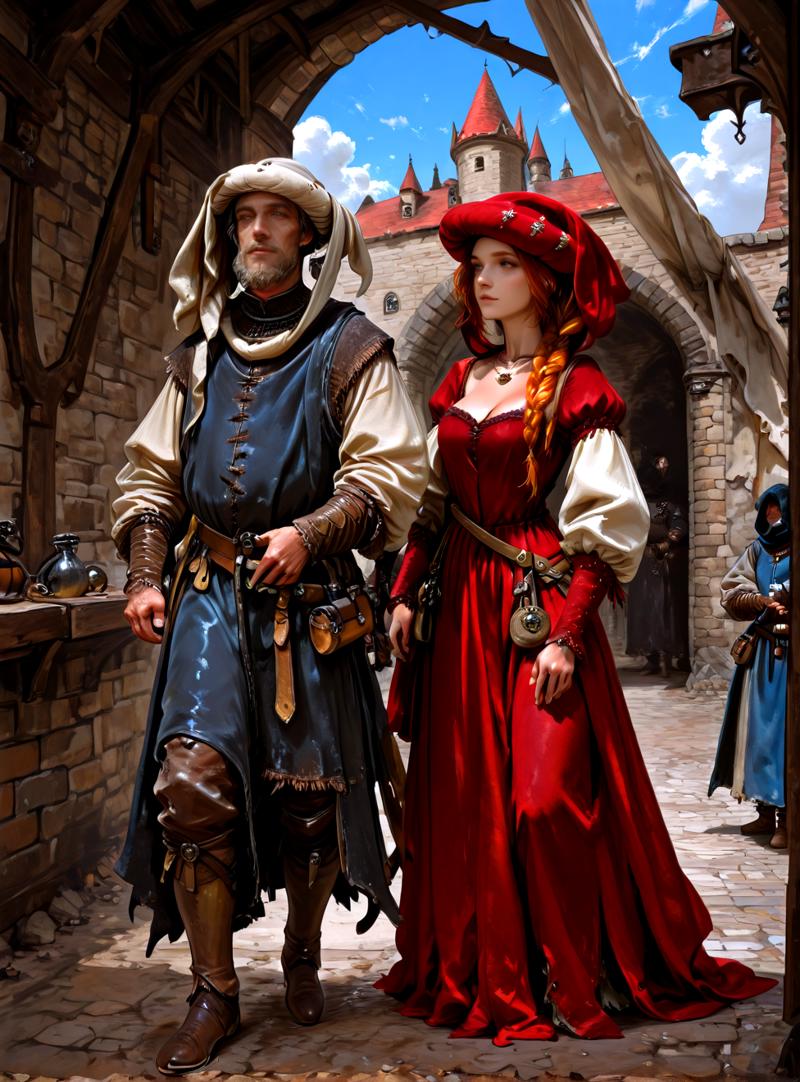
In the first generations, I set the LoRA only in the two LoRA loaders for the characters and...in the pictures, they were just bare headed. To have them wearing the chaperon, I had to specify the LoRA in the LoRA loader for the background as well:
Is it good enough ?
It works quite well! The results are pretty good actually but still, the final image is - obvisouly - heavily dependent on the reference image. In the first picture above, I had to inpaint many small artefacts generated from the spiked characters of the reference image.
I still find that method reliable and very intresting. Overall, the results are slightly better than with the method #3 because the background and the characters are all generated simultaneously, which greatly enhance the final image.
However, the good result don't come easliy and many generation and fine tuning is most of the time required before some nice appear.
Also, on all pictures, I have to use a Face Detailer to enhance and rework faces of the characters.

Method #4b: same, but more characters!
Now, let's try upgrade the workflow to generate three characters.
Please, find the adapted workflow:
Workflow 4b - Multi-characters generation - ControlNet.json
The workflow is basically the same the workflow #4, to which I added a third character prompt. Note that this workflow keep one common LoRA loader for all characters:
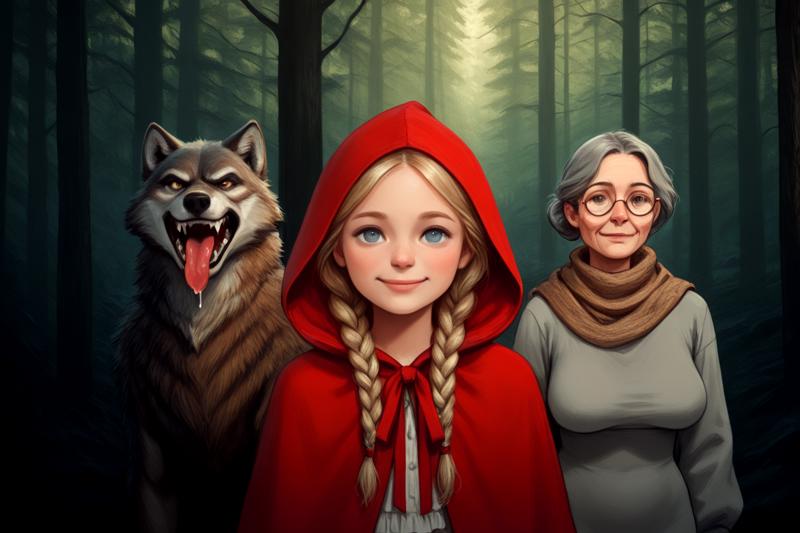
This is the kind of result we can get from it. I really love it!
Is it good enough ?
Overall, the best results I get are generated with the empty latent image. This give more freedom to the model. Generating the final image from the reference image can give very good results but only if the reference perfectly match the desired composition.
Prompt conditioning & ControlNet appear to be a very reliable way to generated several character without or almost without prompt bleeding.
Method #4c: same, but more characters and LoRA for each one!
Now, let's try upgrade the workflow to generate three characters, each with their own set of dedicated LoRA.
Please, find the adapted workflow. It is basically the same the workflow #4a, to which I added a dedicated LoRA loader for each character:
Workflow 4c - Multi-characters generation - ControlNet & LoRA.json
I'm giving you this workflow for reference only because it actually don't work: all I can get from it is one single character mixing all prompts. It is still quite interesting because each LoRA are properly applied on their respective part of the image but this is not quite what we are looking for.
Any help to make this workflow work properly is welcome!
Way forward
The most important thing here is all the workflows I give you are actually starting points. They can produce good images on the spot but most of the time, they need to be specifically adapted to generate the image you want.
For instance, the character's mask extraction from workflow #4 don't always work properly, whatever the differents techniques I provide, and therefore, for some pictures, I had to extract the mask by manipulating the image with Paint and/or PowerPoint.
So don't hesitate to adjust the workflows to your needs and also don't hesitate to provide some feedback in the comment section below.
Now, let's go froward with some interesting ressources I found and I share with you below:
All these workflows using the prompt conditioning & ControlNet are based on this workflow from shigatsu_renaki. So big thanks to him.
If you want to learn more about how all of this work, please check his article:
the-multiple-characters-generation-anger-tears-and-a-pinch-of-hope
Following the bounty, I received these very interesting articles from Prog420ress. These articles will help you generate muticharacters in the same picture when using Forge or A1111 webui:
Guide to Using Multiple Character Images with LoRas (stable-diffusion-webui-forge)
HOWTO: Multiple subjects using a Pony model (sd-webui-forge)
HOW TO: Prevent LoRA bleed using SDXL/Pony/Illustrious
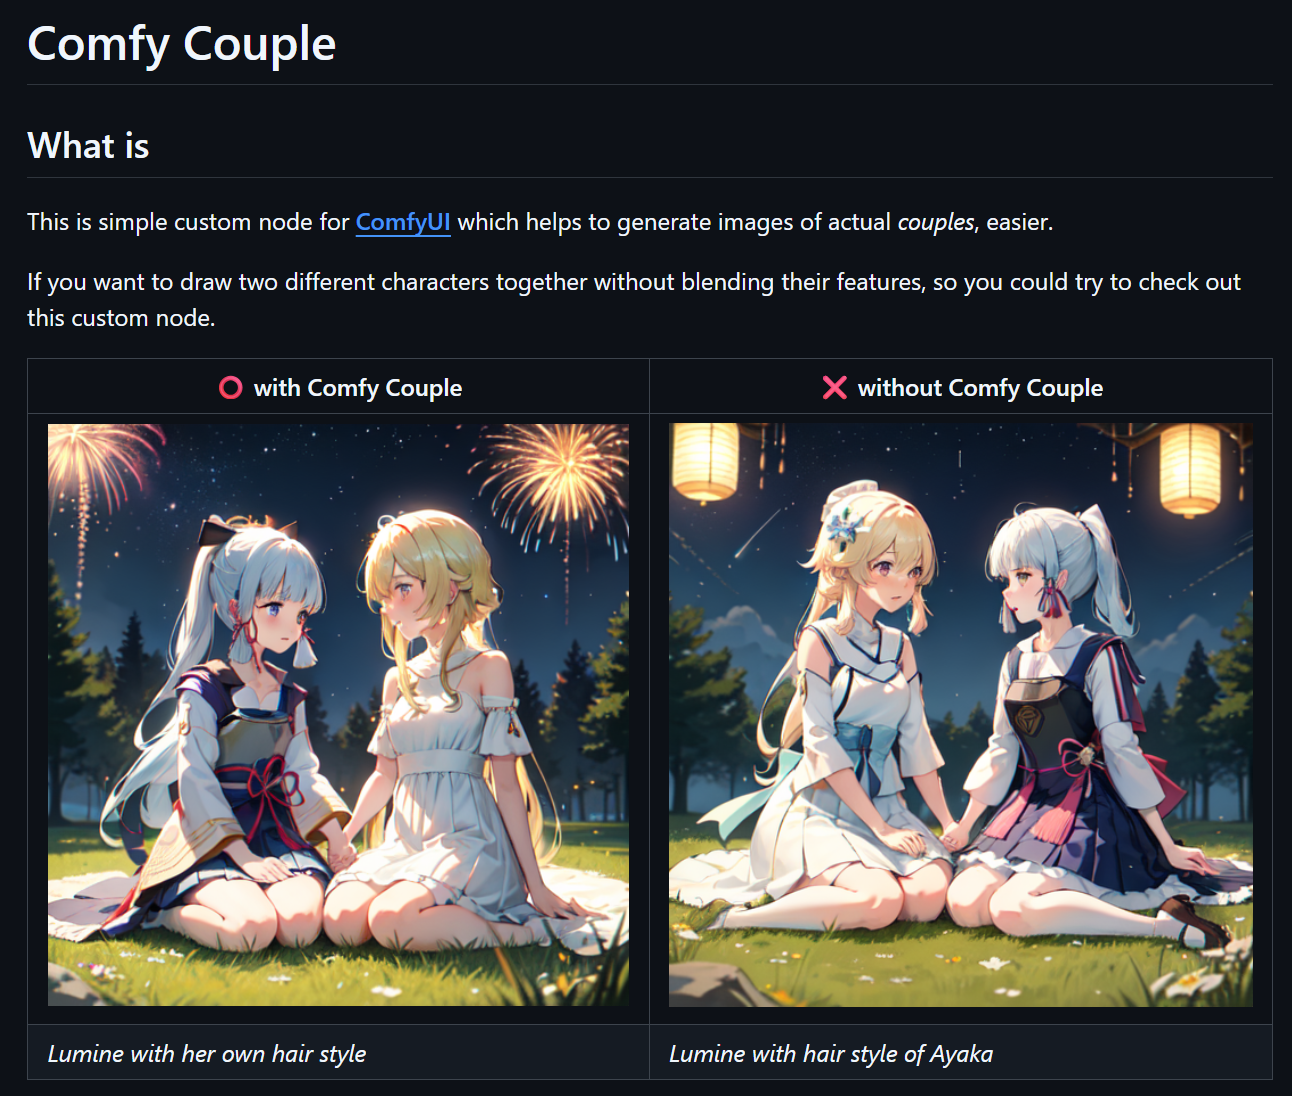
There is a ComfyUI custom node specialized into generating couples. I haven't tried it yet, but you can. Here is the link:
https://github.com/Danand/ComfyUI-ComfyCouple
There's a full article from FallenIncursio here about Regional Prompter to use in Forge. This is very interesting. I haven't yet explored the regional prompting techniques in ComfyUI but you can certainly start now if you're using Forge instead.
https://civitai.com/models/339604?modelVersionId=610058
Conclusion
There are still more techniques to explore to generate several characters in the same pictures, by using for instance regional prompting or IPAdapter style transfers. I will try these but later as this article is already waaay to loong!
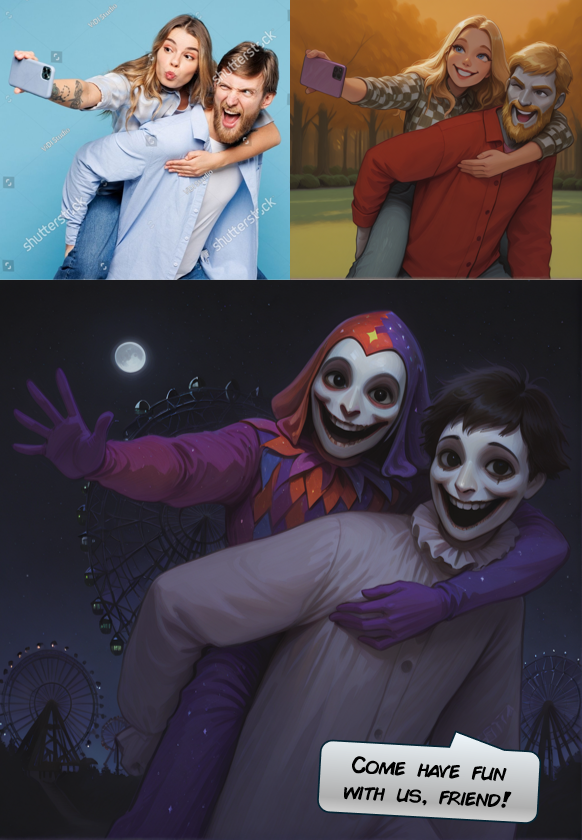
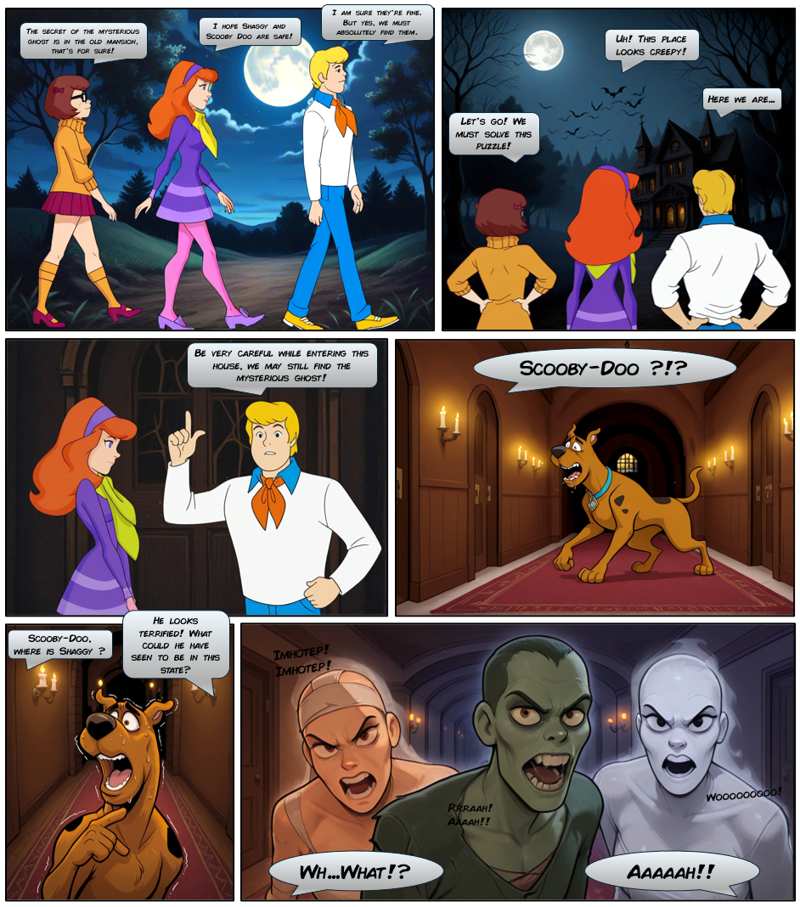
For your enjoyment and as a conclusion, here is a short comic, generated by using the various techniques described above.
Thank you for reaching the end of this article. Please, help me improve the workflows by sharing your own generations and by leaving comments below.
Have fun with your characters!