Beginning
The theme of this article comes from the tug-of-war between ControlNet. As far as ControlNet is concerned, it is very difficult to change the target of the screen, such as clothing, background, etc. in some combinations. I would like to propose a few directions for discussion, hopefully it will be helpful to all of you.
Prompt & ControlNet
As I mentioned in my previous article [ComfyUI] AnimateDiff Workflow with ControlNet and FaceDetailer about the ControlNets used, this time we will focus on the control of these three ControlNets.
OpenPose
Lineart
Depth
After we use ControlNet to extract the image data, when we want to do the description, theoretically, the processing of ControlNet will match the result we want, but in reality, the situation is not so good when ControlNet is used separately.
This is not only true for AnimateDiff, but also for IP-Adapters in general. Let's take a real example to illustrate. Below is the prompt I'm currently using,
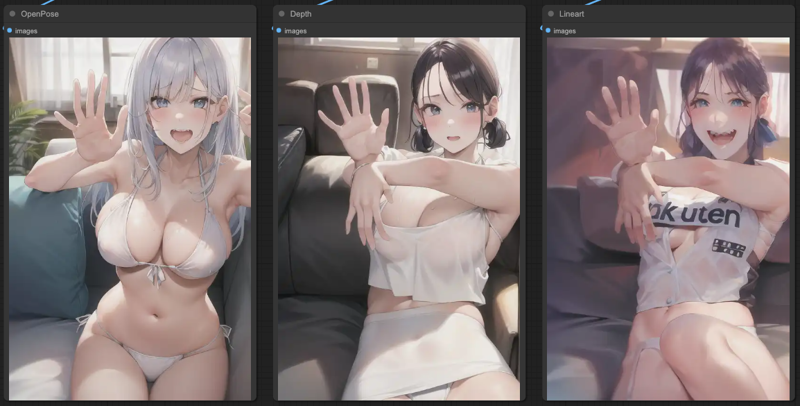
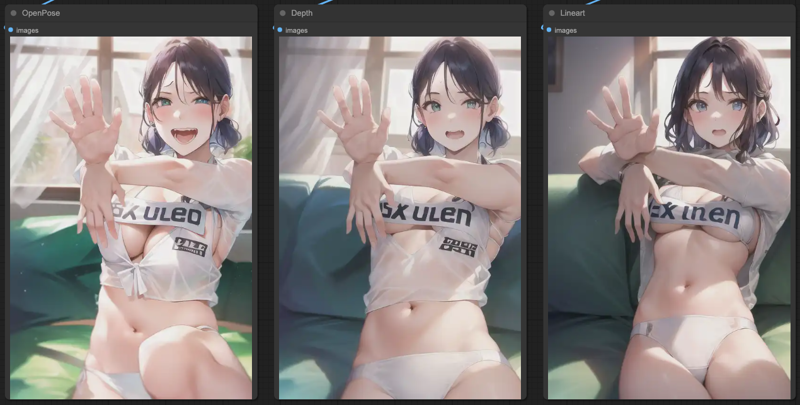
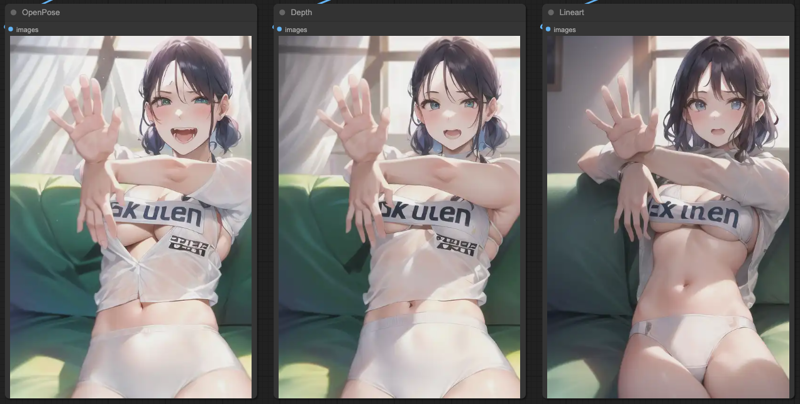
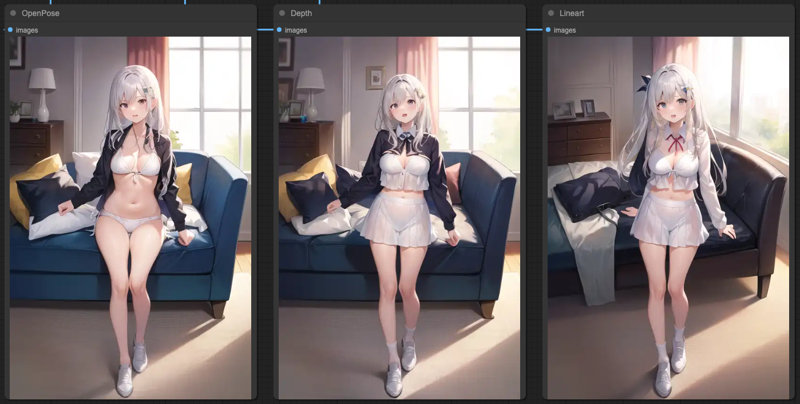
adult girl, (extreme detail face), (white bikini), bikini, short top, indoor, in front of sofa, bed, window, (bedroom),Then we look at the output of the three ControlNets,
OpenPose

Depth

Lineart

You'll see that OpenPose makes the most sense for the overall prompt, followed by Depth, which only has a reasonable background, and finally Lineart, which only has a reasonable background.
What happens if we connect these ControlNets?
OpenPose + Depth + Lineart

Connecting all the ControlNets results in an almost complete deviation from the prompt.
OpenPose + Depth
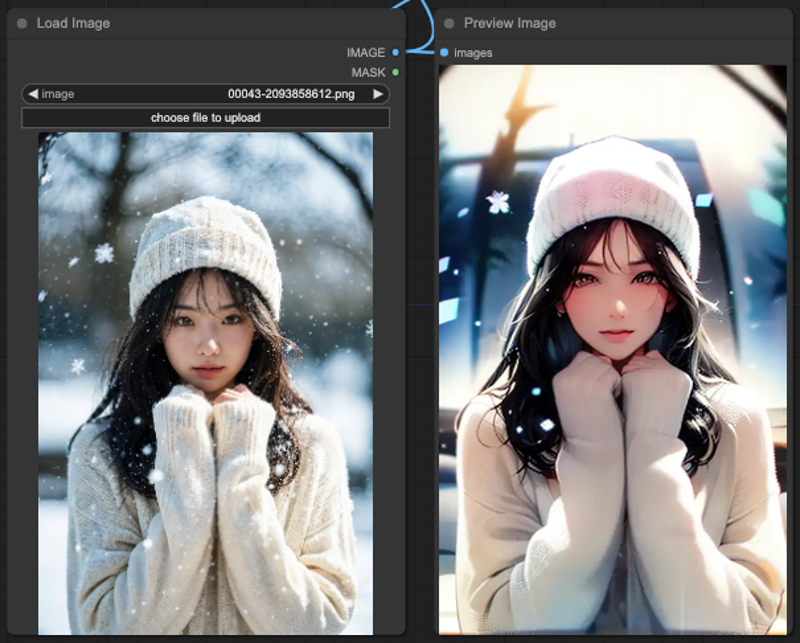
Just picking up on the OpenPose and Depth conditions, you'll notice that the windows in the background fit the prompt reasonably well.
OpenPose + Lineart
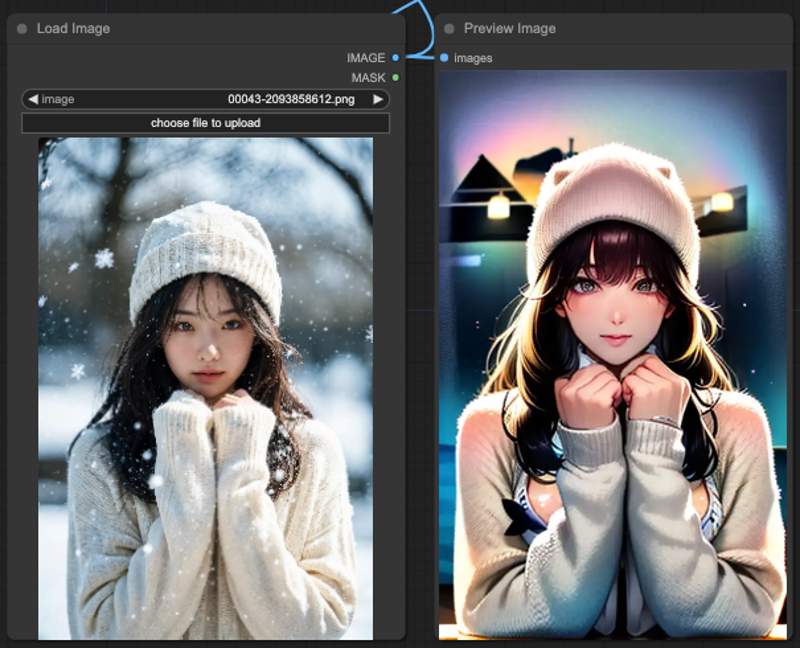
The combination above is even weirder, you'll find the swimsuit and the sweater at the same time, but the background becomes unclear.
Depth + Lineart
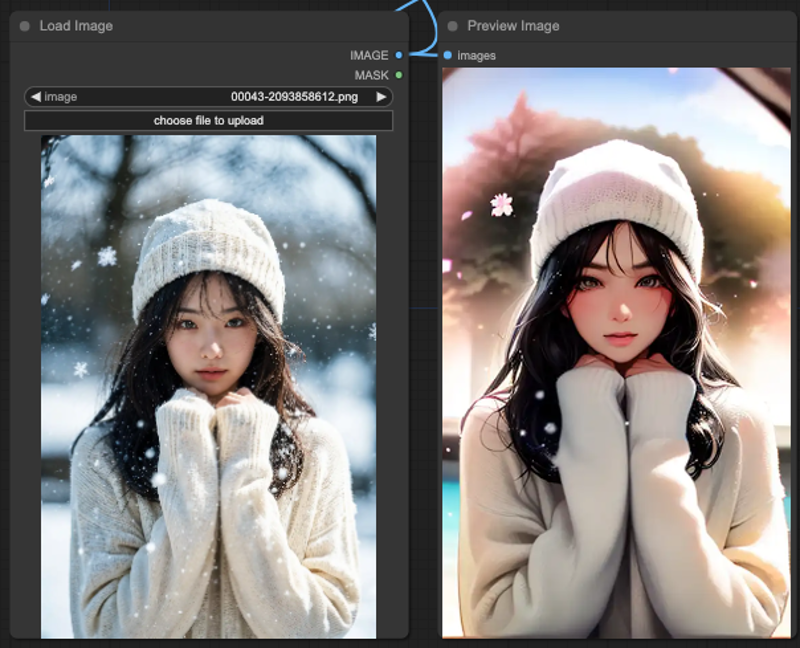
Finally, Depth + Lineart completely ignores all concepts of the prompt and just redraws all.
Why I focus on these three ControlNets?
Let me switch to a different reference source so that you can see why you need to use a combination of ControlNets in the first place.

You can see that the OpenPose on the far right is not that accurate, although it defines the face clearly, the hand movement is almost unusable. Therefore, we still need to use other ControlNets to clearly define the relationship between the body movement and its front and back.
If we follow the above three sets of ControlNets to sampler the graph directly, the result will be like this,
Sampling alone is the same as described at the beginning of the article, then we need to string together ControlNets to achieve a situation that matches our prompt. The order in which I've done this is,
Lineart x 0.5 > Depth x 0.5 > OpenPost x 0.7In this way we will get this result if we make individual outputs for each connection step,

If we connect the outputs of the KSampler in series with the order of our ControlNets, then we get the following result.

So, based on this result, you can connect the ControlNets and based on the result of the KSampler, connect the KSampler again so that you can get a more accurate output.
Mask & ControlNet
Based on the above results, if we test other input sources, you will find that the results are not as good as expected. If we test a different source, you will still have a situation where the characteristics are not obvious.

You will find that with the same steps, in the final OpenPose output, basically it still refers to the source content, and the whole background and costumes are not what we want to output. At this point, we need to work on ControlNet's MASK, in other words, we let ControlNet read the character's MASK for processing, and separate the CONDITIONING between the original ControlNets.
Our approach here is to
Get the MASK for the target first.
Put the MASK into ControlNets.
Separate the CONDITIONING of OpenPose.
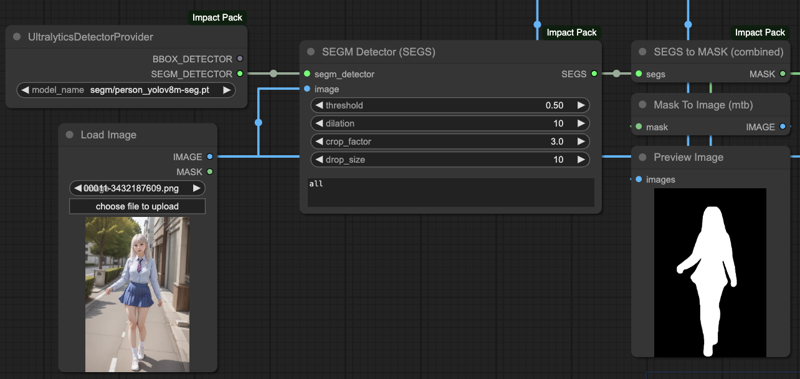
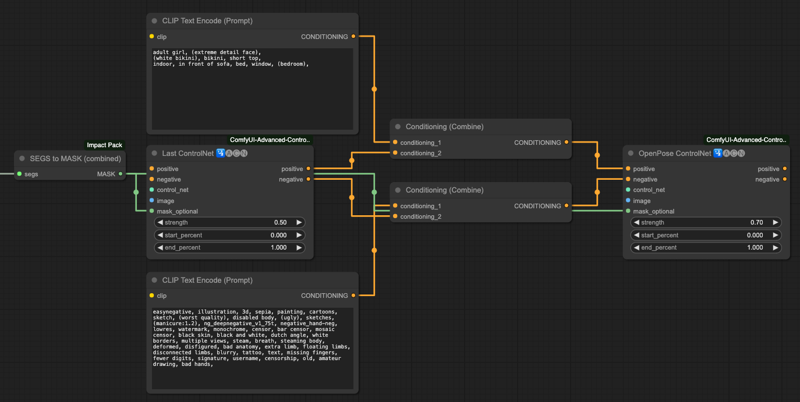
After this separation, you'll get an output that matches your cue word well.
The combination of ControlNets and masks generated by each graphic source is not the best solution, you can try different combinations to achieve the best output. You can try different combinations to achieve the best output. This is just a way to use the masks so that the output can be closest to the image we want to describe in our hints.
Please note that not all source images are suitable for MASK or CONDITIONING! Not all source images are suitable for MASK or combination CONDITIONING, you need to test yourself how to combine them to get better output.
SEGs Detailer & ControlNets
This is similar to the MASK approach described above, but this is more of a post-processor approach. In other words, after all the ControlNets have been processed, we do a post-processor on the acquired image.
The advantage is that there is less need to consider the correspondence between ControlNets and MASK, and there is no need to adjust the order of ControlNets and cue word processing. However, the result is not necessarily better, you need to compare the difference between the two and choose the one you think is better to use.
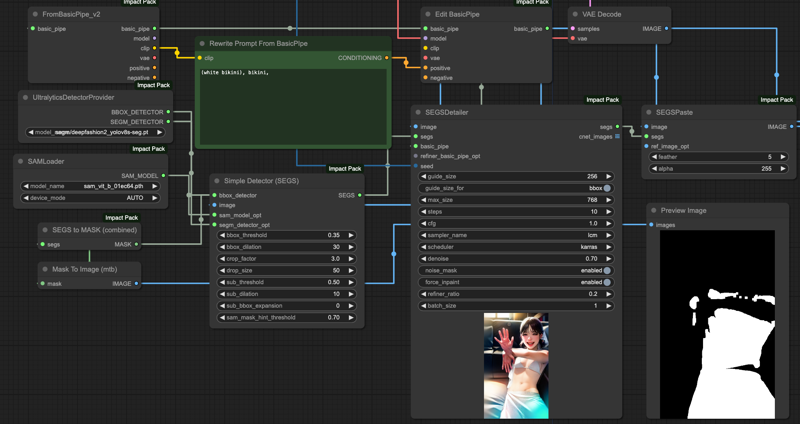
The process of using SEGS Detailer is that after our VAE Decode outputs the final result, we use SEGS Detector to help us circle the blocks that we want to redraw for the final result, which is actually very similar to MASK.
Get the final output from VAR Decode.
Take the
positivepart of the original Pipe and rewrite it using Edit BasicPipe.Use SEGM DETECTOR and select the model
deepfashion2_volov8s-seg.pt, which is a model fr recognizing clothing.Plug in Simple Detector and test various parameters inside.
Send it to SEGSDetailer and make sure
force_inpaintisenabled.Finally send it to SEGSPaste to merge the original output with SEGS.
For the SEGS Detailer part, our ControlNets don't have to test the whole masking process like in the previous article, we just need to do a post-processing after the final VAE Decode is done. Of course, it's up to you to decide if this is better or not.


IPApater & ControlNets
First of all, we need to clarify what you want to achieve in your workflow when you use IPAdpater. Generally speaking, the IPAdapter refers to the entire input image, or you just want to refer to the face. We'll use the whole image as an illustration, and this part of the design with the ControlNets is a bit more complex and interfering.
If you want to use MASK and ControlNets to achieve the result of interfering with the IPAdapter, the actual operation will be very complicated. Let's take a look at the effects of combining IPAdapter with three ControlNets.

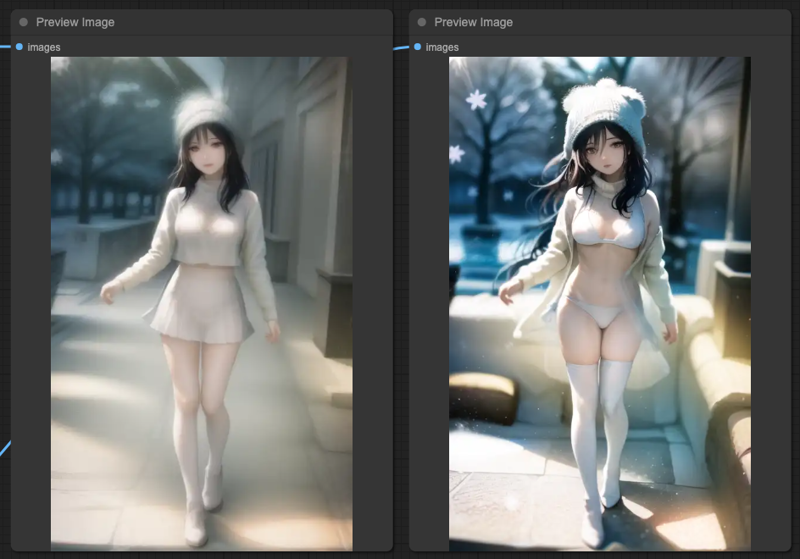
We still have the same basic prompt, and the result will be that OpenPose will be closest to the prompt, while the other two will be closer to the original input image. In this case, no matter how you combine these ControlNets, you end up with a fused IPAdapter and original image, which is the intent of the IPAdapter, which is much stronger than what your prompt describes, resulting in a fused image.
So, we do it again based on the last KSampler output, which gives us a better result, similar to how ControlNets' individual KSamplers work in tandem, only we do it again for the final output.

SEGs and IPAdapter
There is a problem between IPAdapter and Simple Detector, because IPAdapter is accessing the whole model to do the processing, when you use SEGM DETECTOR, you will detect two sets of data, one is the original input image, and the other is the reference image of IPAdapter.
When you use SEGM DETECTOR, you will detect two sets of data, one is the original input image and the other is the reference image of IPAdapter.
Therefore, when you want to use SEGM DETECTOR, please use the original model source for your BasicPipe's model source, if you connect the output MODEL of IPAdapter as your source, the final output result may not be what you want.


You will find that there is a problem with SEGSDetailer, that is, there will be obvious color differences in the MASK blocks, this is due to the use of the output results for redrawing the problem, this situation does not exist when you simply go to use the ControlNets interconnection test.
AnimateDiff & ControlNets
Finally, by integrating all the ControlNets operations above, we can probably expect the following effects in the AnimateDiff process.
Clothing and background stability.
Rationality and continuity of body movements.
Facial expression optimization.
Before we start this section, please make sure your ComfyUI about ComfyUI Impact Pack is updated to the latest version, because we need the two new features in it.

In my previous post [ComfyUI] AnimateDiff with IPAdapter and OpenPose I mentioned about AnimateDiff Image Stabilization, if you are interested you can check it out first.
After the ComfyUI Impact Pack is updated, we can have a new way to do face retouching, costume control and other behaviors. This way will be more effective than my previous article, and it can also improve in output speed.
You can refer to the workflow provided by the author to understand how the whole process works.
The author has also provided a video for your reference. This author's videos have no sound, which is a wonderful feeling :P
Next, we will adjust our output by referring to the original author's production style.

We only use the part of the clothing to illustrate, he also has a good effect on the part of the face repair, interested parties can refer to the author of the above Workflow to create the process of face adjustment.
Of course, our purpose is to modify the clothing, that is to say, we do not want to change to other parts, according to the original author's method, he is the use of MASK way to make a certain block to do redraw and change the clothing, but because we are here to read the frame frame to deal with, so it is not possible to do this thing manually. Therefore, according to the SEGs mentioned in the first half of our article, we use thedeepfashion2_volov8s-seg.pt model to do clothing detection and rewrite the BasicPipe prompts.
This process is very similar to face retouching, except that we use the concept of face retouching to control the clothing.
Face Detailer with AnimateDiff
Regarding the face retouching part, we can follow a similar process to do the face retouching after the costume is done. The only difference is that we only need to use the BBOX DETECTOR and select the face repair model for the face repair, the following example is to use the modelbbox/face_yolov8n_v2.ptto repair the face.

LCM & ComfyUI
All the KSampler and Detailer in this article use LCM for output.
Since LCM is very popular these days, and ComfyUI starts to support native LCM function after this commit, so it is not too difficult to use it on ComfyUI.
ComfyUI also supports LCM Sampler,
Source code here: LCM Sampler support
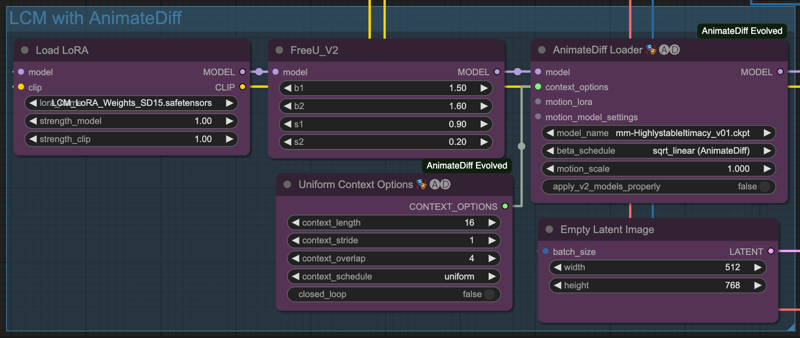
In ComfyUI, we can use LCM Lora and LCM Sampler to produce image quickly,
Conclusion
ComfyUI has a high degree of freedom, but also requires a lot of cross-experimentation, I only provide a few examples for your reference, everyone still has to adjust the process according to their own needs.
Finally, I'll put up the animation produced by this article,
Finally, here's the full Workflow file used in this post, for those who are interested:
https://github.com/hinablue/comfyUI-workflows/blob/main/2023_11_20_blog_workflow.png


![[GUIDE] AnimateDiff, IPAdapter, ControlNet with ComfyUI Target and Background Handling](https://image.civitai.com/xG1nkqKTMzGDvpLrqFT7WA/9955ce7c-115c-45d8-9abe-7b18671dfa4e/width=1320/9955ce7c-115c-45d8-9abe-7b18671dfa4e.jpeg)