I've been doing a few tests with Flux training using CivitAI's onsite training tool. (Documentation
I wanted to share the results a set of experiments with captions for a World Morph style model I created.
Part 2 of this article
Similar article but with a character
Wooly Style Flux LoRA

I've uploaded each version of the model as a separate version, with it's own images and such on the side. In this article, I will share a bit more of the process behind each version, and have some comparison pictures.
Training Settings
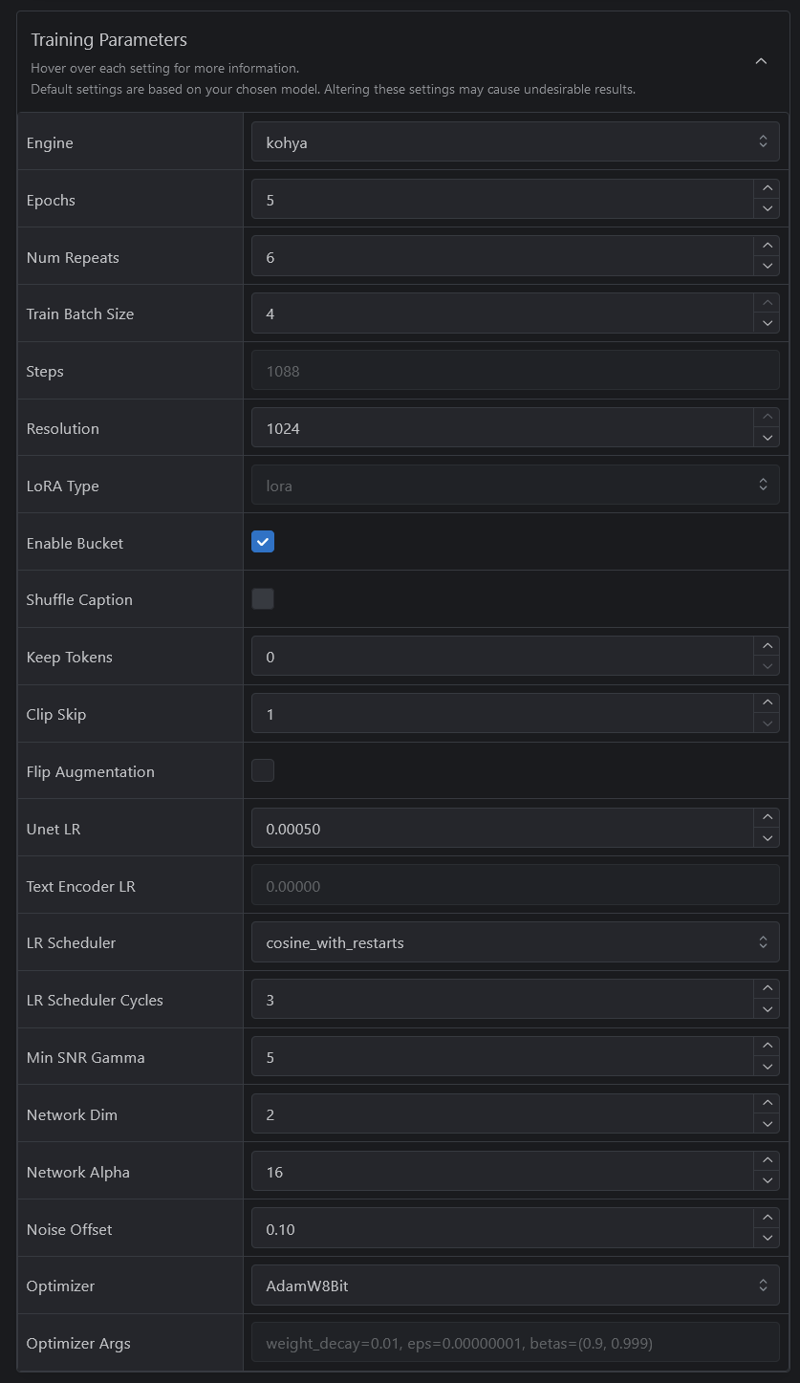
I went with the recommended training settings from the Documentation.
Specifically, adjusting repeats to reach ~1000 steps in the training.
I did however also go for 1024 in resolution. This seems to have worked fine for me. But so has 512 in my earlier trainings.

{
  "engine": "kohya",
  "unetLR": 0.0005,
  "clipSkip": 1,
  "loraType": "lora",
  "keepTokens": 0,
  "networkDim": 2,
  "numRepeats": 6,
  "resolution": 1024,
  "lrScheduler": "cosine_with_restarts",
  "minSnrGamma": 5,
  "noiseOffset": 0.1,
  "targetSteps": 1088,
  "enableBucket": true,
  "networkAlpha": 16,
  "optimizerType": "AdamW8Bit",
  "textEncoderLR": 0,
  "maxTrainEpochs": 5,
  "shuffleCaption": false,
  "trainBatchSize": 4,
  "flipAugmentation": true,
  "lrSchedulerNumCycles": 3
}
Version 1 - No Captions
Does not use any trigger word in the captions.
This version is trained exactly like it sounds. With uploaded images without captions. The CivitAI training tools warns when you do this, since this may not work well for all models.
I think that this method of training works best for styles, like art styles and World Morphs. Think models where you usually want to apply the model to the entire image instead of having it be just a specific part of it.
Since there are no captions, there are no specific trigger words for the model. Instead I describe what I want using natural language. So I went with: Made out of wool as my "trigger word" for it. And to be clear, this is not a trigger word as in something I trained it on, but just what I prompted it with to get the effect out of the model.
This definitely brings forward my training, even though it's never seen that combination of tokens from my training.
Here are some comparisons to without and with the model. Without to the left, and with to the right.

We can see that for some images, we get a natural "felt" look without the LoRA, but with it, we certainly find our training data. Some things that are not natural to "woolify", may not get the treatment at all. Lots of comparison images are without effect without the LoRA.
Note the "woolkswagen" :D
Version 2 - Single Word Captions
Uses trigger word "w00lyw0rld".
This version of the model is trained using my normal World Morph style. By having a trigger word, followed by a simple word, essentially the subject/concept of that image. For more information about this style of training, read this guide.
I think this worked well. As it usually does. It activates fine with the trigger word.
I can see a slight degradation in understanding and effect when the prompt is very long and complex.

More clearly than training with no trigger words, we get no effect, or a strong effect.
This method of captioning is of course useful because it will let you isolate and make the model pay attention to applying your LoRA to the right parts of the image. For example, did you want to make the Car or the Road into being made out of wool?
Version 3 - WD14 Captions
Uses trigger word "w00lyw0rld".
This version of the model was trained using a trigger word and WD14 captions. These captions can be generated by the CivitAI training tool. When you are at the step of uploading images, you can generate captions in this style there. You can also do it using Kohya and other trainers.
I have also released a tool to help you do it quickly, by just entering the images you wish to caption in a folder, and running a script. Check out JoyTag-Batch Github here.
I found that the effect of using this style of captioning was very strong. In many cases when I compared all 4 trained models, my preference was to the WD14 captioned ones. It seem to more often convert more of the whole image into the desired style.
Of course you have to consider that each training brings with it a lot of randomness, so maybe this was just a lucky epoch.

As with the single word caption, this one has a trigger word, so unsurprisingly there's no effect without it. Thus isolating the effect to when we want it. Overall the results are very impressive.
Version 4 - JoyCaption Captions (Complex Captions)
Does not use any trigger word in the captions.
This version uses long and complex captions to describe the training images in very high detail. The captions are generated using the JoyCaption tool. I also created a script to let you run this on all images in an /input/-folder, for easy quick tagging without needing to open Kohya or anything else. Here's the Joy-Caption-Batch Github page.
Captions are very long (perhaps overly so), and I trained them unedited, without adding any trigger word. Here's a caption example:
The image is a photograph of a whimsical, hand-knitted toy airplane against a backdrop of a clear blue sky dotted with fluffy white clouds. The toy airplane, crafted in a chunky knit style, features a predominantly cream-colored body with red accents. The nose of the plane is red, while the tail is yellow with a red tip. The wings and fuselage are adorned with red stripes, and the windows are represented by small, round blue circles. The texture of the knit is evident, with a slightly rough and bumpy surface typical of hand-knitted items. The toy airplane is positioned in the center of the frame, floating in mid-air, giving a sense of flight and movement. The background is slightly blurred, emphasizing the toy airplane as the central focus. The overall style of the image is playful and nostalgic, reminiscent of vintage children's toys. The photograph captures the toy airplane in a way that highlights its detailed craftsmanship and the soft, cozy texture of the knit.This is likely too much detail, and it's a bit repetitive. But it is how the model returns the captions currently, so it's what I went with.
I feel like a slightly held back and more focused model would likely produce better results. You could always fairly easily cut it off after a few sentences, or write a script that strips it to the nearest complete sentence near a certain token amount.
To activate the model, I once again used with: Made out of wool as my "trigger word" for it. And to be clear, this is not a trigger word as in something I trained it on, but just what I prompted it with to get the effect out of the model.

Similar to the NoCaption training, this one has an effect even without the model loaded, since Flux is so capable of understanding natural language.
In general, I find this model to be slightly weaker than the others, but it still has a good effect and I would not be sad with the results if this was the only model I had trained.
For additional results, please read this thread about it in my JoyCaption tool article. Your results may vary. You will need to do some testing of your own.
The Dataset
The dataset for this model was generated entirely using Flux. I'm using my "One-click-dataset" workflow for ComfyUI with a new version designed for Flux use (IPAdapter removed). This works very well, as long as you caption decently and your concept is not over-trained in the model. For example, trying to get a Spider Man-style model, without getting Spider Man's face everywhere is very hard!

The individual datasets are available to download on each model's page.
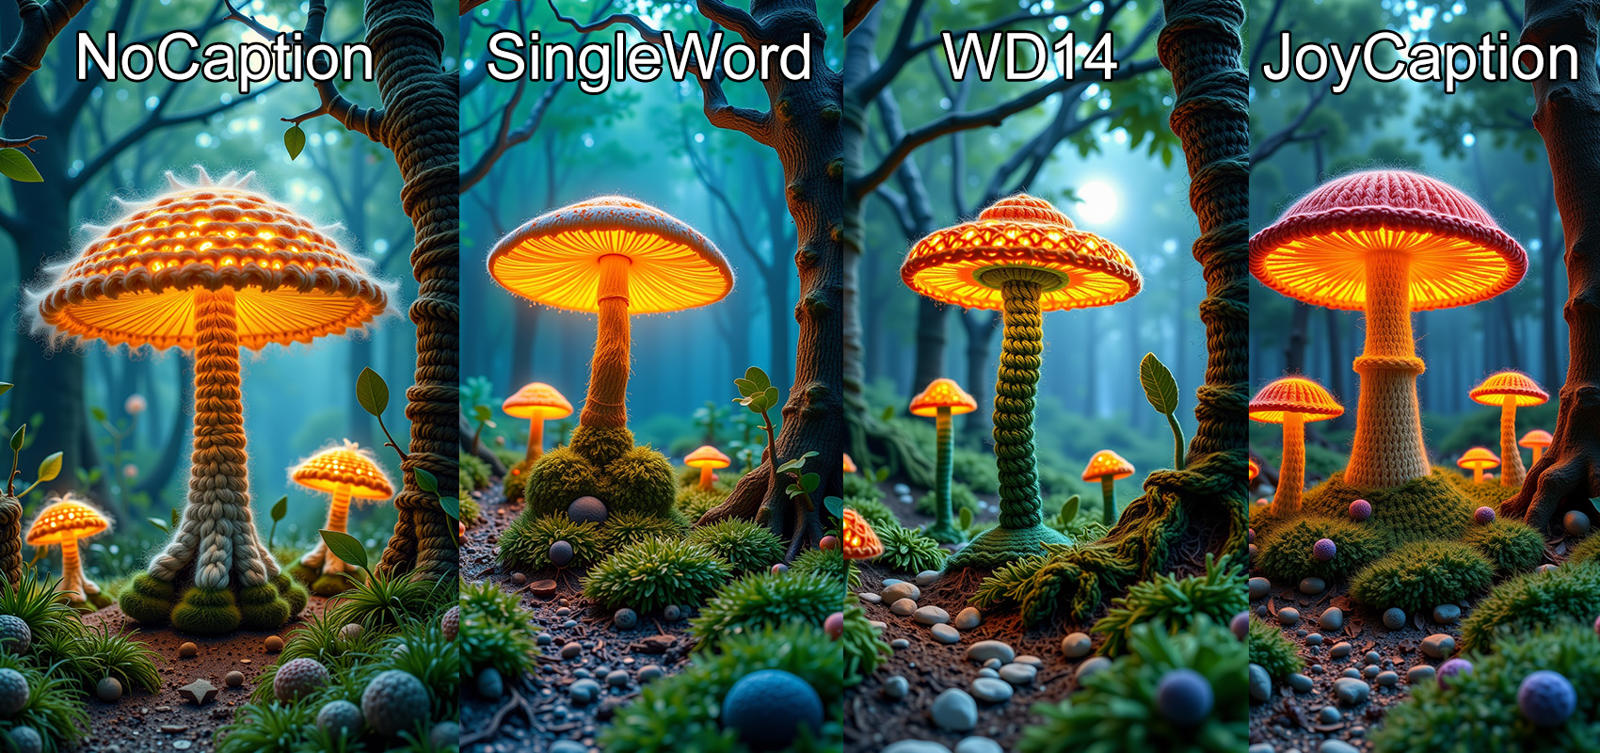
Comparisons

Full-sized version on Imgur.
SDXL Version
I trained 9 different versions of this dataset in SDXL. Neither one is as good as any of the Flux versions. For some reason this model has a very hard time to get the effects out even with SDXL. I had to increase the weight of the model to 1.5 to get the desired effect. I need some different training settings...


For SDXL, I used the Single Word training method.
Trigger Word vs. no Trigger Word?
I tried to use both trigger words and without trigger words for these experiments. My conclusion is that both methods work equally well. It's all about how you want to use the model in the end.
If you use a trigger word, you can more precisely activate the learned data, such as applying the effect to a particular part of the image.
If you don't use a trigger word, you may need to figure out how to trigger and activate the learned data from the content of your trained data. In my examples here by using "made out of wool", even though this was never trained into the model.
Final Conclusions? [TBD]
TBD. More versions incoming with 4 new captioning tools and methods.
What do you think? Please share relevant knowledge below. <3
Part 2 with an actual final "conclusion" can be found here.
But what about the buzz?
Yeah, it took some buzz to train this model. If you feel like you have too much, feel free to drop some for this article or unlock one of the models. Thanks for reading!

