

Dataset Preparation
Your dataset is going to make or break your LoRA. Getting the dataset preparation and associated settings right is 90% of achieving a good LoRA. It comes down to a few essential components.
Selection of Images
There are already countless training guides on image selection, and most of the previous knowledge compiled about Stable Diffusion LoRAs also applies. Flux seems to train best with a low number of images, anywhere from 10 to 50, depending on the quality, diversity, and what you are training. In general, the selection of images needs to follow a somewhat oxymoronic concept – keep consistency in what you want to train and diversity in everything else. I'll only summarize the key points consistently pointed out for three LoRA types and apply them to Flux LoRA training.
Style LoRAs
Capture the Essence of the Style: Select images that highlight the distinctive features of the style you want to emulate (e.g., brush strokes, color palettes, composition). No matter how much you like an image, don’t include it unless it captures the style you are trying to train. One bad image can make a difference (not in a good way).
Varied Subjects, Consistent Style: Use images with different subjects but the same artistic style to teach the model the style independent of the subject matter. Avoid a dataset where certain elements (like a recurring object) dominate, which can lead the model to associate the style with that object. The fewer elements (other than the style) the images have in common, the better.
Compromise Quantity Before Style: It's generally thought that Flux does well training style LoRAs with 20 to 30 images. If the style is rare, you might have to work with fewer images. In such cases, focus on the most representative ones and leave out stuff on the fringe. If the images follow the first two points well, there’s a good chance you can still do well with 10 or fewer images (and there are ways to stretch those numbers; see “Getting the Most Out of a Few Images” below).
Character LoRAs
Consistency in Appearance: Use images where the character's iconic features (face, hair, clothing) are consistent to help the model accurately learn the character and their standard appearance.
Variety of Poses and Expressions: Include images showing different angles, poses, and facial expressions to make the character adaptable in various scenarios. This includes various framing, so images with the full body, portrait only, just the head, etc. Though it may not work to extremes, you should also include various art styles if they are available. However, try not to mix up iconic elements for a character—if you want them to appear in their traditional clothing, don’t include images with them wearing alternative clothes or costumes.
Compromise Quantity Before Consistency: If you can’t find enough consistent images, use fewer images. 10 to 20 images can still make a good style LoRA. It's better to have a small number of good images than risk a bad LoRA—and there are ways to maximize the utility of available images (see “Getting the Most Out of a Few Images” below).
Concept LoRAs
Define the Concept Clearly: Choose images that represent the concept accurately and encompass its various aspects.
Diverse Examples: Incorporate a wide range of images to cover the breadth of the concept, ensuring the model understands its application in different contexts. You should have a varied selection of different subjects, camera angles, framing, and composition.
Quality Over Quantity: It's hard to put a number on how many images you need to include for a concept, as they can greatly vary; however, just like previous notes have mentioned, it's better to have fewer high-quality, relevant images than a large number of mediocre ones. You may be able to get away with only 10 or need to close to 50. A concept can quickly become muddied, and much like the other LoRA types, there are ways of getting more out of a limited number of good images (see “Getting the Most Out of a Few Images” below).
Image Quality
It may be obvious if you read through all the notes above, but quality is important—and for quite a few reasons. But what is quality? Again, I’m only going to summarize what others have noted makes an image good or bad for training:
Avoid Ambiguous Images and Distracting Elements: Avoid having too many images that mix styles, characters, or concepts. For example, if you are training a character, don’t use an image that shows that character in a group of other characters. Exclude images with busy backgrounds, frames, or other elements that might confuse the model.
Use High-Resolution Images: Utilize clear, high-resolution images to ensure the model learns the most accurate features. A size that fits into the 1 million pixel range (like 1024x1024) is perfect because it can be scaled down for other training resolutions. If you have less than an ideal number of images, even higher resolutions will be very beneficial (see “Getting the Most Out of a Few Images”).
Avoid Blurry or Pixelated Images: Even if they are technically higher resolution, avoid images with blurs, poor lighting, or pixelation. These are often images that are captured stills or images that were enlarged from lower resolutions.
Use Lossless Image Formats: Without going too deep into technical details, images come in two types (usually depending on their file extension)—lossless and lossy. Lossless image formats preserve all the original data without any compression artifacts, ensuring that fine details and color information remain intact. Lossy image formats, on the other hand, compress images by removing some data, which can introduce artifacts and degrade image quality. When selecting images, always choose lossless images over lossy—you can always save them in a different format later but picking lossless images up front will save you trouble later. So, pick the PNGs or TIFFs over the JPEGs/JPGs when you have the option.
Avoid Watermarks and Artifacts: Ensure images are free from watermarks, logos, or compression artifacts. Including images with distracting elements that don't contribute to the learning objective. You never know when the LoRA will learn a bad habit from that one image with a watermark or logo.
Building the Dataset
Finding and selecting the images is the first step, but there’s more to be done other than just tossing them together and running a trainer. Often you’ll have pulled together a good number of images, so it's important to really analyze the selection to decide what to keep and what to pull. For those decisions, there are a few things to consider.
The Zen Principle
Move toward balance and unity. The best dataset is a balanced one. Depending on your LoRA type, this means it includes a balanced selection of images that feature your style, character, or concept consistently, but vary everything else. If you have a good number of images to choose from, try to get an equal number of those varied aspects. For example, if you are making a Character LoRA, try to get a few images of their full body, a few of a portrait view, a few cowboy shots, and a few face close-ups. If it's possible, include images of the front, side, and back of the character and maybe a few from above or from below. Try to balance it out and do it with other aspects as well—framing and camera angles are just one common example. Elements that aren’t varied may be learned as part of the LoRA. Having consistency (or unity with what you are attempting to train) is just as important. This is particularly true if the number of images is limited: the very best small datasets will be ones where the only commonality between the images is the style, character, or concept you are trying to train.
The Zen Principle applies to more than just the content of the images, but also to their aspect ratios. Discussion of the actual cropping and sizing of your images comes next, but it's important to consider here too. You’ll want to either select a number of images for your dataset that can be cropped into a balanced range of aspect ratios (so you have a few wide, a few square, and a few tall) or a single aspect ratio (thus the unity part of the practice). If all else fails, there’s nothing wrong with resorting to 1:1 for a standard aspect ratio throughout the dataset. What you don’t want is 39 tall images and 1 wide image—it can unbalance things later. Again, it's all if you’ve found a good number of images—in the end, as long as they are quality images, try the training with what you could find. You can always tweak it later.
Cropping and Aspect Ratios
Without getting too technical, first you have to understand the basics of bucketing. Bucketing is a data preprocessing technique used in machine learning, particularly in computer vision tasks. It involves grouping images into "buckets" based on their resolutions and aspect ratios to optimize training efficiency. If the aspect ratio of an image doesn't perfectly match the bucket's aspect ratio, the image may be cropped to fit. You may or may not be okay with the way that the script crops the image (it usually does a center crop, but depending on the training resolution, the crop can be more drastic than you expect). So, it's important to know what aspect ratios are safe and which ones are likely to get cropped.
Two steps happen during bucketing: First, when you set the training resolution for your dataset, your images are going to be downsized (or in a few cases, upsized) to fit into buckets near that resolution. Second, after being resized, they will be cropped to perfectly fit the available buckets.
Three settings are important: your training resolution, your maximum resolution, and your minimum resolution. I’m going to use a training resolution of 256 as an example—few people are going to be training at that resolution, but it's the easiest to lay out for a discussion. At a 256 training resolution, buckets for your dataset are created starting from 256x256 and adding or subtracting increments of 64 until the height or width reaches the maximum resolution or minimum resolution. So, if my maximum and minimum are set to 448 and 64 respectively, my buckets will be 64x448, 128x384, 192x320, 256x256, 320x192, 384x128, and 448x64. At a training resolution of 256, those are the dimensions that all of your images will be resized and cropped to during training.
So you may think you just need to make sure all of your images are the exact sizes of the buckets—but that’s not quite true. You only need to make sure they are the same aspect ratio as those buckets. The bucketing script will scale the images down; you just need to make sure the aspect ratios are the same to avoid any auto-cropping. If you’ve followed all the principles so far, you should have a nice diverse dataset full of high-resolution images. As long as they are at or beyond the 1024x1024 size, you can crop them once and then use the same dataset at one or more of the available training resolutions. To make this really easy, I made a chart for myself (and everyone else) to follow.
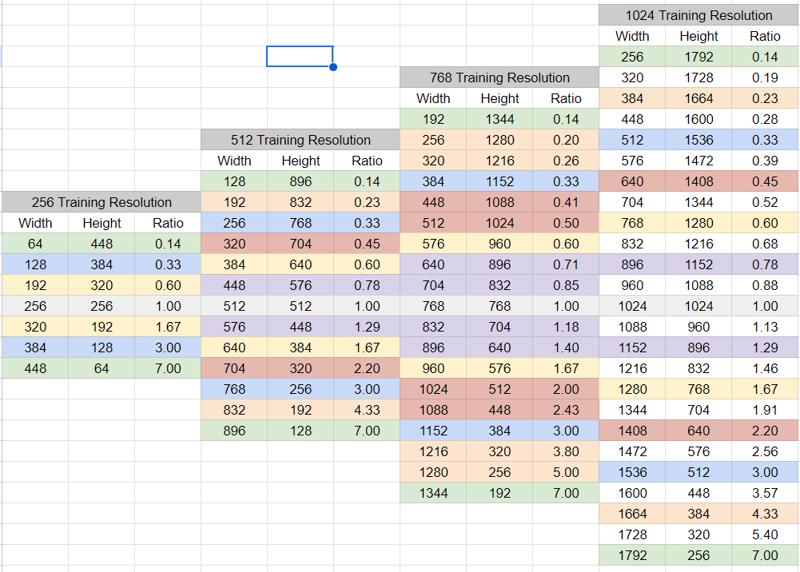
Looking at the chart (which is linked to a full size here), you’ll notice there are four different training resolutions listed and all the possible buckets are listed at each resolution. You’ll also notice that there are many more buckets at 1024 than there are at 256. But the key is to look at the colors: buckets with the same aspect ratios have been color-coded with the same colors. Aspect ratios of 0.14, 0.33, 0.60, 1.00, 1.67, 3.00, and 7.00 are available at every training resolution, so those are ideal to crop to if you are ever going to train at different resolutions. Aspect ratios of 0.45, 0.78, 1.29, and 2.20 match buckets at 512 and 1024, with them falling between buckets at 768—not a bad compromise if you think you’ll only train at 512 or 1024 or don’t mind a small bit of auto-cropping to fit in one of the two 768 buckets highlighted with the same color. Unless you 1) have tons of images in your dataset and 2) are only going to train at 1024, don’t crop to fit into any of the unhighlighted buckets.
As you crop images to fit into your selected aspect ratios, remember the Zen Principle in dataset building. Buckets with only a single image aren’t going to give you the most optimized training and are best left empty. Only using a few buckets is actually better for a few reasons. For buckets with images, you want at least 2 in each bucket (and for ones with more than 2, try to put in an even number—more on why later). If you have extra images to choose from, try to balance out the numbers in buckets. But don’t spend too much time fussing over the buckets. It's a good practice and will help with training efficiency, but it's not going to ruin your LoRA if you can’t bucket everything perfectly—but it will make the LoRA a bit more flexible. Again, if all else fails, crop everything to a 1:1 aspect ratio—perfect squares have the most pixels at that training resolution and all fit into a single bucket.
Getting the Most Out of a Few Images
All that cropping and bucketing talk is really important when revisiting an earlier topic—what do you do when you only have a handful of images? If your dataset is very limited, hopefully you at least have a couple of high-resolution images. You are going to use those to make more images. For each LoRA type, there are aspects of your images that you can crop that will make the most of what you have. Just make sure your starting image has a really high resolution and your cropped images still can fit into the buckets of your preferred training resolution.
Style LoRAs
The style of the image is much more important than the subject or composition. Let’s say you want to make a Vincent van Gogh LoRA and only have a high-resolution image of The Starry Night. While of course, you would want to use the whole painting, you can also crop the heck out of it to maximize what you can teach the LoRA. Crop to the top right corner to capture the moon and sky. Crop the bottom right to show the imaginary village. Crop a tall section from the left to showcase the landforms. Crop the center to display the swirling brushstrokes. Crop the upper left corner for a close-up of the stars. Need more? Do a tall image from the right side, then the left side. Crop it to 1:1. Then, rotate a few, flip them, whatever. You get the idea. While it's not better than finding a large number of images, with careful captioning, it’ll work surprisingly well. You can check out this proof of concept LoRA, complete with metadata and training dataset, to see what I mean (It’s a LoRA made from the actual example above).
Character LoRAs
Cropping to small details for a few images when making a Character LoRA is already a best practice. If you have one high-resolution image of a character’s full body, you can crop to a cowboy shot, the shoulders and head, and get a close-up of the face. Crop out parts that showcase iconic or traditional clothing worn by the character or items carried by the character. This is particularly useful for teaching the model to recreate small, detailed, and unique items—crop to weapons, pendants, belt buckles, etc. For a unique approach to making a Character LoRA with just a few images (or just one!), check out mnemic's Flux model training from just 1 image.
Concept LoRAs
Though usually not an issue for Concept LoRAs, the same principles apply. For this example, we are going to use clothing—a skirt. I know it's not a good example of a difficult-to-find concept, but bear with me. For this, you could start with a picture of a girl wearing the skirt. Then crop to just the lower body. Then crop to just the skirt itself. Same idea as the other two examples.
Captioning
I feel like captioning is in every guide and there’s a ton of information out there on tools, ways, methods, and everything else for captioning for Flux and every other model. It's also perhaps the most important thing to get right out of everything discussed so far. I wrote a good bit about it here (and follow that link for more links to other articles as well). So, other than stressing the importance, I’m going to only talk about it in general and toss out a few things I think are really important. I shouldn’t have to say it, but these won’t apply to captionless training.
Caption Everything: Caption everything that the model would see except for the things that you want to be part of the style, character, or concept. I’m anthropomorphizing and simplifying it here, but as far as the LoRA knows, the trigger word IS the thing you haven’t captioned. As the only thing in common with all the images and the only thing you haven’t intentionally talked about, it assumes that the name of the thing that has not been named is the strange word that it doesn’t know and you keep using.
Remember What You Are Not Training: Keep in mind the LoRA types you are not training. If you aren’t training a style, caption the style; if it's a character or concept LoRA, make sure to label the image as a photograph, illustration, painting, anime, etc. It's important because let’s say all your images are photographs of a person you are training and you want to make an anime version of the person. Since all the images were photographs and you didn’t caption it, the LoRA is going to think being realistic is part of the person’s concept and resist being turned into anime. Ditto for captioning characters and concepts.
Don’t Forget About the Abstracts: Don’t forget the framing, angles, and other abstract artistic type things that may not be IN the picture. You risk the model inadvertently learning anything that is consistent over a few of your images that isn’t captioned.
For more information on captioning methods and options, take a look at mnemic's Flux Character Caption Differences Part 1 and Part 2.
Training Settings Related to Datasets
By now you may have a nice, balanced, cropped, and captioned dataset ready for training. But before all the preparation is really done, there are a few training settings that are directly related to your dataset. These are still things you need to keep in mind and know about before all your prep work is done.
Training Resolution: For most LoRAs, 512 will work. For LoRAs with very fine details, you may need 1024. The training resolution you choose determines what size images the trainer will use. If your images are larger than the training resolution size, there’s no issue as they’ll be resized to fit. The only real drawback to a larger training size (other than needing higher-resolution images) is the VRAM requirement. To give you an example, on my 3060 with 12 GB VRAM, I can train at 512 without much of an issue (I can even run at a higher batch size). While I can train at 1024, the training time is double, and there isn’t enough free memory to take advantage of any other optimized settings.
For most of the Style LoRAs I’ve been training, using 512 is just fine. I’ve compared the results to higher resolutions, and I cannot detect a difference looking at generations side by side. But there are situations where you may want to train at a higher resolution. If your dataset has images that are very detailed, crowded, or busy, the model may have trouble learning at lower resolutions. And of course, if you are training a particular style, character, or concept that relies on a great deal of precision or detail, you may want to train at a higher resolution. If you have the GPU availability and time to wait, there’s no real advantage to training at a lower resolution.
One special note: I’ve found that there may be good reasons to train at multiple resolutions (treated as multiple datasets) at the same time. If you are interested, read the article here.
Repeats: Typically, set it to 1. Setting repeats tells the trainer how many times to use the images in your dataset. It effectively increases your dataset size, so 20 images with five repeats is seen as a dataset of 100 images. Repeats typically are used when you are training with multiple datasets (whether it is multiple concepts or at multiple resolutions) and want to make sure everything is balanced. For example, if you are training two concepts and have 20 images for one and 40 images for the other, you may set the first dataset to have two repeats, also 40 images. However, if you are using an increased batch size, there may be other reasons you would want to increase repeats to a number over 1.
Training Steps (Iterations): The number of steps will significantly depend on other settings and is better set to align with epochs. A step is an update to the model. One step means the model updates once. If you run the training for 2,000 steps, your model will be updated 2,000 times. It also helps you estimate when the model training is complete, as seconds per iteration is a common measurement of how quickly training is moving along.
Epochs: Typically, more epochs are better than fewer epochs. An epoch is one complete pass through the entire training dataset (including repeats). Epochs provide a way to measure training progress relative to the entire dataset. If you have a small dataset (like 20 images), you will have ten times as many epochs as a dataset with 100 images (if you run the training for the same number of steps).
Other than just being a measurement tool, a few other things happen every epoch:
Learning Rate Schedules: If your optimizer uses epoch-based learning rate adjustments (e.g., decaying the learning rate after each epoch).
Data Shuffling: Data is often shuffled at the start of each epoch, promoting better generalization. It means the pictures are loaded in a different order (which gives benefits when batching; see below).
Evaluation and Early Stopping: Epochs provide checkpoints where you can evaluate model performance and decide whether to continue training.
Batch Size: Set your batch size to 2 or 4 if possible (whatever your hardware will allow without erroring out). Batch size is related to steps. You train on one “batch” of images before updating your model, so a larger batch size means you train on more images every step. For example, if you have 20 images in your dataset and set the batch size to 2, you’ll train 2 images in each training step and do one complete pass through your dataset in 10 steps. That cuts your time to convergence in half if everything else is set up optimally; you’ll need to run for half the steps, so if you’d typically converge in 2,000 steps, a batch size of 2 can get it to converge in 1,000 steps. Other than speed, there are some other considerations with batch sizes.
First, remember that a step represents an update to a model. If your batch size is 2, your trainer will process two images before updating your model. In basic, non-technical terms, this averages out the learning for each step, making it more stable. There is some trade-off with quality when doing this, so a batch size should compromise speed, stability, and quality—which is why you shouldn’t set it too high, even if your hardware would allow it (at least for LoRA training). This benefit is also increased with more epochs, as the images will be shuffled and different images will be batched together. I believe the benefit also scales with your dataset size, particularly if you have a few images in the dataset that are iffy in their quality.
Second, the effectiveness of your batch size increase is dependent on your dataset and how your images are bucketed. Images of different dimensions cannot be placed in batches together, so you won’t benefit from larger batch sizes if you only have an odd number of images in your buckets (or only one). This is where setting repeats higher may benefit you. For example, if all your buckets have 3 images, a batch size of 2 will have a diminished benefit; however, if you also set repeats to 2, you’ll now have 6 images in each bucket, making them run through batch processing efficiently. You will have half as many epochs, but the trade-off in speed and stability should be worth it.
Third, there’s a principle called the Linear Scaling Rule. The Linear Scaling Rule states that when you increase your batch size by a factor, you should also increase your learning rate by the same factor. If you trained with a learning rate of 0.0001 at batch size 1, you should increase that to 0.0002 at batch size 2. If you use this rule, your convergence time will be further decreased. If you use an optimizer, don’t worry; this can be managed and adjusted for you.
Gradient Accumulation Steps: If you don’t have the VRAM to use a batch size of at least 2, see if you can run with gradient accumulation steps of 2 or 4. But what are gradient accumulation steps? The oversimplified explanation—increasing gradient accumulation steps is a way to fake a higher batch size without needing near as much VRAM. While batch size processes multiple images simultaneously and then updates the model, gradient accumulation steps indicate how many batches to process in a row before it updates the model. You get the extra stability of a larger batch size and you’ll be able to take advantage of the Linear Scaling Rule, but you won’t increase your training speed. As each gradient accumulation step takes just as long as a regular step, the training takes just as long—but it's not easy to grasp why. Here’s an example: While training at a 512 resolution, I get about 12 seconds per iteration (or per step). When I increase my gradient accumulation steps to 2, I slow to 24 seconds per iteration. That's because I’m processing two images back to back before updating the model. It does mean that I can use half as many steps to reach convergence, but each step is going to take twice as much time. But since you can also increase your learning rate, there is a net gain in training—just not as much as increasing the batch size.
Increasing both batch size and gradient accumulation steps is multiplicative. If my batch size is 4 and gradient accumulation steps are 4, then I’m going to process 4 images per batch and process 4 batches before updating the model—that’s 16 images total. Since there is some evidence that higher batch sizes aren’t always better when training a LoRA, I’d recommend a compromise of running both a batch size and gradient accumulation steps of 2 (unless you can run batch sizes of 4, then just do that).
Conclusion
Preparing your dataset is the most critical step in training a successful LoRA for Flux. By carefully selecting high-quality images that capture the essence of your style, character, or concept, and by ensuring your dataset is balanced and well-organized, you're setting yourself up for success. Remember to consider image quality, aspect ratios, and the importance of captioning. Adjust your training settings to match your dataset and hardware capabilities, keeping in mind how factors like batch size and gradient accumulation affect your training process. With these guidelines, even a small dataset can produce impressive results.
Special thanks to CrasH and mnemic, whose Flux training articles helped me when I first got into Flux training. Check them out; they've continued to write good guides.
Happy training!