Download
1 variant available

151
10.9K
2.1M


If you found this useful, please click the :heart: and post your own image using the technique with a rating. Thanks!
To help with some confusion on how I get my preview images for my models, I created this tutorial. It's a really great technique for creating very sharp details and high contrast in any image with any model. Without having to upscale it even larger. (see a side by side comparison in the model images)
Step 1:
I start with a good prompt and create a batch of images. When using a Stable Diffusion (SD) 1.5 model, ALWAYS ALWAYS ALWAYS use a low initial generation resolution. The model's latent space is 512x512. If you gen higher resolutions than this, it will tile the latent space. That's why you sometimes get long necks, or double heads. However, depending on newer models, their training, and your subject matter, you can get away with 768 in some cases. But if you get strange generations and don't know what's wrong, bring your resolution withing the 512x512 zone. To get the higher resolution images, you use hires fix, explained in Step 2.
In this tutorial, I use the very superior and legendary A-Zovya RPG Artist Tools version 2 model. It's quite capable of 768 resolutions so my favorite is 512x768. Posting on civitai really does beg for portrait aspect ratios. In the image below, you see my sampler, sample steps, cfg scale, and resolution.
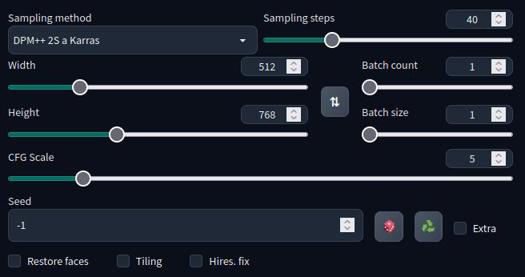
Additionally, I'm using the vae-ft-mse-840000-ema-pruned.ckpt for VAE and the 4x_foolhardy_Remacri.pth for my upscaler. Any upscaler should work fine, but the default latent upscalers are very soft, and the opposite of this tutorial. The vae and upscaler is included in the files of this tutorial for you to download. The VAE goes in your /stable-diffusion-webui/models/VAE folder and the upscaler goes in your /stable-diffusion-webui/models/ESRGAN folder.
Step 2:
Once I find the image I like, I put the seed number in the seed box. Like in the picture below, I leave everything the same including the initial resolution.
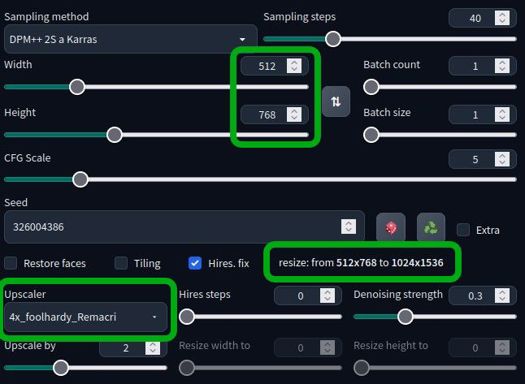
When you click the Hires. fix checkbox, you get more options. I choose my upscaler and upscale by 2. You can see the resize dialogue shows it will gen a 512x768 image, but then regen over that initial image to the higher resolution of 1024x1536. This gives it better details and a chance to fix things it couldn't do in smaller resolutions, like faces and eyes.
Then I select a denoising strength. The range is from 0 to 1. The smaller the number, the closer it will stay with the original generation. A higher number will allow it to make up more details which can fix things, and sometimes break things. So adjust the slider to your preference. I usually go from 0.25 to as high as 0.5. Any higher than that, I probably didn't like the original generation to begin with and now I'm going to get something wildly different.
Step 3:
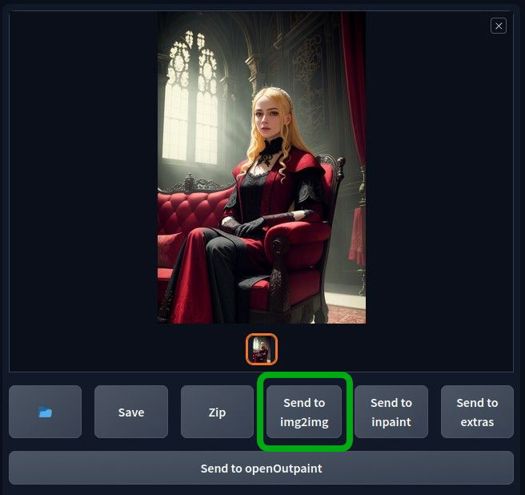
Your image will show up in the box to the right as usual. Click on the "send to img2img" box as shown below.
Once you're on the img2img page, make sure your prompt is exactly the same. Make sure all other settings are exactly the same also. It will sometimes give you a different sampler and CFG scale.
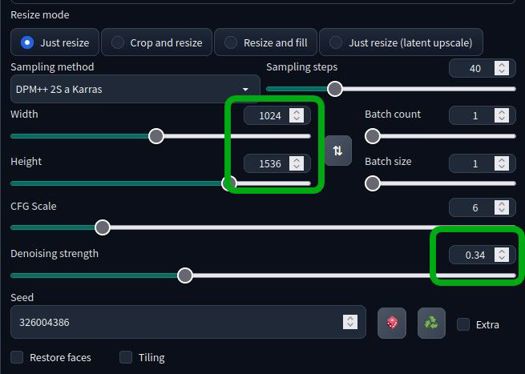
Make sure you have selected "just resize", the same settings from the previous image including the seed number. The ONLY difference here will be the resolution, it should be the larger size you hires fixed to, and the denoising strength. Most video cards can handle this in img2img. If you get vram errors, try using --xformers and/or --no-half in your startup script. For extreme cases, you could also use --medvram. Otherwise, a weaker card will just take more time than a more powerful one, but at this point, you're giving final polish to a good cherry-picked image.
Denoising strength: the higher this number, the more contrast and sharpness will be added. Too low and you'll see no difference. To high and it will shred the image into confetti. This number will vary from image, subject matter, details and even the model you use. For my use, I get good results from 0.12 to 0.35.
And that's it, PLEASE PLEASE PLEASE post some ultra sharp images you made and rank this tutorial. Feedback and encouragement is what fuels creators to make more and post their stuff. Support those that you like.
Obligatory donation chant:
Do you have requests? I've been putting in many more hours lately with this. That's my problem, not yours. But if you'd like to tip me, buy me a beer. Beer encourages me to ignore work and make AI models instead. Tip and make a request. I'll give it a shot if I can. Here at Ko-Fi