[ EDIT ]
I have made another training guide with another tool :
derrian-distro/LoRA_Easy_Training_Scripts.
Here is the link : https://civitai.com/articles/6531
LoRA_Easy_Training_Scripts is way easier to play with to make Lora !
It also has more scheduler to choose from like the famous combination : Came / Rex.
Check it out ;D
[ Presentation ]
This guide is my way of tweaking/making lora with my little 3070RTX card that has 8GB of VRAM.
I have also 64GB of computer RAM (that's an important information for the tweaking of kohya).
As my card has fewer vram (8GB) than what is recommanded (12GB minimum), I have changed quite a bit the original guide of am7coffeelove to adapt my configuration and the newer version of kohya (as of july 2024 as I write this article).
This guide is based on am7coffeelove :
https://civitai.com/models/351583?modelVersionId=393230
So thanks https://civitai.com/user/am7coffeelove for making this guide that helped me a lot.
(That I encourage you to check it out !)
Notice : The result won't be as good as with a better VRAM card, but you can produce Okayish results in only ... hours ! The goal is to try and have fun with what you have :)
[ 1 - What you need to start ]
1) Obviously you'll need the checkpoint base model of pony Diffusion V6 XL, the famous "V6 (start with this one), download the safetensor file on this link :
https://civitai.com/models/257749?modelVersionId=290640
2) The installation of kohya_ss that I recommend is the bmaltais version that comes with GUI :
https://github.com/bmaltais/kohya_ss?tab=readme-ov-file#windows
(Just follow the installation, you will be fine, there is a youtube video link in the "other useful links" section that will help you out for the installation if needed).
3) The dataset of the character that you want to make the lora from.
Like the original guide, I will just provide the dataset with the anotation txt generated by kohya.
The Japanese ZUNKO project images is from this url : https://zunko.jp/con_illust.html
You can download the dataset that is attached on this guide.
Or just by clicking on this link :
https://civitai.com/api/download/attachments/87021
Note : I have renamed and converted to jpg each image ... because why not ?
4) The config file of kohya, attached to this article, here is the direct link :
https://civitai.com/api/download/attachments/87023
That file is more targeted for experts out there who knows how to read that. You could eventually load it into kohya gui, but some parts might stay blank (example : Dataset Preparation might be blank). So just follow this tutorial.
So let's do this step by step shall we ? :)
[ 2 - Folders Preparation ]
First of all, Prepare/Create all the folders needed (don't skip that part or you will be sorry at the training part). Just follow along for the moment.
Here is what I have in my computer :
G:\TRAIN_LORA\znkAA
G:\TRAIN_LORA\znkAA\img
G:\TRAIN_LORA\znkAA\log
G:\TRAIN_LORA\znkAA\model
Note : I have my dataset on a G drive that's why it starts with G but you can have it on your C drive.
Now, unzip the zipfile 5_znkAA girl attached to this article to the G:\TRAIN_LORA\znkAA folder.
Get rid of the txt files as we will be tagging each image automatically with kohyaa tools.
Now your G:\TRAIN_LORA\znkAA looks like this :

[ 3 - Tagging ]
After starting kohya_ss on your computer, go to this address on your local PC :
http://127.0.0.1:7860/?__theme=dark
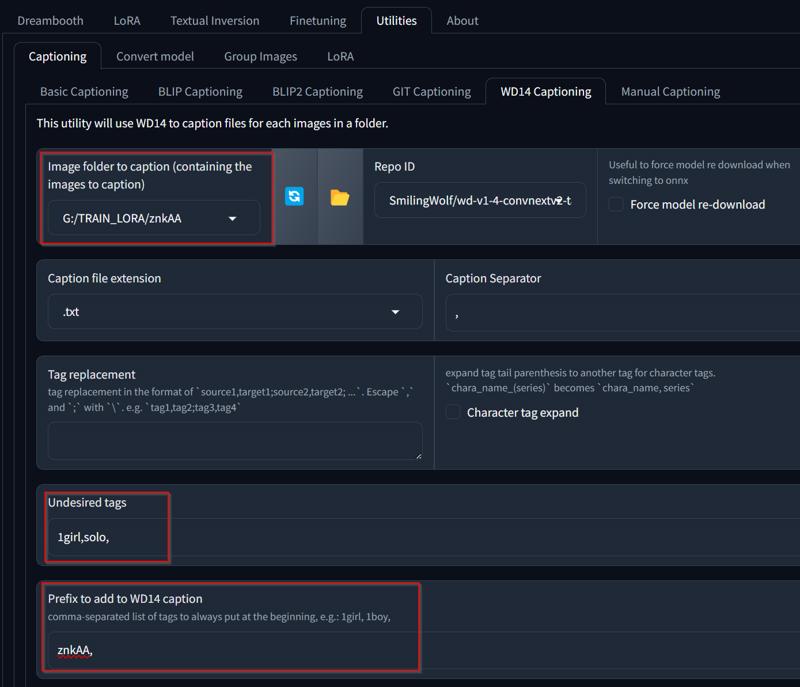
Click on the upper tab : Utilities > Captioning > WD14 Captioning
You only need to change 3 informations there :
- Image folder to caption (where the images files are located)
- Undesired tags (1girl, solo, what you don't want the WD14 to use as tags)
- Prefix to add to WD14 caption (this is the tagname to call the character)
And then, click on the button on the bottom of the kohya page : "Caption Images".
Note : it can take a little while for the first time as it will download the model to tag everything, look into the command dos to know what it is doing.
I left by default the Repo ID : SmilingWolf/wd-v1-4-convnextv2-tagger-v2
Now if you go back to your folder, in my case in : G:\TRAIN_LORA\znkAA
You will see for each image a txt file that has exactly the same name as the image file.
For example for the znkAA_15.jpg you can have something like znkAA_15.txt :
znkAA, long hair, looking at viewer, blush, smile, simple background, white background, very long hair, closed mouth, full body, yellow eyes, ahoge, hairband, japanese clothes, green hair, socks, kimono, sash, obi, white kimono, tabi, muneate, tasuki, short kimono, green hairband
Note : That same description will be useful to try on your lora model after the training. A bit too much words ? I know, but for now let's continue.
[ 4 - Folder (part 2) and Dataset Preparation ]
That is the part that few people talk about in their tutorials (video and written article). If you ignore that part, kohya_ss will just not work ! So beware of that crucial part (as chatgpt like to say ^^).
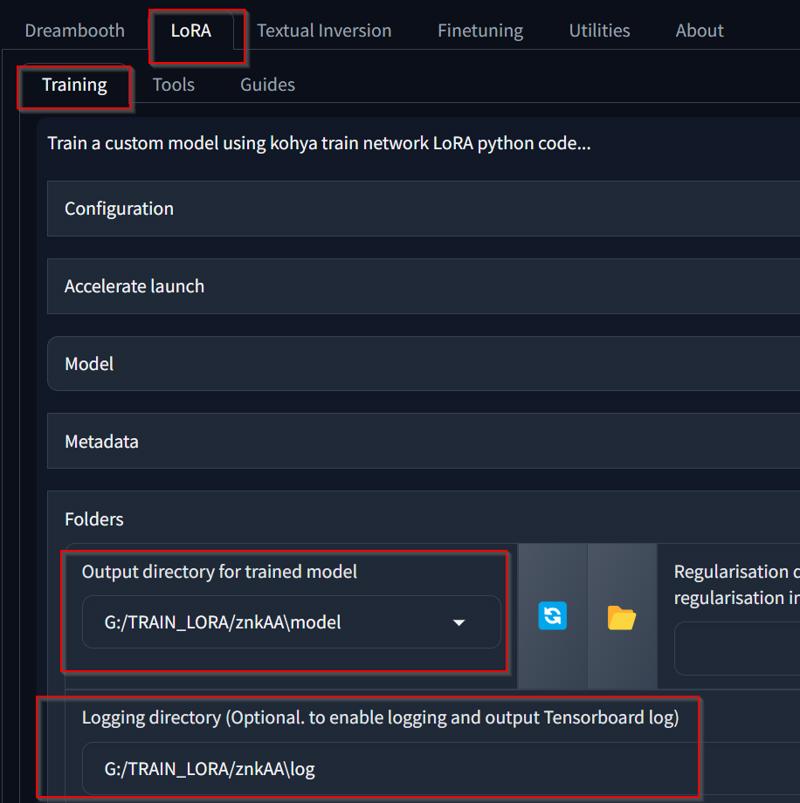
First of all, switch to tab : LoRA > Training and open only the "Folders" part.
Complete theses 2 fields :
- Output directory for trained model : G:/TRAIN_LORA/znkAA\model
- Logging directory : G:/TRAIN_LORA/znkAA\log
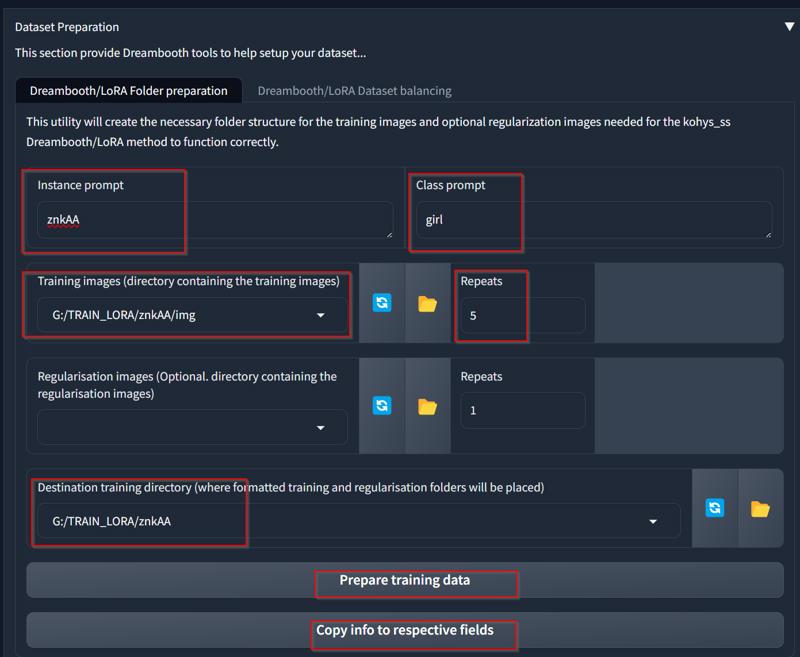
{ Unfold the Dataset Preparation }
This part is very tricky ! Start by filling theses fields :
- Instance prompt : znkAA
- class prompt : girl
- Training images : G:/TRAIN_LORA/znkAA/img
- Repeats : 5
- Destination Training directory : G:/TRAIN_LORA/znkAA
! HOLD ON ! before continue, be shure that you have created all the Folder in the [ 2 - Folders Preparation ] ! There's a weird bug that might create in loop folders when trying to "Prepare training data". That's why you have to make the folders beforehand.
Then press the "Prepare training data", look into the command dos window, when it finished, click on the "Copy info to respective fields"
IMPORTANT ! unfortunatly kohyaa GUI might not work well on the Prepare training data.
The button "Prepare training data" should create a new directory/folder here :
G:\TRAIN_LORA\znkAA\img\5_znkAA girl
Where 5 is the number of repeats, znkAA is the instance prompt and girl is the class prompt.
The program seems to "parse" the folder name to understand what kohya has to do (number of repeat and stuff like that). Kohya expect that the images are INSIDE that folder !
If the folder 5_znkAA girl is empty, just populate it with all the images and txt files inside.
In a nutshell, copy paste all the G:\TRAIN_LORA\znkAA\*.jpg and G:\TRAIN_LORA\znkAA\*.txt
Inside G:\TRAIN_LORA\znkAA\img\5_znkAA girl
[ 5 - Tweaking Parameters of Kohya ]
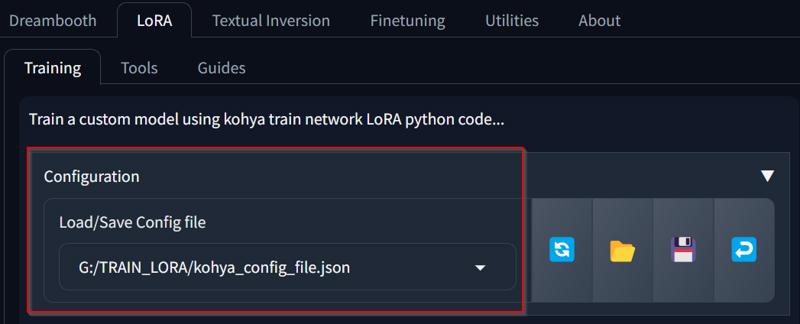
{ Unfold Configuration }
Where you can save or load a config file.
If you want, you can load my json config_file attached in zipfile to this article.
{ Unfold Accelerate Launch }
Mixed precision : fp16
Number of processes : 2
Number of CPU threads per core : 8 (it can be less depends on your CPU)

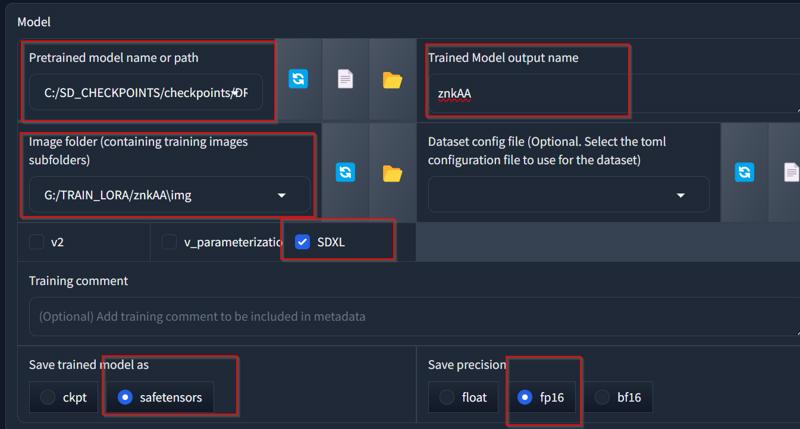
{ Unfold Model }
Pretrained model name or path : C:/SD_CHECKPOINTS/checkpoints/DRAWING-XL/ponyDiffusionV6XL_v6StartWithThisOne.safetensors
Trained model output name : znkAA (will be the name of your lora output file)
Image folder : G:/TRAIN_LORA/znkAA\img (this folder only contains the subfolder that contains the images with txt files to train on).
Check SDXL
Save trained model as : safetensors (ckpt is too old !)
Save precision : fp16 (because we have only 8GB of VRAM !)
{ Unfold Parameters }
That one is a BIG one ! So, I'll just post some common things to tweak. By the way, you can also import my json config file attached to this article to auto-fill theses fields.
Presets : None
Basic > LoRA type : Standard
Train batch size : 2 (if you encounter problems, put at 1 ! but it will be much slower).
Epoch : 5
Max train epoch : 5
Max train steps : 0
Save every N epochs : 1
Caption file extension : .txt
Seed : 0
Cache latents : checked
Cache latents to disk : Unchecked
LR Scheduler : constant (EDIT: cosine might be a better choice here)
Optimizer : Adafactor (EDIT: AdamW8Bit might be more appropriate with cosine, try it)
Optimizer extra arguments : scale_parameter=False relative_step=False warmup_init=False
Learning rate : 0,0003
Max resolution : 1024,1024
Enable buckets : checked (this will permit to have dataset image size of different format (not only 1:1))
Text Encoder learning rate : 0,0003
Unet learning rate : 0,0003
No Half VAE : checked
Network Rank (Dimension) : 16 (you can crank it up to get more definition, but for the moment let's stay with 16)
Network Alpha : 8 (it can be something like => Network rank divided by 2, so if you put 32 in the network rank (dimension) this one should be 16 and so on, let's stay at 8 for now)
{ Unfold Parameters > Advanced }
The Advanced is inside the Unfold Parameters. It needs a section by itself !
Clip skip : 2
Max Token Length : 150
Full fp16 Training (experimental) : checked
Gradient checkpointing : checked (I personnaly don't check this to gain some time, but it depends on the amount of PC ram that you have, I have 64GB and it eats all of them without that option ! scary).
Persistent data loader : checked (check this to save time between epoch, very effective)
Memory efficient attention : unchecked (if you encounter problems, check it)
CrossAttention : xformers
Don't upscale bucket resolution : checked (prepare beforehand your dataset images properly :))
Max num workers for DataLoader : 2 (if you checked Persistent data loader, it will read this value ... weird that it is so far from the other parameter)
That's it ! Let's run it :)
Click on the big orange button :
! START TRAINING !
[ 6 - Oops ERRORs ]
Part 6 ! ... yup it might not work the first time ! (lol). What's wrong Dr ?
{ ERROR No data found }
ERROR No data found. Please verify arguments (train_data_dir must be the parent of folders with train_network.py
Read again part 2 and 4 :
[ 2 - Folders Preparation ] ; [ 4 - Folder (part 2) and Dataset Preparation ]
Tips : look into the folder : G:\TRAIN_LORA\znkAA\img\5_znkAA girl is it empty ? it shouldn't be !
Place inside G:\TRAIN_LORA\znkAA\img\5_znkAA girl all your image files and caption txt files inside !
Empty theses directories :
G:\TRAIN_LORA\znkAA\model
G:\TRAIN_LORA\znkAA\log
And launch again !
Click on the big orange button :
! START TRAINING !
[ 7 - OH ! It kind of do something ! ]
Look at your command dos window where you executed the kohya_ss gui.bat.
It will take quite a while ! Hey, we have 8GB of vram ... poor potato video card (that is not that old in my opinion).
How to read this ? ask ChatGPT... Okay here it is :
It will take 1 hour 45 minutes and 37 seconds. My computer is doing 1 iteration every 24seconds (very very slow). the Average Loss is a bit special to explain, it will by the time of the training be very small, which is a good sign.
So it will do 5 times (because we put 5 to epoch configuration).
As we checked "Persistent data loader" in the Advanced Parameter, it will take less time to do the other epoch and so on.

Why so many EPOCH !? Because the more epoch you have, the better the training will get.
In the end, you will have 5 files in the model folder, remember ? that one :
G:\TRAIN_LORA\znkAA\model
A the end of the training, move all the safetensors and put them into the Lora folder of your favorite generating AI image (automatic1111, comfyui, whatever).
So you can try them out by calling your selfmade LORA !
[ 8 - Okay, time to choose the best Lora ]
Now that you have your hot new loras. In my case, I have theses safetensors files that were created by kohya in the G:\TRAIN_LORA\znkAA\model in this particular order :
- znkAA-000001.safetensors
- znkAA-000002.safetensors
- znkAA-000003.safetensors
- znkAA-000004.safetensors
- znkAA.safetensors
The last one (znkAA.safetensors) is the fifth one. It should be the more "accurate" one "probably". That's when your 6th sense will come into place !
Load the lora one by one in your favorite AI image generator and ... try them on !
For example, I tried that prompt :
znkAA, long hair, looking at viewer, blush, smile, open mouth, very long hair, standing, full body, yellow eyes, ahoge, short sleeves, hairband, japanese clothes, green hair, kimono, sash, obi, yukata, geta, tabi, muneate, tasuki, short kimono, green hairband,
(view from front), (looking at viewer),
during the day, late afternoon, bluesky, sunset,
on a beach, ocean, sky, beach, (palmtrees:0.3),sandfloor,
Tips 1 : for comfyui fanatics (like myself), play with the strengh of the lora loader. Mine is :
- Strength_model : 0.8
- Strength_clip : 0
Tip 2 : Use another model instead of the original PonyDiffusionV6XL_v6StartWithThisOne.safetensors, try something else like this excellent (and easily among the best) : incursiosMemeDiffusion_v16PDXL.safetensors (https://civitai.com/models/314404?modelVersionId=352729)
[ Other useful links ]
First of all, the original guide : https://civitai.com/models/351583?modelVersionId=393230
That excellent guide of UPDATED: SDXL Local LORA Training Guide: Unlimited AI Images of Yourself
He will help you install kohya_ss and give a lot of good informations.
Another useful link :
https://civitai.com/articles/138/making-a-lora-is-like-baking-a-cakeBest tutorial ever with a lot of useful tools to help you out :
https://civitai.com/articles/680/characters-clothing-poses-among-other-things-a-guide
[ Special thanks ]
Big thanks to civitai community and people on civitai who helped me on this case.
I hope that this article will help you a little bit on your Lora Journey.
"Stay Hungry, Stay Foolish" - Steve Jobs


